165 mm 5603R 190 mm 5703R 235 mm 5903R 270 mm 5103R 355 mm 5143R
|
|
|
- Bertha Mulder
- 6 jaren geleden
- Aantal bezoeken:
Transcriptie
1 GB Circular Saw Instruction Manual F Scie circulaire Manuel d instructions D Handkreissäge Betriebsanleitung I Sega circolare Istruzioni per l uso NL Cirkelzaagmachine Gebruiksaanwijzing E Sierra circular Manual de instrucciones P Serra circular Manual de instruções DK Rundsav Brugsanvisning S Cirkelsåg Bruksanvisning N Sirkelsag Bruksanvisning FIN Pyörösahat Käyttöohje GR ισκοπρίονο Οδηγίες χρήσεως TR Dairesel bıçkı El kitabı 165 mm 5603R 190 mm 5703R 235 mm 5903R 270 mm 5103R 355 mm 5143R
2


3
4
5 ENGLISH 1 Hex wrench 2 Shaft lock 3 Tighten 4 Loosen 5 Saw blade 6 Outer flange 7 Inner flange 8 Outer flange 9 Hex socket head bolt 10 Saw blade 11 Setting protuberances 12 Hex socket head bolt (For adjusting riving knife) Explanation of general view 13 Cutting depth 14 Loosen 15 Lever 16 Thumb nut 17 For 45 bevel cuts 18 For straight cuts 19 Base plate angle cuts 21 Straight cuts 22 Top guide 23 Base angle cuts angle cuts angle cuts 27 Straight cuts 28 Blade 29 Base 30 Top guide 31 Lock-off button 32 Switch trigger 33 Vacuum cleaner 34 Limit mark 35 Brush holder cap 36 Screwdriver SPECIFICATIONS Model 5603R 5703R 5903R 5103R 5143R Blade diameter mm 190 mm 235 mm 270 mm 355 mm Max. cutting depth At mm 66 mm 85 mm 100 mm 130 mm At mm 46 mm 64 mm 73 mm 90 mm No load speed (min 1 )... 5,000 4,800 4,500 3,800 2,700 Overall length mm 356 mm 400 mm 442 mm 607 mm Net weight kg 5.2 kg 7.6 kg 9.4 kg 14.5 kg Due to our continuing program of research and development, the specifications herein are subject to change without notice. Note: Specifications may differ from country to country. Power supply The tool should be connected only to a power supply of the same voltage as indicated on the nameplate, and can only be operated on single-phase AC supply. They are double-insulated in accordance with European Standard and can, therefore, also be used from sockets without earth wire. Safety hints For your own safety, please refer to the enclosed Safety instructions. SPECIFIC SAFETY RULES GEB029-1 DO NOT let comfort or familiarity with product (gained from repeated use) replace strict adherence to circular saw safety rules. If you use this tool unsafely or incorrectly, you can suffer serious personal injury. Danger: 1. Keep hands away from cutting area and the blade. Keep your second hand on auxiliary handle, or motor housing. If both hands are holding the saw, they cannot be cut by the blade. 2. Do not reach underneath the workpiece. The guard cannot protect you from the blade below the workpiece. Do not attempt to remove cut material when blade is moving. CAUTION: Blades coast after turn off. Wait until blade stops before grasping cut material. 3. Adjust the cutting depth to the thickness of the workpiece. Less than a full tooth of the blade teeth should be visible below the workpiece. 4. Never hold piece being cut in your hands or across your leg. Secure the workpiece to stable platform. It is important to support the work properly to minimize body exposure, blade binding, or loss of control. (Fig. A) A typical illustration of proper hand support, workpiece support, and supply cord routing (if applicable). Fig. A 5. Hold power tool by insulated gripping surfaces when performing an operation where the cutting tool may contact hidden wiring or its own cord. Contact with a live wire will also make exposed metal parts of the power tool live and shock the operator. 6. When ripping always use a rip fence or straight edge guide. This improves the accuracy cut and reduces the chance of blade binding. 7. Always use blades with correct size and shape (diamond versus round) of arbour holes. Blades that do not match the mounting hardware of the saw will run eccentrically, causing loss of control. 8. Never use damaged or incorrect blade washers or bolt. The blade washers and bolt were specially designed for your saw, for optimum performance and safety of operation. 5
6 9. Causes and Operator Prevention of Kickback: kickback is a sudden reaction to a pinched, bound or misaligned saw blade, causing an uncontrolled saw to lift up and out of the workpiece toward the operator; when the blade is pinched or bound tightly by the kerf closing down, the blade stalls and the motor reaction drives the unit rapidly back toward the operator; if the blade becomes twisted or misaligned in the cut, the teeth at the back edge of the blade can dig into the top surface of the wood causing the blade to climb out of the kerf and jump back toward the operator. Kickback is the result of saw misuse and/or incorrect operating procedures or conditions and can be avoided by taking proper precautions as given below. Maintain a firm grip with both hands on the saw and position your arms to resist kickback forces. Position your body to either side of the blade, but not in line with the blade. Kickback could cause the saw to jump backwards, but kickback forces can be controlled by the operator, if proper precautions are taken. When blade is binding, or when interrupting a cut for any reason, release the trigger and hold the saw motionless in the material until the blade comes to a complete stop. Never attempt to remove the saw from the work or pull the saw backward while the blade is in motion or kickback may occur. Investigate and take corrective actions to eliminate the cause of blade binding. When restarting a saw in the workpiece, centre the saw blade in the kerf and check that saw teeth are not engaged into the material. If saw blade is binding, it may walk up or kickback from the workpiece as the saw is restarted. Support large panels to minimise the risk of blade pinching and kickback. Large panels tend to sag under their own weight. Supports must be placed under the panel on both sides, near the line of cut and near the edge of the panel. To minimize the risk of blade pinching and kickback. When cutting operation requires the resting of the saw on the workpiece, the saw should be rested on the larger portion and the smaller piece cut off. (Fig. B & C) Don t support board or panel away from the cut. Fig. C Do not use dull or damaged blades. Unsharpened or improperly set blades produce narrow kerf causing excessive friction, blade binding and kickback. Keep blade sharp and clean. Gum and wood pitch hardened on blades slows saw and increases potential for kickback. Keep blade clean by first removing it from tool, then cleaning it with gum and pitch remover, hot water or kerosene. Never use gasoline. Blade depth and bevel adjusting locking levers must be tight and secure before making cut. If blade adjustment shifts while cutting, it may cause binding and kickback. Use extra caution when making a plunge cut into existing walls or other blind areas. The protruding blade may cut objects that can cause kickback. For plunge cuts, retract lower guard using retracting handle. ALWAYS hold the tool firmly with both hands. NEVER place your hand or fingers behind the saw. If kickback occurs, the saw could easily jump backwards over your hand, leading to serious personal injury. (Fig. D) Fig. D To avoid kickback, do support board or panel near the cut. Fig. B Never force the saw. Forcing the saw can cause uneven cuts, loss of accuracy, and possible kickback. Push the saw forward at a speed so that the blade cuts without slowing. 6
7 10. Check lower guard for proper closing before each use. Do not operate the saw if lower guard does not move freely and close instantly. Never clamp or tie the lower guard into the open position. If saw is accidentally dropped, lower guard may be bent. Raise the lower guard with the retracting handle and make sure it moves freely and does not touch the blade or any other part, in all angles and depths of cut. To check lower guard, open lower guard by hand, then release and watch guard closure. Also check to see that retracting handle does not touch tool housing. Leaving blade exposed is VERY DANGEROUS and can lead to serious personal injury. 11. Check the operation of the lower guard spring. If the guard and the spring are not operating properly, they must be serviced before use. Lower guard may operate sluggishly due to damaged parts, gummy deposits, or a build-up of debris. 12. Lower guard should be retracted manually only for special cuts such as plunge cuts and compound cuts. Raise lower guard by retracting handle and as soon as blade enters the material, the lower guard must be released. For all other sawing, the lower guard should operate automatically. 13. Always observe that the lower guard is covering the blade before placing saw down on bench or floor. An unprotected, coasting blade will cause the saw to walk backwards, cutting whatever is in its path. Be aware of the time it takes for the blade to stop after switch is released. Before setting the tool down after completing a cut, be sure that the lower guard has closed and the blade has come to a complete stop. 14. Use the appropriate riving knife for the blade being used. For the riving knife to work, it must be thicker than the body of the blade but thinner than the tooth set of the blade. 15. Adjust the riving knife as described in this instruction manual. Incorrect spacing, positioning and alignment can make the riving knife ineffective in preventing kickback. 16. Always use the riving knife except when plunge cutting. Riving knife must be replaced after plunge cutting. Riving knife causes interference during plunge cutting and can create kickback. 17. For the riving knife to work, it must be engaged in the workpiece. The riving knife is ineffective in preventing kickback during short cuts. 18. Do not operate the saw if riving knife is bent. Even a light interference can slow the closing rate of a guard. 19. Use extra caution when cutting damp wood, pressure treated lumber, or wood containing knots. Adjust speed of cut to maintain smooth advancement of tool without decrease in blade speed. 20. Avoid Cutting Nails. Inspect for and remove all nails from lumber before cutting. 21. Place the wider portion of the saw base on that part of the workpiece which is solidly supported, not on the section that will fall off when the cut is made. As examples, Fig. E illustrates the RIGHT way to cut off the end of a board, and Fig. F the WRONG way. If the workpiece is short or small, clamp it down. DO NOT TRY TO HOLD SHORT PIECES BY HAND! (Fig. E & F) Fig. E Fig. F 22. Never attempt to saw with the circular saw held upside down in a vise. This is extremely dangerous and can lead to serious accidents. (Fig. G) Fig. G 23. Some material contains chemicals which may be toxic. Take caution to prevent dust inhalation and skin contact. Follow material supplier safety data. 24. Do not stop the blades by lateral pressure on the saw blade. 25. Always use blades recommended in this manual. Do not use any abrasive wheels. 7
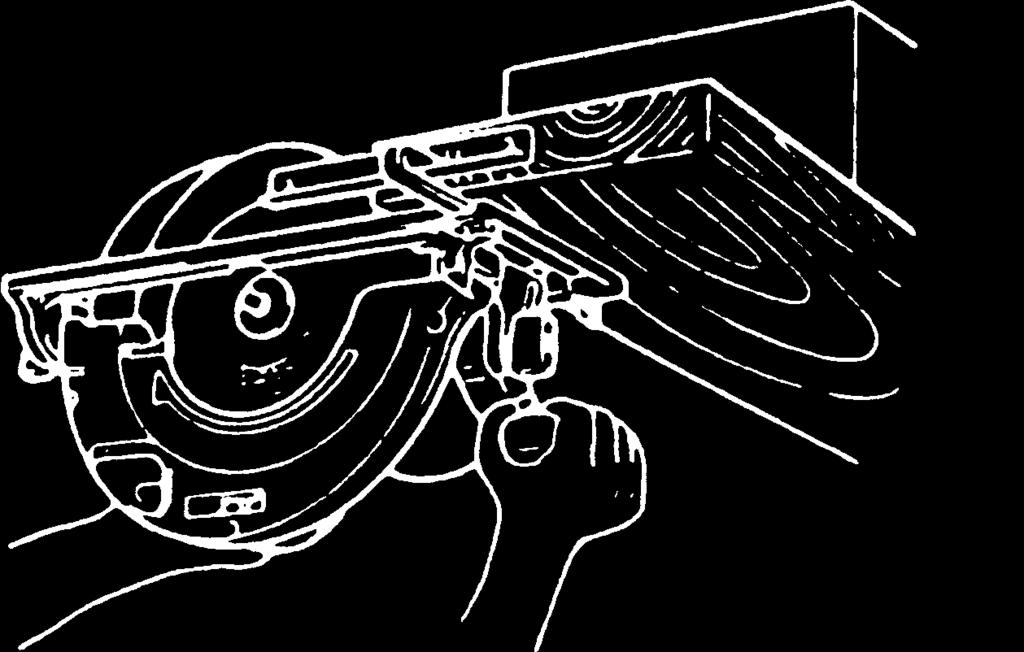
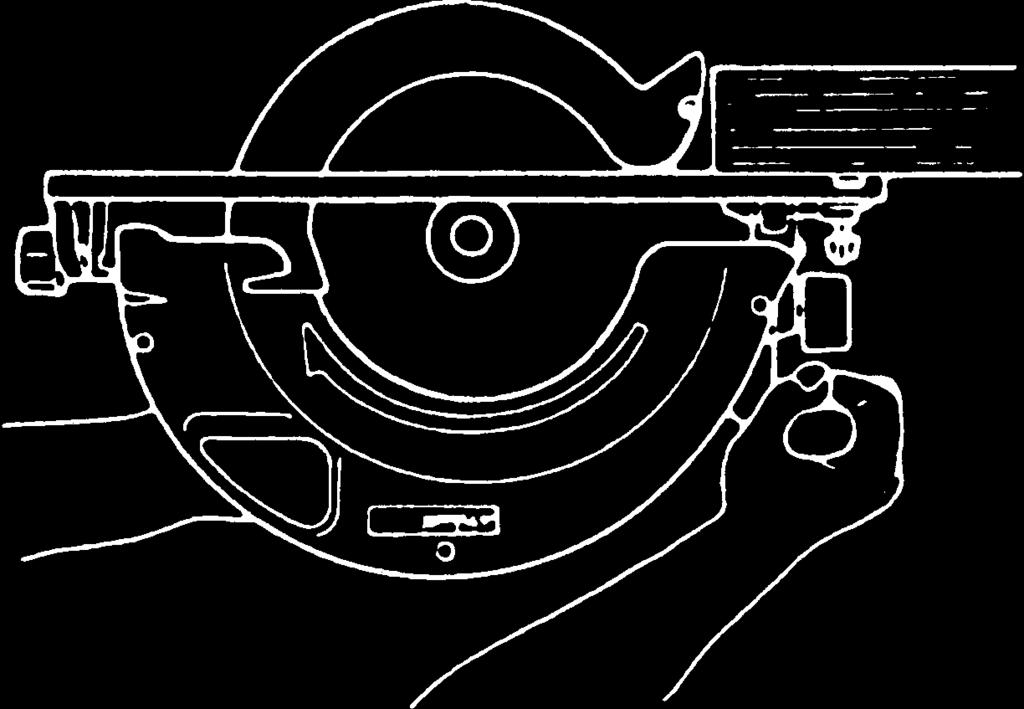
8 26. Wear a dust mask and hearing protection when use the tool. SAVE THESE INSTRUCTIONS. WARNING: MISUSE or failure to follow the safety rules stated in this instruction manual may cause serious personal injury. OPERATING INSTRUCTIONS Removing or installing saw blade The following blade can be used with this tool. Model Max. dia. Min. dia. Blade thickness Kerf 5603R 165 mm 150 mm Less than 1.7 mm More than 1.9 mm 5703R 190 mm 170 mm Less than 1.7 mm More than 1.9 mm 5903R 235 mm 210 mm Less than 1.9 mm More than 2.1 mm 5103R 270 mm 260 mm Less than 1.8 mm More than 2.2 mm 5143R 355 mm 350 mm Less than 2.3 mm More than 2.7 mm The thickness of the riving knife is 1.8 mm for Models 5603R and 5703R or 2.0 mm for Model 5903R and 5103R or 2.5 mm for Model 5143R. CAUTION: Do not use saw blades which do not comply with the characteristics specified in these instructions. Do not use saw blades the disc of which is thicker or the set of which is smaller than the thickness of the riving knife. To remove the saw blade, depress the shaft lock fully to prevent shaft rotation, then use the hex wrench to loosen the hex socket head bolt. (Fig. 1) Now remove the outer flange, raise the safety cover as much as possible, and remove the saw blade. (Fig. 2) Install the saw blade using the reverse of the removal procedure. Install the inner flange, saw blade, outer flange and hex socket head bolt, in that order. Be sure to secure the hex socket head bolt tightly with the shaft lock fully depressed. (Fig. 1 & 3) CAUTION: Make sure that the blade teeth point forward in the same direction as the tool rotation (the arrow on the blade should point in the same direction as the arrow on the tool). Never depress the shaft lock while the saw is running. Use only the Makita socket wrench to remove or install the blade. Riving knife adjustment (Fig. 4) Use the socket wrench to loosen the hex head socket bolt for the riving knife adjustment, then raise the safety cover. Move the riving knife up or down over the two protuberances for settings indicated in the illustration, so as to obtain the proper clearance between the riving knife and saw blade. CAUTION: Ensure that the riving knife is adjusted such that: The distance between the riving knife and the toothed rim of the saw blade is not more than 5 mm. The toothed rim does not extend more than 5 mm beyond the lower edge of the riving knife. Adjusting depth of cut (Fig. 5) Loosen the lever on the depth guide and move the base up or down. At a desired depth of cut, secure the base by tightening the lever. CAUTION: Use a shallow depth of cut when cutting thin workpiece for cleaner, safer cuts. After adjusting the depth of cut, always tighten the lever securely. Adjusting for bevel cuts (Fig. 6) Loosen the thumb nuts in front and back, and tilt the tool to the desired angle for bevel cuts (0 45 ). Secure the thumb nuts tightly in front and back after making the adjustment. Sighting (5603R, 5703R) (Fig. 7) For straight cuts, align the right notch on the front of the base with your cutting line on the workpiece. For 45 bevel cuts, align the left notch with it. Top guide (5903R, 5103R) (Fig. 8) Align your sight line with either the 0 notch for straight cutting or the 45 notch for 45 angle cuts. Top guide (5143R) (Fig. 9) Align your sight line with either the 0 notch for straight cutting or the 30 notch for 30 angle cuts or the 45 notch for 45 angle cuts or the 60 notch for 60 angle cuts. Switch action (Fig. 10) To prevent the switch trigger from being accidentally pulled, a lock-off button is provided. To start the tool, depress the lock-off button and pull the switch trigger. Release the switch trigger to stop. CAUTION: Before plugging in the tool, always check to see that the switch trigger actuates properly and returns to the OFF position when released. 8
9 Operation (Fig. 11) Hold the tool firmly. Set the base plate on the workpiece to be cut without the blade making any contact. Then turn the tool on and wait until the blade attains full speed. Now simply move the tool forward over the workpiece surface, keeping it flat and advancing smoothly until the sawing is completed. To get clean cuts, keep your sawing line straight and your speed of advance uniform. CAUTION: The riving knife should always be used except when plunging in the middle of the workpiece. Do not stop the saw blade by lateral pressure on the disc. Guide rule (Fig. 12 & 13) The handy guide rule allows you to do extra-accurate straight cuts. Simply slide the guide rule up snugly against the side of the workpiece and secure it in position with the screw on the front of the base. It also makes repeated cuts of uniform width possible. Joint assembly (Fig. 14, 15 & 16) (for connecting a vacuum cleaner) When you wish to perform clean cutting operation, connect a vacuum cleaner to your tool. Install the joint on the tool using the screw. Then connect a hose of vacuum cleaner to the joint. MAINTENANCE CAUTION: Always be sure that the tool is switched off and unplugged before carrying out any work on the tool. To maintain product safety and reliability, repairs, maintenance or adjustment should be carried out by a Makita Authorized Service Center. 9
10 NEDERLANDS 1 Inbussleutel 2 Asvergrendeling 3 Vastzetten 4 Losmaken 5 Zaagblad 6 Buitenste flens 7 Binnenste flens 8 Buitenste flens 9 Bout met zeskante kop 10 Zaagblad 11 Uitsteeksels voor afstelling 12 Bout met zeskante kop (Voor afstelling van spouwmes) Verklaring van algemene gegevens 13 Zaagdiepte 14 Losmaken 15 Hendel 16 Vleugelmoer 17 Voor zagen in een hoek van Voor recht zagen 19 Grondplaat schuine zaagsneden 21 Rechte zaagsneden 22 Bovengeleider 23 Grondplaat schuine zaagsneden schuine zaagsneden schuine zaagsneden 27 Rechte zaagsneden 28 Zaagblad 29 Grondplaat 30 Bovengeleider 31 Vergrendelingsknop 32 Trekkerschakelaar 33 Stofzuiger 34 Limietmarkering 35 Kap van koolborstelhouder 36 Schroevedraaier TECHNISCHE GEGEVENS Model 5603R 5703R 5903R 5103R 5143R Bladdiameter mm 190 mm 235 mm 270 mm 355 mm Max. zaagdiepte Bij mm 66 mm 85 mm 100 mm 130 mm Bij mm 46 mm 64 mm 73 mm 90 mm Nullasttoerental (min 1 ) Totale lengte mm 356 mm 400 mm 442 mm 607 mm Netto gewicht...4,2 kg 5,2 kg 7,6 kg 9,4 kg 14,5 kg In verband met ononderbroken research en ontwikkeling behouden wij ons het recht voor bovenstaande technische gegevens te wijzigen zonder voorafgaande kennisgeving. Opmerking: De technische gegevens kunnen van land tot land verschillen. Stroomvoorziening De machine mag alleen worden aangesloten op een stroombron van hetzelfde voltage als aangegeven op de naamplaat, en kan alleen op enkel-fase wisselstroom worden gebruikt. De machine is dubbel-geïsoleerd volgens de Europese standaard en kan derhalve ook op een niet-geaard stopcontact worden aangesloten. Veiligheidswenken Voor uw veiligheid dient u de bijgevoegde Veiligheidsvoorschriften nauwkeurig op te volgen. AANVULLENDE VEILIGHEIDSVOORSCHRIFTEN Laat u NIET misleiden door een vals gevoel van comfort en bekendheid met het gereedschap (na veelvuldig gebruik) en neem alle veiligheidsvoorschriften van de cirkelzaag altijd strikt in acht. Bij onveilig of verkeerd gebruik van het elektrisch gereedschap, bestaat de kans op ernstig persoonlijk letsel. Gevaar: 1. Houd uw handen uit de buurt van het zaaggebied en het zaagblad. Houd met uw andere hand de voorhandgreep of de behuizing van het gereedschap vast. Als u de cirkelzaag met beide handen vasthoudt, kunt u nooit in uw handen zagen. 2. Reik nooit met uw handen onder het werkstuk. De beschermkap kan u niet beschermen onder het werkstuk tegen het zaagblad. Probeer niet afgezaagd materiaal te verwijderen terwijl het zaagblad nog draait. LET OP: Het zaagblad draait nog na nadat het gereedschap is uitgeschakeld. Wacht totdat het zaagblad volledig tot stilstand is gekomen voordat u het afgezaagde materiaal vastpakt. 3. Stel de zaagdiepte in overeenkomstig de dikte van het werkstuk. Minder dan een volledige tandhoogte dient onder het werkstuk uit te komen. 4. Houd het werkstuk waarin wordt gezaagd nooit vast met uw handen of benen. Zorg dat het werkstuk stabiel is ten opzichte van de ondergrond. Het is belangrijk het werkstuk goed te ondersteunen om de kans te minimaliseren dat uw lichaam eraan blootgesteld wordt, het zaagblad vastloopt of u de controle over het gereedschap verliest. (Fig. A) Een typische afbeelding van goede handplaatsing, werkstukondersteuning en netsnoerroute (indien van toepassing). Fig. A 26
11 5. Houd elektrisch gereedschap vast aan het geïsoleerde oppervlak van de handgrepen wanneer u werkt op plaatsen waar het zaaggereedschap met verborgen bedrading of zijn eigen snoer in aanraking kan komen. Door contact met onder spanning staande draden, zullen ook de niet-geïsoleerde metalen delen van het elektrisch gereedschap onder spanning komen te staan zodat de gebruiker een elektrische schok kan krijgen. 6. Gebruik bij het schulpen altijd de breedtegeleider of de langsgeleider. Hierdoor wordt de nauwkeurigheid van het zagen vergroot en de kans op vastlopen van het zaagblad verkleint. 7. Gebruik altijd zaagbladen met doorngaten van de juiste afmetingen en vorm (diamand or rond). Zaagbladen die niet goed passen op de bevestigingsmiddelen van de cirkelzaag, zullen excentrisch draaien waardoor u de controle over het gereedschap verliest. 8. Gebruik nooit een beschadigde of verkeerde bouten en ringen om het zaagblad mee te bevestigen. De bouten en ringen voor de bevestiging van het zaagblad zijn speciaal ontworpen voor gebruik met uw cirkelzaag voor optimale prestaties en veilig gebruik. 9. Oorzaken van terugslag en wat de gebruiker hieraan kan doen: Terugslag is een plotselinge reactie op een bekneld, vastgelopen of niet-uitgelijnd zaagblad, waardoor de oncontroleerbare cirkelzaag omhoog, uit het werkstuk en in de richting van de gebruiker gaat. Wanneer het zaagblad bekneld raakt of vastloopt doordat de zaagsnede naar beneden toe smaller wordt, vertraagt het zaagblad en komt als reactie de motor snel omhoog in de richting van de gebruiker. Als het zaagblad gebogen of niet-uitgelijnd raakt in de zaagsnede, kunnen de tanden aan de achterrand van het zaagblad zich in het bovenoppervlak van het hout vreten, waardoor het zaagblad uit de zaagsnede klimt en omhoog springt in de richting van de gebruiker. Terugslag is het gevolg van misgebruik van de cirkelzaag en/of onjuiste gebruiksprocedures of - omstandigheden, en kan worden voorkomen door goede voorzorgsmaatregelen te treffen, zoals hieronder vermeld: Houd de cirkelzaag stevig vast met beide handen en houdt uw armen zodanig dat een terugslag wordt opgevangen. Plaats uw lichaam zijwaarts versprongen van het zaagblad en niet in een rechte lijn erachter. Door terugslag kan de cirkelzaag achterwaarts springen, maar de kracht van de terugslag kan met de juiste voorzorgsmaatregelen door de gebruiker worden opgevangen. Wanneer het zaagblad vastloopt, of wanneer u om een of andere reden het zagen onderbreekt, laat u de aan/uit-schakelaar los en houdt u de cirkelzaag stil in het materiaal totdat het zaagblad volledig tot stilstand is gekomen. Probeer nooit het zaagblad uit het werkstuk te halen of de cirkelzaag naar achteren te trekken, terwijl het zaagblad nog draait omdat hierdoor een terugslag kan optreden. Onderzoek waarom het zaagblad is vastgelopen en tref afdoende maatregelen om de oorzaak ervan op te heffen. Wanneer u de cirkelzaag weer inschakelt terwijl het zaagblad in het werkstuk zit, plaatst u het zaagblad in het midden van de zaagsnede en controleert u dat de tanden niet in het materiaal grijpen. Als het zaagblad is vastgelopen, kan wanneer de cirkelzaag wordt ingeschakeld het zaagblad uit het werkstuk lopen of terugslaan. Ondersteun grote platen om de kans te minimaliseren dat het zaagblad bekneld raakt of terugslaat. Grote platen neigen door te zakken onder hun eigen gewicht. U moet de plaat ondersteunen aan beide zijranden, vlakbij de zaaglijn en vlakbij het uiteinde. De kans te minimaliseren dat het zaagblad vastloopt. Wanneer het noodzakelijk is om tijdens het zagen de cirkelzaag tot stilstand te brengen op het werkstuk, moet de cirkelzaag op het grootste deel rusten terwijl het kleinste deel wordt afgezaagd. (Fig. B en C) Om terugslag te voorkomen, ondersteun de plank of het paneel dichtbij de zaagsnede. Ondersteun de plank of het paneel niet van de zaagsnede weg. Fig. B Fig. C 27
12 Gebruik een bot of beschadigd zaagblad niet meer. Niet-geslepen of verkeerd gezette tanden maken een smalle zaagsnede wat leidt tot grote wrijving, vastlopen en terugslag. Houd het zaagblad scherp en schoon. Gom of hars dat op het zaagblad is opgedroogd vertraagt het zaagblad en verhoogt de kans op terugslag. Houd het zaagblad schoon door dit eerst van het gereedschap te demonteren en het vervolgens schoon te maken met een reinigingsmiddel voor gom en hars, heet water of kerosine. Gebruik nooit benzine. De vergrendelhendels voor het instellen van de zaagbladdiepte en verstelhoek moeten vastzitten alvorens te beginnen met zagen. Als de instellingen van het zaagblad zich tijdens het zagen wijzigen, kan dit leiden tot vastlopen of terugslag. Wees extra voorzichtig wanneer u een blinde zaagsnede maakt in een bestaande wand of een andere plaats waarvan u de onderkant van het zaagoppervlak niet kunt zien. Wanneer het zaagblad door het materiaal heen breekt, kan het een voorwerp raken waardoor een terugslag optreedt. Bij het maken van een blinde zaagsnede opent u de onderste beschermkap met behulp van de terugtrekhendel. Houd het gereedschap ALTIJD met beide handen stevig vast. Plaats NOOIT uw hand of vingers achter het zaagblad. Als een terugslag optreedt, kan het zaagblad gemakkelijk achteruit en over uw hand springen waardoor ernstig persoonlijk letsel ontstaat. (Fig. D) Fig. D Dwing de cirkelzaag nooit. Als u het zaagblad dwingt, kan dat leiden tot een ongelijkmatige zaagsnede, verminderde nauwkeurigheid en mogelijke terugslag. Duw de cirkelzaag vooruit met een snelheid waarbij het zaagblad niet vertraagt. 10. Controleer voor ieder gebruik of de onderste beschermkap goed sluit. Gebruik de cirkelzaag niet als de onderste beschermkap niet vrij kan bewegen en onmiddellijk sluit. Zet de onderste beschermkap nooit vast in de geopende stand. Als u de cirkelzaag per ongeluk laat vallen, kan de onderste beschermkap worden verbogen. Til de onderste beschermkap op aan de terugtrekhendel en controleer dat deze vrij kan bewegen en niet het zaagblad of enig ander onderdeel raakt, onder alle verstekhoeken en op alle zaagdiepten. U kunt de onderste beschermkap controleren, door deze met de hand te openen, los te laten en te kijken hoe hij sluit. Controleer tevens of de terugtrekhendel de behuizing van het gereedschap niet raakt. Het zaagblad onbeschermd laten is UITERST GEVAARLIJK en kan leiden tot ernstig persoonlijk letsel. 11. Controleer de werking van de veer van de onderste beschermkap. Als de beschermkap en de veer niet goed werken, dienen deze te worden gerepareerd voordat de cirkelzaag wordt gebruikt. De onderste beschermkap kan traag werken als gevolg van beschadigde onderdelen, gomof hardafzetting, of opeenhoping van vuil. 12. De onderste beschermkap mag alleen met de hand worden geopend voor het maken van speciale zaagsneden, zoals een blinde zaagsnede en samengestelde zaagsnede. Til de onderste beschermkap op aan de terugtrekhendel en laat deze los zodra het zaagblad in het materiaal zaagt. Bij alle andere typen zaagsneden, dient de onderste beschermkap automatisch te werken. 13. Let er altijd op dat de onderste beschermkap het zaagblad bedekt voordat u de cirkelzaag op een werkbak of vloer neerlegt. Een onbeschermd zaagblad dat nog nadraait, zal de cirkelzaag achteruit doen lopen waarbij alles op zijn weg wordt gezaagd. Denk aan de tijd die het duurt nadat de cirkelzaag is uitgeschakeld voordat het zaagblad stilstaat. Voordat u het gereedschap neerlegt na het voltooien van een zaagsnede, controleert u dat de onderste beschermkap gesloten is en het zaagblad volledig tot stilstand is gekomen. 14. Gebruik het geschikte spouwmes voor het zaagblad dat wordt gebruikt. Om het spouwmes goed te laten werken, moet het dikker zijn dan het zaagbladlichaam, maar dunner zijn dan de breedte van de gezette zaagtanden. 15. Stel het spouwmes in zoals beschreven in deze gebruiksaanwijzing. Door een onjuiste afstand, positie of uitlijning, zal het spouwmes eventuele terugslag niet effectief kunnen voorkomen. 16. Gebruik het spouwmes altijd, behalve bij het maken van een blinde zaagsnede. Het spouwmes moet worden teruggeplaatst nadat de 'blinde' zaagsnede is gemaakt. Het spouwmes zit in de weg bij het maken van een blinde zaagsnede en kan terugslag veroorzaken. 17. Voor een goede werking van het spouwmes, moet het in het werkstuk lopen. Het spouwmes is niet effectief in het voorkomen van terugslag tijdens korte zaagsneden. 18. Bedien de zaag niet als het spouwmes verbogen is. Zelfs bij heel licht aanlopen kan de sluitsnelheid van een beschermkap worden verlaagd. 28
13 19. Wees extra voorzichtig bij het zagen in nat hout, druk-behandeld timmerhout en hout met knoesten. Pas de snelheid van het zagen aan zodat de cirkelzaag soepel vooruit blijft gaan zonder dat de snelheid van het zaagblad lager wordt. 20. Voorkom dat u in spijkers zaag. Inspecteer het hout op spijkers en verwijder deze zonodig voordat u begint te zagen. 21. Plaats het bredere deel van de zool van de cirkelzaag op het deel van het werkstuk dat goed is ondersteund, en niet op het deel dat omlaag valt nadat de zaagsnede gemaakt is. Als voorbeeld laat afbeelding E zien hoe u het uiteinde van een plank GOED afzaagt, en afbeelding F hoe u dit VERKEERD doet. Als het werkstuk kort of smal is, klemt u het vast. PROBEER NOOIT EEN KORT WERKSTUK IN UW HANDEN VAST TE HOUDEN! (Fig. E en F) Fig. E 22. Probeer nooit te zagen waarbij de cirkelzaag ondersteboven in een bankschroef is geklemd. Dit is uiterst gevaarlijk en kan leiden tot ernstig persoonlijk letsel. (Fig. G) Fig. G 23. Sommige materialen bevatten chemische stoffen die giftig kunnen zijn. Neem voorzorgsmaatregelen tegen het inademen van stof en contact met de huid. Volg de veiligheidsinstructies van de leverancier van het materiaal op. 24. Breng het zaagblad niet tot stilstand door zijdelings op het zaagblad te drukken. 25. Gebruik altijd zaagbladen die in deze gebruiksaanwijzing aanbevolen worden. Gebruik geen slijpschijven. 26. Draag een stofmasker en gehoorbescherming tijdens gebruik van het gereedschap. BEWAAR DEZE VOORSCHRIFTEN. WAARSCHUWING: VERKEERD GEBRUIK of het niet naleven van de veiligheidsvoorschriften in deze gebruiksaanwijzing kan leiden tot ernstige verwondingen. Fig. F BEDIENINGSVOORSCHRIFTEN Verwijderen of installeren van het zaagblad Het volgende blad kan met deze machine worden gebruikt. Model Max. diameter Min. diameter Bladdikte Zaagsnede 5603R 165 mm 150 mm minder dan 1,7 mm meer dan 1,9 mm 5703R 190 mm 170 mm minder dan 1,7 mm meer dan 1,9 mm 5903R 235 mm 210 mm minder dan 1,9 mm meer dan 2,1 mm 5103R 270 mm 260 mm minder dan 1,8 mm meer dan 2,2 mm 5143R 355 mm 350 mm minder dan 2,3 mm meer dan 2,7 mm De dikte van het spouwmes is 1,8 mm voor Modellen 5603R en 5703R, 2,0 mm voor Modellen 5903R en 5103R, en 2,5 mm voor Model 5143R. 29
14 LET OP: Gebruik geen zaagbladen die niet voldoen aan de specificaties in deze gebruiksaanwijzing. Gebruik geen zaagbladen waarvan de schijf dikker is of de zetting kleiner is dan de dikte van het spouwmes. Om het zaagblad te verwijderen, druk de asvergrendeling volledig in om te voorkomen dat de as gaat draaien, en draai dan de bout met zeskante kop los met behulp van de inbussleutel. (Fig. 1) Breng de veiligheidskap zo ver mogelijk omhoog om de buitenste flens te verwijderen en verwijder dan het zaagblad. (Fig. 2) Installeer het zaagblad in de omgekeerde volgorde van verwijderen. Monteer achtereenvolgens de binnenste flens, het zaagblad, de buitenste flens en de bout met zeskante kop. Draai de bout met zeskante kop stevig vast terwijl u de asvergrendeling volledig ingedrukt houdt. (Fig. 1 en 3) LET OP: Zorg ervoor dat de tanden van het zaagblad naar voren wijzen in dezelfde richting als de draairichting van de machine. (De pijl op het zaagblad moet in dezelfde richting wijzen als de pijl op de machine.) Druk de asvergrendeling nooit in terwijl de zaag draait. Gebruik alleen de Makita dopsleutel voor het verwijderen of installeren van het zaagblad. Afstellen van het spouwmes (Fig. 4) Gebruik de dopsleutel voor het losdraaien van de zeskante bout voor afstelling van het spouwmes en breng dan de veiligheidskap omhoog. Beweeg het spouwmes omhoog of omlaag over de twee uitsteeksels voor afstelling (zie de afbeelding), zodat de juiste afstand tussen het spouwmes en het zaagblad wordt verkregen. LET OP: Het spouwmes moet zodanig worden afgesteld dat: De afstand tussen het spouwmes en de getande rand van het zaagblad niet meer dan 5 mm bedraagt. De getande rand niet meer dan 5 mm onder de onderste rand van het spouwmes uitsteekt. Afstellen van zaagdiepte (Fig. 5) Zet de hendel op de dieptegeleider los en beweeg de grondplaat op of neer. Zet de grondplaat op de gewenste diepte vast door de hendel vast te zetten. LET OP: Gebruik een geringe zaagdiepte voor het zagen van dunne werkstukken, om veiliger te zagen en schonere zaagsneden te krijgen. Na het afstellen van de zaagdiepte, dient u de hendel altijd stevig vast te zetten. Afstelling voor verstekzagen (Fig. 6) Draai de vleugelmoeren vooraan en achteraan los en zet dan de machine in de gewenste hoek voor verstekzagen (0 45 ). Na afstelling, de vleugel-moeren vooraan en achteraan stevig vastdraaien. Zaaghoek instellen (5603R, 5703R) (Fig. 7) Voor rechte zaagsneden, laat de zaaglijn op het werkstuk samenvallen met de rechter inkeping op de voorkant van de grondplaat. Voor 45 schuine zaagsneden, laat de zaaglijn op het werkstuk samenvallen met de linker inkeping. Bovengeleider (5903R, 5103R) (Fig. 8) Laat uw richtlijn samenvallen met de 0 inkeping voor rechte zaagsneden of de 45 inkeping voor 45 schuine zaagsneden. Bovengeleider (5143R) (Fig. 9) Laat uw richtlijn samenvallen met de 0 inkeping voor rechte zaagsneden, de 30 inkeping voor 30 schuine zaagsneden, de 45 inkeping voor 45 schuine zaagsneden, of de 60 inkeping voor 60 schuine zaagsneden. Werking van de trekkerschakelaar (Fig. 10) Een vergrendelingsknop is voorzien om te voorkomen dat de trekkerschakelaar per toeval wordt ingedrukt. Om de machine aan te zetten, de vergrendelingsknop indrukken en dan de trekkerschakelaar indrukken. Om de machine af te zetten, de trekkerschakelaar loslaten. LET OP: Alvorens de stekker in een stopcontact te steken, altijd eerst controleren of de trekkerschakelaar juist werkt en terugkeert naar de OFF stand wanneer hij wordt losgelaten. Bediening (Fig. 11) Houd de machine stevig vast. Zet de grondplaat op het te zagen werkstuk zonder dat het zaagblad ermee in contact komt. Zet dan de machine aan en wacht tot het zaagblad op volle snelheid is gekomen. Beweeg nu gewoon de machine naar voren over het oppervlak van het werkstuk; houd hierbij de machine vlak en beweeg deze langzaam totdat het zagen is voltooid. Om schone zaagsneden te krijgen, dient u uw zaaglijn recht te houden en de machine met gelijkmatige snelheid naar voren te bewegen. LET OP: Gebruik altijd het spouwmes, behalve voor zaagsneden die in het midden van het werkstuk beginnen. Stop het zaagblad niet door zijwaartse kracht op de schijf uit te oefenen. Richtliniaal (Fig. 12 en 13) Het handige richtliniaal stelt u in staat uiterst nauwkeurige rechte zaagsneden te krijgen. Schuif gewoon het richtliniaal omhoog tot vlak tegen de zijkant van het werkstuk en zet het vast met de schroef op de voorkant van de grondplaat. Met het richtliniaal kunt u ook herhaaldelijk zaagsneden van dezelfde breedte zagen. Koppelstuk (Fig. 14, 15 en 16) (voor het aansluiten van een stofzuiger) Om schoon te werken, kunt u een stofzuiger op uw machine aansluiten. Monteer het koppelstuk op de machine met behulp van de schroef, en sluit dan de slang van een stofzuiger erop aan. ONDERHOUD LET OP: Zorg er altijd voor dat de machine is uitgeschakeld en de stekker uit het stopcontact is verwijderd alvorens werken aan de machine uit te voeren. Opdat het gereedschap veilig in betrouwbaar blijft, dienen alle reparaties, onderhoud of afstellingen te worden uitgevoerd in een erkend Makita service centrum. 30
15 ENGLISH EC-DECLARATION OF CONFORMITY We declare under our sole responsibility that this product is in compliance with the following standards of standardized documents, EN60745, EN55014, EN61000 in accordance with Council Directives, 89/336/EEC and 98/37/EC. FRANÇAISE DÉCLARATION DE CONFORMITÉ CE Nous déclarons sous notre entière responsabilité que ce produit est conforme aux normes des documents standardisés suivants, EN60745, EN55014, EN61000 conformément aux Directives du Conseil, 89/336/CEE et 98/37/EG. DEUTSCH CE-KONFORMITÄTSERKLÄRUNG Hiermit erklärt wir unter unserer alleinigen Verantwortung, daß dieses Produkt gemäß den Ratsdirektiven 89/336/EWG und 98/37/EG mit den folgenden Normen von Normendokumenten übereinstimmen: EN60745, EN55014, EN ITALIANO ENH101-5 DICHIARAZIONE DI CONFORMITÀ CON LE NORME DELLA COMUNITÀ EUROPEA Dichiariamo sotto la nostra sola responsabilità che questo prodotto è conforme agli standard di documenti standardizzati seguenti: EN60745, EN55014, EN61000 secondo le direttive del Consiglio 89/336/CEE e 98/37/CE. NEDERLANDS EG-VERKLARING VAN CONFORMITEIT Wij verklaren hierbij uitsluitend op eigen verantwoordelijkheid dat dit produkt voldoet aan de volgende normen van genormaliseerde documenten, EN60745, EN55014, EN61000 in overeenstemming met de richtlijnen van de Raad 89/336/EEC en 98/37/EC. ESPAÑOL DECLARACIÓN DE CONFORMIDAD DE LA CE Declaramos bajo nuestra sola responsabilidad que este producto cumple con las siguientes normas de documentos normalizados, EN60745, EN55014, EN61000 de acuerdo con las directivas comunitarias, 89/336/EEC y 98/37/CE. Yasuhiko Kanzaki CE 2005 Director Directeur Direktor Amministratore Directeur Director MAKITA INTERNATIONAL EUROPE LTD. Michigan Drive, Tongwell, Milton Keynes, Bucks MK15 8JD, ENGLAND Responsible manufacturer: Fabricant responsable : Verantwortlicher Hersteller: Produttore responsabile: Verantwoordelijke fabrikant: Fabricante responsable: Makita Corporation Anjo Aichi Japan 72
16 PORTUGUÊS DECLARAÇÃO DE CONFORMIDADE DA CE Declaramos sob inteira responsabilidade que este produto obedece às seguintes normas de documentos normalizados, EN60745, EN55014, EN61000 de acordo com as directivas 89/336/CEE e 98/37/CE do Conselho. DANSK EU-DEKLARATION OM KONFORMITET Vi erklærer hermed på eget ansvar, at dette produkt er i overensstemmelse med de følgende standarder i de normsættende dokumenter, EN60745, EN55014, EN61000 i overensstemmelse med Rådets Direktiver 89/336/EEC og 98/37/EC. SVENSKA EG-DEKLARATION OM ÖVERENSSTÄMMELSE Under eget ansvar deklarerar vi härmed att denna produkt överensstämmer med följande standardiseringar för standardiserade dokument, EN60745, EN55014, EN61000 i enlighet med EG-direktiven 89/336/EEC och 98/37/EC. NORSK ENH101-5 EUs SAMSVARS-ERKLÆRING Vi erklærer på eget ansvar at dette produktet er i overensstemmelse med følgende standard i de standardiserte dokumenter: EN60745, EN55014, EN61000, i samsvar med Råds-direktivene, 89/336/EEC og 98/37/EC. SUOMI VAKUUTUS EC-VASTAAVUUDESTA Yksinomaisesti vastuullisina ilmoitamme, että tämä tuote on seuraavien standardoitujen dokumenttien standardien mukainen, EN60745, EN55014, EN61000 neuvoston direktiivien 89/336/EEC ja 98/37/EC mukaisesti. ΕΛΛΗΝΙΚΑ ΗΛΩΣΗ ΣΥΜΜΟΡΦΩΣΗΣ ΕΚ ηλώνουµε υπό την µοναδική µας ευθύνη ότι αυτό το προιόν βρίσκεται σε Συµφωνία µε τα ακόλουθα πρότυπα τυποποιηµένων εγγράφων, EN60745, EN55014, EN61000 σύµφωνα µε τις Οδηγίες του Συµβουλίου, 89/336/EEC και 98/37/ΚE. TÜRKÇE AVRUPA KONSEYİ UYGUNLUK BEYANI Bütün sorumluluğu üzerimize alarak, bu ürünün, Avrupa Konseyi Yönergeleri, 89/336/EEC ve 98/37/EC, uyarınca, aşağıdaki standartlaştırılmış belgelerdeki standartlara uygunluğuna beyan ederiz: EN60745, EN55014, EN Yasuhiko Kanzaki CE 2005 Director Direktør Direktör Direktor Johtaja ιευθυντής Müdür MAKITA INTERNATIONAL EUROPE LTD. Michigan Drive, Tongwell, Milton Keynes, Bucks MK15 8JD, ENGLAND Fabricante responsável: Ansvarlig fabrikant: Ansvarig tillverkare: Ansvarlig produsent: Vastaava valmistaja: Υπεύθυνος κατασκευαστής: Sorumlu imalatçı: Makita Corporation Anjo Aichi Japan 73
17 ENGLISH For European countries only Noise and Vibration of Model 5603R The typical A-weighted noise levels are sound pressure level: 96 db (A) sound power level: 107 db (A) Uncertainty is 3 db (A). Wear ear protection. The typical weighted root mean square acceleration value is not more than 2.5 m/s 2. These values have been obtained according to FRANÇAISE Pour les pays d Europe uniquement Bruit et vibrations du modèle 5603R Les niveaux de bruit ponderes types A sont: niveau de pression sonore: 96 db (A) niveau de puissance du son: 107 db (A) L incertitude de mesure est de 3 db (A). Porter des protecteurs anti-bruit. L accélération pondérée ne dépasse pas Ces valeurs ont été obtenues selon DEUTSCH Nur für europäische Länder Geräusch- und Vibrationsentwicklung des Modells 5603R Die typischen A-bewerteten Geräuschpegel betragen: Schalldruckpegel: 96 db (A) Schalleistungspegel: 107 db (A) Die Abweichung beträgt 3 db (A). Gehörschutz tragen. Der gewichtete Effektivwert der Beschleunigung beträgt nicht mehr als Diese Werte wurden gemäß EN60745 erhalten. ITALIANO ENG005-2-V3 Modello per l Europa soltanto Rumore e vibrazione del modello 5603R I livelli del rumore pesati secondo la curva A sono: Livello pressione sonora: 96 db (A) Livello potenza sonora: 107 db (A) L incertezza è di 3 db (A). Indossare i paraorecchi. Il valore quadratico medio di accellerazione non supera i Questi valori sono stati ottenuti in conformità NEDERLANDS Alleen voor Europese landen Geluidsniveau en trilling van het model 5603R De typische A-gewogen geluidsniveau s zijn geluidsdrukniveau: 96 db (A) geluidsenergie-niveau: 107 db (A) Onzekerheid is 3 db (A). Draag oorbeschermers. De typische gewogen effectieve versnellingswaarde is niet meer dan Deze waarden werden verkregen in overeenstemming met ESPAÑOL Para países europeos solamente Ruido y vibración del modelo 5603R Los niveles típicos de ruido ponderados A son presión sonora: 96 db (A) nivel de potencia sonora: 107 db (A) Incerteza 3 db (A). Póngase protectores en los oídos. El valor ponderado de la aceleración no sobrepasa los Estos valores han sido obtenidos de acuerdo con 74
18 PORTUGUÊS Só para países Europeus Ruído e vibração do modelo 5603R Os níveis normais de ruído A são nível de pressão de som: 96 db (A) nível do sum: 107 db (A) A incerteza é de 3 db (A). Utilize protectores para os ouvidos O valor médio da aceleração é inferior a Estes valores foram obtidos de acordo com DANSK Kun for lande i Europa Lyd og vibration fra model 5603R De typiske A-vægtede lydniveauer er lydtryksniveau: 96 db (A) lydeffektniveau: 107 db (A) Der er en usikkerhed på 3dB (A). Bær høreværn. Den vægtede effektive accelerationsværdi overstiger ikke Disse værdier er beregnet i overensstemmelse med SVENSKA Endast för Europa Buller och vibration hos modell 5603R De typiska A-vägda bullernivåerna är ljudtrycksnivå: 96 db (A) ljudeffektnivå: 107 db (A) Osäkerheten är 3 db (A). Använd hörselskydd Det typiskt vägda effektivvärdet för acceleration överstiger inte Dessa värden har erhållits i enlighet med NORSK ENG005-2-V3 Gjelder bare land i Europa Støy og vibrasjon fra modell 5603R De vanlige A-belastede støynivå er lydtrykksnivå: 96 db (A) lydstyrkenivå: 107 db (A) Usikkerheten er på 3 db (A). Benytt hørselvern. Den vanlig belastede effektiv-verdi for akselerasjon overskrider ikke Disse verdiene er beregnet eller målt i samsvar med SUOMI Vain Euroopan maat Mallin 5603R melutaso ja tärinä Tyypilliset A-painotetut melutasot ovat äänenpainetaso: 96 db (A) äänen tehotaso: 107 db (A) Epävarmuus on 3 db (A). Käytä kuulosuojaimia. Tyypillinen kiihtyvyyden painotettu tehollisarvo ei ylitä Nämä arvot on mitattu normin EN60745 mukaisesti. ΕΛΛΗΝΙΚΑ Μόνο για χώρες της Ευρώπης Θόρυβος και κραδασµός του µοντέλου 5603R Οι τυπικές A-µετρούµενες εντάσεις ήχου είναι πίεση ήχου: 96 db (A) δύναµη του ήχου: 107 db (A) Η Αβεβαιότητα είναι 3 db (A). Φοράτε ωτοασπίδες. Η τυπική αξία της µετρούµενης ρίζας του µέσου τετραγώνου της επιτάχυνσης δεν ξεπερνά τα Αυτές οι τιµές έχουν σηµειωθεί σύµφωνα µε το TÜRKÇE Sadece Avrupa ülkeleri için 5603R modelin gürültü ve titreşimi Tipik A-ağırlıklı gürültü seviyeleri şöyledir; ses basınç seviyesi: 96 db (A) ses güç seviyesi: 107 db (A) Belirsizlik: 3 db (A) Kulak koruyucusu takın. Tipik ağırlıklı karekök ortalama ivme 2,5 m/s 2 den fazla değildir. Bu değerler EN60745 standardına göre elde edilmiştir. 75
19 ENGLISH For European countries only Noise and Vibration of Model 5703R The typical A-weighted noise levels are sound pressure level: 93 db (A) sound power level: 104 db (A) Uncertainty is 3 db (A). Wear ear protection. The typical weighted root mean square acceleration value is not more than 2.5 m/s 2. These values have been obtained according to FRANÇAISE Pour les pays d Europe uniquement Bruit et vibrations du modèle 5703R Les niveaux de bruit ponderes types A sont: niveau de pression sonore: 93 db (A) niveau de puissance du son: 104 db (A) L incertitude de mesure est de 3 db (A). Porter des protecteurs anti-bruit. L accélération pondérée ne dépasse pas Ces valeurs ont été obtenues selon DEUTSCH Nur für europäische Länder Geräusch- und Vibrationsentwicklung des Modells 5703R Die typischen A-bewerteten Geräuschpegel betragen: Schalldruckpegel: 93 db (A) Schalleistungspegel: 104 db (A) Die Abweichung beträgt 3 db (A). Gehörschutz tragen. Der gewichtete Effektivwert der Beschleunigung beträgt nicht mehr als Diese Werte wurden gemäß EN60745 erhalten. ITALIANO ENG005-2-V3 Modello per l Europa soltanto Rumore e vibrazione del modello 5703R I livelli del rumore pesati secondo la curva A sono: Livello pressione sonora: 93 db (A) Livello potenza sonora: 104 db (A) L incertezza è di 3 db (A). Indossare i paraorecchi. Il valore quadratico medio di accellerazione non supera i Questi valori sono stati ottenuti in conformità NEDERLANDS Alleen voor Europese landen Geluidsniveau en trilling van het model 5703R De typische A-gewogen geluidsniveau s zijn geluidsdrukniveau: 93 db (A) geluidsenergie-niveau: 104 db (A) Onzekerheid is 3 db (A). Draag oorbeschermers. De typische gewogen effectieve versnellingswaarde is niet meer dan Deze waarden werden verkregen in overeenstemming met ESPAÑOL Para países europeos solamente Ruido y vibración del modelo 5703R Los niveles típicos de ruido ponderados A son presión sonora: 93 db (A) nivel de potencia sonora: 104 db (A) Incerteza 3 db (A). Póngase protectores en los oídos. El valor ponderado de la aceleración no sobrepasa los Estos valores han sido obtenidos de acuerdo con 76
20 PORTUGUÊS Só para países Europeus Ruído e vibração do modelo 5703R Os níveis normais de ruído A são nível de pressão de som: 93 db (A) nível do sum: 104 db (A) A incerteza é de 3 db (A). Utilize protectores para os ouvidos O valor médio da aceleração é inferior a Estes valores foram obtidos de acordo com DANSK Kun for lande i Europa Lyd og vibration fra model 5703R De typiske A-vægtede lydniveauer er lydtryksniveau: 93 db (A) lydeffektniveau: 104 db (A) Der er en usikkerhed på 3dB (A). Bær høreværn. Den vægtede effektive accelerationsværdi overstiger ikke Disse værdier er beregnet i overensstemmelse med SVENSKA Endast för Europa Buller och vibration hos modell 5703R De typiska A-vägda bullernivåerna är ljudtrycksnivå: 93 db (A) ljudeffektnivå: 104 db (A) Osäkerheten är 3 db (A). Använd hörselskydd Det typiskt vägda effektivvärdet för acceleration överstiger inte Dessa värden har erhållits i enlighet med NORSK ENG005-2-V3 Gjelder bare land i Europa Støy og vibrasjon fra modell 5703R De vanlige A-belastede støynivå er lydtrykksnivå: 93 db (A) lydstyrkenivå: 104 db (A) Usikkerheten er på 3 db (A). Benytt hørselvern. Den vanlig belastede effektiv-verdi for akselerasjon overskrider ikke Disse verdiene er beregnet eller målt i samsvar med SUOMI Vain Euroopan maat Mallin 5703R melutaso ja tärinä Tyypilliset A-painotetut melutasot ovat äänenpainetaso: 93 db (A) äänen tehotaso: 104 db (A) Epävarmuus on 3 db (A). Käytä kuulosuojaimia. Tyypillinen kiihtyvyyden painotettu tehollisarvo ei ylitä Nämä arvot on mitattu normin EN60745 mukaisesti. ΕΛΛΗΝΙΚΑ Μόνο για χώρες της Ευρώπης Θόρυβος και κραδασµός του µοντέλου 5703R Οι τυπικές A-µετρούµενες εντάσεις ήχου είναι πίεση ήχου: 93 db (A) δύναµη του ήχου: 104 db (A) Η Αβεβαιότητα είναι 3 db (A). Φοράτε ωτοασπίδες. Η τυπική αξία της µετρούµενης ρίζας του µέσου τετραγώνου της επιτάχυνσης δεν ξεπερνά τα Αυτές οι τιµές έχουν σηµειωθεί σύµφωνα µε το TÜRKÇE Sadece Avrupa ülkeleri için 5703R modelin gürültü ve titreşimi Tipik A-ağırlıklı gürültü seviyeleri şöyledir; ses basınç seviyesi: 93 db (A) ses güç seviyesi: 104 db (A) Belirsizlik: 3 db (A) Kulak koruyucusu takın. Tipik ağırlıklı karekök ortalama ivme 2,5 m/s 2 den fazla değildir. Bu değerler EN60745 standardına göre elde edilmiştir. 77
21 ENGLISH For European countries only Noise and Vibration of Model 5903R The typical A-weighted noise levels are sound pressure level: 95 db (A) sound power level: 106 db (A) Uncertainty is 3 db (A). Wear ear protection. The typical weighted root mean square acceleration value is not more than 2.5 m/s 2. These values have been obtained according to FRANÇAISE Pour les pays d Europe uniquement Bruit et vibrations du modèle 5903R Les niveaux de bruit ponderes types A sont: niveau de pression sonore: 95 db (A) niveau de puissance du son: 106 db (A) L incertitude de mesure est de 3 db (A). Porter des protecteurs anti-bruit. L accélération pondérée ne dépasse pas Ces valeurs ont été obtenues selon DEUTSCH Nur für europäische Länder Geräusch- und Vibrationsentwicklung des Modells 5903R Die typischen A-bewerteten Geräuschpegel betragen: Schalldruckpegel: 95 db (A) Schalleistungspegel: 106 db (A) Die Abweichung beträgt 3 db (A). Gehörschutz tragen. Der gewichtete Effektivwert der Beschleunigung beträgt nicht mehr als Diese Werte wurden gemäß EN60745 erhalten. ITALIANO ENG005-2-V3 Modello per l Europa soltanto Rumore e vibrazione del modello 5903R I livelli del rumore pesati secondo la curva A sono: Livello pressione sonora: 95 db (A) Livello potenza sonora: 106 db (A) L incertezza è di 3 db (A). Indossare i paraorecchi. Il valore quadratico medio di accellerazione non supera i Questi valori sono stati ottenuti in conformità NEDERLANDS Alleen voor Europese landen Geluidsniveau en trilling van het model 5903R De typische A-gewogen geluidsniveau s zijn geluidsdrukniveau: 95 db (A) geluidsenergie-niveau: 106 db (A) Onzekerheid is 3 db (A). Draag oorbeschermers. De typische gewogen effectieve versnellingswaarde is niet meer dan Deze waarden werden verkregen in overeenstemming met ESPAÑOL Para países europeos solamente Ruido y vibración del modelo 5903R Los niveles típicos de ruido ponderados A son presión sonora: 95 db (A) nivel de potencia sonora: 106 db (A) Incerteza 3 db (A). Póngase protectores en los oídos. El valor ponderado de la aceleración no sobrepasa los Estos valores han sido obtenidos de acuerdo con 78
DB
 GB Belt Sander Instruction Manual F Ponceuse à bande Manuel d instructions D Bandschleifer Betriebsanleitung I Levigatrice a nastro Istruzioni per l uso NL Bandschuurmachine Gebruiksaanwijzing E Lijadora
GB Drill Instruction Manual Perceuse Manuel d instructions Bohrmaschine Betriebsanleitung
 GB Drill Instruction Manual F Perceuse Manuel d instructions D Bohrmaschine Betriebsanleitung I Trapano Istruzioni per l uso NL Boormachine Gebruiksaanwijzing E Taladro Manual de instrucciones P Berbequim
GB Nibbler Instruction Manual Grignoteuse Manuel d Instructions Knabber Betriebsanleitung
 GB Nibbler Instruction Manual F Grignoteuse Manuel d Instructions D Knabber Betriebsanleitung I Roditrice Istruzioni d Uso NL Knabbelschaar Gebruiksaanwijzing E Roedora Manual de Instrucciones P Roedora
GB Cordless Percussion-Driver Drill Instruction Manual Perceuse percussion-visseuse sans fil Manuel d instructions
 GB Cordless Percussion-Driver Drill Instruction Manual F Perceuse percussion-visseuse sans fil Manuel d instructions D Akku-Schlagbohrschrauber Betriebsanleitung I Trapano avvitatore percussione a batteria
GB Nibbler Instruction Manual Grignoteuse Manuel d instructions Knabber Betriebsanleitung
 GB Nibbler Instruction Manual F Grignoteuse Manuel d instructions D Knabber Betriebsanleitung I Roditrice Istruzioni per l uso NL Knabbelschaar Gebruiksaanwijzing E Roedora Manual de instrucciones P Nibbler
GB Shear Instruction Manual Cisaille Manuel d Instructions Blechschere Betriebsanleitung Cesoia Istruzioni d Uso NL Plaatschaar Gebruiksaanwijzing
 GB Shear Instruction Manual F Cisaille Manuel d Instructions D Blechschere Betriebsanleitung I Cesoia Istruzioni d Uso NL Plaatschaar Gebruiksaanwijzing E Tijera Electrica Manual de Instrucciones P Tesoura
GB Impact Driver Instruction Manual F Tournevis à chocs Manuel d instructions D Schlagschrauber Betriebsanleitung I Avvitatore ad impulso Istruzioni
 GB Impact Driver Instruction Manual F Tournevis à chocs Manuel d instructions D Schlagschrauber Betriebsanleitung I Avvitatore ad impulso Istruzioni per l uso NL Slagschroevedraaier Gebruiksaanwijzing
GB Drywall Screwdriver Instruction Manual F Visseuse Manuel d instructions D Schrauber Betriebsanleitung I Avvitatrice per Muri a Secco Istruzioni
 GB Drywall Screwdriver Instruction Manual F Visseuse Manuel d instructions D Schrauber Betriebsanleitung I Avvitatrice per Muri a Secco Istruzioni per l uso NL Drywall schroevendraaier Gebruiksaanwijzing
GB Belt Sander Instruction Manual F Ponceuse à bande Manuel d instructions D Bandschleifer Betriebsanleitung I Levigatrice a nastro Istruzioni per l
 GB Belt Sander Instruction Manual F Ponceuse à bande Manuel d instructions D Bandschleifer Betriebsanleitung I Levigatrice a nastro Istruzioni per l uso NL Stripschuurmachine Gebruiksaanwijzing E Lijadora
GB Finishing Sander Instruction Manual F Ponceuse orbitale Manuel d instructions D Schwingschleifer Betriebsanleitung I Levigatrice orbitale
 GB Finishing Sander Instruction Manual F Ponceuse orbitale Manuel d instructions D Schwingschleifer Betriebsanleitung I Levigatrice orbitale Istruzioni per l uso NL Vlakschuurmachine Gebruiksaanwijzing
GB Circular Saw Instruction Manual Scie circulaire Manuel d instructions Handkreissäge Betriebsanleitung
 GB Circular Saw Instruction Manual F Scie circulaire Manuel d instructions D Handkreissäge Betriebsanleitung I Sega circolare Istruzioni per l uso NL Cirkelzaagmachine Gebruiksaanwijzing E Sierra circular
HR4001C HR4010C HR4011C
 GB Rotary Hammer Instruction Manual F Perforateur Manuel d instructions D Bohrhammer Betriebsanleitung I Martello rotativo Istruzioni per l uso NL Boorhamer Gebruiksaanwijzing E Martillo rotativo Manual
Παλινδροµικ πρι νι Οδηγίες χρήσης
 GB Resipro Saw Instruction manual F Scie recipro Manuel d instructions D Reciprosäge Betriebsanleitung I Seghetto diritto Istruzioni per l uso NL Reciprozaag Gebruiksaanwijzing E Sierra de sable Manual
GB Power Scraper Instruction Manual Burineur Manuel d Instructions Kratzer Betriebsanleitung
 GB Power Scraper Instruction Manual F Burineur Manuel d Instructions D Kratzer Betriebsanleitung I Scalpellatore Istruzioni d Uso NL Bikhamer Gebruiksaanwijzing E Raspadora Manual de Instrucciones P Hartelo
GB Drywall Screwdriver Instruction Manual Visseuse Manuel d instructions Schrauber Betriebsanleitung
 GB Drywall Screwdriver Instruction Manual F Visseuse Manuel d instructions D Schrauber Betriebsanleitung I Avvitatrice per Muri a Secco Istruzioni per l uso NL Drywall schroevendraaier Gebruiksaanwijzing
2000 Volkswagen Passat GLS
 REAR DOOR WINDOW Rear door window, assembly overview Fig. 304: Exploded View Of Rear Door Window 1 - Door Removing and installing: --> Rear door, removing and installing 2 - Spring nut Qty 2 3 - Screw
GB Drywall Screwdriver Instruction Manual F Visseuse Manuel d instructions D Schrauber Betriebsanleitung I Avvitatrice per muri a secco Istruzioni
 GB Drywall Screwdriver Instruction Manual F Visseuse Manuel d instructions D Schrauber Betriebsanleitung I Avvitatrice per muri a secco Istruzioni per l uso NL Drywall schroevendraaier Gebruiksaanwijzing
6207D 6217D 6317D 6337D 6347D
 GB Cordless Driver Drill Instruction Manual F Perceuse-visseuse sans fil Manuel d instructions D Akku-Bohrschrauber Betriebsanleitung I Trapano-avvitatore a batteria Istruzioni per l uso NL Snoerloze boor-schroevedraaier
Flybye. Ernst Koning, Montagehandleiding / Instruction manual
 Flybye Ernst Koning, 2018 Montagehandleiding / Instruction manual GELEVERD MATERIAAL / MATERIALS SUPPLIED A. B. C. D. E. F. G. A. B. C. D. E. F. G. H. H. lichtbuis / lighting tube plafondkap / ceiling
GB Orbital Sander Instruction Manual F Ponceuse orbitale Manuel d instructions D Schwingschleifer Betriebsanleitung I Levigatrice orbitale Istruzioni
 GB Orbital Sander Instruction Manual F Ponceuse orbitale Manuel d instructions D Schwingschleifer Betriebsanleitung I Levigatrice orbitale Istruzioni per l uso NL Vlakschuurmachine Gebruiksaanwijzing E
GB Cordless Circular Saw Instruction Manual Scie circulaire sans fil Manuel d instructions Akku-Handkreissäge Betriebsanleitung
 GB Cordless Circular Saw Instruction Manual F Scie circulaire sans fil Manuel d instructions D Akku-Handkreissäge Betriebsanleitung I Sega circolare a batteria Istruzioni per l uso NL Accu cirkelzaag Gebruiksaanwijzing
GB Rotary Hammer Instruction Manual Marteau perforateur Manuel d instructions Bohrhammer Betriebsanleitung
 GB Rotary Hammer Instruction Manual F Marteau perforateur Manuel d instructions D Bohrhammer Betriebsanleitung I Martello rotativo Istruzioni d uso NL Boorhamer Gebruiksaanwijzing E Martillo rotativo Manual
GB Screwdriver Instruction Manual Visseuse Manuel d instructions Schrauber Betriebsanleitung
 GB Screwdriver Instruction Manual F Visseuse Manuel d instructions D Schrauber Betriebsanleitung I Avvitatrice Istruzioni per l uso NL Schroevedraaier Gebruiksaanwijzing E Atornillador Manual de instrucciones
Rhythm of Light. Susanne de Graef, Montagehandleiding / Instruction manual
 Rhythm of Light Susanne de Graef, 2016 Montagehandleiding / Instruction manual GELEVERD MATERIAAL / SUPPLIED MATERIAL B. C. D. A. E. F. A. B. C. D. E. F. armatuur / fixture fitting lange staalkabels (3)
2006 Volkswagen Jetta TDI
 Door handle and door lock, assembly overview The illustration shows the left side. The right side is derived accordingly from this. Fig. 99: Door Handle And Door Lock, Assembly Overview 1 - Cable For disengaging
Dustless Cutter Instruction Manual Scie Diamanté Manuel d Instructions Diamantschneider Betriebsanleitung
 GB Dustless Cutter Instruction Manual F Scie Diamanté Manuel d Instructions D Diamantschneider Betriebsanleitung I Troncatrice con Aspirapolvere Istruzioni d Uso NL Diamant zaag droog Gebruiksaanwijzing
NEDERLANDS. Plaatselijke telefoonnummers voor de klantendienst kunt u vinden op: G-01 rev.
 For the latest User Installation Guide please visit: www.ergotron.com User's Guide - English Guía del usuario - Español Manuel de l utilisateur - Français Gebruikersgids - Deutsch Benutzerhandbuch - Nederlands
GB Filing Sander Instruction Manual F Ponceuse à lime Manuel d instructions D Elektronikfeile Betriebsanleitung I Levigatrice a nastro Istruzioni per
 GB Filing Sander Instruction Manual F Ponceuse à lime Manuel d instructions D Elektronikfeile Betriebsanleitung I Levigatrice a nastro Istruzioni per l uso NL Strip schuurmachine Gebruiksaanwijzing E Lijadora
GB Cordless Angle Grinder Instruction Manual Meuleuse d angle sans fil Manuel d instructions Akku-Winkelschleifer Betriebsanleitung
 GB Cordless Angle Grinder Instruction Manual F Meuleuse d angle sans fil Manuel d instructions D Akku-Winkelschleifer Betriebsanleitung I Smerigliatrice angolare a batteria Istruzioni per l uso NL Accu
GB Belt Sander Instruction Manual F Ponceuse à bande Manuel d instructions D Bandschleifer Betriebsanleitung I Levigatrice a nastro Istruzioni per l
 GB Belt Sander Instruction Manual F Ponceuse à bande Manuel d instructions D Bandschleifer Betriebsanleitung I Levigatrice a nastro Istruzioni per l uso NL Bandschuurmachine Gebruiksaanwijzing E Lijadora
GB Rotary Hammer Instruction Manual Perforateur Manuel d instructions Bohrhammer Betriebsanleitung
 GB Rotary Hammer Instruction Manual F Perforateur Manuel d instructions D Bohrhammer Betriebsanleitung I Martello rotativo Istruzioni per l uso NL Boorhamer Gebruiksaanwijzing E Martillo ligero Manual
Verklaring van Conformite
 Verklaring van Conformite Wij, ondergetekende, Adres certificeert en verklaart onder eigen verantwoordelijkheid dat het volgende product Omschrijving Merk Identificatie In overeenstemming is met de essentiële
Verklaring van Conformite
 Verklaring van Conformite Wij, ondergetekende, Digital Data Communications GmbH Adres certificeert en verklaart onder eigen verantwoordelijkheid dat het volgende product Omschrijving Ethernet converter
Shear Instruction Manual Cisaille Manuel d Instructions Blechschere Betriebsanleitung Cesoia Istruzioni d Uso NL Plaatschaar Gebruiksaanwijzing
 GB Shear Instruction Manual F Cisaille Manuel d Instructions D Blechschere Betriebsanleitung I Cesoia Istruzioni d Uso NL Plaatschaar Gebruiksaanwijzing E Tijera Electrica Manual de Instrucciones P Tesoura
GB Impact Wrench Instruction Manual Boulonneuse à chocs Manuel d instructions Schlagschrauber Betriebsanleitung
 GB Impact Wrench Instruction Manual F Boulonneuse à chocs Manuel d instructions D Schlagschrauber Betriebsanleitung I Avvitatrice ad impulso Istruzioni per l uso NL Slagmoersleutel Gebruiksaanwijzing E
Limpid Light. design Esther Jongsma & Sam van Gurp, Montagehandleiding / Assembly Instructions
 Limpid Light design Esther Jongsma & Sam van Gurp, 05 Montagehandleiding / Assembly Instructions GELEVERD MATERIAAL / SUPPLIED MATERIAL A. A. B. B. C. D. E. F. G. G. H. I. J. K. / / ophanging / suspension:
HS6100 HS6101 HS7100 HS7101
 GB Circular Saw Instruction Manual F Scie Circulaire Manuel d instructions D Handkreissäge Betriebsanleitung I Sega circolare Istruzioni per l uso NL Cirkelzaagmachine Gebruiksaanwijzing E Sierra Circular
MONTAGE INSTRUCTIE ASSEMBLY INSTRUCTION
 MONTAGE INSTRUCTIE ASSEMBLY INSTRUCTION - 1. Waterpas stellen. De groef aan de zijkant van de beschermdeksel moet gelijk staan met de deellijn van het inbouw box. 2. Zet de inbouw box vast in de muur.
Quality requirements concerning the packaging of oak lumber of Houthandel Wijers vof (09.09.14)
") Quality requirements concerning the packaging of oak lumber of (09.09.14) Content: 1. Requirements on sticks 2. Requirements on placing sticks 3. Requirements on construction pallets 4. Stick length and
Quality requirements concerning the packaging of oak lumber of (09.09.14) Content: 1. Requirements on sticks 2. Requirements on placing sticks 3. Requirements on construction pallets 4. Stick length and
Verklaring van Conformite
 Verklaring van Conformite Wij, ondergetekende, Digital Data Communications GmbH Adres certificeert en verklaart onder eigen verantwoordelijkheid dat het volgende product Omschrijving Print Server Merk
1/8 ATLAS Atlas cabinet cabinet 1 7
 TLS cabinet / / / 0 D E F G H / L x Lx x L / x x D E Dx Ex / x x x x x x Fx x Hx Gx Fx Fx Fx Fx G H G H H G 0 0 0 0 0 / L / 0 NL: Deze kast bevat twee gaten aan de achterkant om aan de wand te kunnen bevestigen.
ATD Floor Fan Owner s Manual Features:
 ATD-30320 20 Floor Fan Owner s Manual Features: Made in China to ATD Tools, Inc. Specifications Visit us at www.atdtools.com General Safety Warnings: WARNING: The in and warnings ned in this manual d be
GB Impact Wrench Instruction Manual F Boulonneuse à chocs Manuel d instructions D Schlagschrauber Betriebsanleitung I Avvitatrice ad impulso
 GB Impact Wrench Instruction Manual F Boulonneuse à chocs Manuel d instructions D Schlagschrauber Betriebsanleitung I Avvitatrice ad impulso Istruzioni per l uso NL Slagmoersleutel Gebruiksaanwijzing E
GB Belt Sander Instruction Manual F Ponceuse à bande Manuel d instructions D Bandschleifer Betriebsanleitung I Levigatrice a nastro Istruzioni per l
 GB Belt Sander Instruction Manual F Ponceuse à bande Manuel d instructions D Bandschleifer Betriebsanleitung I Levigatrice a nastro Istruzioni per l uso NL Bandschuurmachine Gebruiksaanwijzing E Lijadora
165 mm 5603R 190 mm 5705R 235 mm 5903R
 GB Circular Saw Instruction Manual F Scie circulaire Manuel d instructions D Handkreissäge Betriebsanleitung I Sega circolare Istruzioni d uso NL Cirkelzaagmachine Gebruiksaanwijzing E Sierra circular
Function checklist for the ML-350 or XL-350 with a print set. Missing loop.
 Function checklist for the ML-350 or XL-350 with a 260217 print set. Below mentioned check-point should resolve function problems of the lift systems. Missing loop. When a lift is connected to an external
GB Cordless High Speed Drill Instruction Manual Perceuse à haute vitesse sans fil Manuel d instructions
 GB Cordless High Speed Drill Instruction Manual F Perceuse à haute vitesse sans fil Manuel d instructions D Akku-hochgeschwindigkeits-bohrmaschine Betriebsanleitung I Trapano ad alta velocità Istruzioni
GB Cordless Angle Socket Driver Instruction Manual Clé d Angle sans fil Manuel d instructions Akku-Winkelschrauber Betriebsanleitung
 GB Cordless Angle Socket Driver Instruction Manual F Clé d Angle sans fil Manuel d instructions D Akku-Winkelschrauber Betriebsanleitung I Avvitatore angolare a batteria Istruzioni per l uso NL Accu haakse
GB Battery-Powered Pruning Shears Instruction Manual Sécateur à batterie Manuel d instructions Akku-Astschere Betriebsanleitung
 GB Battery-Powered Pruning Shears Instruction Manual F Sécateur à batterie Manuel d instructions D Akku-Astschere Betriebsanleitung I Forbici per potate a batteria Istruzioni d uso NL Accu-snoeischaar
OUTDOOR HD BULLET IP CAMERA PRODUCT MANUAL
 OUTDOOR HD BULLET IP CAMERA PRODUCT MANUAL GB - NL GB PARTS & FUNCTIONS 1. 7. ---- 3. ---- 4. ---------- 6. 5. 2. ---- 1. Outdoor IP camera unit 2. Antenna 3. Mounting bracket 4. Network connection 5.
Dagelijkse checklist Daily checklist
 Dagelijkse checklist Daily checklist Sluiting met snelspanner Verstelbare hoofdsteun Verstelbare en aanpasbare riem Verstelbare voetsteunen Verstelbare riemen van de voetsteun Quick release locked Head
FSW-VW-2X2 FSW-VW. Handleiding / Manual
 FSW-VW-2X2 FSW-VW Handleiding / Manual Rev. 1.0 17-03-2014 I Pakketinhoud / Content Accessoires Benodigde gereedschappen / Required Tools Montage / Assembling Onderhoud / Maintenance Veel Gestelde Vragen
GB Recipro Saw Instruction Manual Scie recipro Manuel d instructions Reciprosäge Betriebsanleitung
 GB Recipro Saw Instruction Manual F Scie recipro Manuel d instructions D Reciprosäge Betriebsanleitung I Seghetto diritto Istruzioni per l uso NL Reciprozaag Gebruiksaanwijzing E Sierra alternativa Manual
DSS500 DSS501. GR Φορητό δισκοπρίονο Οδηγίες χρήσης
 GB Cordless Circular Saw Instruction manual F Scie circulaire sans fil Manuel d instructions D Akku-Kreissäge Betriebsanleitung I Sega circolare a batteria Istruzioni per l uso NL Accucirkelzaag Gebruiksaanwijzing
PANEELRADIATOR - Type PR Handleiding. PANEL RADIATOR - Type PR Manual
 Fax. +31 (0)227-549 150 Website: www.sinusjevi.com PANEELRADIATOR - Type PR Handleiding PANEL RADIATOR - Type PR Manual Page 2 of 8 Page 3 of 8 Technische informatie Spanning: 230 of 400 Volt Vermogen:
OUTDOOR HD DOME IP CAMERA PRODUCT MANUAL GB - NL
 OUTDOOR HD DOME IP CAMERA PRODUCT MANUAL GB - NL GB PARTS & FUNCTIONS 2. ---- 1. ---- 3. ---- 7. ---------- 5. 4. 6. 1. Outdoor IP camera unit 2. Antenna 3. Mounting bracket 4. Network connection 5. Power
Mobile concrete base
 1 14 Mobile concrete base UMBASM8000000000 Mobile concrete base UMBASM8000000000 Congratula ons with your purchase! Please completely read and follow all the instruc ons. pg. 3 Proficiat met uw aankoop!
Mounting ceiling & wall
 5 / profile 34 bending radius R 15*) (1015) R 20 (1015) R 30 (1015) R>80 (1018) filler position profile 26 bending radius filler position R 15*) (1015) R 25 (1015) R>100 (1018) 28 15 405 gr/m 522 gr/m
GB High Speed Drill Instruction Manual Perceuse à haute vitesse Manuel d instructions Hochgeschwindigkeits-Bohrmaschine Betriebsanleitung
 GB High Speed Drill Instruction Manual F Perceuse à haute vitesse Manuel d instructions D Hochgeschwindigkeits-Bohrmaschine Betriebsanleitung I Trapano ad alta velocità Istruzioni per l uso NL Boormachine
GB Random Orbit Sander Instruction Manual Ponceuse orbitale à disque Manuel d instructions Exzenterschleifer Betriebsanleitung
 GB Random Orbit Sander Instruction Manual F Ponceuse orbitale à disque Manuel d instructions D Exzenterschleifer Betriebsanleitung I Levigatrice rotorbitale Istruzioni per l uso NL Excenter schuurmachine
The upside down Louisa tutorial by Dorothée: Noortjeprullemie.blogspot.be Written for Compagnie M.: m.com
 The upside down Louisa tutorial by Dorothée: Noortjeprullemie.blogspot.be Written for Compagnie M.: www.compagnie- m.com Dorothée heeft een unieke Compagnie M. hack gemaakt: de Louisa op zijn kop. Als
GB Blower Instruction Manual Aspirateur Manuel d instructions Gebläse Betriebsanleitung
 GB Blower Instruction Manual F Aspirateur Manuel d instructions D Gebläse Betriebsanleitung I Soffiatrice-Aspiratore Istruzioni per l uso NL Blazer Gebruiksaanwijzing E Sopladora Aspiradora Manual de instrucciones
Montagehandleiding: doucheset
 Montagehandleiding: doucheset Installation manual: showerset 0 6 5 7 8 9 0 8 9 7 5 6 Controleer voor installatie of alle onderdelen aanwezig zijn. Check if all parts are present before installation. 5
PIR DC-SWITCH. DC Passive infra-red Detector. Model No. PDS-10 GEBRUIKSAANWIJZING/INSTRUCTION MANUAL
 PIR DC-SWITCH DC Passive infra-red Detector Model No. PDS-10 GEBRUIKSAANWIJZING/INSTRUCTION MANUAL Please read this manual before operating your DETECTOR PIR DC-Switch (PDS-10) De PDS-10 is een beweging
GB Cordless Cutter Instruction Manual Scie diamant sans fil Manuel d instructions Akku- Glas- und Fliesenschneider Betriebsanleitung
 GB Cordless Cutter Instruction Manual F Scie diamant sans fil Manuel d instructions D Akku- Glas- und Fliesenschneider Betriebsanleitung I Sega al diamante a batteria Istruzioni per l uso NL Accu tegel-
GB Finishing Sander Instruction Manual Ponceuse orbitale Manuel d instructions Schwingschleifer Betriebsanleitung
 GB Finishing Sander Instruction Manual F Ponceuse orbitale Manuel d instructions D Schwingschleifer Betriebsanleitung I Levigatrice orbitale Istruzioni per l uso NL Vlakschuurmachine Gebruiksaanwijzing
SPANBUSSEN RVS LOCKING DEVICES SS SPANNSÄTZE INOX MOYEUX DE SERRAGE INOX
 SPANBUSSEN RVS OCKING EVICES SS SPANNSÄTZE INOX MOYEUX E SERRAGE INOX KTN 10 KTN 30 KTN 40 KTN 61 KTN 80.7.1 SPANBUSMONTAGE OCKING EVICE MONTAGE SPANNSÄTZE MONTAGE MOYEUX E SERRAGE MONTAGE 1 2 3 4 5 dg
GB Cordless Impact Wrench Instruction Manual Boulonneuse sans fil Manuel d instructions Akku-Schlagschrauber Betriebsanleitung
 GB Cordless Impact Wrench Instruction Manual F Boulonneuse sans fil Manuel d instructions D Akku-Schlagschrauber Betriebsanleitung I Avvitatrice ad impulso a batteria Istruzioni per l uso NL Snoerloze
Procedure Reset tv-toestellen:
 Procedure Reset tv-toestellen: Volgende procedure is te volgen wanneer er een tv-toestel, op een van de kamers niet meer werkt. TV Re-installation Factory Default Her-installeren van de TV Fabrieksinstellingen
Συρόμενο σύνθετο φαλτσοπρίονο Οδηγίες χρήσης
 GB Slide Compound Miter Saw Instruction manual F Scie à onglet radiale Manuel d instructions D Kapp- und Gehrungssäge Betriebsanleitung I Troncatrice radiale per legno Istruzioni per l uso NL Schuifbare
BSS610 BSS611. DK Ledningsfri rundsav Brugsanvisning
 GB Cordless Circular Saw Instruction manual F Scie circulaire sans fil Manuel d instructions D Akku-Kreissäge Betriebsanleitung I Sega circolare a batteria Istruzioni per l uso NL Accucirkelzaag Gebruiksaanwijzing
HANDLEIDING - ACTIEVE MOTORKRAAN
 M A N U A L HANDLEIDING - ACTIEVE MOTORKRAAN MANUAL - ACTIVE MOTOR VALVE Model E710877 E710878 E710856 E710972 E710973 www.tasseron.nl Inhoud / Content NEDERLANDS Hoofdstuk Pagina NL 1 ALGEMEEN 2 NL 1.1
Exalto wiper motor / wissermotor
 Exalto wiper motor / wissermotor Type: 215BD Cat. nos. 2151225/50/75 (12V) / 2152425/50/75 (24V) Quality Marine Equipment ! Contents 1 Dimensions and electrical scheme... 3 2 Adjusting the wiper arc....
Alistair LED stairwell luminaire Handleiding Alistair (Emergency UC03 sensor)
") Alistair LED stairwell luminaire Handleiding Alistair (Emergency UC03 sensor) Let op: Als het flexibele draad van dit licht beschadigd is, dient het te worden vervangen door iemand van de technische service,
Alistair LED stairwell luminaire Handleiding Alistair (Emergency UC03 sensor) Let op: Als het flexibele draad van dit licht beschadigd is, dient het te worden vervangen door iemand van de technische service,
L.Net s88sd16-n aansluitingen en programmering.
 De L.Net s88sd16-n wordt via één van de L.Net aansluitingen aangesloten op de LocoNet aansluiting van de centrale, bij een Intellibox of Twin-Center is dat de LocoNet-T aansluiting. L.Net s88sd16-n aansluitingen
GB Rotary Hammer Instruction Manual F Marteau perforateur Manuel d instructions D Bohrhammer Betriebsanleitung I Martello rotativo Istruzioni per l
 GB Rotary Hammer Instruction Manual F Marteau perforateur Manuel d instructions D Bohrhammer Betriebsanleitung I Martello rotativo Istruzioni per l uso NL Boor-en breekhamer Gebruiksaanwijzing E Martillo
F Scie à métal Manuel d instructions D Metallkreissäge Betriebsanleitung I Troncatrice per metallo Istruzioni per l uso
 GB Metal Cutter Instruction Manual F Scie à métal Manuel d instructions D Metallkreissäge Betriebsanleitung I Troncatrice per metallo Istruzioni per l uso NL Metaalzaag Gebruiksaanwijzing E Cortador de
GB Cordless Jig Saw Instruction Manual Scie sauteuse sans fil Manuel d instructions Akku-Stichsäge Betriebsanleitung
 GB Cordless Jig Saw Instruction Manual F Scie sauteuse sans fil Manuel d instructions D Akku-Stichsäge Betriebsanleitung I Seghetto alternativo a batteria Istruzioni per l uso NL Snoerloze figuurzaag Gebruiksaanwijzing
Verstekzaagmachine Elu/DeWALT 230 V
 Verstekzaagmachine Elu/DeWALT 230 V Code: 700002 Veiligheidssymbolen: Fabricaat/merk: Type: Elu/DeWALT TGS 3 / DW 743 (N) Toepassing Zagen van hout, aluminium en kunststof. Veiligheidsvoorschriften Lees
180 mm 9067/9067S/9067L/9067H 9067F/9067SF 230 mm 9069/9069S/9069H 9069F/9069SF
 GB Angle Grinder Instruction Manual F Meuleuse d angle Manuel d instructions D Winkelschleifer Betriebsanleitung I Smerigliatrice angolare Istruzioni per l uso NL Haakse slijpmachine Gebruiksaanwijzing
Montagehandleiding servo drive / Assembly instructions servo drive
 Bodemmontage houder transfo / Floor mounting transformer 1. Communicatiekabel / Communication cable 2. Draagprofielkabel / Bracket profile cable 3. Verdeelkabel / Distribution cable 4. Stroomkabel / Power
GB Cordless Impact Wrench Instruction Manual Boulonneuse sans fil Manuel d instructions Akku-Schlagschrauber Betriebsanleitung
 GB Cordless Impact Wrench Instruction Manual F Boulonneuse sans fil Manuel d instructions D Akku-Schlagschrauber Betriebsanleitung I Avvitatrice ad impulso a batteria Istruzioni per l uso NL Snoerloze
GB 2-speed drill Instruction Manual F 2 vitesses perceuse Manuel d instructions D 2-Gang Bohrmaschine Betriebsanleitung I 2 velocità trapano
 GB 2-speed drill Instruction Manual F 2 vitesses perceuse Manuel d instructions D 2-Gang Bohrmaschine Betriebsanleitung I 2 velocità trapano Istruzioni per l uso NL 2 snelheden boormachine Gebruiksaanwijzing
Quick start guide. Powerbank MI Mah. Follow Fast All rights reserved. Page 1
 Quick start guide Powerbank MI 16.000 Mah Follow Fast 2016 - All rights reserved. Page 1 ENGLISH The Mi 16000 Power Bank is a very good backup option for those on the move. It can keep you going for days
GB Cordless Power Planer Instruction Manual Rabot électrique sans fil Manuel d instructions Akku-Hobel Betriebsanleitung
 GB Cordless Power Planer Instruction Manual F Rabot électrique sans fil Manuel d instructions D Akku-Hobel Betriebsanleitung I Piallatrice a batteria Istruzioni per l uso NL Accu-schaaf Gebruiksaanwijzing
256 kb Memory in NMS 8250, 8255 and 8280
 256 kb Memory in NMS 8250, 8255 and 8280 Supplied by Bastiaan Huber, 2001 Converted to PDF by HansO, 2001 Dutch text follows the english text! MEMORY-UPGRADE to 256Kb This description is only for people
GB Angle Sander Instruction Manual Ponceuse angulaire Manuel d instructions Winkelschleifer Betriebsanleitung
 GB Angle Sander Instruction Manual F Ponceuse angulaire Manuel d instructions D Winkelschleifer Betriebsanleitung I Smerigliatrice angolare Istruzioni per l uso NL Haakse schuurmachine Gebruiksaanwijzing
GB Wall Chaser Instruction Manual Rainureuse à béton Manuel d instructions Mauernutfräse Betriebsanleitung
 GB Wall Chaser Instruction Manual F Rainureuse à béton Manuel d instructions D Mauernutfräse Betriebsanleitung I Scanalatore 125 mm Istruzioni per l uso NL 125 mm Sleuvenzaag Gebruiksaanwijzing E Ranuradora
User manual Gebruikershandleiding. Version 1.0 March
 User Manual Hotel Safe GB NL User manual Gebruikershandleiding 1 User Manual Overview LED display Override key cover * button # button General Thank you for choosing a SafetyFirst Hotel Safe. Before operating
NEDERLANDS. Display Instructies. Knoppen. Geeft afwisselend Tijd, Datum en Temperatuur weer, kan ook ingesteld worden op enkel tijd
 NEDERLANDS Het ziet eruit als een simpel blokje hout, maar maak een geluid (knip met je vingers, kuch, klap in je handen, of tip op de bovenkant) en het geeft onmiddelijk en afwisselend tijd, datum en
GB Cordless Driver Drill Instruction Manual Perceuse-visseuse sans fil Manuel d instructions Akku-Bohrschrauber Betriebsanleitung
 GB Cordless Driver Drill Instruction Manual F Perceuse-visseuse sans fil Manuel d instructions D Akku-Bohrschrauber Betriebsanleitung I Trapano-avvitatore a batteria Istruzioni per l uso NL Snoerloze boor-/schroevendraaier
GB Random Orbit Sander Instruction Manual Ponceuse orbitale à disque Manuel d instructions Exzenterschleifer Betriebsanleitung
 GB Random Orbit Sander Instruction Manual F Ponceuse orbitale à disque Manuel d instructions D Exzenterschleifer Betriebsanleitung I Levigatrice rotorbitale Istruzioni per l uso NL Excenter schuurmachine
6835D. Manual de instruções. Brugsanvisning. Bruksanvisning. Bruksanvisning
 GB Cordless Auto Feed Screwdriver Instruction Manual F Visseuse automatique sans fil Manuel d instructions D Akku-Schnellbau-Magazin-Schrauber Betriebsanleitung I Avvitatore autoalimentato a batteria Istruzioni
Αναδευτήρας Οδηγίες χρήσης
 GB Power Mixer Instruction manual F Mélangeur électrique Manuel d instructions D Rührgerät Betriebsanleitung I Miscelatore elettrico Istruzioni per l uso NL Elektrische menger Gebruiksaanwijzing E Mezcladora
GB Cordless Impact Wrench Instruction Manual Boulonneuse sans fil Manuel d instructions Akku-Schlagschrauber Betriebsanleitung
 GB Cordless Impact Wrench Instruction Manual F Boulonneuse sans fil Manuel d instructions D Akku-Schlagschrauber Betriebsanleitung I Avvitatrice ad impulso a batteria Istruzioni per l uso NL Snoerloze
Alistair LED stairwell luminaire Handleiding Alistair (UC03 sensor)
") Alistair LED stairwell luminaire Handleiding Alistair (UC03 sensor) Let op: Als het flexibele draad van dit licht beschadigd is, dient het te worden vervangen door iemand van de technische service, of
Alistair LED stairwell luminaire Handleiding Alistair (UC03 sensor) Let op: Als het flexibele draad van dit licht beschadigd is, dient het te worden vervangen door iemand van de technische service, of
EU Declaration of Conformity and safety instructions EU Conformiteitsverklaring en veiligheidsinstructies ISC 230B
 EU Declaration of Conformity and safety instructions EU Conformiteitsverklaring en veiligheidsinstructies ISC 230B Explosion safety instructions (Ex) (EN) ISC230B is approved for use outside the explosion-hazardous
EU Declaration of Conformity and safety instructions EU Conformiteitsverklaring en veiligheidsinstructies
 EU Declaration of Conformity and safety instructions EU Conformiteitsverklaring en veiligheidsinstructies Battery operated UNICOM 300 N51 UNICOM 300 met batterijvoeding N51 Explosion safety instructions
GB Cordless Impact Wrench Instruction Manual Boulonneuse sans fil Manuel d instructions Akku-schlagschrauber Betriebsanleitung
 GB Cordless Impact Wrench Instruction Manual F Boulonneuse sans fil Manuel d instructions D Akku-schlagschrauber Betriebsanleitung I Avvitatrice ad impulso a batteria Istruzioni per l uso NL Snoerloze
liniled Cast Joint liniled Gietmof liniled Castjoint
 liniled Cast Joint liniled Gietmof liniled is een hoogwaardige, flexibele LED strip. Deze flexibiliteit zorgt voor een zeer brede toepasbaarheid. liniled kan zowel binnen als buiten in functionele en decoratieve