GB Cordless Jig Saw Instruction Manual Scie sauteuse sans fil Manuel d instructions Akku-Stichsäge Betriebsanleitung
|
|
|
- Frederik van Dongen
- 8 jaren geleden
- Aantal bezoeken:
Transcriptie
1 GB Cordless Jig Saw Instruction Manual F Scie sauteuse sans fil Manuel d instructions D Akku-Stichsäge Betriebsanleitung I Seghetto alternativo a batteria Istruzioni per l uso NL Snoerloze figuurzaag Gebruiksaanwijzing E Sierra de cacadora a batería Manual de instrucciones P Serra de vaivém a bateria Manual de instruções DK Akku-pendulstiksav Brugsanvisning S Sladdlös sticksåg Bruksanvisning N Batteridrevet løvsag Bruksanvisning SF Akkukäyttöinen kuviosaha Käyttöohje GR Ασύρµατο παλινδροµικό πριόνι Οδηγίες χρήσεως 4334D

2

3 (1) (4) (2) (3) (5) (6) 24 (1)
 24 (1) 23 18 15 16")
4 (4) (2) (5) 18 (3) (6)

5 25 26 (1) (4) (2) 18 (3) (5) (4) (6)
 19 20 (6) 31")
6 (7)
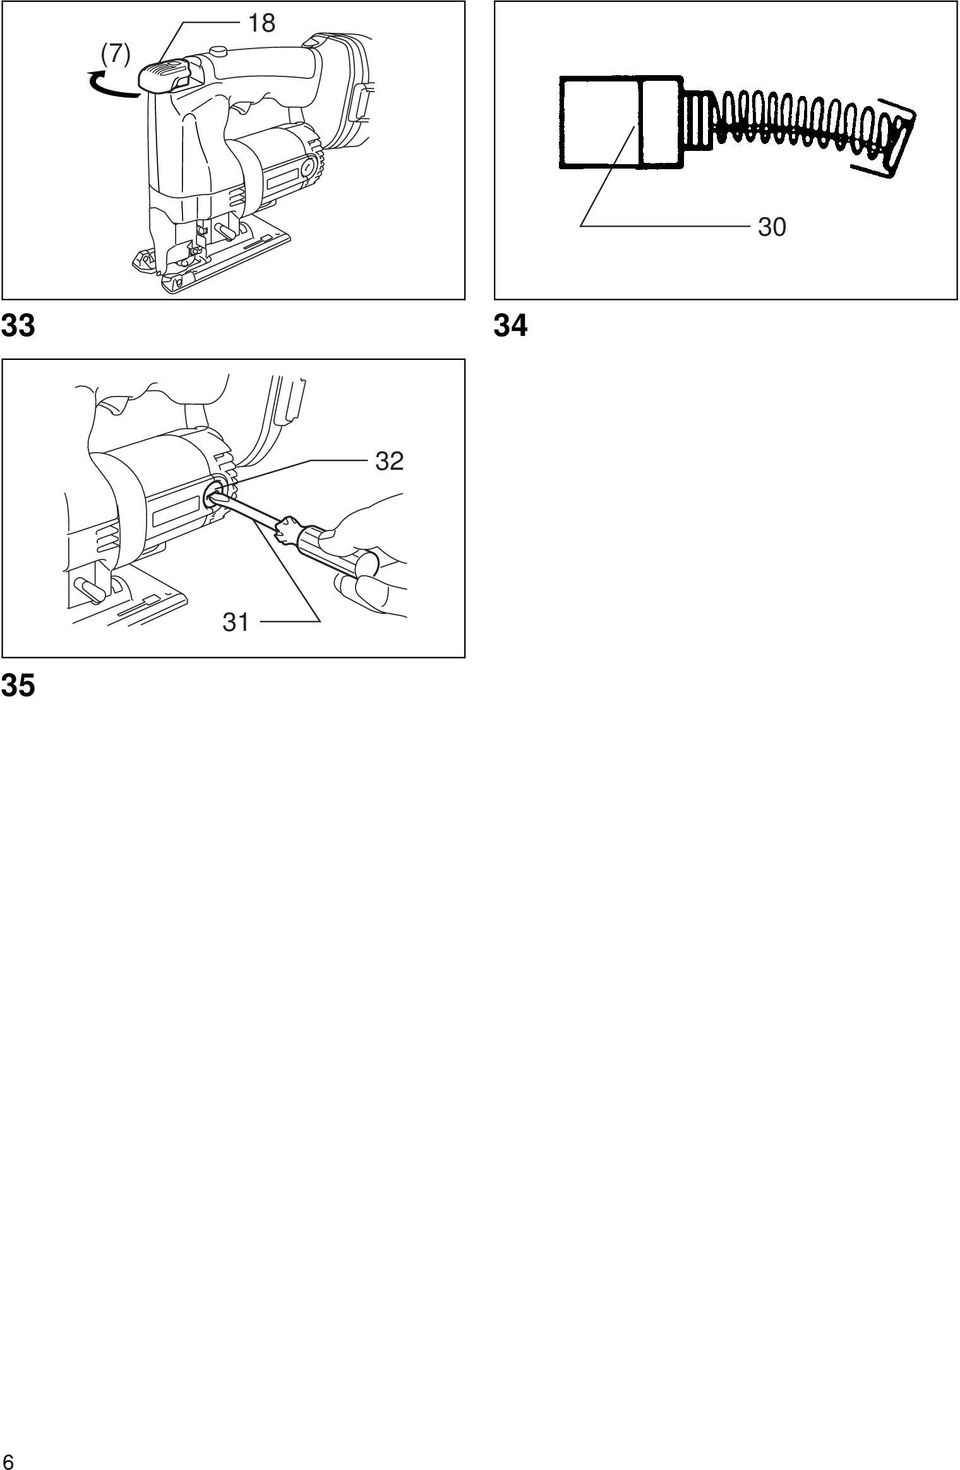
7 ENGLISH 1 Button 2 Battery cartridge 3 Lever 4 Lock-off button 5 Switch trigger 6 Speed adjusting dial 7 Base 8 Anti-splintering device 9 Screw 10 Plastic base plate 11 Hex wrench Explanation of general view 12 Bolt 13 Guide rule 14 Threaded knob 15 Circular guide 16 Pin 17 Vacuum head 18 Blade installing lever 19 Blade holder 20 Clamp 21 Roller 22 Slot 23 Blade 24 Hold blade against blade holder 25 Cutting line 26 Base securing lever 27 Dent mark 28 Slot 29 Graduations 30 Limit mark 31 Screwdriver 32 Brush holder cap SPECIFICATIONS Model 4334D Length of stroke mm Max. cutting capacities Wood mm Mild steel mm Aluminum mm Strokes per minute ,800 Overall length mm Net weight kg Rated voltage...d.c. 18 V Due to our continuing program of research and development, the specifications herein are subject to change without notice. Note: Specifications may differ from country to country. Intended use As a result of the extensive accessory and saw blade program, the tool can be used for many purposes and is very well suited for curved or circular cuts. Safety hints For your own safety, please refer to the enclosed safety instructions. IMPORTANT SAFETY INSTRUCTIONS FOR CHARGER & BATTERY CARTRIDGE ENC Before using battery cartridge, read all instructions and cautionary markings on (1) battery charger, (2) battery, and (3) product using battery. 2. Do not disassemble battery cartridge. 3. If operating time has become excessively shorter, stop operating immediately. It may result in a risk of overheating, possible burns and even an explosion. 4. If electrolyte gets into your eyes, rinse them out with clear water and seek medical attention right away. It may result in loss of your eyesight. 5. Always cover the battery terminals with the battery cover when the battery cartridge is not used. 6. Do not short the battery cartridge: (1) Do not touch the terminals with any conductive material. (2) Avoid storing battery cartridge in a container with other metal objects such as nails, coins, etc. (3) Do not expose battery cartridge to water or rain. A battery short can cause a large current flow, overheating, possible burns and even a breakdown. 7. Do not store the tool and battery cartridge in locations where the temperature may reach or exceed 50 C (122 F). 8. Do not incinerate the battery cartridge even if it is severely damaged or is completely worn out. The battery cartridge can explode in a fire. 9. Be careful not to drop or strike battery. SAVE THESE INSTRUCTIONS. Tips for maintaining maximum battery life 1. Charge the battery cartridge before completely discharged. Always stop tool operation and charge the battery cartridge when you notice less tool power. 2. Never recharge a fully charged battery cartridge. Overcharging shortens the battery service life. 3. Charge the battery cartridge with room temperature at 10 C 40 C (50 F 104 F). Let a hot battery cartridge cool down before charging it. 4. Charge the Nickel Metal Hydride battery cartridge when you do not use it for more than six months. SPECIFIC SAFETY RULES GEB016-1 DO NOT let comfort or familiarity with product (gained from repeated use) replace strict adherence to jig saw safety rules. If you use this tool unsafely or incorrectly, you can suffer serious personal injury. 1. Hold power tools by insulated gripping surfaces when performing an operation where the cutting tool may contact hidden wiring or its own cord. Contact with a "live" wire will make exposed metal parts of the tool "live" and shock the operator. 2. Use clamps or another practical way to secure and support the workpiece to a stable platform. Holding the work by hand or against your body leaves it unstable and may lead to loss of control. 7

8 3. Always use safety glasses or goggles. Ordinary eye or sun glasses are NOT safety glasses. 4. Avoid cutting nails. Inspect workpiece for any nails and remove them before operation. 5. Do not cut oversize workpiece. 6. Check for the proper clearance beyond the workpiece before cutting so that the blade will not strike the floor, workbench, etc. 7. Hold the tool firmly. 8. Make sure the blade is not contacting the workpiece before the switch is turned on. 9. Keep hands away from moving parts. 10. Do not leave the tool running. Operate the tool only when hand-held. 11. Always switch off and wait for the blade to come to a complete stop before removing the blade from the workpiece. 12. Do not touch the blade or the workpiece immediately after operation; they may be extremely hot and could burn your skin. 13. Do not operate the tool at no-load unnecessarily. 14. Some material contains chemicals which may be toxic. Take caution to prevent dust inhalation and skin contact. Follow material supplier safety data. 15. Always use the correct dust mask/respirator for the material and application you are working with. SAVE THESE INSTRUCTIONS. WARNING: MISUSE or failure to follow the safety rules stated in this instruction manual may cause serious personal injury. OPERATING INSTRUCTIONS Installing or removing battery cartridge (Fig. 1) Always switch off the tool before insertion or removal of the battery cartridge. To remove the battery cartridge, withdraw it from the tool while pressing the buttons on both sides of the cartridge. To insert the battery cartridge, align the tongue on the battery cartridge with the groove in the housing and slip it into place. Always insert it all the way until it locks in place with a little click. If not, it may accidentally fall out of the tool, causing injury to you or someone around you. Do not use force when inserting the battery cartridge. If the cartridge does not slide in easily, it is not being inserted correctly. Selecting the cutting action (Fig. 2) This tool can be operated with an orbital or a straight line cutting action. To change the cutting action, just turn the lever to the desired cutting action position. Refer to the table below to help determine the appropriate cutting action. Position Cutting action Applications O Straight line cutting action For cutting mild steel, stainless steel and plastics. For clean cuts in wood and plywood. I Small orbit cutting action For cutting mild steel, aluminum and hard wood. II Medium orbit cutting action For cutting wood and plywood. For fast cutting in aluminum and mild steel. III Large orbit cutting action For fast cutting in wood and plywood. Switch action (Fig. 3) CAUTION: Before inserting the battery cartridge into the tool, always check to see that the switch trigger actuates properly and returns to the OFF position when released. To prevent the switch trigger from being accidentally pulled, a lock-off button is provided. To start the tool, depress the lock-off button and pull the switch trigger. Release the switch trigger to stop. 8

9 Speed adjusting dial (Fig. 4) The tool speed can be adjusted and maintained between 500 and 2,800 strokes per minute by turning the adjusting dial. The dial is marked 1 (lowest speed) to 5 (full speed). Refer to the table below to select the proper speed for the workpiece to be cut. However, the appropriate speed may differ with the type or thickness of the workpiece. In general, higher speeds will allow you to cut workpieces faster but the service life of the blade will be reduced. Workpiece to be cut Number on adjusting dial Wood 3 5 Mild steel 3 5 Stainless steel 3 4 Aluminum 2 3 Plastics 1 4 CAUTION: Adjust the speed adjusting dial only within the range of numbers 1 through 5. Do not force the dial beyond this range or damage to the tool may result. Anti-splintering device (Fig. 5) To reduce the potential for workpiece surface splintering, the anti-splintering device can be used. Fit it into the base from below so that it surrounds the sides of the blade. Plastic base plate (optional accessory) (Fig. 6) Use the plastic base plate when cutting decorative veneers, plastics, etc. It protects sensitive or delicate surfaces from damage. To replace the base plate, remove the four screws. Guide rule (rip fence; optional accessory) (Fig. 7) When cutting widths of under 150 mm repeatedly, use of the guide rule will assure fast, clean, straight cuts. To install it, loosen the bolt on the front of the base. Slip in the guide rule and secure the bolt. Circular guide (optional accessory) (Fig. 8) Use of the circular guide insures clean, smooth cutting of circles (radius: under 200 mm). Insert the pin through the center hole and secure it with the threaded knob. Move the base of the tool forward fully. Then install the circular guide on the base in the same manner as the guide rule. Vacuum head (optional accessory) (Fig. 9 & 10) The vacuum head is recommended to perform clean cutting operations. Install the plastic cover on the tool by fitting it into the notches in the tool. To attach the vacuum head on the tool, insert the hook of the vacuum head into the hole in the base. The vacuum head can be installed on either left or right side of the base. Then connect a Makita vacuum cleaner to the vacuum head. Installing or removing the saw blade CAUTION: Always be sure that the tool is switched off and the battery cartridge is removed before installing or removing the blade. Always clean off the blade and blade holder before installing the blade. Chips or foreign matter on them may cause insufficient securing of the blade, possibly resulting in blade breakage or serious injury. Installation 1. Push the blade installing lever in the (1) direction to release it. (Fig. 11) 2. Pull the blade installing lever in the (2) direction until it stops with a little click. If you have difficulty pulling it out, try to do so while moving it back and forth in the (3) direction. 3. Rotate the blade installing lever in the (4) direction until the clamp protrudes 5 7 mm from the blade holder. (Fig. 12) CAUTION: If you rotate the blade installing lever excessively, the clamp will also rotate and finally come off. In this case, re-install it properly as lately described in Installing clamp. 4. With the blade teeth facing forward, insert the blade into the blade holder as far as it will go. Make sure that the back edge of the blade fits properly into the groove of the roller. (Fig. 13) 5. With the blade held against the blade holder, rotate the blade installing lever in the (5) direction until it stops. (Fig. 14) 6. With the blade installing lever held in this position, push it in the (6) direction. Then rotate the blade installing lever to its original position. (Fig. 15) Removal 1. Push the blade installing lever in the (1) direction to release it. (Fig. 16) 2. Pull the blade installing lever in the (2) direction until it stops with a little click. If you have difficulty pulling it out, try to do so while moving it back and forth in the (3) direction. 3. Rotate the blade installing lever in the (4) direction and remove the blade. (Fig. 17) 4. Rotate the blade installing lever in the (5) direction until it stops. (Fig. 18) 5. With the blade installing lever held in this position, push it in the (6) direction. Then rotate the blade installing lever to its original position. (Fig. 19) OPERATION Cutting operation CAUTION: Always hold the tool with the base flush with the workpiece. Failure to do so may cause a slanted cutting surface and blade breakage. Advance the tool very slowly when cutting curves or scrolling. Forcing the tool may cause a slanted cutting surface and blade breakage. Turn the tool on without the blade making any contact. Rest the base flat on the workpiece and gently move the tool forward along the previously marked cutting line. (Fig. 20) 9

10 Bevel cutting (Fig. 21 & 22) CAUTION: Always remove the battery from the tool before making any adjustments. With the base tilted, you can make bevel cuts at any angle between 0 and 45 (left or right). Loosen the base securing lever and move the base so that the dent mark in the motor housing is aligned with the slot in the base. Tilt the base until the desired bevel angle is obtained. The edge of the motor housing indicates the bevel angle by graduations. The tighten the base securing lever to secure the base. NOTE: Always remove the plastic cover (chip shield) from the tool when you make bevel cuts using an optional guide rule (rip fence) or circular guide. Flush cutting (Fig. 23) Loosen th base securing lever and slide the base all the way back. Then tighten the base securing lever to secure the base. Cutouts (Fig. 24 & 25) Cutouts can be made with either of two methods A or B. A) Boring a starting hole: For internal cutouts without a lead-in cut from an edge, pre-drill a starting hole more than 12 mm in diameter. Insert the blade into this hole and hold the tool firmly against the workpiece to start your cut. B) Plunge cutting: You need not bore a starting hole or make a lead-in cut if you carefully do as follows. 1. Tilt the tool up on the front edge of the base, with the blade point positioned just above the workpiece surface. 2. Apply pressure to the tool so that the front edge of the base will not move when you switch on the tool and gently lower the back end of the tool slowly. 3. As the blade slices into the workpiece, slowly lower the base of the tool down onto the workpiece surface. 4. Complete the cut in the normal manner. Finishing edges (Fig. 26) To trim edges or make slight dimensional adjustments, run the blade lightly along the cut edges. Metal cutting Always use a suitable coolant (cutting oil) when cutting metal. Failure to do so will cause significant blade wear. The underside of the workpiece can be greased instead of using a coolant. MAINTENANCE CAUTION: Always be sure that the tool is switched off and the battery cartridge is removed before carrying out any work on the tool. Cleaning clamp on blade holder If chips or foreign matter get into the clamp on the blade holder, clean out the clamp after removing it from the blade holder. Removing clamp 1. Push the blade installing lever in the (1) direction to release it. (Fig. 27) 2. Pull the blade installing lever in the (2) direction until it stops with a little click. If you have difficulty pulling it out, try to do so while moving it back and forth in the (3) direction. 3. Rotate the blade installing lever in the (4) direction until it stops. The clamp will protrude from the blade holder. (Fig. 28 & 29) 4. Remove the clamp from the blade holder while rotating the clamp in the (5) direction. (Fig. 30) Installing clamp 1. Make sure that the blade installing lever has been rotated in the (4) direction until it stops. (Fig. 31) 2. Insert the clamp into the blade holder while rotating it in the (6) direction one quarter to one full turn so that its slot will face forward. (Fig. 32) CAUTION: Do not rotate the clamp more than one full turn when inserting in into the blade holder. If you do so, the blade may not be tightened firmly. 3. Grasp the clamp with your fingers so that it will not turn, then rotate the blade installing lever in the (7) direction until it stops. The clamp will go in the blade holder. (Fig. 33) Replacing carbon brushes (Fig. 34 & 35) Remove and check the carbon brushes regularly. Replace when they wear down to the limit mark. Keep the carbon brushes clean and free to slip in the holders. Both carbon brushes should be replaced at the same time. Use only identical carbon brushes. Use a screwdriver to remove the brush holder caps. Take out the worn carbon brushes, insert the new ones and secure the brush holder caps. To maintain product safety and reliability, repairs, maintenance or adjustment should be carried out by a Makita Authorized Service Center. ACCESSORIES CAUTION: These accessories or attachments are recommended for use with your Makita tool specified in this manual. The use of any other accessories or attachments might present a risk of injury to persons. Only use accessory or attachment for its stated purpose. If you need any assistance for more details regarding these accessories, ask your local Makita service center. Plastic base plate Hex wrench 3 Circular guide assembly Vacuum head Anti-splintering device Plastic cover Guide rule Hose Jig saw blade (Packed 5 each) Various type of Makita genuine batteries and chargers Battery cover 10

11 NEDERLANDS 1 Knop 2 Accu 3 Hendel 4 Ontgrendelknop 5 Trekschakelaar 6 Snelheidsregelknop 7 Gereedschapsvoet 8 Antisplinterinrichting 9 Schroef 10 Plastic voetplaat 11 Inbussleutel 12 Bout Verklaring van algemene gegevens 13 Breedtegeleider 14 Schroefknop 15 Cirkelgeleider 16 Pin 17 Stofzuigkop 18 Zaagbladinstallatiehendel 19 Zaagbladhouder 20 Klem 21 Rol 22 Sleuf 23 Zaagblad 24 Houd het zaagblad tegen de zaagbladhouder 25 Zaaglijn 26 Vastzethendel voor gereedschapsvoet 27 Inkeping 28 Sleuf 29 Schaalverdelingen 30 Limietstreep 31 Schroevendraaier 32 Borstelhouderdop TECHNISCHE GEGEVENS Model 4334D Slaglengte mm Max. zaagcapaciteiten Hout mm Zacht staal mm Aluminium mm Slagen per minuut Totale lengte mm Netto gewicht... 3,3 kg Nominale spanning... D.C. 18 V In verband met ononderbroken research en ontwikkeling behouden wij ons het recht voor bovenstaande technische gegevens te wijzigen zonder voorafgaande kennisgeving. Opmerking: De technische gegevens kunnen van land tot land verschillen. Doeleinden van gebruik Dit gereedschap is bedoeld voor het zagen van hout, kunststof en metalen materialen. Een uitgebreide keuze van accessoires en zaagbladen staat ter beschikking, zodat het gereedschap voor talrijke doeleinden kan worden gebruikt en optimaal geschikt is voor het zagen van bogen en cirkels. Veiligheidswenken Voor uw veiligheid dient u de bijgevoegde Veiligheidsvoorschriften nauwkeurig op te volgen. BELANGRIJKE VEILIGHEIDSVOORSCHRIFTEN VOOR ACCULADER EN ACCU 1. Lees alle voorschriften en waarschuwingen op (1) de acculader, (2) de accu, en (3) het product waarvoor de accu wordt gebruikt, aandachtig door alvorens de acculader in gebruik te nemen. 2. Neem de accu niet uit elkaar. 3. Als de gebruikstijd van een opgeladen accu aanzienlijk korter is geworden, moet u het gebruik ervan onmiddellijk stopzetten. Voortgezet gebruik kan oververhitting, brandwonden en zelfs een ontploffing veroorzaken. 4. Als er elektrolyt in uw ogen is terechtgekomen, spoel dan uw ogen met schoon water en roep onmiddellijk de hulp van een dokter in. Elektrolyt in de ogen kan blindheid veroorzaken. 5. Bedek de accuklemmen altijd met de accukap wanneer u de accu niet gebruikt. 6. Voorkom kortsluiting van de accu: (1) Raak de accuklemmen nooit aan met een geleidend materiaal. (2) Bewaar de accu niet in een bak waarin andere metalen voorwerpen zoals spijkers, munten e.d. worden bewaard. (3) Stel de accu niet bloot aan water of regen. Kortsluiting van de accu kan oorzaak zijn van een grote stroomafgifte, oververhitting, brandwonden, en zelfs defecten. 7. Bewaar het gereedschap en de accu niet op plaatsen waar de temperatuur kan oplopen tot 50 C of hoger. 8. Werp de accu nooit in het vuur, ook niet wanneer hij zwaar beschadigd of volledig versleten is. De accu kan namelijk ontploffen in het vuur. 9. Wees voorzichtig dat u de accu niet laat vallen en hem niet blootstelt aan schokken of stoten. BEWAAR DEZE VOORSCHRIFTEN. Tips voor een maximale levensduur van de accu 1. Laad de accu op voordat hij volledig ontladen is. Stop het gebruik van het gereedschap en laad de accu op telkens wanneer u vaststelt dat het vermogen van het gereedschap is afgenomen. 2. Laad een volledig opgeladen accu nooit opnieuw op. Als u de accu te veel oplaadt, zal hij minder lang meegaan. 3. Laad de accu op bij een kamertemperatuur tussen 10 C en 40 C. Laat een warme accu afkoelen alvorens hem op te laden. 4. Laad de nikkel-metaalhydride accu op telkens wanneer u hem langer dan zes maanden niet hebt gebruikt. 26

12 AANVULLENDE VEILIGHEIDSVOORSCHRIFTEN Laat u NIET misleiden door een vals gevoel van comfort en bekendheid met het gereedschap (na veelvuldig gebruik) en neem alle veiligheidsvoorschriften van de decoupeerzaag altijd strikt in acht. Bij onveilig of verkeerd gebruik van het elektrisch gereedschap, bestaat de kans op ernstig persoonlijk letsel. 1. Houd elektrisch gereedschap vast aan het geïsoleerde oppervlak van de handgrepen wanneer u werkt op plaatsen waar het zaaggereedschap met verborgen bedrading of zijn eigen snoer in aanraking kan komen. Door contact met onder spanning staande draden, zullen de niet-geïsoleerde metalen delen van het gereedschap onder spanning komen te staan zodat de gebruiker een elektrische schok kan krijgen. 2. Gebruik klemmen of een andere praktische methode om het werkstuk op een stabiele ondergrond te bevestigen en ondersteunen. Als u het werkstuk in uw hand of tegen uw lichaam geklemd houdt, is het onvoldoende stabiel en kunt u de controle erover verliezen. 3. Draag altijd een veiligheidsbril. Een gewone bril of een zonnebril is GEEN veiligheidsbril. 4. Vermijd het zagen op spijkers. Inspecteer het werkstuk vooraf op de aanwezigheid van spijkers en verwijder deze voordat u met het werk begint. 5. Ook niet voor het zagen van zeer grote werkstukken. 6. Controleer vooraf of er voldoende vrije ruimte is achter het werkstuk om te voorkomen dat het zaagblad tegen een vloer, een werkbank e.d. stoot. 7. Houd het gereedschap stevig vast. 8. Zorg ervoor dat het zaagblad niet in contact is met het werkstuk voordat u de spanning inschakelt. 9. Houd uw handen uit de buurt van de bewegende delen. 10. Schakel altijd het gereedschap uit als u weg moet. Schakel het gereedschap alleen in als u het in handen houdt. 11. Schakel altijd uit en wacht tot het zaagblad volledig tot stilstand is gekomen, alvorens het gereedschap van het werkstuk te verwijderen. 12. Raak onmiddellijk na gebruik het zaagblad of het werkstuk niet aan, aangezien het nog gloeiend heet kan zijn en brandwonden kan veroorzaken. 13. Laat het gereedschap niet onnodig onbelast draaien. 14. Sommige materialen bevatten chemische stoffen die vergiftig kunnen zijn. Vermijd inademing van stof en contact met de huid. Volg de veiligheidsinstructies van de leverancier van het materiaal. 15. Gebruik altijd het juiste stofmasker/ademhalingsapparaat voor het materiaal en de toepassing waarmee u werkt. BEWAAR DEZE VOORSCHRIFTEN. WAARSCHUWING: VERKEERD GEBRUIK of het niet naleven van de veiligheidsvoorschriften in deze gebruiksaanwijzing kan leiden tot ernstige verwondingen. BEDIENINGSVOORSCHRIFTEN Installeren of verwijderen van de accu (Fig. 1) Schakel het gereedschap altijd uit alvorens de accu te installeren of te verwijderen. Om de accu te verwijderen, neemt u deze uit het gereedschap terwijl u de knoppen aan beide zijden van de accu indrukt. Om de accu te installeren, past u de rug op de accu in de groef in de behuizing van het gereedschap, en dan schuift u de accu naar binnen. Schuif de accu zo ver mogelijk erin, totdat deze met een klikgeluid vergrendelt. Indien u dit niet doet, kan de accu per ongeluk uit het gereedschap vallen en uzelf of anderen verwonden. Als de accu moeilijk in de houder gaat, moet u niet proberen hem met geweld erin te duwen. Indien de accu er niet gemakkelijk ingaat, betekent dit dat u hem niet op de juiste wijze erin steekt. Selecteren van de zaagactie (Fig. 2) Dit gereedschap kan worden gebruikt voor zagen in bochten of in rechte lijn. U kunt de zaagactie veranderen door de keuzehendel naar de gewenste positie te draaien. Zie de onderstaande tabel voor het kiezen van de geschikte zaagactie. Stand Zaagactie Toepassingen O Zagen in rechte lijn Zagen van zacht staal, roestvrij staal en plastic. Schoon zagen van hout en gelaagd hout. I Zagen in kleine cirkelbaan Zagen van zacht staal, aluminium en hard hout. II Zagen in middelgrote cirkelbaan Zagen van hout en gelaagd hout. Snel zagen in aluminium en zacht staal. III Zagen in grote cirkelbaan Snel zagen in hout en gelaagd hout. 27

13 Werking van de schakelaar (Fig. 3) LET OP: Alvorens u de accu in het gereedschap plaatst, moet u altijd controleren of de trekschakelaar goed werkt en bij het loslaten naar de OFF positie terugkeert. Een ontgrendelknop is voorzien om te voorkomen dat de trekschakelaar per ongeluk wordt ingedrukt. Om het gereedschap in te schakelen, drukt u de ontgrendelknop en de trekschakelaar in. Laat de trekschakelaar los om te stoppen. Snelheidsregelknop (Fig. 4) Door de snelheidsregelknop te draaien kunt u de zaagsnelheid instellen op een willekeurige snelheid tussen 500 en slagen per minuut. De knop is gemarkeerd met nummers van 1 (laagste snelheid) tot 5 (maximale snelheid). Raadpleeg de onderstaande tabel voor het selecteren van de snelheid die geschikt is voor het te zagen werkstuk. De geschikte snelheid hangt echter ook af van het type of de dikte van het werkstuk. In het algemeen, kunt u met hogere snelheden sneller zagen, maar het zaagblad zal dan minder lang meegaan. Te zagen werkstuk Nummer op regelknop Hout 3 5 Zacht staal 3 5 Roestvrij staal 3 4 Aluminium 2 3 Plastic 1 4 LET OP: De snelheidsregelknop dient te worden ingesteld binnen het bereik tussen de nummers 1 en 5. Probeer niet de knop met geweld voorbij 1 of 5 te draaien, aangezien het gereedschap dan beschadigd kan raken. Antisplinterinrichting (Fig. 5) Gebruik de antisplinterinrichting om splintervrije zaagsneden te krijgen. Schuif de inrichting vanaf de onderzijde in de voet zodat deze de zijkanten van het zaagblad omsluit. Plastic voetplaat (los verkrijgbaar accessoire) (Fig. 6) Gebruik de plastic voetplaat voor het zagen van decoratief fineerhout, plastic materiaal, enz. Deze plaat beschermt gevoelige of delicate oppervlakken tegen beschadiging. Om de voetplaat te vervangen, verwijdert u de vier schroeven. Trekgeleider (Geleidelineaal; los verkrijgbaar toebehoren) (Fig. 7) Wanneer u herhaaldelijk sneden met een breedte van minder dan 150 mm zaagt, kunt u bij gebruik van de sneller zagen en tegelijk schone, rechte sneden krijgen. Om dit te installeren, dient u de bout op de voorkant van de grondplaat los te draaien. Schuif de geleidelineaal erin en zet de bout opnieuw vast. Cirkelgeleider (los verkrijgbaar toebehoren) (Fig. 8) Met behulp van de cirkelgeleider is het gemakkelijk om schone cirkels (radius: minder dan 200 mm) te zagen. Steek de pen in het middelste gat en zet deze vast met behulp van de schroefknop. Schuif de grondplaat van het gereedschap helemaal naar voren. Monteer dan de cirkelgeleider op de grondplaat op dezelfde wijze als de trekgeleider. Stofzuigkop (los verkrijgbaar accessoire) (Fig. 9 en 10) Het is aan te bevelen dat u de stofzuigkop gebruikt om schoner te kunnen zagen. Installeer de plastic kap door deze in de inkepingen in het gereedschap te schuiven. Bevestig de stofzuigkop aan het gereedschap door de haak van de stofzuigkop in het gat in de gereedschapsvoet te schuiven. De stofzuigkop kan aan de linker of rechter zijde van de gereedschapsvoet worden bevestigd. Sluit daarna een Makita stofzuiger aan op de stofzuigkop. Installeren of verwijderen van het zaagblad LET OP: Zorg er altijd voor dat het gereedschap is uitgeschakeld en de accu ervan is verwijderd alvorens het zaagblad te installeren of te verwijderen. Verwijder altijd spaanders of verontreinigingen van het zaagblad en de zaagbladhouder alvorens het zaagblad te installeren. Als u dit verzuimt, is er kans dat het zaagblad niet goed vastgezet zal zijn, hetgeen zaagbladbreuk of ernstige verwonding kan veroorzaken. Installeren 1. Ontgrendel de zaagbladinstallatiehendel door deze in de richting (1) te duwen. (Fig. 11) 2. Trek de zaagbladinstallatiehendel in de richting (2) totdat deze op zijn plaats vastklikt. Als de hendel niet gemakkelijk eruit komt, probeer dan hem naar buiten te trekken terwijl u hem heen en weer beweegt in de richting (3). 3. Draai de zaagbladinstallatiehendel in de richting (4) totdat de klem 5 7 mm uit de zaagbladhouder steekt. (Fig. 12) LET OP: Als u de zaagbladinstallatiehendel te ver draait, zal de klem meedraaien en eraf komen. Als dit gebeurt, moet u de klem weer juist installeren zoals beschreven onder Installeren van de klem op de volgende bladzijde. 4. Steek het zaagblad met de tanden naar voren gericht zo ver mogelijk in de zaagbladhouder. Zorg ervoor dat de rug van het zaagblad goed in de groef van de rol zit. (Fig. 13) 5. Houd het zaagblad tegen de zaagbladhouder en draai de zaagbladinstallatiehendel in de richting (5) totdat deze stopt. (Fig. 14) 6. Houd de zaagbladinstallatiehendel in deze positie en duw hem in de richting (6). Draai daarna de zaagbladinstallatiehendel terug naar zijn oorspronkelijke positie. (Fig. 15) 28
 Door de snelheidsregelknop te draaien kunt u de zaagsnelheid instellen op een willekeurige snelheid tussen 500 en 2 800 slagen per minuut.")
14 Verwijderen 1. Ontgrendel de zaagbladinstallatiehendel door deze in de richting (1) te duwen. (Fig. 16) 2. Trek de zaagbladinstallatiehendel in de richting (2) totdat deze op zijn plaats vastklikt. Als de hendel niet gemakkelijk eruit komt, probeer dan hem naar buiten te trekken terwijl u hem heen en weer beweegt in de richting (3). 3. Draai de zaagbladinstallatiehendel in de richting (4) en verwijder het zaagblad. (Fig. 17) 4. Draai de zaagbladinstallatiehendel in de richting (5) totdat deze stopt. (Fig. 18) 5. Houd de zaagbladinstallatiehendel in deze positie en duw hem in de richting (6). Draai daarna de zaagbladinstallatiehendel terug naar zijn oorspronkelijke positie. (Fig. 19) BEDIENING Zagen LET OP: Houd de voet van het gereedschap altijd vlak met het werkstuk. Als u dit niet doet, zal de zaagsnede scheef zijn en kan het zaagblad breken. Beweeg het gereedschap zeer langzaam naar voren wanneer u bochten of figuren zaagt. Als u het gereedschap forceert, zal de zaagsnede scheef zijn en kan het zaagblad breken. Schakel het gereedschap in zonder dat het zaagblad in contact komt met het werkstuk. Plaats de voet van het gereedschap vlak op het werkstuk en beweeg het gereedschap langzaam naar voren langs de van te voren op het werkstuk aangebrachte zaaglijn. (Fig. 20) Zagen onder een schuine hoek (Fig. 21 en 22) LET OP: Verwijder altijd de accu uit het gereedschap alvorens de gereedschapsvoet schuin te zetten. Door de gereedschapsvoet schuin te zetten kunt u schuin zagen onder een willekeurige hoek tussen 0 en 45 (links of rechts). Zet de vastzethendel voor de gereedschapsvoet los en beweeg de voet zodat de inkeping in het motorhuis op één lijn komt met de sleuf in de voet. Kantel de gereedschapsvoet om de gewenste schuine hoek te krijgen. De rand van het motorhuis geeft de schuine hoek in schaalverdelingen aan. Zet daarna de vastzethendel vast om de gereedschapsvoet weer vast te zetten. OPMERKING: Verwijder altijd de plastic kap (spaanderscherm) van het gereedschap wanneer u de los verkrijgbare breedtegeleider (geleidelineaal) of cirkelgeleider gebruikt om schuine sneden te zagen. Zagen tot helemaal tegen de rand (Fig. 23) Zet de vastzethendel voor de gereedschapsvoet in de vrije stand en schuif de voet helemaal naar achteren. Zet daarna de vastzethendel vast om de gereedschapsvoet weer vast te zetten. Figuren uitzagen (Fig. 24 en 25) Voor het uitzagen van figuren kunt u methode A of B gebruiken. A) Voorboren van een startgaatje: Om figuren direct in het midden van het werkstuk uit te zagen, en dus niet vanaf de rand, moet u eerst een startgaatje met een diameter van 12 mm of meer boren. Steek het zaagblad door dit gaatje, houd het gereedschap stevig tegen het werkstuk, en begin dan te zagen. B) Invalzagen: U hoeft geen startgaatje te boren of geen geleidesnede te maken indien u voorzichtig als volgt te werk gaat. 1. Kantel het gereedschap naar voren door de voorrand van de voet op het werkstuk te laten rusten, met de punt van het zaagblad net boven het werkstukoppervlak. 2. Oefen een beetje druk uit op het gereedschap om te voorkomen dat de voorrand van de voet kan bewegen, en schakel het gereedschap in. Laat daarna het achterste gedeelte van het gereedschap langzaam zakken. 3. Naarmate het zaagblad door het werkstuk heen zaagt, laat u de voet van het gereedschap langzaam op het werkstukoppervlak zakken. 4. Zaag verder op de normale manier. Afwerken van randen (Fig. 26) Voor het afwerken van randen of voor nauwkeurig op maat zagen, laat u het zaagblad lichtjes langs de gezaagde randen lopen. Zagen van metaal Voor het zagen van metaal dient u altijd een geschikt koelmiddel (snijolie) te gebruiken. Als u dit niet doet, zal het zaagblad sneller slijten. In plaats van een koelmiddel te gebruiken, kunt u ook de onderkant van het werkstuk invetten. ONDERHOUD LET OP: Controleer altijd of het gereedschap is uitgeschakeld en de accu is losgekoppeld vooraleer onderhoud uit te voeren aan het gereedschap. Schoonmaken van de klem op de zaagbladhouder Als er spaanders of verontreinigingen zijn terechtgekomen in de klem op de zaagbladhouder, moet u de klem van de zaagbladhouder verwijderen om deze schoon te maken. Verwijderen van de klem 1. Ontgrendel de zaagbladinstallatiehendel door deze in de richting (1) te duwen. (Fig. 27) 2. Trek de zaagbladinstallatiehendel in de richting (2) totdat deze op zijn plaats vastklikt. Als de hendel niet gemakkelijk eruit komt, probeer dan hem naar buiten te trekken terwijl u hem heen en weer beweegt in de richting (3). 3. Draai de zaagbladinstallatiehendel in de richting (4) totdat deze stopt. De klem zal uit de zaagbladhouder steken. (Fig. 28 en 29) 4. Verwijder de klem van de zaagbladhouder terwijl u de klem in de richting (5) draait. (Fig. 30) 29
. Draai daarna de zaagbladinstallatiehendel terug naar zijn oorspronkelijke positie. (Fig.")
15 Installeren van de klem 1. Draai de zaagbladinstallatiehendel in de richting (4) totdat deze stopt. (Fig. 31) 2. Steek de klem in de zaagbladhouder en draai deze tussen een vierde en een volle slag in de richting (6) zodat zijn sleuf naar voren is gericht. (Fig. 32) LET OP: Draai de klem niet verder dan een volle slag wanneer u deze in de zaagbladhouder steekt. Als u dit doet, is er kans dat het zaagblad niet goed vastgezet zal zijn. 3. Houd de klem vast met uw vingers zodat deze niet kan draaien, en draai de zaagbladinstallatiehendel in de richting (7) totdat deze stopt. De klem zal vanzelf in de zaagbladhouder gaan. (Fig. 33) Vervangen van de koolborstels (Fig. 34 en 35) Verwijder en controleer regelmatig de koolborstels. Vervang de koolborstels indien zij tot aan de limietstreep zijn versleten. Houd de koolborstels schoon zodat zij gemakkelijk in de houders schuiven. Beide koolborstels dienen tegelijkertijd te worden vervangen. Gebruik uitsluitend identieke koolborstels. Verwijder de borstelhouderkappen met een schroevendraaier. Neem de versleten koolborstels eruit, schuif de nieuwe koolborstels erin, en zet de borstelhouderkappen weer vast. Opdat het gereedschap veilig en betrouwbaar blijft, dienen alle reparaties, onderhoud of afstellingen te worden uitgevoerd bij een erkend Makita service centrum. ACCESSOIRES LET OP: Deze accessoires of hulpstukken worden aanbevolen voor gebruik met het Makita gereedschap dat in deze gebruiksaanwijzing is beschreven. Bij gebruik van andere accessoires of hulpstukken bestaat er gevaar voor persoonlijke verwonding. Gebruik de accessoires of hulpstukken uitsluitend voor hun bestemde doel. Raadpleeg het dichtstbijzijnde Makita Servicecentrum voor verder advies of bijzonderheden omtrent deze accessoires. Plastic grondplaat Inbussleutel 3 Cirkelgeleider Vacuümkop Anti-splinter inrichting Plastic scherm Trekgeleider Slang 19-2,5 Figuurzaagblad (In pakketten van 5 stuks) Diverse types originele Makita accu s en acculaders Accukap 30
 totdat deze stopt. De klem zal vanzelf in de zaagbladhouder gaan. (Fig.")
16 ENGLISH EC-DECLARATION OF CONFORMITY We declare under our sole responsibility that this product is in compliance with the following standards of standardized documents, EN60745, EN55014 in accordance with Council Directives, 89/336/EEC and 98/37/EC. FRANÇAISE DÉCLARATION DE CONFORMITÉ CE Nous déclarons sous notre entière responsabilité que ce produit est conforme aux normes des documents standardisés suivants, EN60745, EN55014 conformément aux Directives du Conseil, 89/336/CEE et 98/37/EG. DEUTSCH CE-KONFORMITÄTSERKLÄRUNG Hiermit erklärt wir unter unserer alleinigen Verantwortung, daß dieses Produkt gemäß den Ratsdirektiven 89/ 336/EWG und 98/37/EG mit den folgenden Normen von Normendokumenten übereinstimmen: EN60745, EN ITALIANO ENH102-4 DICHIARAZIONE DI CONFORMITÀ CON LE NORME DELLA COMUNITÀ EUROPEA Dichiariamo sotto la nostra sola responsabilità che questo prodotto è conforme agli standard di documenti standardizzati seguenti: EN60745, EN55014 secondo le direttive del Consiglio 89/336/CEE e 98/37/ CE. NEDERLANDS EG-VERKLARING VAN CONFORMITEIT Wij verklaren hierbij uitsluitend op eigen verantwoordelijkheid dat dit produkt voldoet aan de volgende normen van genormaliseerde documenten, EN60745, EN55014 in overeenstemming met de richtlijnen van de Raad 89/ 336/EEC en 98/37/EC. ESPAÑOL DECLARACIÓN DE CONFORMIDAD DE LA CE Declaramos bajo nuestra sola responsabilidad que este producto cumple con las siguientes normas de documentos normalizados, EN60745, EN55014 de acuerdo con las directivas comunitarias, 89/336/EEC y 98/37/CE. Yasuhiko Kanzaki CE 2005 Director Directeur Direktor Amministratore Directeur Director MAKITA INTERNATIONAL EUROPE LTD. Michigan Drive, Tongwell, Milton Keynes, Bucks MK15 8JD, ENGLAND Responsible manufacturer: Fabricant responsable : Verantwortlicher Hersteller: Produttore responsabile: Verantwoordelijke fabrikant: Fabricante responsable: Makita Corporation Anjo Aichi Japan 63

17 PORTUGUÊS DECLARAÇÃO DE CONFORMIDADE DA CE Declaramos sob inteira responsabilidade que este produto obedece às seguintes normas de documentos normalizados, EN60745, EN55014 de acordo com as directivas 89/336/CEE e 98/37/CE do Conselho. DANSK EU-DEKLARATION OM KONFORMITET Vi erklærer hermed på eget ansvar, at dette produkt er i overensstemmelse med de følgende standarder i de normsættende dokumenter, EN60745, EN55014 i overensstemmelse med Rådets Direktiver 89/336/EEC og 98/37/EC. SVENSKA EG-DEKLARATION OM ÖVERENSSTÄMMELSE Under eget ansvar deklarerar vi härmed att denna produkt överensstämmer med följande standardiseringar för standardiserade dokument, EN60745, EN55014 i enlighet med EG-direktiven 89/336/EEC och 98/37/EC. NORSK ENH102-4 EUs SAMSVARS-ERKLÆRING Vi erklærer på eget ansvar at dette produktet er i overensstemmelse med følgende standard i de standardiserte dokumenter: EN60745, EN55014, i samsvar med Råds-direktivene, 89/336/EEC og 98/37/ EC. SUOMI VAKUUTUS EC-VASTAAVUUDESTA Yksinomaisesti vastuullisina ilmoitamme, että tämä tuote on seuraavien standardoitujen dokumenttien standardien mukainen, EN60745, EN55014 neuvoston direktiivien 89/336/EEC ja 98/37/EC mukaisesti. ΕΛΛΗΝΙΚΑ ΗΛΩΣΗ ΣΥΜΜΟΡΦΩΣΗΣ ΕΚ ηλώνουµε υπό την µοναδική µας ευθύνη ότι αυτό το προιόν βρίσκεται σε Συµφωνία µε τα ακόλουθα πρότυπα τυποποιηµένων εγγράφων, EN60745, EN55014 σύµφωνα µε τις Οδηγίες του Συµβουλίου, 89/336/ EEC και 98/37/ΚE. Yasuhiko Kanzaki CE 2005 Director Direktør Direktör Direktor Johtaja ιευθυντής MAKITA INTERNATIONAL EUROPE LTD. Michigan Drive, Tongwell, Milton Keynes, Bucks MK15 8JD, ENGLAND Fabricante responsável: Ansvarlig fabrikant: Ansvarig tillverkare: Ansvarlig produsent: Vastaava valmistaja: Υπεύθυνος κατασκευαστής: Makita Corporation Anjo Aichi Japan 64

18 ENGLISH For European countries only Noise and Vibration The typical A-weighted sound pressure level is 85 db (A). Uncertainty is 3 db (A). The noise level under working may exceed 85 db (A). Wear ear protection. The typical weighted root mean square acceleration value is 6 m/s 2. These values have been obtained according to EN FRANÇAISE Pour les pays d Europe uniquement Bruit et vibrations Le niveau de pression sonore pondere type A est de 85 db (A). L incertitude de mesure est de 3 db (A). Le niveau de bruit en fonctionnement peut dépasser 85 db (A). Porter des protecteurs anti-bruit. L accélération pondérée est de 6 m/s 2. Ces valeurs ont été obtenues selon EN DEUTSCH Nur für europäische Länder Geräusch- und Vibrationsentwicklung Der typische A-bewertete Schalldruckpegel beträgt 85 db (A). Die Abweichung beträgt 3 db (A). Der Lärmpegel kann während des Betriebs 85 db (A) überschreiten. Gehörschutz tragen. Der gewichtete Effektivwert der Beschleunigung beträgt 6m/s 2. Diese Werte wurden gemäß EN60745 erhalten. ITALIANO ENG004-2-V3 Modello per l Europa soltanto Rumore e vibrazione Il livello di pressione sonora pesata secondo la curva A è di 85 db (A). L incertezza è di 3 db (A). Il livello di rumore durante il lavoro potrebbe superare gli 85 db (A). Indossare i paraorecchi. Il valore quadratico medio di accellerazione è di 6 m/s 2. Questi valori sono stati ottenuti in conformità EN NEDERLANDS Alleen voor Europese landen Geluidsniveau en trilling Het typische A-gewogen geluidsdrukniveau is 85 db (A). Onzekerheid is 3 db (A). Tijdens het werken kan het geluidsniveau 85 db (A) overschrijden. Draag oorbeschermers. De typische gewogen effectieve versnellingswaarde is 6m/s 2. Deze waarden werden verkregen in overeenstemming met EN ESPAÑOL Para países europeos solamente Ruido y vibración El nivel de presión sonora ponderada A es de 85 db (A). Incerteza 3 db (A). El nivel de ruido en condiciones de trabajo puede que sobrepase los 85 db (A). Póngase protectores en los oídos. El valor ponderado de la aceleración es de 6 m/s 2. Estos valores han sido obtenidos de acuerdo con EN
. Porter des protecteurs anti-bruit. L accélération pondérée est de 6 m/s 2. Ces valeurs ont été obtenues selon EN60745.")
19 PORTUGUÊS Só para países Europeus Ruído e vibração O nível normal de pressão sonora A é 85 db (A). A incerteza é de 3 db (A). O nível de ruído durante o trabalho pode exceder 85 db (A). Utilize protectores para os ouvidos O valor médio da aceleração é 6 m/s 2. Estes valores foram obtidos de acordo com EN DANSK Kun for lande i Europa Lyd og vibration Det typiske A-vægtede lydtryksniveau er 85 db (A). Der er en usikkerhed på 3 db (A). Støjniveauet under arbejde kan overstige 85 db (A). Bær høreværn. Den vægtede effektive accelerationsværdi er 6 m/s 2. Disse værdier er beregnet i overensstemmelse med EN SVENSKA Endast för Europa Buller och vibration Den typiska-a-vägda ljudtrycksnivån är 85 db (A). Osäkerheten är 3 db (A). Bullernivån under pågående arbete kan överstiga 85 db (A). Använd hörselskydd Det typiskt vägda effektivvärdet för acceleration är 6m/s 2. Dessa värden har erhållits i enlighet med EN NORSK ENG004-2-V3 Gjelder bare land i Europa Støy og vibrasjon Det vanlige A-verktet lydtrykksnivå er 85 db (A). Usikkerheten er på 3 db (A). Under bruk kan støynivået overskride 85 db (A). Benytt hørselvern. Den vanlig belastede effektiv-verdi for akselerasjon er 6m/s 2. Disse verdiene er beregnet eller målt i samsvar med EN SUOMI Vain Euroopan maat Melutaso ja tärinä Tyypillinen A-painotettu äänenpainetaso on 85 db (A). Epävarmuus on 3 db (A). Melutaso työpaikalla saattaa ylittää 85 db (A). Käytä kuulosuojaimia. Tyypillinen kiihtyvyyden painotettu tehollisarvo on 6m/s 2. Nämä arvot on mitattu normin EN60745 mukaisesti. ΕΛΛΗΝΙΚΑ Μόνο για χώρες της Ευρώπης Θόρυβος και κραδασµός Η τυπική Α-µετρούµενη ηχητική πίεση είναι 85 db (A). Η Αβεβαιότητα είναι 3dB (A). Η ένταση ήχου υπο συνθήκες εργασίας µπορεί να µπερβεί τα 85 db (A). Φοράτε ωτοασπίδες. Η τυπική αξία της µετρούµενης ρίζας του µέσου τετραγώνου της επιτάχυνσης είναι 6 m/s 2. Αυτές οι τιµές έχουν σηµειωθεί σύµφωνα µε το ΕΝ

20 67

21 Makita Corporation Anjo, Aichi, Japan D991
GB Cordless Recipro Saw Instruction Manual Scie recipro sans fil Manuel d instructions Akku-Reciprosäge Betriebsanleitung
 GB Cordless Recipro Saw Instruction Manual F Scie recipro sans fil Manuel d instructions D Akku-Reciprosäge Betriebsanleitung I Seghetto diritto a batteria Istruzioni per l uso NL Snoerloze reciprozaag
Rhythm of Light. Susanne de Graef, Montagehandleiding / Instruction manual
 Rhythm of Light Susanne de Graef, 2016 Montagehandleiding / Instruction manual GELEVERD MATERIAAL / SUPPLIED MATERIAL B. C. D. A. E. F. A. B. C. D. E. F. armatuur / fixture fitting lange staalkabels (3)
Flybye. Ernst Koning, Montagehandleiding / Instruction manual
 Flybye Ernst Koning, 2018 Montagehandleiding / Instruction manual GELEVERD MATERIAAL / MATERIALS SUPPLIED A. B. C. D. E. F. G. A. B. C. D. E. F. G. H. H. lichtbuis / lighting tube plafondkap / ceiling
NEDERLANDS. Plaatselijke telefoonnummers voor de klantendienst kunt u vinden op: G-01 rev.
 For the latest User Installation Guide please visit: www.ergotron.com User's Guide - English Guía del usuario - Español Manuel de l utilisateur - Français Gebruikersgids - Deutsch Benutzerhandbuch - Nederlands
2000 Volkswagen Passat GLS
 REAR DOOR WINDOW Rear door window, assembly overview Fig. 304: Exploded View Of Rear Door Window 1 - Door Removing and installing: --> Rear door, removing and installing 2 - Spring nut Qty 2 3 - Screw
GB Cordless Impact Driver Instruction Manual Tournevis à chocs sans fil Manuel d instructions Akku-Schlagschrauber Betriebsanleitung
 GB Cordless Impact Driver Instruction Manual F Tournevis à chocs sans fil Manuel d instructions D Akku-Schlagschrauber Betriebsanleitung I Avvitatrice ad impulso a batteria Istruzioni per l uso NL Snoerloze
12 V UB120D 14.4 V UB140D
 GB Cordless Blower Instruction Manual F Aspirateur-ventilateur sans fil Manuel d instructions D Akku-Gebläse/Sauger Betriebsanleitung I Aspiratore/soffiatrice a batteria Istruzioni per l uso NL Accu blaas-en
Montagehandleiding: doucheset
 Montagehandleiding: doucheset Installation manual: showerset 0 6 5 7 8 9 0 8 9 7 5 6 Controleer voor installatie of alle onderdelen aanwezig zijn. Check if all parts are present before installation. 5
GB Cordless Screwdriver Instruction Manual Visseuse sans fil Manuel d instructions Akku-Schrauber Betriebsanleitung
 GB Cordless Screwdriver Instruction Manual F Visseuse sans fil Manuel d instructions D Akku-Schrauber Betriebsanleitung I Avvitatrice a batteria Istruzioni per l uso NL Snoerloze schroevendraaier Gebruiksaanwijzing
2006 Volkswagen Jetta TDI
 Door handle and door lock, assembly overview The illustration shows the left side. The right side is derived accordingly from this. Fig. 99: Door Handle And Door Lock, Assembly Overview 1 - Cable For disengaging
Smeertechniek Rotterdam Cairostraat 74 3047 BC Rotterdam Tel.: 010 466 62 55 Fax 010 466 66 55 Internet: www.smeertechniek.
 DEZE KOPPELINGEN WORDEN GEBRUIKT IN OLIE- EN VETSMEERSYSTEMEN IN PLAATS VAN DE SNIJRINGKOPPELINGEN ( SNIJRING & DRUKMOER ) KOPPELEN EN ONTKOPPELEN VAN DE LEIDING KAN HERHAALD WORDEN ZONDER BESCHADIGING
GB Jig Saw Instruction Manual F Scie Sauteuse Manuel d instructions D Stichsäge Betriebsanleitung
 GB Jig Saw Instruction Manual F Scie Sauteuse Manuel d instructions D Stichsäge Betriebsanleitung I Seghetto alternativo Istruzioni per l uso NL Decoupeerzaag Gebruiksaanwijzing E Sierra Caladora Manual
Quick start guide. Powerbank MI Mah. Follow Fast All rights reserved. Page 1
 Quick start guide Powerbank MI 16.000 Mah Follow Fast 2016 - All rights reserved. Page 1 ENGLISH The Mi 16000 Power Bank is a very good backup option for those on the move. It can keep you going for days
GB Cordless Angle Impact Driver Instruction Manual Visseuse d angle à chocs à batterie Manuel d instructions
 GB Cordless Angle Impact Driver Instruction Manual F Visseuse d angle à chocs à batterie Manuel d instructions D Akku-Winkel-Schlagschrauber Betriebsanleitung I Avvitatore angolare ad impulso a batteria
GB Cordless Cutter Instruction Manual Scie diamant sans fil Manuel d instructions Akku- Glas- und Fliesenschneider Betriebsanleitung
 GB Cordless Cutter Instruction Manual F Scie diamant sans fil Manuel d instructions D Akku- Glas- und Fliesenschneider Betriebsanleitung I Sega al diamante a batteria Istruzioni per l uso NL Accu tegel-
OUTDOOR HD BULLET IP CAMERA PRODUCT MANUAL
 OUTDOOR HD BULLET IP CAMERA PRODUCT MANUAL GB - NL GB PARTS & FUNCTIONS 1. 7. ---- 3. ---- 4. ---------- 6. 5. 2. ---- 1. Outdoor IP camera unit 2. Antenna 3. Mounting bracket 4. Network connection 5.
Mobile concrete base
 1 14 Mobile concrete base UMBASM8000000000 Mobile concrete base UMBASM8000000000 Congratula ons with your purchase! Please completely read and follow all the instruc ons. pg. 3 Proficiat met uw aankoop!
GB Cordless Circular Saw Instruction Manual Scie circulaire sans fil Manuel d instructions Akku-Handkreissäge Betriebsanleitung
 GB Cordless Circular Saw Instruction Manual F Scie circulaire sans fil Manuel d instructions D Akku-Handkreissäge Betriebsanleitung I Sega circolare a batteria Istruzioni per l uso NL Accu cirkelzaag Gebruiksaanwijzing
GB Codless Grass Shear Instruction Manual Taille-herbes sans fil Manuel d instructions Akku-Grasschere Betriebsanleitung
 GB Codless Grass Shear Instruction Manual F Taille-herbes sans fil Manuel d instructions D Akku-Grasschere Betriebsanleitung I Tosaerba a batteria Istruzioni per l uso NL Accu grasschaar Gebruiksaanwijzing
Dagelijkse checklist Daily checklist
 Dagelijkse checklist Daily checklist Sluiting met snelspanner Verstelbare hoofdsteun Verstelbare en aanpasbare riem Verstelbare voetsteunen Verstelbare riemen van de voetsteun Quick release locked Head
OUTDOOR HD DOME IP CAMERA PRODUCT MANUAL GB - NL
 OUTDOOR HD DOME IP CAMERA PRODUCT MANUAL GB - NL GB PARTS & FUNCTIONS 2. ---- 1. ---- 3. ---- 7. ---------- 5. 4. 6. 1. Outdoor IP camera unit 2. Antenna 3. Mounting bracket 4. Network connection 5. Power
ATD Floor Fan Owner s Manual Features:
 ATD-30320 20 Floor Fan Owner s Manual Features: Made in China to ATD Tools, Inc. Specifications Visit us at www.atdtools.com General Safety Warnings: WARNING: The in and warnings ned in this manual d be
1/8 ATLAS Atlas cabinet cabinet 1 7
 TLS cabinet / / / 0 D E F G H / L x Lx x L / x x D E Dx Ex / x x x x x x Fx x Hx Gx Fx Fx Fx Fx G H G H H G 0 0 0 0 0 / L / 0 NL: Deze kast bevat twee gaten aan de achterkant om aan de wand te kunnen bevestigen.
Limpid Light. design Esther Jongsma & Sam van Gurp, Montagehandleiding / Assembly Instructions
 Limpid Light design Esther Jongsma & Sam van Gurp, 05 Montagehandleiding / Assembly Instructions GELEVERD MATERIAAL / SUPPLIED MATERIAL A. A. B. B. C. D. E. F. G. G. H. I. J. K. / / ophanging / suspension:
GB Blower Instruction Manual Aspirateur Manuel d instructions Gebläse Betriebsanleitung
 GB Blower Instruction Manual F Aspirateur Manuel d instructions D Gebläse Betriebsanleitung I Soffiatrice-Aspiratore Istruzioni per l uso NL Blazer Gebruiksaanwijzing E Sopladora Aspiradora Manual de instrucciones
Function checklist for the ML-350 or XL-350 with a print set. Missing loop.
 Function checklist for the ML-350 or XL-350 with a 260217 print set. Below mentioned check-point should resolve function problems of the lift systems. Missing loop. When a lift is connected to an external
Procedure Reset tv-toestellen:
 Procedure Reset tv-toestellen: Volgende procedure is te volgen wanneer er een tv-toestel, op een van de kamers niet meer werkt. TV Re-installation Factory Default Her-installeren van de TV Fabrieksinstellingen
The upside down Louisa tutorial by Dorothée: Noortjeprullemie.blogspot.be Written for Compagnie M.: m.com
 The upside down Louisa tutorial by Dorothée: Noortjeprullemie.blogspot.be Written for Compagnie M.: www.compagnie- m.com Dorothée heeft een unieke Compagnie M. hack gemaakt: de Louisa op zijn kop. Als
EU Declaration of Conformity and safety instructions EU Conformiteitsverklaring en veiligheidsinstructies
 EU Declaration of Conformity and safety instructions EU Conformiteitsverklaring en veiligheidsinstructies Battery operated UNICOM 300 N51 UNICOM 300 met batterijvoeding N51 Explosion safety instructions
7.2 V DA 302D 9.6 V DA392D 12V DA312D
 GB Cordless Angle Drill Instruction Manual F Perceuse d angle sans fil Manuel d instructions D Akku-Winkelbohrmaschine Betriebsanleitung I Trapano ad angolo a betteria Istruzioni per l uso NL Haakse boormachine
PIR DC-SWITCH. DC Passive infra-red Detector. Model No. PDS-10 GEBRUIKSAANWIJZING/INSTRUCTION MANUAL
 PIR DC-SWITCH DC Passive infra-red Detector Model No. PDS-10 GEBRUIKSAANWIJZING/INSTRUCTION MANUAL Please read this manual before operating your DETECTOR PIR DC-Switch (PDS-10) De PDS-10 is een beweging
GB Cordless Impact Driver Instruction Manual Visseuse à chocs sans fil Manuel d instructions Akku-Schlagschrauber Betriebsanleitung
 GB Cordless Impact Driver Instruction Manual F Visseuse à chocs sans fil Manuel d instructions D Akku-Schlagschrauber Betriebsanleitung I Avvitatore ad impulso a batteria Istruzioni per l uso NL Accu-slagschroevendraaier
MONTAGE INSTRUCTIE ASSEMBLY INSTRUCTION
 MONTAGE INSTRUCTIE ASSEMBLY INSTRUCTION - 1. Waterpas stellen. De groef aan de zijkant van de beschermdeksel moet gelijk staan met de deellijn van het inbouw box. 2. Zet de inbouw box vast in de muur.
Digitale ph-meter. Specificaties Bereik: pH Resolutie: 0.01pH Nauwkeurigheid: ±0.1pH Automatische Temperatuur Compensatie:
 Digitale ph-meter Specificaties Bereik: 0.00-14.00pH Resolutie: 0.01pH Nauwkeurigheid: ±0.1pH Automatische Temperatuur Compensatie: Batterij: 4XLR44 (1.5V) Knoopcel Gebruikstemperatuur: Kalibratie: Handmatig
EM7680 Firmware Update by Micro SD card
 EM7680 Firmware Update by Micro SD card 2 NEDERLANDS/ENGLISH EM7680 Firmware update by Micro SD card Table of contents 1.0 (NL) Introductie... 2 2.0 (NL) Firmware installeren... 2 3.0 (NL) Opmerking...
FSW-VW-2X2 FSW-VW. Handleiding / Manual
 FSW-VW-2X2 FSW-VW Handleiding / Manual Rev. 1.0 17-03-2014 I Pakketinhoud / Content Accessoires Benodigde gereedschappen / Required Tools Montage / Assembling Onderhoud / Maintenance Veel Gestelde Vragen
ANT S KINGDOM Here is some advice for setting up your Master Ant Farm!
 ANT S KINGDOM Master NL EN Instructies Mierenboerderij Master Bedankt voor je bestelling van de Mierenboerderij Master. De beste keus! Installatie NL Naast de informatie die te lezen is in ons boekje
Lockable Tablet Mount
 Benutzerhandbuch Lockable Tablet Mount resulting resulting in in possible possible equipment equipment damage. damage. create create an an unsecured unsecured installation installation and and may may
BFT020F BFT021F BFT040F BFT080F BFT122F BFT081F BFT123F
 GB Cordless Screwdriver Instruction Manual F Visseuse sans fil Manuel d instructions D Akku-Schrauber Betriebsanleitung I Avvitatrice a batteria Istruzioni per l uso NL Snoerloze schroevendraaier Gebruiksaanwijzing
GB Blower Instruction Manual F Souffleur Manuel d instructions D Gebläse Betriebsanleitung
 GB Blower Instruction Manual F Souffleur Manuel d instructions D Gebläse Betriebsanleitung I Soffiatore Istruzioni per l uso NL Luchtblazer Gebruiksaanwijzing E Sopladora Manual de instrucciones P Soprador
liniled Cast Joint liniled Gietmof liniled Castjoint
 liniled Cast Joint liniled Gietmof liniled is een hoogwaardige, flexibele LED strip. Deze flexibiliteit zorgt voor een zeer brede toepasbaarheid. liniled kan zowel binnen als buiten in functionele en decoratieve
6260D 6270D 6280D 6390D
 GB Cordless Driver Drill Instruction Manual F Perceuse-visseuse sans fil Manuel d instructions D Akku-Bohrschrauber Betriebsanleitung I Trapano-avvitatore a batteria Istruzioni per l uso NL Snoerloze boor-/schroevendraaier
KIDSMILL BLADVERGROTER LARS/FYNN
 KIDSMILL BLADVERGROTER LARS/FYNN Zorg ervoor dat de montagematerialen (schroeven, bouten e.d.) altijd goed vast zitten. Controleer dit regelmatig. Wees bewust van het risico van open vuur of andere sterke
V01.indd :06
 2015.021.00V01.indd 1 02-07-18 11:06 2015.021.00V01.indd 2-3 02-07-18 11:06 nl ICONEN LEGENDA en ICONS LEGEND nl ICONEN LEGENDA en ICONS LEGEND Dit product voldoet aan de Richtlijn Medische hulpmiddelen
6207D 6217D 6317D 6337D 6347D
 GB Cordless Driver Drill Instruction Manual F Perceuse-visseuse sans fil Manuel d instructions D Akku-Bohrschrauber Betriebsanleitung I Trapano-avvitatore a batteria Istruzioni per l uso NL Snoerloze boor-schroevedraaier
DJV142 DJV182. GR Σέγα μπαταρίας Οδηγίες χρήσης
 GB Cordless Jig Saw Instruction manual F Scie sauteuse sans fil Manuel d instructions D Akku-Stichsäge Betriebsanleitung I Sega da traforo a batteria Istruzioni per l uso NL Accudecoupeerzaag Gebruiksaanwijzing
EM7580 Firmware Update by Micro SD card
 EM7580 Firmware Update by Micro SD card 2 NEDERLANDS/ENGLISH EM7580 Firmware update by Micro SD card Table of contents 1.0 (NL) Introductie... 3 2.0 (NL) Firmware installeren... 3 3.0 (NL) Opmerking...
Kies uit setje A of B voor deze bakfiets Choose between set A or B for this transportbike
 Kies uit setje A of B voor deze bakfiets Choose between set A or B for this transportbike A A Selecteer op bestelformulier: Houtenbak gat 5 punts bevestiging Set A: standaard setje voor bevestiging icm
256 kb Memory in NMS 8250, 8255 and 8280
 256 kb Memory in NMS 8250, 8255 and 8280 Supplied by Bastiaan Huber, 2001 Converted to PDF by HansO, 2001 Dutch text follows the english text! MEMORY-UPGRADE to 256Kb This description is only for people
Dustless Cutter Instruction Manual Scie Diamanté Manuel d Instructions Diamantschneider Betriebsanleitung
 GB Dustless Cutter Instruction Manual F Scie Diamanté Manuel d Instructions D Diamantschneider Betriebsanleitung I Troncatrice con Aspirapolvere Istruzioni d Uso NL Diamant zaag droog Gebruiksaanwijzing
Gebruiksaanwijzing Pagina 14. Koelkast met explosieveilige binnenkuip Voor de inbedrijfstelling de gebruiksaanwijzing lezen 7083 099-00.
 Gebruiksaanwijzing Pagina 14 Koelkast met explosieveilige binnenkuip Voor de inbedrijfstelling de gebruiksaanwijzing lezen NL 7083 099-00 LKexv Changing over door hinges Door hinges should only be changed
NEDERLANDS. Display Instructies. Knoppen. Geeft afwisselend Tijd, Datum en Temperatuur weer, kan ook ingesteld worden op enkel tijd
 NEDERLANDS Het ziet eruit als een simpel blokje hout, maar maak een geluid (knip met je vingers, kuch, klap in je handen, of tip op de bovenkant) en het geeft onmiddelijk en afwisselend tijd, datum en
KIDSMILL BLADVERGROTER SHAKERY II /LOFT
 KIDSMILL BLADVERGROTER SHAKERY II /LOFT Zorg ervoor dat de montagematerialen (schroeven, bouten e.d.) altijd goed vast zitten. Controleer dit regelmatig. Wees bewust van het risico van open vuur of andere
6203D 6213D/6313D 6233D/6333D
 GB Cordless Driver Drill Instruction Manual F Perceuse-visseuse sans fil Manuel d instructions D Akku-Bohrschrauber Betriebsanleitung I Trapano-avvitatore a batteria Istruzioni per l uso NL Snoerloze boor-schroevedraaier
INSTALLATION INSTRUCTION
 TV MOUNT INSTALLATION INSTRUCTION MODEL:HA051 HA051-T1 HA051-T6 Max VESA: 200 X 200 mm/8x8" Please read this instruction carefully before installation. Fits for most 14-32 inches Plasma, LCD and LED TVs.
Introductie in flowcharts
 Introductie in flowcharts Flow Charts Een flow chart kan gebruikt worden om: Processen definieren en analyseren. Een beeld vormen van een proces voor analyse, discussie of communicatie. Het definieren,
Firewall van de Speedtouch 789wl volledig uitschakelen?
 Firewall van de Speedtouch 789wl volledig uitschakelen? De firewall van de Speedtouch 789 (wl) kan niet volledig uitgeschakeld worden via de Web interface: De firewall blijft namelijk op stateful staan
EU Declaration of Conformity and safety instructions EU Conformiteitsverklaring en veiligheidsinstructies ISC 230B
 EU Declaration of Conformity and safety instructions EU Conformiteitsverklaring en veiligheidsinstructies ISC 230B Explosion safety instructions (Ex) (EN) ISC230B is approved for use outside the explosion-hazardous
B1 Woordkennis: Spelling
 B1 Woordkennis: Spelling Bestuderen Inleiding Op B1 niveau gaan we wat meer aandacht schenken aan spelling. Je mag niet meer zoveel fouten maken als op A1 en A2 niveau. We bespreken een aantal belangrijke
Hoe maak ik zelf AngelEyes? / How to make AngelEyes?
 Hoe maak ik zelf AngelEyes? / How to make AngelEyes? Verwijder de clips bovenaan de gril. Dit zijn platte klemmetjes (3 stuks in totaal) Remove de clips on top of the grill. These are those flat things
9.6 V 6226D 12 V 6227D 14.4 V 6228D
 GB Cordless Driver Drill Instruction Manual F Perceuse-visseuse sans fil Manuel d instructions D Akku-Bohrschrauber Betriebsanleitung I Trapano-avvitatore a batteria Istruzioni per l uso NL Snoerloze boor-schroevedraaier
Alistair LED stairwell luminaire Handleiding Alistair (Emergency UC03 sensor)
") Alistair LED stairwell luminaire Handleiding Alistair (Emergency UC03 sensor) Let op: Als het flexibele draad van dit licht beschadigd is, dient het te worden vervangen door iemand van de technische service,
Alistair LED stairwell luminaire Handleiding Alistair (Emergency UC03 sensor) Let op: Als het flexibele draad van dit licht beschadigd is, dient het te worden vervangen door iemand van de technische service,
Microsoft Surface achterklep Replacement
 Microsoft Surface achterklep Replacement Deze gids instrueert gebruikers over hoe de achterkant van een Microsoft Surface verwijderen om toegang tot de interne componenten te krijgen. Geschreven door:
LOAD SECURING PROCEDURE IN 15 FT/20 FT HOT CONTAINER
 Page: 1 of 5 Page: 2 of 5 Load securing SNS Pool procedure Den Helder in the Procedure 15 ft/20 ft vastzetten hot containers lading according in de 15 ft/20 ft to the NOGEPA guidelines hot containers volgens
Handleiding Zuludesk Parent
 Handleiding Zuludesk Parent Handleiding Zuludesk Parent Met Zuludesk Parent kunt u buiten schooltijden de ipad van uw kind beheren. Hieronder vind u een korte handleiding met de mogelijkheden. Gebruik
180 mm 9067/9067S/9067L/9067H 9067F/9067SF 230 mm 9069/9069S/9069H 9069F/9069SF
 GB Angle Grinder Instruction Manual F Meuleuse d angle Manuel d instructions D Winkelschleifer Betriebsanleitung I Smerigliatrice angolare Istruzioni per l uso NL Haakse slijpmachine Gebruiksaanwijzing
L.Net s88sd16-n aansluitingen en programmering.
 De L.Net s88sd16-n wordt via één van de L.Net aansluitingen aangesloten op de LocoNet aansluiting van de centrale, bij een Intellibox of Twin-Center is dat de LocoNet-T aansluiting. L.Net s88sd16-n aansluitingen
Alistair LED stairwell luminaire Handleiding Alistair (UC03 sensor)
") Alistair LED stairwell luminaire Handleiding Alistair (UC03 sensor) Let op: Als het flexibele draad van dit licht beschadigd is, dient het te worden vervangen door iemand van de technische service, of
Alistair LED stairwell luminaire Handleiding Alistair (UC03 sensor) Let op: Als het flexibele draad van dit licht beschadigd is, dient het te worden vervangen door iemand van de technische service, of
DA301D DA391D DA301D DA301D
 GB Cordless Angle Drill Instruction Manual F Perceuse d angle sans fil Manuel d instructions D Akku-Winkelbohrmaschine Betriebsanleitung I Trapano ad angolo a batteria Istruzioni per l uso NL Haakse boormachine
Συρόμενο σύνθετο φαλτσοπρίονο Οδηγίες χρήσης
 GB Slide Compound Miter Saw Instruction manual F Scie à onglet radiale Manuel d instructions D Kapp- und Gehrungssäge Betriebsanleitung I Troncatrice radiale per legno Istruzioni per l uso NL Schuifbare
GB Power Planer Instruction Manual F Rabot Manuel d instructions D Falzhobel Betriebsanleitung I Pialla Istruzioni per l uso NL Schaafmachine
 GB Power Planer Instruction Manual F Rabot Manuel d instructions D Falzhobel Betriebsanleitung I Pialla Istruzioni per l uso NL Schaafmachine Gebruiksaanwijzing E Cepillo Manual de instrucciones P Plaina
PANEELRADIATOR - Type PR Handleiding. PANEL RADIATOR - Type PR Manual
 Fax. +31 (0)227-549 150 Website: www.sinusjevi.com PANEELRADIATOR - Type PR Handleiding PANEL RADIATOR - Type PR Manual Page 2 of 8 Page 3 of 8 Technische informatie Spanning: 230 of 400 Volt Vermogen:
Verklaring van Conformite
 Verklaring van Conformite Wij, ondergetekende, Digital Data Communications GmbH Adres certificeert en verklaart onder eigen verantwoordelijkheid dat het volgende product Omschrijving Ethernet converter
Verklaring van Conformite
 Verklaring van Conformite Wij, ondergetekende, Adres certificeert en verklaart onder eigen verantwoordelijkheid dat het volgende product Omschrijving Merk Identificatie In overeenstemming is met de essentiële
!!!! Wild!Peacock!Omslagdoek!! Vertaling!door!Eerlijke!Wol.!! Het!garen!voor!dit!patroon!is!te!verkrijgen!op! Benodigdheden:!!
 WildPeacockOmslagdoek VertalingdoorEerlijkeWol. Hetgarenvoorditpatroonisteverkrijgenopwww.eerlijkewol.nl Benodigdheden: 4strengenWildPeacockRecycledSilkYarn rondbreinaaldnr8(jekuntnatuurlijkookgewonebreinaaldengebruiken,maar
ÛÙË ËÁ Â Ú Ûˆ HK1800 HK1810
 GB Power Scraper Instruction Manual F Burineur Manuel d Instructions D Kratzer Betriebsanleitung I Scalpellatore Istruzioni d Uso NL Bikhamer Gebruiksaanwijzing E Raspadora Manual de Instrucciones P Hartelo
RECEPTEERKUNDE: PRODUCTZORG EN BEREIDING VAN GENEESMIDDELEN (DUTCH EDITION) FROM BOHN STAFLEU VAN LOGHUM
 FROM BOHN STAFLEU VAN LOGHUM") Read Online and Download Ebook RECEPTEERKUNDE: PRODUCTZORG EN BEREIDING VAN GENEESMIDDELEN (DUTCH EDITION) FROM BOHN STAFLEU VAN LOGHUM DOWNLOAD EBOOK : RECEPTEERKUNDE: PRODUCTZORG EN BEREIDING VAN STAFLEU
Read Online and Download Ebook RECEPTEERKUNDE: PRODUCTZORG EN BEREIDING VAN GENEESMIDDELEN (DUTCH EDITION) FROM BOHN STAFLEU VAN LOGHUM DOWNLOAD EBOOK : RECEPTEERKUNDE: PRODUCTZORG EN BEREIDING VAN STAFLEU
EM7680 Firmware Update by OTA
 EM7680 Firmware Update by OTA 2 NEDERLANDS/ENGLISH EM7680 Firmware update by OTA Table of contents 1.0 (NL) Introductie... 3 2.0 (NL) Firmware installeren... 3 3.0 (NL) Release notes:... 3 4.0 (NL) Overige
MyDHL+ Van Non-Corporate naar Corporate
 MyDHL+ Van Non-Corporate naar Corporate Van Non-Corporate naar Corporate In MyDHL+ is het mogelijk om meerdere gebruikers aan uw set-up toe te voegen. Wanneer er bijvoorbeeld meerdere collega s van dezelfde
Settings for the C100BRS4 MAC Address Spoofing with cable Internet.
 Settings for the C100BRS4 MAC Address Spoofing with cable Internet. General: Please use the latest firmware for the router. The firmware is available on http://www.conceptronic.net! Use Firmware version
8+ 60 MIN Alleen te spelen in combinatie met het RIFUGIO basisspel. Only to be played in combination with the RIFUGIO basicgame.
 8+ 60 MIN. 2-5 Alleen te spelen in combinatie met het RIFUGIO basisspel. Only to be played in combination with the RIFUGIO basicgame. HELICOPTER SPEL VOORBEREIDING: Doe alles precies hetzelfde als bij
GB Power Scraper Instruction Manual Burineur Manuel d Instructions Kratzer Betriebsanleitung
 GB Power Scraper Instruction Manual F Burineur Manuel d Instructions D Kratzer Betriebsanleitung I Scalpellatore Istruzioni d Uso NL Bikhamer Gebruiksaanwijzing E Raspadora Manual de Instrucciones P Hartelo
Handleiding. #MAKEITHAPPEN Bewaar deze handleiding als naslag. Handleiding_Kranen_Kraan-6_v1. Canim Gladstone Niagra Victoria Vidago
 Handleiding Handleiding_Kranen_Kraan-6_v1 Canim Gladstone Niagra Victoria Vidago Please keep these instructions for future reference. NO. FITBTBL04V1.0 #MAKEITHAPPEN Bewaar deze handleiding als naslag.
Lockable Tablet Mount
 with with arms arms on on the the Benutzerhandbuch Lockable Tablet Mount DO NOT mount tablet sides sides or or ends ends of of the the tablet. tablet. Only Only attach attach arms arms to to the the corners
GB Metal Shear Instruction Manual F Cisaille Manuel d instructions D Blechschere Betriebsanleitung
 GB Metal Shear Instruction Manual F Cisaille Manuel d instructions D Blechschere Betriebsanleitung I Cesoia per metalli Istruzioni per l uso NL Plaatschaar Gebruiksaanwijzing E Cizalla para Metal Manual
Zone 1 and zone 2 Zone 21 and zone 22
 s en contactdozen s and sockets Productoverzicht Product overview Omschrijving: Index Elektro produceert een volledige lijn explosieveilige stekkers en contactdozen onder eigen certificaat. Deze worden
Mounting ceiling & wall
 5 / profile 34 bending radius R 15*) (1015) R 20 (1015) R 30 (1015) R>80 (1018) filler position profile 26 bending radius filler position R 15*) (1015) R 25 (1015) R>100 (1018) 28 15 405 gr/m 522 gr/m
Κατσαβίδι μπαταρίας Οδηγίες χρήσης
 GB Cordless Screwdriver Instruction manual F Visseuse sans Fil Manuel d instructions D Akku-Schrauber Betriebsanleitung I Avvitatore senza fili Istruzioni per l uso NL Accuschroefmachine Gebruiksaanwijzing
Quality requirements concerning the packaging of oak lumber of Houthandel Wijers vof (09.09.14)
") Quality requirements concerning the packaging of oak lumber of (09.09.14) Content: 1. Requirements on sticks 2. Requirements on placing sticks 3. Requirements on construction pallets 4. Stick length and
Quality requirements concerning the packaging of oak lumber of (09.09.14) Content: 1. Requirements on sticks 2. Requirements on placing sticks 3. Requirements on construction pallets 4. Stick length and
MyDHL+ Uw accountnummer(s) delen
 delen") MyDHL+ Uw accountnummer(s) delen met anderen Uw accountnummer(s) delen met anderen in MyDHL+ In MyDHL+ is het mogelijk om uw accountnummer(s) te delen met anderen om op uw accountnummer een zending te
MyDHL+ Uw accountnummer(s) delen met anderen Uw accountnummer(s) delen met anderen in MyDHL+ In MyDHL+ is het mogelijk om uw accountnummer(s) te delen met anderen om op uw accountnummer een zending te
INBEGREPEN ACCESSOIRES LIJST ONDERDELEN LIJST ASSEMBLAGE DIAGRAM. M8x50 mm bout (4 stuks) Schroevendraaier 10, 13, 15, 17 (1 stuk)
 Schroevendraaier 10, 13, 15, 17 (1 stuk)") OXISTEP HANDLEIDING INBEGREPEN ACCESSOIRES LIJST M8x50 mm bout (4 stuks) Ø 8 Sluitring (6 stuks) M8 moerkap (6 stuks) Schroevendraaier 10, 13, 15, 17 (1 stuk) Ø 8 Sluitring (11 stuks) M8 moer (3 stuks)
OXISTEP HANDLEIDING INBEGREPEN ACCESSOIRES LIJST M8x50 mm bout (4 stuks) Ø 8 Sluitring (6 stuks) M8 moerkap (6 stuks) Schroevendraaier 10, 13, 15, 17 (1 stuk) Ø 8 Sluitring (11 stuks) M8 moer (3 stuks)
2019 SUNEXCHANGE USER GUIDE LAST UPDATED
 2019 SUNEXCHANGE USER GUIDE LAST UPDATED 0 - -19 1 WELCOME TO SUNEX DISTRIBUTOR PORTAL This user manual will cover all the screens and functions of our site. MAIN SCREEN: Welcome message. 2 LOGIN SCREEN:
DALISOFT. 33. Configuring DALI ballasts with the TDS20620V2 DALI Tool. Connect the TDS20620V2. Start DALISOFT
 TELETASK Handbook Multiple DoIP Central units DALISOFT 33. Configuring DALI ballasts with the TDS20620V2 DALI Tool Connect the TDS20620V2 If there is a TDS13620 connected to the DALI-bus, remove it first.
Verklaring van Conformite
 Verklaring van Conformite Wij, ondergetekende, Digital Data Communications GmbH Adres certificeert en verklaart onder eigen verantwoordelijkheid dat het volgende product Omschrijving Print Server Merk
Meetkunde en Lineaire Algebra
 Hoofdstuk 1 Meetkunde en Lineaire Algebra Vraag 1.1 Het trapoppervlak is een afwikkelbaar oppervlak met oneindig veel singuliere punten. Vraag 1.2 Het schroefoppervlak is een afwikkelbaar oppervlak met
weaving on a frame loom materials
 weaving on a frame loom materials First you assemble the frame loom (A). Fasten the 2 sides of each beam together loosely with the bolts and wingnuts. Next you slide the rods into the holes in the beams.
ENG - Getting Started Quick Guide NL - Snel Aan De Slag Handleiding
 ENG - Getting Started Quick Guide NL - Snel Aan De Slag Handleiding Congrats with Dusty! Follow these 7 easy steps to get started with Red Dusty. 1. Remove Dusty from the 1 box. The internal battery will
WWW.EMINENT-ONLINE.COM
 WWW.EMINENT-OINE.COM HNDLEIDING USERS MNUL EM1016 HNDLEIDING EM1016 USB NR SERIEEL CONVERTER INHOUDSOPGVE: PGIN 1.0 Introductie.... 2 1.1 Functies en kenmerken.... 2 1.2 Inhoud van de verpakking.... 2
GB Cordless Driver Drill Instruction Manual Perceuse-visseuse sans fil Manuel d instructions Akku-Bohrschrauber Betriebsanleitung
 GB Cordless Driver Drill Instruction Manual F Perceuse-visseuse sans fil Manuel d instructions D Akku-Bohrschrauber Betriebsanleitung I Trapano-avvitatore Istruzioni per l uso NL Snoerloze boor-schroevedraaier