Profielloze cabine I-Shape Frameless cabin I-Shape
|
|
|
- Antoon de Coninck
- 5 jaren geleden
- Aantal bezoeken:
Transcriptie
 Installation manual (p.")
1 Profielloze cabine I-Shape Frameless cabin I-Shape Installatiehandleiding (p.2) Installation manual (p.32) Item no: NL208/06 R0 EN208/06 R0 NL EN
2 Cleopatra B.V. Oostzijde EN Zaandam Nederland Copyright Alle informatie in dit technische document, evenals de tekeningen en technische beschrijvingen beschikbaar gesteld door Cleopatra B.V., blijven eigendom van Cleopatra B.V. en mogen niet worden gekopieerd zonder toestemming. Cleopatra B.V. behoudt het recht voor om wijzigingen aan te brengen in het belang van verdere ontwikkelingen. Actueel op:
3 Inhoudsopgave Installatiehandleiding Voorwoord Waarschuwingen Overzicht Benodigde ruimte Benodigd gereedschap Bijgeleverd Installatie wandprofielen Voorbereiding Wandprofielen en wand voorbereiden Wandprofielen monteren Montage dak profielen Voorbereiding Dakprofiel installeren Installatie glaspanelen Voorbereiding Plaatsing van het glas op wandprofielen LINKS Plaatsing van het glas op wandprofielen RECHTS Installatie van het dak Dak inschuiven Plaatsing dakprofiel Afdichtingsprofiel plaatsen Deur plaatsen Scharnier Deur plaatsen Handgreep...27 Afwerking deur Voorbereiding Magneetstrip plaatsen Afwerking
4 Voorwoord Deze instructies zijn bedoeld voor de installateur. Lees deze instructies goed door om het product, de onderdelen en de installatie methodiek te leren kennen. Het vrijstaande bad moet worden geïnstalleerd door gekwalificeerde en goed opgeleid personeel. De profielloze cabine voldoet aan de geldende Europese normen en voorschriften en levert geen direct gevaar op voor de gebruiker indien het vrijstaande bad is geïnstalleerd volgens de instructies van de fabrikant en in navolging van deze handleiding wordt gebruikt. De mechanische onderdelen moeten zorgvuldig worden onderhouden zodat het stoomgenerator volledig operationeel blijft. Om deze reden moeten de instructies nauwgezet worden gevolgd. Alle informatie en instructies in deze handleiding zijn samengesteld met inachtneming van de geldende normen en voorschriften, de stand van de techniek en onze jarenlange ervaring en bevindingen. Nationale en lokale voorschriften moeten worden opgevolgd. Bekijk bij de levering het product na op eventuele transportschade. Na de installatie zal een vordering tot (oppervlakte) beschadigingen niet door Cleopatra worden aanvaard. Elk recht op garantie komt te vervallen als er aanpassingen aan het originele product, of onderdelen daarvan, zijn gemaakt. Deze handleiding moet dicht bij het product worden gehouden voor een snelle toegang als dat nodig is. Belangrijke instructie of beschrijving Let op: Algemeen gevaar Gebruik schroeven en pluggen om de profielloze cabine aan de muur te monteren. Muren die de profielloze cabine ondersteunen moeten sterk genoeg zijn om het gewicht te kunnen dragen; anders moeten deze worden versterkt. De meegeleverde pluggen en schroeven zijn bedoeld voor gebruik en beton of massief stenen muren. Indien de muren zijn vervaardigd van een ander materiaal,dan beton of maffieve stenen, gebruik dan materiaal dat geschikt is voor dat specifieke wand type. (niet bij levering inbegrepen). Cleopatra aanvaardt geen aansprakelijkheid voor schade veroorzaakt door: - Het niet in acht nemen van de handleiding. - Onjuist gebruik. - Installatie door niet gekwalificeerd personeel. - Ongeautoriseerde wijzigingen aan het product. - Technische wijzigingen. - Het gebruik van niet originele reserve onderdelen. Correct gebruik: - De profielloze cabine mag alleen binnenshuis worden gebruikt. - Gebruik op een andere wijze is niet toegestaan en is voor eigen risico van de gebruiker. - Gebruik de profielloze cabine niet wanneer deze niet perfecte staat verkeerd. - Gebruik dit product niet in een omgeving waar het wordt blootgesteld aan corrosie. 4
5 2 Waarschuwingen Zonder toestemming en zonder aanwijzingen is het gebruik van de stoomcabine voor de volgende personen verboden: - Kinderen. - Volwassenen met psychische, mentale en/of sensorische beperkingen. - Personen die niet geïstrueerd zijn, over waar de stoomcabine voor bedoeld is. - Personen onder invloed van alcohol of drugs. - Stoomcabine alleen betreden zonder make-up. Het meebrengen van elektrische apparaten in de cabine is verboden! Waarschuwing hete oppervlakken. De stoominlaat, maar ook de nabije omgeving hiervan zijn heel heet. Niet aanraken i.v.m. verbrandingsgevaar. Niet direct de hete damp aanraken i.v.m. verbrandingsgevaar. Waarschuwing voor uitglijden. De bodem van de cabine kan glad zijn. Voor het gebruik van de stoomcabine moet de gebruikshandleiding zorgvuldig worden doorgelezen! Maximale verblijfstijd in de cabine: 5 min Luchtvochtigheid in de cabine: 00% Maximale temperatuur in de cabine: C 5

6 3 Overzicht A B C D E H P O N M L K J I G F A G H I K M P A: Dakprofiel wand smal I: Kunststof klemprofiel B: Dakprofiel voorzijde breed J: Glazen wand C: Dak K: Kunststof afdichtprofiel dak-glas D: Dakprofiel wand breed L: Scharnier E: Wanden M: Kunststof glas profiel F: Vloer N: Glazen deur G: Aluminium U-profiel wand O: Handgreep H: Kunststof L-profiel wand P: Magneetprofiel
7 4 Benodigde ruimte Minimale hoogte boven glas: 200mm Ventilatie: min. 50mm HG Raindance Rainmaker Air: 30mm 200mm 7


 : Tape 2:")


 8: Lijmtape 9:")
8 5 Benodigd gereedschap Bijgeleverd : Kitpistool 2: Meetlint 3: Waterpas 4: Winkelhaak 5: Potlood 6: Inbussleutel 7, 3 (Bijgeleverd) 7: Stanley mes 8: Zachte rubberen hamer 9: Boormachine 0: Boorset (tegelboren) : Tape 2: Schroevendraaier (kruiskop) 3: Ladder 4: Handzaag 5: Steeksleutel 7 6: Leidingzoeker 7: Stelblokje (Versch. maten) 8: Lijmtape 9: Plakhulp 20: Bevestigingsmaterialen 60735XX
9 6 Installatie wandprofielen 6. Voorbereiding Gewenste diepte voorzijde glaswand 2 3 9
10 6.2 Wandprofielen en wand voorbereiden 2 standaard hoogte 2500mm gewenste hoogte (hoogte v.h. glas) Boren + verzinken Aluminium profiel Aluminium profiel 3 0
11 4 Controlleer met de leidingzoeker of alle gaten zonder problemen geboord kunnen worden. 5 Siliconen kit achterop Siliconen kit achterop

12 6.3 Wandprofielen monteren Aluminium profiel LET OP!! Ribbels van de profielen aan de binnenzjide van de cabine. 2
13 7 Montage dak profielen 7. Voorbereiding Dakprofiel aluminium 5mm Zijaanzicht Aluminium wandprofiel 2 Dakprofiel aluminium 3x 3
14 3 Controlleer met de leidingzoeker of alle gaten zonder problemen geboord kunnen worden. 7.2 Dakprofiel installeren Dakprofiel aluminium 4
15 2 3 Dakprofiel aluminium 5mm mm Aluminium wandprofiel Dakprofiel wand breed mm 2 3 Vooraanzicht links Dakprofiel wand smal 5
16 8 Installatie glaspanelen 8. Voorbereiding 2 2x Kunststof L-profiel wand 2x Kunststof klemprofiel wand standaard hoogte 2500mm hoogte v.h. glas standaard hoogte 2500mm hoogte v.h. glas 6


17 8.2 Plaatsing van het glas op wandprofielen LINKS? Kunststof L-profiel wand Plaats het glas NOOIT direct op de vloertegel! Plaats het glas NOOIT direct op de vloertegel! Gebruik ten alle tijden stelblokjes. Deze kunnen ook gebruikt worden om de cabine waterpas te maken. Ook is het belangrijk dat bij alle wanden het glas haaks op de muur staat. Meet dit na met een winkelhaak. 2 Glas Vloer VOORBEELD IS EEN OVERDREVEN WEERGAVE Stelblokjes 7
18 3 90 Wanneer het eerste glaswand perfect waterpas staat, met behulp van stelblokes, moet de glaswand in het profiel gefixeerd worden. Dit gebeurt met zogenaamde kunststof klemprofielen. ALS DE INSTEEKPROFIELEN ERIN ZITTEN, IS DIT DEFINITIEF. 4 Kunststof klemprofiel wand 8
19 8.3 Plaatsing van het glas op wandprofielen RECHTS Kunststof L-profiel wand Plaats het glas NOOIT direct op de vloertegel! Plaats het glas NOOIT direct op de vloertegel! Gebruik ten alle tijden stelblokjes. Deze kunnen ook gebruikt worden om de cabine waterpas te maken. Ook is het belangrijk dat bij alle wanden het glas haaks op de muur staat. Meet dit na met een winkelhaak. 2 Glas Vloer VOORBEELD IS EEN OVERDREVEN WEERGAVE Stelblokjes 9
20 3 90 Wanneer het eerste glaswand perfect waterpas staat, met behulp van stelblokes, moet de glaswand in het profiel gefixeerd worden. Dit gebeurt met zogenaamde kunststof klemprofielen. ALS DE INSTEEKPROFIELEN ERIN ZITTEN, IS DIT DEFINITIEF. 4 Kunststof klemprofiel wand 20
21 9 Installatie van het dak 9. Dak inschuiven 2 2
22 9.2 Plaatsing dakprofiel Handvast
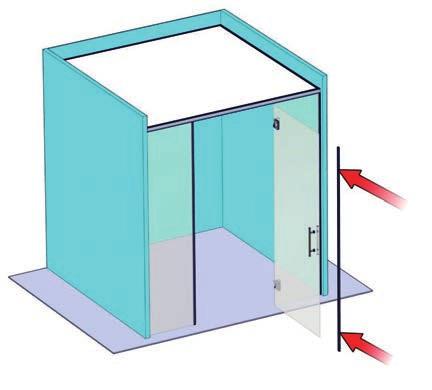
23 9.3 Afdichtingsprofiel plaatsen Buiten de cabine Binnen de cabine 2 platte kop Draai vast 4x 23
24 0 Deur plaatsen 0. Scharnier Bij de leveringsomvang zitten 2 deurscharnieren. Om deze te plaatsen moeten er alvorens een aantal stappen doorlopen worden. Schroef met een schroevendraaier de afdekplaten los. Plaats de rubbers met de juiste dikte op alle oppervlaktes van het scharnier. LET OP DE RUBBER-DIKTEMAAT!! Glas D: 5/6 (8mm) -> Rubber D: 8mm DEZE NIET GEBRUIKEN!! ZITTEN WEL BIJ DE LEVERINGSOMVANG Glas D: 3/8 (0mm) -> Rubber D: 0-2mm Glas D: /2 (2mm) -> Rubber D: 0-2mm Vervang de kruiskop boutjes door de meegeleverde inbus boutjes. Het inbussleuteltje is ook meegeleverd. Smeer geen smeermiddel op deze scharnieren! sleutel 6 kruiskop MEL - 3/25 (8mm) 24
25 0.2 Deur plaatsen 2 2X 25
26 Plaats het glas NOOIT direct op de vloertegel! Gebruik ten alle tijden stelblokjes. Deze kunnen ook gebruikt worden om de deur waterpas te plaatsen. Deze worden alleen gebruikt als hulpmiddel. Nadat de deur bevestigt is aan de scharnieren, worden de stelblokjes weggehaald. 3 Plaats het glas NOOIT direct op de vloertegel!
27 0.3 Handgreep Bij de deur wordt een handgreep geleverd. Om deze te plaatsen moeten een aantal stappen doorlopen worden. Draai met de bijgeleverde inbussleutel de m3 stiften half los. Hierna kunnen de 2 helften van elkaar af worden gehaald. Bevestig het ene deel aan de buitenkant van de deur en de helft met de inbusstiften aan de binnenkant van de cabine. Wanneer de handgreep is bevestigt, is het ook makkelijker om de deur te stellen d.m.v. de scharnieren. inbusstift m3 sleutel 3 inbusstift m3 2 27
28 Afwerking deur. Voorbereiding 2 x Magneetstrip t.b.v. glaswand x Magneetstrip t.b.v. deur standaard hoogte 2500mm hoogte v.h. glas standaard hoogte 2500mm hoogte v.h. deur 28
29 .2 Magneetstrip plaatsen 2 Druk de gehele lengte van het magneetprofiel goed tegen het vaste glasdeel aan. 3 Druk de gehele lengte van het magneetprofiel goed tegen het vaste glasdeel aan. 29
30 2 Afwerking Kunststof glas profiel
31 4 5 6 Kitresten Verwijder siliconenkit met behulp van een siliconenkitverwijderaar. 3
32 Installation manual 32
33 Cleopatra B.V. Oostzijde EN Zaandam Netherlands Copyright All information in this technical document, together with the drawings and technical specifications made available by Cleopatra B.V., remain the property of Cleopatra B.V. and may not be copied without permission. Cleopatra B.V. reserves the right to make changes in the interest of further developments. Up to date on:
34 Table of contents Istallation manual Introduction Warnings Overview Required space Required tools Bijgeleverd Installation of wall profiles Preparation Prepare wall profiles and wall Mounting wall profiles Mounting roof profiles Preparation Installing roof profile Installing glass panels Preparation Placing of the glass on wall profiles LEFT Placing of the glass on wall profiles RIGHT Installing the roof Pushing in the roof Placing the roof profile Placing sealing profile Placing the door Hinge Placing the door Handle...58 Finishing door Preparation Placing magnetic strip Finishing

35 Introduction These instructions are intented for the installer. Read these instructions carefully to get to know the product, the parts and the installation method. The frameless cabin must be installed by qualified and well-trained personnel. The frameless cabin complies with the applicable standards and regulations and does not pose any direct danger for the user if the frameless cabin is installed according to the manufacturer s instructions and is used in accordance with this manual. The electronic and mechanical parts must be carefully maintained so that the frameless cabin remains fully operational. For this reason, the instructions must be followed closely. All information and instructions in this manual have been compiled in accordance to the applicable standards and regulations, the current technique and our years of experience and findings. National and local regulations must be followed. Check the product for possible transport damage. After the installation, a claim for (surface) damage will not be accepted by Cleopatra. Every right to warranty expires if adjustments have been made to the original product or parts. This manual must be kept close to the product for quick access if needed. Important instruction or description Pay attention: General danger Use screws and plugs to mount the frameless cabin on the wall. Walls that support the frameless cabin must be strong enough to carry the weight; otherwise they need to be strengthened. The supplied plugs and screws are intended for use on concrete or solid stone walls. If the walls are made of a different material than concrete or solid stones, use material that is suitable for that specific wall. (not included in delivery). Cleopatra accepts no liability for damage caused by: - Failure to follow the manual. - Wrong use. - Installation by unqualified personnel. - Unauthorized changes to the product. - Technical changes. - The use of non-original spare parts. Correct use: - The frameless cabin may only be used indoors. - Use in another way is not permitted and is for the user s own risk. - Do not use the frameless cabin when it is not in perfect condition. - Do not use this product in an environment where it is exposed to corrosion. 35
36 2 Warnings Without permission and without instructions, the use of a steam cabin is forbidden for the following persons: - Children. - Adults with disabilities. - Persons who have not been instructed about what a steam cabin is meant for. - Persons who are intoxicated. Bringing electrical devices in the cabin is forbidden! Warning hot surfaces. The steam inlet, the surrounding area and the steam itself are very hot. Do not touch them because of danger of injuries. Warning for slipping. The floor of the cabin can be slippery. Read the user manual carefully before using the cabin! Maximum time to stay in the cabin: 5 min Humidity in the cabin: max. 00% Maximum temperature in the cabin: C 36
37 3 Overview A B C D E H P O N M L K J I G F A G H I K M P A: Roof profile wall small I: Plastic clamp profile B: Roof profile front wide J: Glass wall C: Roof K: Plastic sealing profile roof-glass D: Roof profile wall wide L: Hinge E: Walls M: Plastic glass profile F: Floor N: Glass door G: Aluminum U-profile wall O: Handle H: Plastic L-profile wall P: Magnet profile

38 4 Required space Minimum height above glass: 200mm Ventilation: min. 50mm HG Raindance Rainmaker Air: 30mm 200mm 38
39 5 Required tools Bijgeleverd : Kit gun 2: Tapeline 3: Spirit level 4: Square 5: Pencil 6: Allen key 7, 3 (Supplied) 7: Stanley knife 8: Soft rubber hammer 9: Drill 0: Drill set (tile drilling) : Tape 2: Screwdriver (cross) 3: Ladder 4: Hand saw 5: Wrench 7 6: Pipe locator 7: Adjustment blocks (Various sizes) 8: Glue Tape 9: Adhesive help 20: Mounting materials 60735XX
40 6 Installation of wall profiles 6. Preparation Desired depth front glass wall


41 6.2 Prepare wall profiles and wall 2 standard height 2500mm desired height (height of the glass) Drill + zinc Aluminium profile Aluminium profile 3 4

42 4 Check with the pipe locator if all holes can be drilled without problems. 5 Silicone kit on the back Silicone kit on the back 42
43 6.3 Mounting wall profiles Aluminium profile PAY ATTENTION!! Ribbing of the profiles on the inside of the cabin. 43


44 7 Mounting roof profiles 7. Preparation Roof profile aluminum 5mm Side view Aluminum wall profile 2 Roof profile aluminum 2x 44
45 3 Check with the pipe locator if all holes can be drilled without problems. 7.2 Installing roof profile Roof profile aluminum 45
46 2 3 Roof profile aluminum 5mm mm Aluminum wall profile Roof profile wall wide mm 2 3 Front view left Roof profile wall small 46
47 8 Installing glass panels 8. Preparation 2 2x Plastic L-profile wall 2x Plastic clamp profile wall standard height 2500mm height of the glass standard height 2500mm height of the glass 47
48 8.2 Placing of the glass on wall profiles LEFT? Plastic L-profile wall DO NOT place the glass directly on the floor tile! DO NOT place the glass directly on the floor tile! Use adjustment blocks at all times. These can also be used to level the cabin. It is also important that the glass is perpendicular to the wall at all walls. Measure this with a square. 2 Glass Floor EXAMPLE IS AN EXORBITANT DISPLAY Adjustment blocks 48


49 3 90 When the first glass wall is perfectly level, using adjustment blocks, the glass wall must be fixed in the profile. This is done with so-called plastic clamp profiles. IF THE PROFILES HAVE BEEN FASTENED, THIS IS DEFINITIVE 4 Plastic clamp profile wall 49
50 8.3 Placing of the glass on wall profiles RIGHT Plastic L-profile wall DO NOT place the glass directly on the floor tile! DO NOT place the glass directly on the floor tile! Use adjustment blocks at all times. These can also be used to level the cabin. It is also important that the glass is perpendicular to the wall at all walls. Measure this with a square. 2 Glass Floor EXAMPLE IS AN EXORBITANT DISPLAY Adjustment blocks 50


51 3 90 When the first glass wall is perfectly level, using adjustment blocks, the glass wall must be fixed in the profile. This is done with so-called plastic clamp profiles. IF THE PROFILES HAVE BEEN FASTENED, THIS IS DEFINITIVE. 4 Plastic clamp profile wall 5

52 9 Installing the roof 9. Pushing in the roof 2 52


53 9.2 Placing the roof profile Hand-tight


54 9.3 Placing sealing profile Outside the cabin Inside the cabin 2 screwdriver flat Tighten 4x 54


 -> Rubber D: 8mm DO NOT USE THIS!")
 -> Rubber D: 0-2mm Replace the crosshead bolts with the supplied")
55 0 Placing the door 0. Hinge 2 door hinges are included in the delivery. In order to place these, a number of steps must be taken. Unscrew the cover plates using a screwdriver. Place the rubbers with the correct thickness on all surfaces of the hinge. PLEASE NOTE THE RUBBER THICKNESS!! Glass D: 5/6 (8mm) -> Rubber D: 8mm DO NOT USE THIS!! INCLUDED IN DELIVERY Glass D: 3/8 (0mm) -> Rubber D: 0-2mm Glass D: /2 (2mm) -> Rubber D: 0-2mm Replace the crosshead bolts with the supplied Allen screws. The ALLEN key is also included. Do not lubricate these hinges! Screwdriver cross Allen key 6 MEL - 3/25 (8mm) 55


56 0.2 Placing the door 2 2X 56


57 DO NOT place the glass directly on the floor tile! Use adjustment blocks at all times. These can also be used to level the door. These are only used as an aid. After the door is attached to the hinges, the adjustment blocks can be removed. 3 DO NOT place the glass directly on the floor tile!


58 0.3 Handle A handle is supplied with the door. To place it, a number of steps must be taken. Use the supplied Allen key to loosen the m3 pins half way. After this, the 2 halves can be separated. Attach one part to the outside of the door and one half to the inside pins on the inside of the cabin. When the handle is attached, it is also easier to set the door by using the hinges. hex socket m3 Allen key 3 hex socket m3 2 58

59 Finishing door. Preparation 2 x Magnetic strip for glass wall x Magnetic strip for door standard height 2500mm height of the glass standard height 2500mm height of the glass 59


60 .2 Placing magnetic strip 2 Press the entire length of the magnet profile against the fixed glass section. 3 Press the entire length of the magnet profile against the fixed glass section. 60


61 2 Finishing Plastic glass profile 2 3 6


62 4 5 6 Remove silicone kit using a silicone kit remover. 62
63 Identificatielabel van uw product Identification label of your product Wij behouden het recht voor om technische veranderingen door te voeren Cleopatra B.V. Oostzijde 295, 508 EN Zaandam T: , We reserve the right to make technical changes Cleopatra B.V. Oostzijde 295, 508 EN Zaandam T: ,
Profielloze cabine L-Shape Frameless cabin L-Shape
 Profielloze cabine L-Shape Frameless cabin L-Shape Installatiehandleiding (p.) Installation manual (p.37) Item no: 9080 NL08/06 R0 EN08/06 R0 NL EN Cleopatra B.V. Oostzijde 95 508 EN Zaandam Nederland
Profielloze cabine C-Shape. Frameless cabin C-Shape
 Profielloze cabine C-Shape Frameless cabin C-Shape Installatiehandleiding (p.) Installation manual (p.40) Item no: 9080 NL08/06 R0 EN08/06 R0 NL EN Cleopatra B.V. Oostzijde 95 508 EN Zaandam Nederland
Vogue cabines 1750/2000/2500
 Vogue cabines 1/2000/2500 Installatiehandleiding Item no: 90548810 NL2019/02 R01 NL Cleopatra B.V. Oostzijde 295 1508 EN Zaandam Nederland www.cleopatra.nl www.cleopatra-wellness.com Info@cleopatra.nl
Profielloze cabine U-Shape. Frameless cabin U-Shape
 Profielloze cabine U-Shape Frameless cabin U-Shape Installatiehandleiding (p.2) Installation manual (p.40) Item no: 902800 NL208/06 R0 EN208/06 R0 NL EN Cleopatra B.V. Oostzijde 295 508 EN Zaandam Nederland
DRAAIDEUR 80/90 PIVOT DOOR
 HANDLEIDING MANUAL DRAAIDEUR 80/90 PIVOT DOOR 800/900 Montagehandleiding Reflex draaideur 80/90 met zijpaneel 80/90 Verstelbaarheid 611801: (770-810) x (770-810) x 1850 mm Verstelbaarheid 611802: (870-910)
Steam Brain. Gebruikershandleiding. Item no: NL2019/03 R01
 Steam Brain ebruikershandleiding Item no: 9054880 NL209/03 R0 NL Cleopatra B.V. Oostzijde 295 508 EN Zaandam Nederland www.cleopatra.nl www.cleopatra-wellness.com Info@cleopatra.nl Copyright Alle informatie
OUTDOOR HD BULLET IP CAMERA PRODUCT MANUAL
 OUTDOOR HD BULLET IP CAMERA PRODUCT MANUAL GB - NL GB PARTS & FUNCTIONS 1. 7. ---- 3. ---- 4. ---------- 6. 5. 2. ---- 1. Outdoor IP camera unit 2. Antenna 3. Mounting bracket 4. Network connection 5.
OUTDOOR HD DOME IP CAMERA PRODUCT MANUAL GB - NL
 OUTDOOR HD DOME IP CAMERA PRODUCT MANUAL GB - NL GB PARTS & FUNCTIONS 2. ---- 1. ---- 3. ---- 7. ---------- 5. 4. 6. 1. Outdoor IP camera unit 2. Antenna 3. Mounting bracket 4. Network connection 5. Power
Flybye. Ernst Koning, Montagehandleiding / Instruction manual
 Flybye Ernst Koning, 2018 Montagehandleiding / Instruction manual GELEVERD MATERIAAL / MATERIALS SUPPLIED A. B. C. D. E. F. G. A. B. C. D. E. F. G. H. H. lichtbuis / lighting tube plafondkap / ceiling
Rhythm of Light. Susanne de Graef, Montagehandleiding / Instruction manual
 Rhythm of Light Susanne de Graef, 2016 Montagehandleiding / Instruction manual GELEVERD MATERIAAL / SUPPLIED MATERIAL B. C. D. A. E. F. A. B. C. D. E. F. armatuur / fixture fitting lange staalkabels (3)
MONTAGE INSTRUCTIE ASSEMBLY INSTRUCTION
 MONTAGE INSTRUCTIE ASSEMBLY INSTRUCTION - 1. Waterpas stellen. De groef aan de zijkant van de beschermdeksel moet gelijk staan met de deellijn van het inbouw box. 2. Zet de inbouw box vast in de muur.
2000 Volkswagen Passat GLS
 REAR DOOR WINDOW Rear door window, assembly overview Fig. 304: Exploded View Of Rear Door Window 1 - Door Removing and installing: --> Rear door, removing and installing 2 - Spring nut Qty 2 3 - Screw
Mounting ceiling & wall
 5 / profile 34 bending radius R 15*) (1015) R 20 (1015) R 30 (1015) R>80 (1018) filler position profile 26 bending radius filler position R 15*) (1015) R 25 (1015) R>100 (1018) 28 15 405 gr/m 522 gr/m
Gebruikershandleiding (p.2) User manual (p.11)
 User manual (p.11)") One bediening Gebruikershandleiding (p.2) User manual (p.11) Item no: 90187011 NL2017/07 R01 EN2017/07 R01 NL EN 1 Cleopatra B.V. Oostzijde 295 1508 EN Zaandam Nederland Copyright Alle informatie in dit
One bediening Gebruikershandleiding (p.2) User manual (p.11) Item no: 90187011 NL2017/07 R01 EN2017/07 R01 NL EN 1 Cleopatra B.V. Oostzijde 295 1508 EN Zaandam Nederland Copyright Alle informatie in dit
Montagehandleiding: doucheset
 Montagehandleiding: doucheset Installation manual: showerset 0 6 5 7 8 9 0 8 9 7 5 6 Controleer voor installatie of alle onderdelen aanwezig zijn. Check if all parts are present before installation. 5
1/8 ATLAS Atlas cabinet cabinet 1 7
 TLS cabinet / / / 0 D E F G H / L x Lx x L / x x D E Dx Ex / x x x x x x Fx x Hx Gx Fx Fx Fx Fx G H G H H G 0 0 0 0 0 / L / 0 NL: Deze kast bevat twee gaten aan de achterkant om aan de wand te kunnen bevestigen.
GL04300 NISDEUR MONTAGE INSTRUCTIES
 GL04300 NISDEUR MONTAGE INSTRUCTIES BELANGRIJK Bedankt voor het kiezen voor van Rijn Products. Lees voordat u uw deur gaat plaatsen eerst goed deze gebruikshandleiding. 1. Controleer of u beschikt over
FSW-VW-2X2 FSW-VW. Handleiding / Manual
 FSW-VW-2X2 FSW-VW Handleiding / Manual Rev. 1.0 17-03-2014 I Pakketinhoud / Content Accessoires Benodigde gereedschappen / Required Tools Montage / Assembling Onderhoud / Maintenance Veel Gestelde Vragen
EU Declaration of Conformity and safety instructions EU Conformiteitsverklaring en veiligheidsinstructies
 EU Declaration of Conformity and safety instructions EU Conformiteitsverklaring en veiligheidsinstructies Battery operated UNICOM 300 N51 UNICOM 300 met batterijvoeding N51 Explosion safety instructions
REIN kast. eiken standaard iepen. gebakken iepen. gerookt. licht iepen. bijzonderheden. staanders/achterwand/deur. ontwerp: Gjalt Pilat, 2005
 REIN kast ontwerp: Gjalt Pilat, 2005 afwijkende standaard maten op aanvraag standaard staanders/achterwand/deur licht gerookt gebakken bijzonderheden Rein hoogte 79,5 cm kast wordt gedemonteerd geleverd
2006 Volkswagen Jetta TDI
 Door handle and door lock, assembly overview The illustration shows the left side. The right side is derived accordingly from this. Fig. 99: Door Handle And Door Lock, Assembly Overview 1 - Cable For disengaging
PANEELRADIATOR - Type PR Handleiding. PANEL RADIATOR - Type PR Manual
 Fax. +31 (0)227-549 150 Website: www.sinusjevi.com PANEELRADIATOR - Type PR Handleiding PANEL RADIATOR - Type PR Manual Page 2 of 8 Page 3 of 8 Technische informatie Spanning: 230 of 400 Volt Vermogen:
liniled Cast Joint liniled Gietmof liniled Castjoint
 liniled Cast Joint liniled Gietmof liniled is een hoogwaardige, flexibele LED strip. Deze flexibiliteit zorgt voor een zeer brede toepasbaarheid. liniled kan zowel binnen als buiten in functionele en decoratieve
NEDERLANDS. Plaatselijke telefoonnummers voor de klantendienst kunt u vinden op: G-01 rev.
 For the latest User Installation Guide please visit: www.ergotron.com User's Guide - English Guía del usuario - Español Manuel de l utilisateur - Français Gebruikersgids - Deutsch Benutzerhandbuch - Nederlands
ANT S KINGDOM Here is some advice for setting up your Master Ant Farm!
 ANT S KINGDOM Master NL EN Instructies Mierenboerderij Master Bedankt voor je bestelling van de Mierenboerderij Master. De beste keus! Installatie NL Naast de informatie die te lezen is in ons boekje
EM7680 Firmware Auto-Update for Kodi 17.2
 EM7680 Firmware Auto-Update for Kodi 17.2 2 NEDERLANDS/ENGLISH EM7680 Firmware Auto-update for Kodi 17.2 Table of contents 1.0 (NL) Introductie... 3 2.0 (NL) Firmware installeren... 3 3.0 (NL) Opmerking...
EM7680 Firmware Update by OTA
 EM7680 Firmware Update by OTA 2 NEDERLANDS/ENGLISH EM7680 Firmware update by OTA Table of contents 1.0 (NL) Introductie... 3 2.0 (NL) Firmware installeren... 3 3.0 (NL) Release notes:... 3 4.0 (NL) Overige
GL03350 HOEKCABINE MONTAGE INSTRUCTIES
 GL03350 HOEKCABINE MONTAGE INSTRUCTIES BELANGRIJK Bedankt voor het kiezen voor van Rijn Products. Lees voordat u uw deur gaat plaatsen eerst goed deze gebruikshandleiding. 1. Controleer of u beschikt over
Quality requirements concerning the packaging of oak lumber of Houthandel Wijers vof (09.09.14)
") Quality requirements concerning the packaging of oak lumber of (09.09.14) Content: 1. Requirements on sticks 2. Requirements on placing sticks 3. Requirements on construction pallets 4. Stick length and
Quality requirements concerning the packaging of oak lumber of (09.09.14) Content: 1. Requirements on sticks 2. Requirements on placing sticks 3. Requirements on construction pallets 4. Stick length and
Shipment Centre EU Quick Print Client handleiding [NL]
![Shipment Centre EU Quick Print Client handleiding [NL]](/thumbs/78/76906513.jpg "Shipment Centre EU Quick Print Client handleiding [NL]") Shipment Centre EU Quick Print Client handleiding [NL] Please scroll down for English. Met de Quick Print Client kunt u printers in Shipment Centre EU configureren. De Quick Print Client kan alleen op
Shipment Centre EU Quick Print Client handleiding [NL] Please scroll down for English. Met de Quick Print Client kunt u printers in Shipment Centre EU configureren. De Quick Print Client kan alleen op
Betegelbare stoomcabine Tileable steam cabin
 Betegelbare stoomcabine Tileable steam cabin Installatiehandleiding (p.2) Installation manual (p.55) Item no: 90187050 NL2018/01 R01 EN2018/01 R01 NL EN 1 Cleopatra B.V. Oostzijde 295 1508 EN Zaandam Nederland
Handleiding. #MAKEITHAPPEN Bewaar deze handleiding als naslag. Handleiding_Kranen_Kraan-6_v1. Canim Gladstone Niagra Victoria Vidago
 Handleiding Handleiding_Kranen_Kraan-6_v1 Canim Gladstone Niagra Victoria Vidago Please keep these instructions for future reference. NO. FITBTBL04V1.0 #MAKEITHAPPEN Bewaar deze handleiding als naslag.
Flat panel XXL lift system. Mounting instructions Montage handleiding
 Flat panel XXL lift system Mounting instructions Montage handleiding Safety instructions: Check the unit for damages caused by transport. In case of damage please report directly to the transporter and
Limpid Light. design Esther Jongsma & Sam van Gurp, Montagehandleiding / Assembly Instructions
 Limpid Light design Esther Jongsma & Sam van Gurp, 05 Montagehandleiding / Assembly Instructions GELEVERD MATERIAAL / SUPPLIED MATERIAL A. A. B. B. C. D. E. F. G. G. H. I. J. K. / / ophanging / suspension:
FRAME [UPRIGHT MODEL] / [DEPTH] / [HEIGHT] / [FINISH] TYPE OF BASEPLATE P Base plate BP80 / E alternatives: ZINC finish in all cases
![FRAME [UPRIGHT MODEL] / [DEPTH] / [HEIGHT] / [FINISH] TYPE OF BASEPLATE P Base plate BP80 / E alternatives: ZINC finish in all cases](/thumbs/60/44127117.jpg "FRAME [UPRIGHT MODEL] / [DEPTH] / [HEIGHT] / [FINISH] TYPE OF BASEPLATE P Base plate BP80 / E alternatives: ZINC finish in all cases") FRAME XS UPRIGHT BASE PLATE UPRIGHT HORIZONTAL PROFILE DIAGONAL PROFILE DESCRIPTION A vertical structure consisting of 2 uprights, joined by a system of bracing profiles, and base plates intended to support
FRAME XS UPRIGHT BASE PLATE UPRIGHT HORIZONTAL PROFILE DIAGONAL PROFILE DESCRIPTION A vertical structure consisting of 2 uprights, joined by a system of bracing profiles, and base plates intended to support
MyDHL+ Van Non-Corporate naar Corporate
 MyDHL+ Van Non-Corporate naar Corporate Van Non-Corporate naar Corporate In MyDHL+ is het mogelijk om meerdere gebruikers aan uw set-up toe te voegen. Wanneer er bijvoorbeeld meerdere collega s van dezelfde
Handleiding Pendeldeur EnjoY² ( tussen 2 muren )
") Handleiding Pendeldeur EnjoY² ( tussen 2 muren ) Maatbereik: 80: 76,5 80,5 cm 90: 86,5 90,5 cm 1.Voorbereiding voor installatie 1) Lees na het openen van de verpakking deze montagehandleiding aandachtig
Handleiding Pendeldeur EnjoY² ( tussen 2 muren ) Maatbereik: 80: 76,5 80,5 cm 90: 86,5 90,5 cm 1.Voorbereiding voor installatie 1) Lees na het openen van de verpakking deze montagehandleiding aandachtig
ATD Floor Fan Owner s Manual Features:
 ATD-30320 20 Floor Fan Owner s Manual Features: Made in China to ATD Tools, Inc. Specifications Visit us at www.atdtools.com General Safety Warnings: WARNING: The in and warnings ned in this manual d be
Installatie van Windows 10 op laptops. Windows 10 installation on laptops
 Installatie van Windows 10 op laptops In mei vindt de migratie naar Windows 10 plaats op de laptops. Per dag worden ongeveer 25 laptops gemigreerd. Elke laptop heeft een ISSC-sticker met een laptop-nummer.
Montage handleiding Draaideur Enjoy (tussen 2 muren )
") Montage handleiding Draaideur Enjoy (tussen 2 muren ) Maatbereik: 80: 76,5 80,5 cm 90: 86,5 90,5 cm 1.Voorbereiding voor installatie 1) Lees na het openen van de verpakking deze montagehandleiding aandachtig
Montage handleiding Draaideur Enjoy (tussen 2 muren ) Maatbereik: 80: 76,5 80,5 cm 90: 86,5 90,5 cm 1.Voorbereiding voor installatie 1) Lees na het openen van de verpakking deze montagehandleiding aandachtig
My Inspiration I got my inspiration from a lamp that I already had made 2 years ago. The lamp is the you can see on the right.
 Mijn Inspiratie Ik kreeg het idee om een variant te maken van een lamp die ik al eerder had gemaakt. Bij de lamp die in de onderstaande foto s is afgebeeld kun je het licht dimmen door de lamellen open
MONTAGEHANDLEIDING SANICLEAR SWING SK1206 & SK1207. Downloads
 MONTAGEHANDLEIDING SANICLEAR SWING SK1206 & SK1207 Downloads Belangrijk! Het moet altijd door de klant worden gewaarborgd dat de complete douchecabine zodanig is gemonteerd dat de complete douchecabine
GL VIJFHOEKCABINE MONTAGE INSTRUCTIES
 GL041000 VIJFHOEKCABINE MONTAGE INSTRUCTIES BELANGRIJK Bedankt voor het kiezen voor van Rijn Products. Lees voordat u uw deur gaat plaatsen eerst goed deze gebruikshandleiding. 1. Controleer of u beschikt
256 kb Memory in NMS 8250, 8255 and 8280
 256 kb Memory in NMS 8250, 8255 and 8280 Supplied by Bastiaan Huber, 2001 Converted to PDF by HansO, 2001 Dutch text follows the english text! MEMORY-UPGRADE to 256Kb This description is only for people
Het beheren van mijn Tungsten Network Portal account NL 1 Manage my Tungsten Network Portal account EN 14
 QUICK GUIDE C Het beheren van mijn Tungsten Network Portal account NL 1 Manage my Tungsten Network Portal account EN 14 Version 0.9 (June 2014) Per May 2014 OB10 has changed its name to Tungsten Network
EU Declaration of Conformity and safety instructions EU Conformiteitsverklaring en veiligheidsinstructies ISC 230B
 EU Declaration of Conformity and safety instructions EU Conformiteitsverklaring en veiligheidsinstructies ISC 230B Explosion safety instructions (Ex) (EN) ISC230B is approved for use outside the explosion-hazardous
Quick start guide. Powerbank MI Mah. Follow Fast All rights reserved. Page 1
 Quick start guide Powerbank MI 16.000 Mah Follow Fast 2016 - All rights reserved. Page 1 ENGLISH The Mi 16000 Power Bank is a very good backup option for those on the move. It can keep you going for days
3. Montage ( Voorbeeld geeft de zijwand links en Pendeldeur rechts)
") Montage handleiding Pendeldeur EnjoY² (in combinatie met zijwand ) Maatbereik: 80: 76,5 80,5 cm 90: 86,5 90,5 cm 1.Voorbereiding voor installatie 1) Lees na het openen van de verpakking deze montagehandleiding
Montage handleiding Pendeldeur EnjoY² (in combinatie met zijwand ) Maatbereik: 80: 76,5 80,5 cm 90: 86,5 90,5 cm 1.Voorbereiding voor installatie 1) Lees na het openen van de verpakking deze montagehandleiding
Installatie handleiding van de Sanifun Complete Douchecabine Ernesto. Benodigdheden
 Installatie handleiding van de Complete Douchecabine Ernesto. Benodigdheden Stap 1 Neem de douchebak en verwijder zorgvuldig de beschermfolie. Plaats de douchebak op zijn definitieve plaats en regel de
INSTALATIEGIDS VIDEOWALL
 INSTALATIEGIDS VIDEO 1. Bereken de hoogte van de rails door te meten hoeveel lager het onderste scherm zal uitkomen. Je kan dit meten aan de achterkant van de display, waar de beugels op gemonteerd zijn.
Dagelijkse checklist Daily checklist
 Dagelijkse checklist Daily checklist Sluiting met snelspanner Verstelbare hoofdsteun Verstelbare en aanpasbare riem Verstelbare voetsteunen Verstelbare riemen van de voetsteun Quick release locked Head
Handleiding van de Sanifun Whirlpool douchecabine Osvaldo & Pasquale
 Handleiding van de Whirlpool douchecabine Osvaldo & Pasquale ATTENTION INSTALLERS: These instruc ons must be leō with the customer Last Modified: 23/01/2014 Benodigdheden. Stap 1 Neem de douchebak en verwijder
GB - Installation manual Mercedes Benz C-Class A205 convertible wind deflector (from 2015).
.") GB - Installation manual Mercedes Benz C-Class A205 convertible wind deflector (from 2015). DE Montage Anleitung Mercedes Benz C-Klasse Cabrio Windschott (ab 2015). NL Montage handleiding Mercedes Benz
GB - Installation manual Mercedes Benz C-Class A205 convertible wind deflector (from 2015). DE Montage Anleitung Mercedes Benz C-Klasse Cabrio Windschott (ab 2015). NL Montage handleiding Mercedes Benz
Vrijstaande baden Free standing Bathtubs
 Vrijstaande baden Free standing Bathtubs Montagehandleiding blz. 2 Installation manual p. 11 Item no: 90178998 NL2019/04 R01 EN2019/04 R01 NL/EN Cleopatra B.V. Oostzijde 295 1508 EN Zaandam Nederland www.cleopatra.nl
PIR DC-SWITCH. DC Passive infra-red Detector. Model No. PDS-10 GEBRUIKSAANWIJZING/INSTRUCTION MANUAL
 PIR DC-SWITCH DC Passive infra-red Detector Model No. PDS-10 GEBRUIKSAANWIJZING/INSTRUCTION MANUAL Please read this manual before operating your DETECTOR PIR DC-Switch (PDS-10) De PDS-10 is een beweging
EM7580 Firmware Update by Micro SD card
 EM7580 Firmware Update by Micro SD card 2 NEDERLANDS/ENGLISH EM7580 Firmware update by Micro SD card Table of contents 1.0 (NL) Introductie... 3 2.0 (NL) Firmware installeren... 3 3.0 (NL) Opmerking...
HANDLEIDING - ACTIEVE MOTORKRAAN
 M A N U A L HANDLEIDING - ACTIEVE MOTORKRAAN MANUAL - ACTIVE MOTOR VALVE Model E710877 E710878 E710856 E710972 E710973 www.tasseron.nl Inhoud / Content NEDERLANDS Hoofdstuk Pagina NL 1 ALGEMEEN 2 NL 1.1
L.Net s88sd16-n aansluitingen en programmering.
 De L.Net s88sd16-n wordt via één van de L.Net aansluitingen aangesloten op de LocoNet aansluiting van de centrale, bij een Intellibox of Twin-Center is dat de LocoNet-T aansluiting. L.Net s88sd16-n aansluitingen
FSW-TOUCH (-R) Touch trolley table (with electric tilt) Touch trolley tafel (met elektrische hoekverstelling) Installation manual Montage handleiding
 Touch trolley table (with electric tilt) Touch trolley tafel (met elektrische hoekverstelling) Installation manual Montage handleiding") FSW-TOUCH (-R) Touch trolley table (with electric tilt) Touch trolley tafel (met elektrische hoekverstelling) Installation manual Montage handleiding Safety instructions: - Read the manual carefully before
FSW-TOUCH (-R) Touch trolley table (with electric tilt) Touch trolley tafel (met elektrische hoekverstelling) Installation manual Montage handleiding Safety instructions: - Read the manual carefully before
FSB plug-in handles for doors and windows Technical Details
 FSB plug-in handles for doors and windows Plug-in handles for doors and windows FSB plug-in handles for internal doors easy to assemble door thicknesses 39 48 mm can be combined with any of 53 doorlever
WWW.EMINENT-ONLINE.COM
 WWW.EMINENT-OINE.COM HNDLEIDING USERS MNUL EM1016 HNDLEIDING EM1016 USB NR SERIEEL CONVERTER INHOUDSOPGVE: PGIN 1.0 Introductie.... 2 1.1 Functies en kenmerken.... 2 1.2 Inhoud van de verpakking.... 2
LONDEN MET 21 GEVARIEERDE STADSWANDELINGEN 480 PAGINAS WAARDEVOLE INFORMATIE RUIM 300 FOTOS KAARTEN EN PLATTEGRONDEN
 LONDEN MET 21 GEVARIEERDE STADSWANDELINGEN 480 PAGINAS WAARDEVOLE INFORMATIE RUIM 300 FOTOS KAARTEN EN PLATTEGRONDEN LM2GS4PWIR3FKEP-58-WWET11-PDF File Size 6,444 KB 117 Pages 27 Aug, 2016 TABLE OF CONTENT
GEBRUIKSHANDLEIDING Enjoy 2 Kwartrond
 GEBRUIKSHANDLEIDING Enjoy 2 Kwartrond 1.Voorbereiding voor installatie 1) Lees na het openen van de verpakking deze montagehandleiding aandachtig door, controleer of alle voor montage benodige onderdelen
EM7680 Firmware Update by Micro SD card
 EM7680 Firmware Update by Micro SD card 2 NEDERLANDS/ENGLISH EM7680 Firmware update by Micro SD card Table of contents 1.0 (NL) Introductie... 2 2.0 (NL) Firmware installeren... 2 3.0 (NL) Opmerking...
INSTRUCTIE BOEKJE - INSTRUCTION BOOKLET
 HANDLEIDING MANUAL INSTRUCTIE BOEKJE - INSTRUCTION BOOKLET Legende - legend = Aandacht! Symbool - Attention! Symbol = Elektrische schroevendraaier symbool Electric screwdriver symbol = Manueel positionering
EVA. Uitgave : Januari 2010 Edition : January 2010
 Montagehandleiding Installation manual EVA Uitgave : Januari 2010 Edition : January 2010 Inhoud pagina Contents page lees dit eerst! oneigenlijk gebruik montage notities First read this! improper use
Besteldossier. Cleopatra Profielloze Glazen Cabines & Design Cabines
 Besteldossier Cleopatra Profielloze Glazen Cabines & Design Cabines Werkwijze: Uw bestelling kan alleen in behandeling genomen worden indien alle relevante pagina s van het besteldossier volledig ingevuld
Settings for the C100BRS4 MAC Address Spoofing with cable Internet.
 Settings for the C100BRS4 MAC Address Spoofing with cable Internet. General: Please use the latest firmware for the router. The firmware is available on http://www.conceptronic.net! Use Firmware version
LINO. handleiding vijfhoek
 LINO handleiding vijfhoek Controleer vóór montage of het product compleet en vrij van beschadigingen is. Mocht u een gebrek constateren, neem dan contact op met uw Bruynzeeldealer. De leverancier is niet
GOVERNMENT NOTICE. STAATSKOERANT, 18 AUGUSTUS 2017 No NATIONAL TREASURY. National Treasury/ Nasionale Tesourie NO AUGUST
 National Treasury/ Nasionale Tesourie 838 Local Government: Municipal Finance Management Act (56/2003): Draft Amendments to Municipal Regulations on Minimum Competency Levels, 2017 41047 GOVERNMENT NOTICE
GL05300 NISDEUR MONTAGE INSTRUCTIES
 GL000 NISDEUR MONTAGE INSTRUCTIES BELANGRIJK Bedankt voor het kiezen voor van Rijn Products. Lees voordat u uw deur gaat plaatsen eerst goed deze gebruikshandleiding.. Controleer of u beschikt over de
GL05350 SCHUIFHOEKCABINE MONTAGE INSTRUCTIES
 GL00 SCHUIFHOEKCABINE MONTAGE INSTRUCTIES BELANGRIJK Bedankt voor het kiezen voor van Rijn Products. Lees voordat u uw deur gaat plaatsen eerst goed deze gebruikshandleiding.. Controleer of u beschikt
MyDHL+ ProView activeren in MyDHL+
 MyDHL+ ProView activeren in MyDHL+ ProView activeren in MyDHL+ In MyDHL+ is het mogelijk om van uw zendingen, die op uw accountnummer zijn aangemaakt, de status te zien. Daarnaast is het ook mogelijk om
RECEPTEERKUNDE: PRODUCTZORG EN BEREIDING VAN GENEESMIDDELEN (DUTCH EDITION) FROM BOHN STAFLEU VAN LOGHUM
 FROM BOHN STAFLEU VAN LOGHUM") Read Online and Download Ebook RECEPTEERKUNDE: PRODUCTZORG EN BEREIDING VAN GENEESMIDDELEN (DUTCH EDITION) FROM BOHN STAFLEU VAN LOGHUM DOWNLOAD EBOOK : RECEPTEERKUNDE: PRODUCTZORG EN BEREIDING VAN STAFLEU
Read Online and Download Ebook RECEPTEERKUNDE: PRODUCTZORG EN BEREIDING VAN GENEESMIDDELEN (DUTCH EDITION) FROM BOHN STAFLEU VAN LOGHUM DOWNLOAD EBOOK : RECEPTEERKUNDE: PRODUCTZORG EN BEREIDING VAN STAFLEU
MobiDM App Handleiding voor Windows Mobile Standard en Pro
 MobiDM App Handleiding voor Windows Mobile Standard en Pro Deze handleiding beschrijft de installatie en gebruik van de MobiDM App voor Windows Mobile Version: x.x Pagina 1 Index 1. WELKOM IN MOBIDM...
Activant Prophet 21. Prophet 21 Version 12.0 Upgrade Information
 Activant Prophet 21 Prophet 21 Version 12.0 Upgrade Information This class is designed for Customers interested in upgrading to version 12.0 IT staff responsible for the managing of the Prophet 21 system
Bijlage 2: Informatie met betrekking tot goede praktijkvoorbeelden in Londen, het Verenigd Koninkrijk en Queensland
 Bijlage 2: Informatie met betrekking tot goede praktijkvoorbeelden in Londen, het Verenigd Koninkrijk en Queensland 1. Londen In Londen kunnen gebruikers van een scootmobiel contact opnemen met een dienst
Montage handleiding Pendeldeur Intense ( tussen 2 muren)
") Pendeldeur Intense ( tussen 2 muren) 1.Voorbereiding voor installatie 1) Lees na het openen van de verpakking deze montagehandleiding aandachtig door, controleer of alle voor montage benodige onderdelen
Pendeldeur Intense ( tussen 2 muren) 1.Voorbereiding voor installatie 1) Lees na het openen van de verpakking deze montagehandleiding aandachtig door, controleer of alle voor montage benodige onderdelen
Handleiding Zuludesk Parent
 Handleiding Zuludesk Parent Handleiding Zuludesk Parent Met Zuludesk Parent kunt u buiten schooltijden de ipad van uw kind beheren. Hieronder vind u een korte handleiding met de mogelijkheden. Gebruik
handleiding douche hoekinstap
 vitro handleiding douche hoekinstap Controleer vóór montage of het product compleet en vrij van beschadigingen is. Mocht u een gebrek constateren, neem dan contact op met uw Bruynzeeldealer. De leverancier
CilO. handleiding vijfhoek
 CilO handleiding vijfhoek Controleer vóór montage of het product compleet en vrij van beschadigingen is. Mocht u een gebrek constateren, neem dan contact op met uw Bruynzeeldealer. De leverancier is niet
Montage handleiding ¼ ronde cabine Intense
 1.Voorbereiding voor installatie 1) Lees na het openen van de verpakking deze montagehandleiding aandachtig door, controleer of alle voor montage benodige onderdelen aanwezig zijn en check de cabine op
ANGSTSTOORNISSEN EN HYPOCHONDRIE: DIAGNOSTIEK EN BEHANDELING (DUTCH EDITION) FROM BOHN STAFLEU VAN LOGHUM
 FROM BOHN STAFLEU VAN LOGHUM") Read Online and Download Ebook ANGSTSTOORNISSEN EN HYPOCHONDRIE: DIAGNOSTIEK EN BEHANDELING (DUTCH EDITION) FROM BOHN STAFLEU VAN LOGHUM DOWNLOAD EBOOK : ANGSTSTOORNISSEN EN HYPOCHONDRIE: DIAGNOSTIEK STAFLEU
Read Online and Download Ebook ANGSTSTOORNISSEN EN HYPOCHONDRIE: DIAGNOSTIEK EN BEHANDELING (DUTCH EDITION) FROM BOHN STAFLEU VAN LOGHUM DOWNLOAD EBOOK : ANGSTSTOORNISSEN EN HYPOCHONDRIE: DIAGNOSTIEK STAFLEU
Understanding and being understood begins with speaking Dutch
 Understanding and being understood begins with speaking Dutch Begrijpen en begrepen worden begint met het spreken van de Nederlandse taal The Dutch language links us all Wat leest u in deze folder? 1.
MCP-16RC, luchtzuiveringstoren
 Compacte patroonfilter met pulsreiniging De MCP-16RC luchtzuiveringstoren is een compacte patroonfilter voor gedecentraliseerde reiniging van binnenlucht, waar terugwinnen van lucht mogelijk is. Het compacte
7 Piece Fillet Weld Set
 7 Piece Fillet Weld Set Checking Fillet Throat Size Checking Fillet Leg Size Bridge Cam Gauge The following measurements are possible either in inches or millimeters Angle of preparation, 0º to 60º Excess
HET ADRES VOOR AL UW RVS
 HET ADRES VOOR AL UW RVS PIPETITE HYGIËNISCHE MUURDOORVOERING SKS INOXPA POMPEN SKS DIN 11866 Pipetite The hygienic wall boot system A new approach to an old problem The current solutions for pipe connections
Gebruikershandleiding (p.2) User manual (p.16)
 User manual (p.16)") Steam Smart Gebruikershandleiding (p.2) User manual (p.16) Item no: 90187001 NL2017/07 R01 EN2017/07 R01 NL EN 1 Cleopatra B.V. Oostzijde 295 1508 EN Zaandam Nederland Copyright Alle informatie in dit
Steam Smart Gebruikershandleiding (p.2) User manual (p.16) Item no: 90187001 NL2017/07 R01 EN2017/07 R01 NL EN 1 Cleopatra B.V. Oostzijde 295 1508 EN Zaandam Nederland Copyright Alle informatie in dit
INSTALLATION INSTRUCTION
 TV MOUNT INSTALLATION INSTRUCTION MODEL:HA051 HA051-T1 HA051-T6 Max VESA: 200 X 200 mm/8x8" Please read this instruction carefully before installation. Fits for most 14-32 inches Plasma, LCD and LED TVs.
Chapter 4 Understanding Families. In this chapter, you will learn
 Chapter 4 Understanding Families In this chapter, you will learn Topic 4-1 What Is a Family? In this topic, you will learn about the factors that make the family such an important unit, as well as Roles
Professionele Stoombaden New Bench-line
 Professionele Stoombaden New Bench-line Opbouwvoorschriften en installatiehandleiding Item no: 90327401 NL2017/07 R01 NL 1 Cleopatra B.V. Oostzijde 295 1508 EN Zaandam Nederland Copyright Alle informatie
STAP 1 VOORBEREIDING. Bestudeer de tekeningen en deze bevestigings instructies alvorens u begint met de montage! Organiseer uw werkplek.
 1 STAP 1 VOORBEREIDING Bestudeer de tekeningen en deze bevestigings instructies alvorens u begint met de montage! Organiseer uw werkplek. Organiseer de materialen. Breng ze naar de juiste plaats, en maak
---ENGLISH BELOW--- ALGEMENE VOORWAARDEN VSV EERSTEJAARSWEEKEND 2017
 ---ENGLISH BELOW--- ALGEMENE VOORWAARDEN VSV EERSTEJAARSWEEKEND 2017 ------------------------------------------------------------------------------------------- TOEPASSELIJKHEID De algemene voorwaarden
22U demonteerbare serverkast met wielen
 22U demonteerbare serverkast met wielen Product ID: RK2236BKF Dit server rack biedt 22U opbergruimte in een slanke, veilige kast voor het opbergen van EIA-310 conforme, 19" in een rack te monteren apparaten
NMOZTMKUDLVDKECVLKBVESBKHWIDKPDF-WWUS Page File Size 9,952 KB 29 May, 2016
 NAVIJVEN MINILAMPJES OM ZELF TE MAKEN KERSTFIGUREN UIT DE LAPPENMAND VOOR DE KINDERSSALOON EN COWBOYS VAN LOLLYSTOKJES KAMERBREED BOEKENREK VOOR EEN SMAL BUDGETGEBAKKEN KOEKFIGUURTJES HANGEN WE IN DE KERSTBOOM
EM6250 Firmware update V030507
 EM6250 Firmware update V030507 EM6250 Firmware update 2 NEDERLANDS/ENGLISH Table of contents 1.0 (NL) Introductie... 3 2.0 (NL) Firmware installeren... 3 3.0 (NL) Release notes:... 5 1.0 (UK) Introduction...
8U verticale serverkast - 76,2 cm diep - wandmonteerbare server rack
 8U verticale serverkast - 76,2 cm diep - wandmonteerbare server rack Product ID: RK830WALVS Deze 8U verticale serverkast is een ruimtebesparende manier om uw netwerk- en serverapparatuur te beveiligen.
(1) De hoofdfunctie van ons gezelschap is het aanbieden van onderwijs. (2) Ons gezelschap is er om kunsteducatie te verbeteren
 De hoofdfunctie van ons gezelschap is het aanbieden van onderwijs. (2) Ons gezelschap is er om kunsteducatie te verbeteren") (1) De hoofdfunctie van ons gezelschap is het aanbieden van onderwijs (2) Ons gezelschap is er om kunsteducatie te verbeteren (3) Ons gezelschap helpt gemeenschappen te vormen en te binden (4) De producties
(1) De hoofdfunctie van ons gezelschap is het aanbieden van onderwijs (2) Ons gezelschap is er om kunsteducatie te verbeteren (3) Ons gezelschap helpt gemeenschappen te vormen en te binden (4) De producties
Montagehandleiding Sanitaire ruimteverdeler Devider
 Montagehandleiding Sanitaire ruimteverdeler Devider LET OP!!! Plaats glazen wanden / deuren nooit onbeschermd op de vloer. Maar plaats deze op een stuk karton of houten plank. ( Tijdens uitpakken en tijdens