2 2a. B 2d. 12 2d POSIZIONAMENTO E MESSA IN OPERA
|
|
|
- Anke Segers
- 6 jaren geleden
- Aantal bezoeken:
Transcriptie
1 P 2b 2 2a A B 2d A 2c L 12 2d P B 2e L 2f POSIZIONAMENTO E MESSA IN OPERA 14
2 M 3b N 16 3a 15
3 16
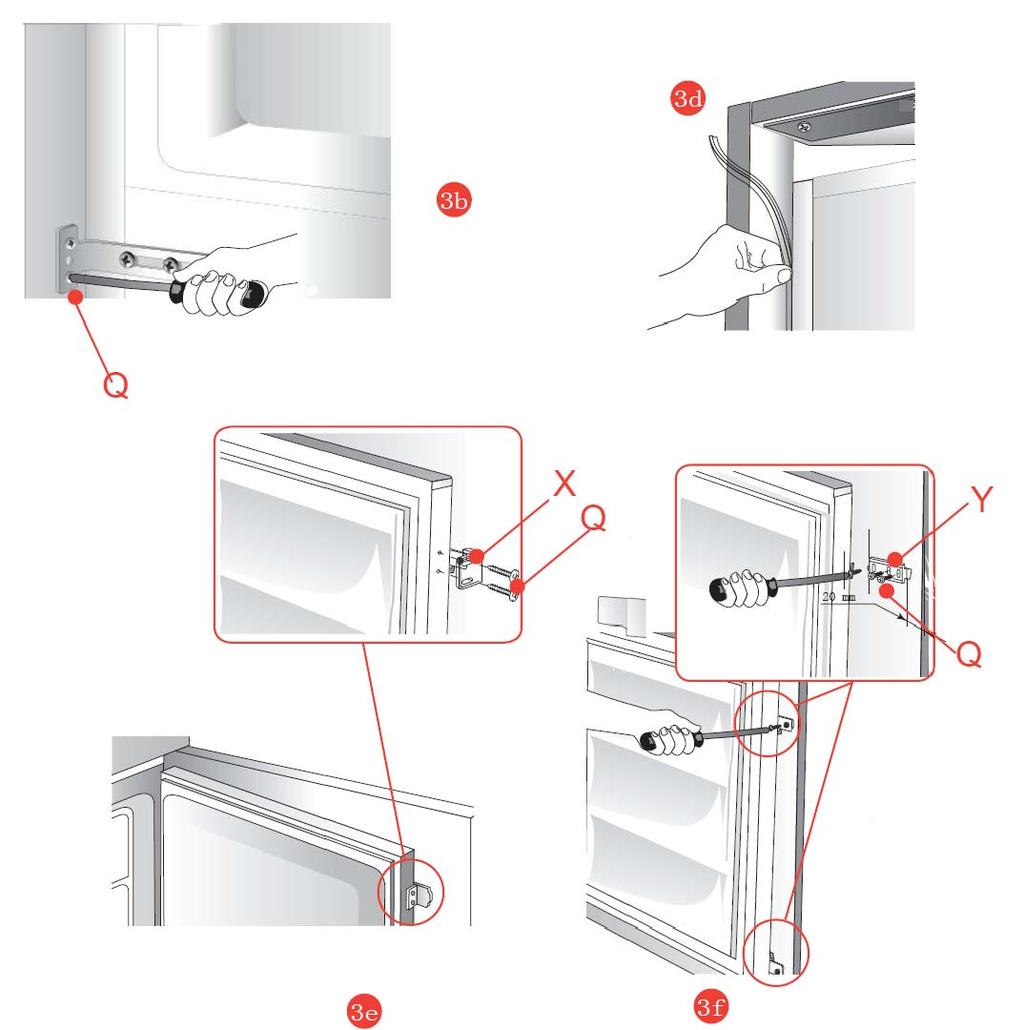
4 Het plaatsen en instellen van het toestel 1. Eens het toestel is uitgepakt, controleer of de spanning hetzelfde is als deze aangegeven op het type plaat. 2. Indien de richting van de deuropening is zoals vereist, ga over naar punt 3. Verander de positie van de deurscharnieren. Voor deze handeling moet u eerst de koelkast op zijn achterwand leggen. Gebruik tussenschotten om te verhinderen dat de condensbuizen en de compressor worden beschadigd. 2a. Verwijder de onderste scharnierpen P. 2b. Verwijder de onderste scharnier A en maak de deur los. 2c. Verwijder de bovenste scharnier B en maak de scharnier A vast aan de tegenovergestelde kant. 2d. Verwijder de bodemondersteuning L. 2 e. Maak de deur en het scharnier B vast aan de linkerkant. 2f. Maak de bodemondersteuning L vast aan de tegenovergestelde kant. Opgepast! Wanneer u het toestel installeert: A. Installeer het toestel niet in de buurt van warmtebronnen zoals kachels, radiatoren, fornuizen, enz. of in direct zonlicht. B. Zorg ervoor dat tijdens de automatische ontdooiing, het water op da achterwand van het compartiment in de afvoergoot loopt. C. Nadat het toestel op zijn definitieve plaats staat, laat het minstens één uur staan voordat u het aansluit aan een stroombron. D. Zorg ervoor dat het toestel goed werkt, vooralleer u er voedsel in plaatst. OPGEPAST: INSTALLEER HET TOESTEL NIET IN DE BUURT VAN WARMTEBRONNEN EN LAAT EEN ruimte VAN MINSTENS 5CM BOVEN HET TOESTEL. Installatie in de behuizing De afmetingen van de behuizing stemmen overeen met die vermeld in de figuur. 3. Steek het toestel in de behuizing tegen het zijpaneel naast de opening. 3a. Stel de voeten van de behuizing op de juiste hoogte zodat het bovenpaneel de koelkast niet raakt. Maak het bovenste deel van de koelkast vast in het voorgeboorde paneel over de voorkant met behulp van de schroeven. 3b. Maak de onderkant van het toestel vast aan de muur van de behuizing met behulp van speciale beugels. 3c. Bevestig de twee onderste voeten in de gaten onderaan de behuizing. 3d. Indien aanwezig, plaats de toegevoegde plastieken tussenlaag. 3 e. Maak het deel X vast met schroeven aan de deur van de koelkast. 3f. Monteer het schuivende deel Y met schroeven nadat de deur van de behuizing werd aangepast. 17
5 P 2b 2 2a A B 2d A 2c L 12 2d P B 2e L 2f POSIZIONAMENTO E MESSA IN OPERA 15
6 M 3b N 16 3a 16
7 17
8 Placer et installer l appareil 1. uand vous déballez l appareil, vérifiez que la tension du réfrigérateur soit identique à celle mentionné sur la plaque. 2. Si la direction de l ouverture de la porte vous convient, passez au point 3. En cas contraire, changez la position des charnières de la porte. Pour cette opération, couchez le réfrigérateur. 2a. Retirez le pivot de la charnière inférieure P. 2b. Retirez la charnière inférieure A et détachez la porte. 2c. Retirez la charnière supérieure B et attachez la charnière A au côté opposé. 2d. Retirez le support de fond L. 2 e. Attachez la porte et la charnière B à gauche. 2f. Fixez le support de fond L au côté opposé. Attention! uand vous installez l appareil: A. Ne l installez pas près d une source chaude, exemple: radiateur, feu ouvert, etc. B. Durant la décongélation automatique, veillez à ce que l eau, se trouvant à l arrière du compartiment, coule dans le tuyau d évacuation. C. Branchez l appareil une heure après son placement. D. Veillez à ce que l appareil fonctionne correctement avant de le charger d aliments. ATTENTION: N INSTALLEZ PAS L APPAREIL DANS LES ENVIRONS D UNE SOURCE CHAUDE ET GARDEZ UN ESPACE D AU MOINS 5CM AU DESSUS DU REFRIGERATEUR. Installation dans la niche Les dimensions de la niche correspondent à celles mentionnées sur l image. 3. Placez l appareil dans son encastrement contre le panneau latéral à côté de l ouverture. 3a. Ajustez la hauteur des pieds de l encastrement afin que le panneau supérieur du réfrigérateur ne touche pas l encastrement. Fixez la partie supérieure du réfrigérateur à l aide de vis au panneau pré percé. 3b. Fixez la partie inférieure du réfrigérateur à l encastrement à l aide des supports. 3c. Joignez les deux pieds de fond dans les trous de la partie inférieure de l encastrement. 3d. Si possible, placez l intercalaire en plastique. 3 e. Fixez la partie X à l aide des charnières à la porte du réfrigérateur. 3f. Après avoir ajusté la porte de l encastrement, assemblez la partie coulissante Y à l aide de vis. 18
9 P 2b 2 2a A B 2d A 2c L 12 2d P B 2e L 2f POSIZIONAMENTO E MESSA IN OPERA 13
10 M 3b N 16 3a 14

11 3d 3b X Y 20 mm 3h 3e 3f 15
12 Positioning and installing the appliance 1. Once the appliance has been unpacked, check the main voltage is the same as that indicated on the rating plate. 2. If the door opening direction is as required, go to Point 3. Otherwise, reverse the position of the hinges. To do this, carefully place the on its back, user spacers to prevent crushing the condenser pipes and damaging the compressor unit. 2a Remove the lower hinge pin P. 2b Remove the lower hinge A and free the door. 2c Remove upper hinge B, and fit the hinge A to the opposite side. 2d Remove the bottom support L. 2e Refit the door and the hinge B one the left side. 2f Refit the bottom support L to the opposite side. When installing the appliance, remember the following: A Do not install it near to sources of heat such as heaters, radiators, cookers, etc. or in direct sunlight. B Make sure that during the automatic defrost, any water on the back wall of the compartment runs into the drain channel. C After the appliance has been placed in its final position, leave it for about at least an hour before connecting it to the power supply. D Make sure that the appliance is working properly before placing any food in it. WARNING: DO NOT INSTALL THE APPLIANCE NEAR TO ANY HEAT SOURCES AND LEAVE A GAP OF AT LEAST 5 CM ABOVE IT. INSTALLATION IN THE TALL UNIT HOUSING The dimensions of the tall unit housing must be correspond to those reported in the figure. 3 insert the appliance in the housing against the side panel adjacent to the opening. 3a adjust the foot until the top panel is not in contact with the unit, and anchor the upper part of the appliance, using the screws supplied, in the pre-drilled panel over the front fascia. 3b Anchor the bottom of the appliance to the wall of the unit using the special brackets. 3c Fix the two bottom feet in the holes in the base of the unit. 3d where provided, apply the plastic joint gasket. 3e Anchor the part X with screws on the appliance door. 3f Fit the sliding part Y with screws, after adjusting the housing door. 16
OUTDOOR HD BULLET IP CAMERA PRODUCT MANUAL
 OUTDOOR HD BULLET IP CAMERA PRODUCT MANUAL GB - NL GB PARTS & FUNCTIONS 1. 7. ---- 3. ---- 4. ---------- 6. 5. 2. ---- 1. Outdoor IP camera unit 2. Antenna 3. Mounting bracket 4. Network connection 5.
MONTAGEHANDLEIDING/NOTICE D INSTALLATION
 MONTAGEHANDLEIDING/NOTICE D INSTALLATION Ribbon douchecabine / cabine de douche (ref. 223216) Barna douchecabine / cabine de douche (ref. 223217)! Voor uw gemak zijn de wanden en tub van deze douchecabine
Rhythm of Light. Susanne de Graef, Montagehandleiding / Instruction manual
 Rhythm of Light Susanne de Graef, 2016 Montagehandleiding / Instruction manual GELEVERD MATERIAAL / SUPPLIED MATERIAL B. C. D. A. E. F. A. B. C. D. E. F. armatuur / fixture fitting lange staalkabels (3)
OUTDOOR HD DOME IP CAMERA PRODUCT MANUAL GB - NL
 OUTDOOR HD DOME IP CAMERA PRODUCT MANUAL GB - NL GB PARTS & FUNCTIONS 2. ---- 1. ---- 3. ---- 7. ---------- 5. 4. 6. 1. Outdoor IP camera unit 2. Antenna 3. Mounting bracket 4. Network connection 5. Power
2000 Volkswagen Passat GLS
 REAR DOOR WINDOW Rear door window, assembly overview Fig. 304: Exploded View Of Rear Door Window 1 - Door Removing and installing: --> Rear door, removing and installing 2 - Spring nut Qty 2 3 - Screw
Plaatsingsvoorschriften Govawall Instructions de montage Govawall Verlegeanleitung Govawall Installation instructions Govawall
 V s u stainable p r i va c y NL F D UK Plaatsingsvoorschriften Govawall Instructions de montage Govawall Verlegeanleitung Govawall Installation instructions Govawall - + 502 40 502 6 x Ø 6 mm 2590 502
Flybye. Ernst Koning, Montagehandleiding / Instruction manual
 Flybye Ernst Koning, 2018 Montagehandleiding / Instruction manual GELEVERD MATERIAAL / MATERIALS SUPPLIED A. B. C. D. E. F. G. A. B. C. D. E. F. G. H. H. lichtbuis / lighting tube plafondkap / ceiling
PIÈCES DE RECHANGE POUR BATTERIES DE TRACTION
 BS/16277 Standaard vuldoppen Manuele vuldop diameter 35, kleur zwart Bouchons de remplissage manuel standard Bouchon de remplissage manuel diamètre 35, couleur noir BS/22096 Drukvuldoppen Drukvuldop TPO
Wegbeschrijving naar P27 en de kantoren van Brussels Airport Company (Satellietgebouw en Passport)
") Wegbeschrijving naar P27 en de kantoren van Brussels Airport Company (Satellietgebouw en Passport) 1. Op de ring van Brussel volgt u richting A201 Zaventem Luchthaven. 2. Blijf op de hoofdrijbaan A201
Wegbeschrijving naar P27 en de kantoren van Brussels Airport Company (Satellietgebouw en Passport) 1. Op de ring van Brussel volgt u richting A201 Zaventem Luchthaven. 2. Blijf op de hoofdrijbaan A201
Wegbeschrijving naar P27 en de kantoren van Brussels Airport Company (Satellietgebouw)
") Wegbeschrijving naar P27 en de kantoren van Brussels Airport Company (Satellietgebouw) 1. Op de ring van Brussel volgt u richting A201 Zaventem Luchthaven. 2. Blijf op de hoofdrijbaan A201 en houd links
Wegbeschrijving naar P27 en de kantoren van Brussels Airport Company (Satellietgebouw) 1. Op de ring van Brussel volgt u richting A201 Zaventem Luchthaven. 2. Blijf op de hoofdrijbaan A201 en houd links
The upside down Louisa tutorial by Dorothée: Noortjeprullemie.blogspot.be Written for Compagnie M.: m.com
 The upside down Louisa tutorial by Dorothée: Noortjeprullemie.blogspot.be Written for Compagnie M.: www.compagnie- m.com Dorothée heeft een unieke Compagnie M. hack gemaakt: de Louisa op zijn kop. Als
2006 Volkswagen Jetta TDI
 Door handle and door lock, assembly overview The illustration shows the left side. The right side is derived accordingly from this. Fig. 99: Door Handle And Door Lock, Assembly Overview 1 - Cable For disengaging
DRAAIDEUR 80/90 PIVOT DOOR
 HANDLEIDING MANUAL DRAAIDEUR 80/90 PIVOT DOOR 800/900 Montagehandleiding Reflex draaideur 80/90 met zijpaneel 80/90 Verstelbaarheid 611801: (770-810) x (770-810) x 1850 mm Verstelbaarheid 611802: (870-910)
GEVELPANELEN PANNEAUX DE FACADE
 Handleiding Manuel GEVELPANELEN PANNEAUX DE FACADE update van 11/09/2015 www.scalaplastics.com Gereedschappen en bevestigingsmiddelen: Hamer, meetlint, metaalzaag met een cirkelzaagblad met fijne tanden,
MONTAGE INSTRUCTIE ASSEMBLY INSTRUCTION
 MONTAGE INSTRUCTIE ASSEMBLY INSTRUCTION - 1. Waterpas stellen. De groef aan de zijkant van de beschermdeksel moet gelijk staan met de deellijn van het inbouw box. 2. Zet de inbouw box vast in de muur.
INSTALLATIE VOORSCHRIFT
 INSTALLATIE VOORSCHRIFT Ontwerp Voor doorgifte van IP signalen via coax systeem. Voorzien van HF in- en uitgang voor eenvoudig plaatsen tussen coax kabel. Voorzien van RJ-45 aansluiting voor in- uitkoppeling
VERTICALE SYSTEMEN SYSTÈMES VERTICAUX
 non food Outdoor & Style I architect & shopfitter: Knoblauch Marrel - St-Lenaarts I architect: PUUR Interieurarchitecten I shopfitter: Gyma kenmerken caractéristiques - Keuze uit Kolyma voor, op- en inbouw.
COLD/FREEZER ROOM. Gebruikershandleiding. Gebrauchsanweisung Owners manual Le mode d emploi
 COLD/FREEZER ROOM Gebruikershandleiding Gebrauchsanweisung Owners manual Le mode d emploi 1 CONTENT 1 Assembly of the cold rooms Kühlraum montage Assemblage des chambres froid Montage van de koelcel...
GB - Installation manual Mercedes Benz C-Class A205 convertible wind deflector (from 2015).
.") GB - Installation manual Mercedes Benz C-Class A205 convertible wind deflector (from 2015). DE Montage Anleitung Mercedes Benz C-Klasse Cabrio Windschott (ab 2015). NL Montage handleiding Mercedes Benz
GB - Installation manual Mercedes Benz C-Class A205 convertible wind deflector (from 2015). DE Montage Anleitung Mercedes Benz C-Klasse Cabrio Windschott (ab 2015). NL Montage handleiding Mercedes Benz
100 % Belge. 100 % Qualité. En acier de haute qualité. Peinture poudre texturée et résistante aux chocs pour un entretien facile. Vitrage de sécurité
 STEELIT Slide, meer dan zomaar een schuifdeur inculsief SOFT CLOSE inclus 100 % Belgisch. 100 % Kwaliteit. Staal van hoogwaardige kwaliteit Slagvaste structuurlak voor makkelijk onderhoud Gelaagd veiligheidsglas
EM7680 Firmware Update by Micro SD card
 EM7680 Firmware Update by Micro SD card 2 NEDERLANDS/ENGLISH EM7680 Firmware update by Micro SD card Table of contents 1.0 (NL) Introductie... 2 2.0 (NL) Firmware installeren... 2 3.0 (NL) Opmerking...
L.Net s88sd16-n aansluitingen en programmering.
 De L.Net s88sd16-n wordt via één van de L.Net aansluitingen aangesloten op de LocoNet aansluiting van de centrale, bij een Intellibox of Twin-Center is dat de LocoNet-T aansluiting. L.Net s88sd16-n aansluitingen
Technische fiche details Solidstone Fiche technique détaillée Solidstone. 1. Gewicht. De berekening van de gewichten gaat als volgt :
 1. Gewicht De berekening van de gewichten gaat als volgt : - Gewicht douchebak = 0 9 * lengte (mm) * breedte (mm) * 30 mm * 2,1/1.000000 Gemiddeld is dit ongeveer 50 kg/m2 voor de douchebak. 2. Afmetingen
PANEELRADIATOR - Type PR Handleiding. PANEL RADIATOR - Type PR Manual
 Fax. +31 (0)227-549 150 Website: www.sinusjevi.com PANEELRADIATOR - Type PR Handleiding PANEL RADIATOR - Type PR Manual Page 2 of 8 Page 3 of 8 Technische informatie Spanning: 230 of 400 Volt Vermogen:
1/8 ATLAS Atlas cabinet cabinet 1 7
 TLS cabinet / / / 0 D E F G H / L x Lx x L / x x D E Dx Ex / x x x x x x Fx x Hx Gx Fx Fx Fx Fx G H G H H G 0 0 0 0 0 / L / 0 NL: Deze kast bevat twee gaten aan de achterkant om aan de wand te kunnen bevestigen.
Scheepvaarttermen Termes nautiques
 * Scheepvaarttermen Termes nautiques *Een schip moet zijn navigatielichten voeren van zonsondergang tot zonsopgang en bij slecht zicht( minder dan 500m). *Un bateau doit allumer ses feux de navigation
L.Net s88sd16-n aansluitingen en programmering.
 De L.Net s88sd16-n wordt via één van de L.Net aansluitingen aangesloten op de LocoNet aansluiting van de centrale, bij een Intellibox of Twin-Center is dat de LocoNet-T aansluiting. L.Net s88sd16-n aansluitingen
Function checklist for the ML-350 or XL-350 with a print set. Missing loop.
 Function checklist for the ML-350 or XL-350 with a 260217 print set. Below mentioned check-point should resolve function problems of the lift systems. Missing loop. When a lift is connected to an external
Eco bedrukte envelop C4 Enveloppes ECO imprimées C4
 Eco bedrukte envelop C4 Enveloppes ECO imprimées C4 Taal Langue Eco Bedrukte envelop C4 Formaat 229 x Opmaakformaat 235 x Voorkeur plaatsing *1 110 mm 110 mm Aan te leveren formaat 235 x (breedte x hoogte)
MERU HORIZONTALE SYSTEMEN SYSTÈMES HORIZONTAUX KENMERKEN CARACTÉRISTIQUES
 Foto s onder: speciale afwerking black mirror en zwart gelakt Photos en bas: finitions spéciaux black mirror et laqué noir KENMERKEN CARACTÉRISTIQUES - Beschikbaar als opbouw en inbouw profiel. - Dragers
EM7580 Firmware Update by Micro SD card
 EM7580 Firmware Update by Micro SD card 2 NEDERLANDS/ENGLISH EM7580 Firmware update by Micro SD card Table of contents 1.0 (NL) Introductie... 3 2.0 (NL) Firmware installeren... 3 3.0 (NL) Opmerking...
KIDDY. Montage instructies Instructions de montage
 KIDDY Montage instructies Instructions de montage FR Attention! pour éviter le gonflement des planches à l'humidité, qui pourrait entraîner une déformation, traitez votre abri d'enfant sans attendre dès
TRACTATENBLAD VAN HET. JAARGANG 1990 Nr. 175
 63 (1975) Nr. 16 TRACTATENBLAD VAN HET KONINKRIJK DER NEDERLANDEN JAARGANG 1990 Nr. 175 A. TITEL Douaneovereenkomst inzake het internationaal vervoer van goederen onder dekking van Carnets TIR (TIR-Overeenkomst),
Aanduiden: installatie op douchebak of betegelde vloer. Indiquer: installation sur receveur de douche ou sur sol carrelé.
 1 Kies het geschikte maatblad / Choisir la feuille de mesure appropriée 2 Situatie / Situation Aanduiden: installatie op douchebak of betegelde vloer. Indiquer: installation sur receveur de douche ou sur
VERTICALE SYSTEMEN SYSTÈMES VERTICAUX
 non food harz en applique Carmi - Be I architect: Buro Busseniers I shopfitter: Jansen Finishings Alles kids - Zelzate I shopfitter: Johan Steyaert kenmerken caractéristiques - Opbouwprofiel - Dubbele
Limpid Light. design Esther Jongsma & Sam van Gurp, Montagehandleiding / Assembly Instructions
 Limpid Light design Esther Jongsma & Sam van Gurp, 05 Montagehandleiding / Assembly Instructions GELEVERD MATERIAAL / SUPPLIED MATERIAL A. A. B. B. C. D. E. F. G. G. H. I. J. K. / / ophanging / suspension:
45MM 385X565CM GARAGE SDPAU+EDC (ART 4004M)
") 45MM 385X565CM GARAGE SDPAU+EDC (ART 4004M) Onderdelenlijst Liste d'inventaire 4004M Wandelementen / Eléments des parois Typ ovoïde 45mm 385x565 SDPAU Artikel nr Afmeting / Dimension # Functie/Fonction
45MM 385X565CM GARAGE SDPAU+EDC (ART 4004M) Onderdelenlijst Liste d'inventaire 4004M Wandelementen / Eléments des parois Typ ovoïde 45mm 385x565 SDPAU Artikel nr Afmeting / Dimension # Functie/Fonction
SERIE GAMME KINEPRIME KINEPRIME KINEPRIME
 SERIE GAMME 100 101 DOUCHECABINES CABINES DE DOUCHE Een betaalbare douchecabine Une cabine à petit prix u Douchecabines voor compacte badkamers, bijvoorbeeld in een studentenkamer of huurwoning. Ruime
MONTAGEHANDLEIDING MANUEL DE MONTAGE SYSTEM
 1. Leg 2 stijlen + 1 diagonaal op de grond.(*1) Schuif de rechtse inkepingen van de diagonaal over de onderste verbindingsknoppen en klop vast met een kleine metalen hamer in de rechtse stijl 1. Posez
Quality requirements concerning the packaging of oak lumber of Houthandel Wijers vof (09.09.14)
") Quality requirements concerning the packaging of oak lumber of (09.09.14) Content: 1. Requirements on sticks 2. Requirements on placing sticks 3. Requirements on construction pallets 4. Stick length and
Quality requirements concerning the packaging of oak lumber of (09.09.14) Content: 1. Requirements on sticks 2. Requirements on placing sticks 3. Requirements on construction pallets 4. Stick length and
RESERVOIR RONDO - TEMPO NOTICE DE MONTAGE - TECHNISCHE FICHE
 RESERVOIR RONDO - TEMPO NOTICE DE MONTAGE - TECHNISCHE FICHE DESCRIPTION Double volume Mono volume d b e f c Mono volume g a h i Double volume a b c d e f g h i Cuve Couvercle avec palette(s) de commande
LOTIS BF MONTAGE HANDLEIDING MANUEL DE POSE
 LOTIS BF MONTAGE HANDLEIDING MANUEL DE POSE Algemene informatie Controleer de producten bij ontvangst onmiddellijk op eventuele schade, ontbrekende delen of productiefouten. Problemen dienen onmiddellijk
SERIE GAMME NEW ESPACE NEW ESPACE
 SERIE GAMME 118 119 DOUCHECABINES CABINES DE DOUCHE Kies voor eenvoud Préférez la simplicité u Simpel en esthetisch; het New Espace gamma is perfect geschikt voor starters of voor het creëren van een tweede
DPM. The installer s choice cdvibenelux.com. Deurpositiecontact voor opbouwmagneten Contact de position de porte pour ventouse en applique NEDERLANDS
 NL FR NEDERLANDS FRANçAIS 300 400 500 Deurpositiecontact voor opbouwmagneten Contact de position de porte pour ventouse en applique The installer s choice INSTALLATIE HANDLEIDING Deurpositiecontact voor
Gebruiksaanwijzing Pagina 14. Koelkast met explosieveilige binnenkuip Voor de inbedrijfstelling de gebruiksaanwijzing lezen 7083 099-00.
 Gebruiksaanwijzing Pagina 14 Koelkast met explosieveilige binnenkuip Voor de inbedrijfstelling de gebruiksaanwijzing lezen NL 7083 099-00 LKexv Changing over door hinges Door hinges should only be changed
(1) De hoofdfunctie van ons gezelschap is het aanbieden van onderwijs. (2) Ons gezelschap is er om kunsteducatie te verbeteren
 De hoofdfunctie van ons gezelschap is het aanbieden van onderwijs. (2) Ons gezelschap is er om kunsteducatie te verbeteren") (1) De hoofdfunctie van ons gezelschap is het aanbieden van onderwijs (2) Ons gezelschap is er om kunsteducatie te verbeteren (3) Ons gezelschap helpt gemeenschappen te vormen en te binden (4) De producties
(1) De hoofdfunctie van ons gezelschap is het aanbieden van onderwijs (2) Ons gezelschap is er om kunsteducatie te verbeteren (3) Ons gezelschap helpt gemeenschappen te vormen en te binden (4) De producties
Bedrukte envelop C5 Enveloppes personnalisées C5
 Bedrukte envelop C5 Enveloppes personnalisées C5 Taal Langue Bedrukte envelop C5 Formaat 229 x Opmaakformaat 235 x Envelop Formaat (mm) Materiaalsoort Opties sluiting* Opties venster* C5 229 x 162 90 gr.
Instructies voor het monteren van het koppelingsframe.
 Instructies voor het monteren van het koppelingsframe. Bevestig de 4 zwarte kunststof wielen aan de twee zijframes met behulp van de M12 x 60 halve zeskantbouten, M12-moeren en M12-borgmoeren, zoals afgebeeld.
34MM BODEN 355X535+30 CM SDPAU+EDC
 34MM BODEN 355X535+30 CM SDPAU+EDC Onderdelenlijst Liste d'inventaire 6005 Wandelementen / Eléments des parois Typ Ovoïde 34mm 355x535+30 SDPAU+EDC01L Artikel nr Afmeting / Dimension # Functie/Fonction
Bedrukte envelop EA5 Enveloppes personnalisées EA5
 Bedrukte envelop EA5 Enveloppes personnalisées EA5 Taal Langue Bedrukte envelop EA5 Formaat 220 x Opmaak formaat 226 x Envelop Formaat (mm) Materiaalsoort Opties sluiting* Opties venster* EA5 220 x 156
Style 21 ROBE. fashion. Juillet 2017 FOURNITURES
 Juillet 2017 Style fashion 21 ROBE Dans les tailles 36 à 56 Il faut d abord lire «Quelle taille choisir?» à la page 28. La disposition des pièces en tissu se trouve à la page 2 de ce PDF. Longueur du dos
spiegelkast Armoire de toilette
 spiegelkast Armoire de toilette handleiding / notice explicative (NL) Controleer vóór montage of het product compleet en vrij van beschadigingen is. Mocht u een gebrek constateren, neem dan contact op
EXPERT IN DEUR- EN MEUBELBESLAG
 SALICE AIR EXPERT IN DEUR- EN MEUBELBESLAG Deceuninck - Deforce nv Lodewijk De Raetlaan 28 8870 Kachtem T +32 (0)51 22 41 11 info@dcdf.be www.dcdf.be AIR - ONZICHTBARE SCHARNIER Air, een revolutionaire
Flat panel XXL lift system. Mounting instructions Montage handleiding
 Flat panel XXL lift system Mounting instructions Montage handleiding Safety instructions: Check the unit for damages caused by transport. In case of damage please report directly to the transporter and
Mounting ceiling & wall
 5 / profile 34 bending radius R 15*) (1015) R 20 (1015) R 30 (1015) R>80 (1018) filler position profile 26 bending radius filler position R 15*) (1015) R 25 (1015) R>100 (1018) 28 15 405 gr/m 522 gr/m
INSTALLATION INSTRUCTION
 TV MOUNT INSTALLATION INSTRUCTION MODEL:HA051 HA051-T1 HA051-T6 Max VESA: 200 X 200 mm/8x8" Please read this instruction carefully before installation. Fits for most 14-32 inches Plasma, LCD and LED TVs.
Bedrukte envelop C4 Enveloppes personnalisées C4
 Bedrukte envelop C4 Enveloppes personnalisées C4 Taal Langue Bedrukte envelop C4 Formaat 229 x Opmaakformaat 235 x * R = Rechts L = Links B = Boven(kant) Envelop Formaat (mm) Materiaalsoort Opties sluiting*
Bedrukte envelop EA4 Enveloppes personnalisées EA4
 Bedrukte envelop EA4 Enveloppes personnalisées EA4 Taal Nederlands Langue Français Bedrukte envelop EA4 Nederlands Formaat 220 x 312 mm Opmaakformaat 226 x 318 mm Envelop Formaat (mm) Materiaalsoort Opties
Bedrukte envelop C4 Enveloppes personnalisées C4
 Bedrukte envelop C4 Enveloppes personnalisées C4 Taal Langue Bedrukte envelop C4 Formaat mm Opmaakformaat 235 x Envelop * R = Rechts L = Links B = Boven(kant) Formaat (mm) Materiaalsoort Opties sluiting*
Procedure Reset tv-toestellen:
 Procedure Reset tv-toestellen: Volgende procedure is te volgen wanneer er een tv-toestel, op een van de kamers niet meer werkt. TV Re-installation Factory Default Her-installeren van de TV Fabrieksinstellingen
Andere Dimmers / Other Dimmers. Inhoud / Contents. - Overige Dimmers / Other Dimmers. COMPACT klantenspecificatie / Custom Special 5-1
 Andere Dimmers / Other Dimmers Inhoud / Contents - Overige Dimmers / Other Dimmers 5 mini-spotmat klantenspecificatie / Custom Special 5-2 5-4 5-6 elpo_074 rev. 08/03 5-1 mini mini-spotmat De mini-spotmat
Bedrukte envelop EA4 Enveloppes personnalisées EA4
 Bedrukte envelop EA4 Enveloppes personnalisées EA4 Taal Langue Bedrukte envelop EA4 Formaat 220 x 312 mm Opmaakformaat 226 x 318 mm Envelop Formaat (mm) Materiaalsoort Opties sluiting* Opties venster*
Panoram. Panorama SL
 - Easy to change the poster - Indoor usage - Cost saving - Curved design - Price / quality ratio - Easy to install / easy to handle - Different possible colour finishes - Possible branding with logo 25
Brix % While the Agriculture and Horticulture Development Board seeks to ensure that the information
 Refractometer Het gebruik van een Brix Refractometer Het is heel belangrijk om de kwaliteit van de biest bij ieder nieuw staal te controleren. Het beoordelen van de kwaliteit helpt u om te beslissen voor
INSTALATIEGIDS VIDEOWALL
 INSTALATIEGIDS VIDEO 1. Bereken de hoogte van de rails door te meten hoeveel lager het onderste scherm zal uitkomen. Je kan dit meten aan de achterkant van de display, waar de beugels op gemonteerd zijn.
spiegelkast Armoire de toilette
 spiegelkast Armoire de toilette handleiding / notice explicative (NL) Controleer vóór montage of het product compleet en vrij van beschadigingen is. Mocht u een gebrek constateren, neem dan contact op
Dagelijkse checklist Daily checklist
 Dagelijkse checklist Daily checklist Sluiting met snelspanner Verstelbare hoofdsteun Verstelbare en aanpasbare riem Verstelbare voetsteunen Verstelbare riemen van de voetsteun Quick release locked Head
28MM 840X320 CM ZDEDC01+DDP02 (ART 3811EXT)
") 28MM 840X320 M ZDED01+DDP02 (RT 3811EXT) Onderdelenlijst Liste d'inventaire 3811 Wandelementen / Eléments des parois Typ diamond 28mm 505x320 cm ZDED01 rtikel nr fmeting / Dimension # Functie/Fonction
28MM 840X320 M ZDED01+DDP02 (RT 3811EXT) Onderdelenlijst Liste d'inventaire 3811 Wandelementen / Eléments des parois Typ diamond 28mm 505x320 cm ZDED01 rtikel nr fmeting / Dimension # Functie/Fonction
Quick start guide. Powerbank MI Mah. Follow Fast All rights reserved. Page 1
 Quick start guide Powerbank MI 16.000 Mah Follow Fast 2016 - All rights reserved. Page 1 ENGLISH The Mi 16000 Power Bank is a very good backup option for those on the move. It can keep you going for days
Aufbauanleitung Verbundsicherheitsglas 10mm Assembly instructions / Instructions de montage / Montagehandleiding
 Aufbauanleitung Verbundsicherheitsglas 10mm Assembly instructions / Instructions de montage / Montagehandleiding Dacheindeckung / Roofing / Toiture / Dakbedekking 6 Versenken Sie die Schraube mindestens
HANDLEIDING - MODE D EMPLOI - MANUAL. Afschrijfgereedschap voor vloerders Kit de traçage pour carreleurs
 HANDLEIDING - MODE D EMPLOI - MANUAL TM1055 (829701021) Afschrijfgereedschap voor vloerders Kit de traçage pour carreleurs P.02 Gelieve te lezen en voor later gebruik bewaren P.06 Veuillez lire et conserver
HARZ CUBE 50 VERTICALE SYSTEMEN SYSTÈMES VERTICAUX
 non food kenmerken caractéristiques - Slanke wandstijl met zichtbare opening van 5,5 mm. - Montage als kokerprofiel mogelijk (met clipsprofiel). - Stap 50 mm. - Perforatie laat toe om 2 dragers dikte 2
Handleiding voor de opmeting Instructions pour la prise de mesure Wand/deur in hoek - Paroi/porte en coin
 1 Situatie / Situation Aanduiden: installatie op douchebak of betegelde vloer. Indiquer: installation sur receveur de douche ou sur sol carrelé. 2 Op douchebak/sur receveur Plaatsing van uiterste punt
Toshiba Satellite 2435-S255 Heat Sink
 Toshiba Satellite 2435-S255 Heat Sink Replacement Deze gids zal u tonen hoe u het koellichaam, handig voor het uit het reinigen of het oplossen van een probleem verwarming te vervangen. Geschreven door:
Roll-up banner Small (85 x 200 cm)
") Roll-up banner Small (85 x 200 cm) Taal Langue Nederlands Français Roll-up banner Small (85 x 200 cm) Nederlands Deze banner op klein formaat is van prima kwaliteit voor actiematig gebruik. De zichtmaat
Roll-up banner Small (85 x 200 cm) Taal Langue Nederlands Français Roll-up banner Small (85 x 200 cm) Nederlands Deze banner op klein formaat is van prima kwaliteit voor actiematig gebruik. De zichtmaat
AE1103 Statics. 25 January h h. Answer sheets. Last name and initials:
 Space above not to be filled in by the student AE1103 Statics 09.00h - 12.00h Answer sheets Last name and initials: Student no.: Only hand in the answer sheets! Other sheets will not be accepted Write
Settings for the C100BRS4 MAC Address Spoofing with cable Internet.
 Settings for the C100BRS4 MAC Address Spoofing with cable Internet. General: Please use the latest firmware for the router. The firmware is available on http://www.conceptronic.net! Use Firmware version
AIR-SUSPENSION AIR-SUSPENSION
 AIR-SUSPENSION AIR-SUSPENSION Dunlop Systems and Components Het Wegdam 22 A.J.V. 7496 Luchtveersystemen CA Hengevelde B.V. Het Wegdam The 22 Netherlands 7496 CA Hengevelde Tel.: +31-(0)547-333065 Nederland
256 kb Memory in NMS 8250, 8255 and 8280
 256 kb Memory in NMS 8250, 8255 and 8280 Supplied by Bastiaan Huber, 2001 Converted to PDF by HansO, 2001 Dutch text follows the english text! MEMORY-UPGRADE to 256Kb This description is only for people
4 Port USB Travel Charger with universal AC plugs
 4 Port USB Travel Charger with universal AC plugs Chargeur de voyage USBx4 avec prises de courant universelles Teknihall support/ Teknihall, tel.: 03/485.63.51 2 SUMMAIRE CARACTÉRISTIQUES... 4 INSTALLATION...
REIN kast. eiken standaard iepen. gebakken iepen. gerookt. licht iepen. bijzonderheden. staanders/achterwand/deur. ontwerp: Gjalt Pilat, 2005
 REIN kast ontwerp: Gjalt Pilat, 2005 afwijkende standaard maten op aanvraag standaard staanders/achterwand/deur licht gerookt gebakken bijzonderheden Rein hoogte 79,5 cm kast wordt gedemonteerd geleverd
EM7680 Firmware Update by Micro SD card or USB stick
 EM7680 Firmware Update by Micro SD card or USB stick 2 NEDERLANDS/ENGLISH EM7680 Firmware update by Micro SD card or USB stick Table of contents 1.0 (NL) Introductie... 3 2.0 (NL) Firmware installeren...
Appliques Notices de pose Wandlampen Plaatsingsinstructies Bracket lamps Instructions
 Appliques Notices de pose Wandlampen Plaatsingsinstructies Bracket lamps Instructions FR NL EN Système INC E27 p.2 Système INCV E27 p.3 Système HAL R7S p.4 Système ECO G24D2 p.5 Système G9 G9 p.6 Système
liniled Cast Joint liniled Gietmof liniled Castjoint
 liniled Cast Joint liniled Gietmof liniled is een hoogwaardige, flexibele LED strip. Deze flexibiliteit zorgt voor een zeer brede toepasbaarheid. liniled kan zowel binnen als buiten in functionele en decoratieve
Notices de pose Plaatsingsintructies Instructions
 Appliques - Wandlampen - Bracket lamps otices de pose Plaatsingsintructies Instructions IC E7... p. HA R7S... p. ECO G4D... p.4 G9 G9... p.5 ECOV E7-0 E7 W... p.6 GR8 GR0q... p.7 G G... p.8 ED... p.9 www.gesso.be
PLUS & PRO. Addendum installatie aanvullende MID 65A kwh-meter - Addendum installation additional MID 65A kwh-meter SET
 PLUS & PRO Addendum installatie aanvullende MID 65A kwh-meter - Addendum installation additional MID 65A kwh-meter 1 Aansluiten MID 65A kwh-meter Adres instellen MID 65A kwh-meter Maxem kan verschillende
by GARDIPOOL Montagehandleiding Maatwerk --- Notice de montage Sur mesure
 Montagehandleiding Maatwerk --- Notice de montage Sur mesure www.infiniteau.be Montagehandleiding/Notice de montage - INFINIT EAU MAATWERK/SUR MESURE 1. Inleiding Hartelijk gefeliciteerd met uw Infinit
Je rijdt recht door, voorbij het sportpaleis, over de brug van het Albertkanaal tot aan de verkeerslichten.
 Eerste mogelijkheid U komt vanuit Brussel, Gent of Hasselt. U volgt de ring van Gent naar Breda tot aan de afrit Sportpaleis. Bij het nemen van deze afrit moet u voorsorteren om rechtdoor het kruispunt
Dat is ook C'est aussi. Ergonomische ladevaatwassers Lave-vaisselles à tiroir ergonomique
 Dat is ook C'est aussi Ergonomische ladevaatwassers Lave-vaisselles à tiroir ergonomique Dat is ook C'est aussi Stijlvolle multi-koellade Tiroir réfrigérateur élégant Vrijstaand Pose Libre RF540ADUX4 900
RBR VERTICALE SYSTEMEN SYSTÈMES VERTICAUX
 kenmerken caractéristiques - Keuze uit (enkel of dubbele perforatie), vierkant (perforatie aan 2 of 4 zijden). - Gondelstaander (L of T model) beschikbaar. - Zware belasting mogelijk. - Dragers en profiel
MONTAGEHANDLEIDING INSTRUCTIONS DE MONTAGE
 BELGIAN PREMIUM QUALITY STEEL DOORS MONTAGEHANDLEIDING INSTRUCTIONS DE MONTAGE WWW.STEELIT.BE - WWW.STEEL-IT.NL 2 3 Beste klant, Proficiat met uw aankoop van een STEELIT stalen binnendeur! Met STEELIT
ICARUS Illumina E653BK on Windows 8 (upgraded) how to install USB drivers
 how to install USB drivers") ICARUS Illumina E653BK on Windows 8 (upgraded) how to install USB drivers English Instructions Windows 8 out-of-the-box supports the ICARUS Illumina (E653) e-reader. However, when users upgrade their Windows
ICARUS Illumina E653BK on Windows 8 (upgraded) how to install USB drivers English Instructions Windows 8 out-of-the-box supports the ICARUS Illumina (E653) e-reader. However, when users upgrade their Windows
Box and Blocks Test Of Manual Dexterity
 Handleiding voor de Box and Blocks Test Of Manual Dexterity Een test voor handmotoriek ADVYS art. 072280-7531 www.advys.be 1 Testprocedure: Klaarzetten van de test Open de testkoffer en plaats het tussenschot
Paxton. ins nl. Desktop lezer met Keyboard uitgang- USB
 Paxton ins-30217-nl Desktop lezer met Keyboard uitgang- USB 1 2 1 3 4 2 Desktop lezer De desktop lezer is ontworpen om naast een PC gebruikt te worden. Deze wordt gebruikt om kaarten en tags uit te lezen
Raamvlag Drapeau de fenêtre
 Raamvlag Drapeau de fenêtre Taal Nederlands Langue Raamvlag Nederlands Zoekt u naar een drager voor een snelle winkelactie of wilt u opvallen op een ludieke manier? En dit zonder teveel rompslomp. Kies
Telebib2 Edifact Validation - Tool introduction page 2 / 15
 Tool introduction Telebib2 Edifact Validation page 1 / 15 10.01.2012 Er is nu een tool beschikbaar die het mogelijk maakt een tekstbestand met inhoud op basis van de Telebib2 Edifact syntaxis the valideren.
HARZ CUBE 35 VERTICALE SYSTEMEN SYSTÈMES VERTICAUX KENMERKEN CARACTÉRISTIQUES
 Ralet - Sluis - NL I architect: Luc Pratz I shopfitter: Dima Design KENMERKEN CARACTÉRISTIQUES - Slanke wandstijl met zichtbare opening van 5,5 mm. - Montage: inbouw of opbouw met clips. - Stap 35 mm.
Mefa brievenbussen. Puur design. Mefa boîtes aux lettres. Design à l état pur.
 Mefa brievenbussen. Puur design. Mefa boîtes aux lettres. Design à l état pur. Mefa brievenbussen. Puur design. Mefa brievenbussen blinken niet alleen uit door hun stijlvol design. Ze zijn ook functioneel,
Jacob 1,25' Muurplaat Etagère Wall unit
 Jacob Muurplaat Etagère Wall unit Gebruik deze handleiding van begin tot einde voor het probleemloos monteren van uw aangekocht meubel aub.. Veuillez bien suivre nos instructions ci-après lors du montage