GB Cordless Recipro Saw Instruction Manual Scie recipro sans fil Manuel d instructions Akku-Reciprosäge Betriebsanleitung
|
|
|
- Nathan Vink
- 8 jaren geleden
- Aantal bezoeken:
Transcriptie
1 GB Cordless Recipro Saw Instruction Manual F Scie recipro sans fil Manuel d instructions D Akku-Reciprosäge Betriebsanleitung I Seghetto diritto a batteria Istruzioni per l uso NL Snoerloze reciprozaag Gebruiksaanwijzing E Sierra de sable a batería Manual de instrucciones P Serra de sabre a bateria Manual de instruções DK Akku bajonet sav Brugsanvisning S Sladdlös rak sticksåg Bruksanvisning N Accu bajonettsag Bruksanvisning SF Akkupuukkosaha Käyttöohje GR Φορητό παλινδροµικό πριόνι Οδηγίες χρήσεως BJR240

2 B A

3
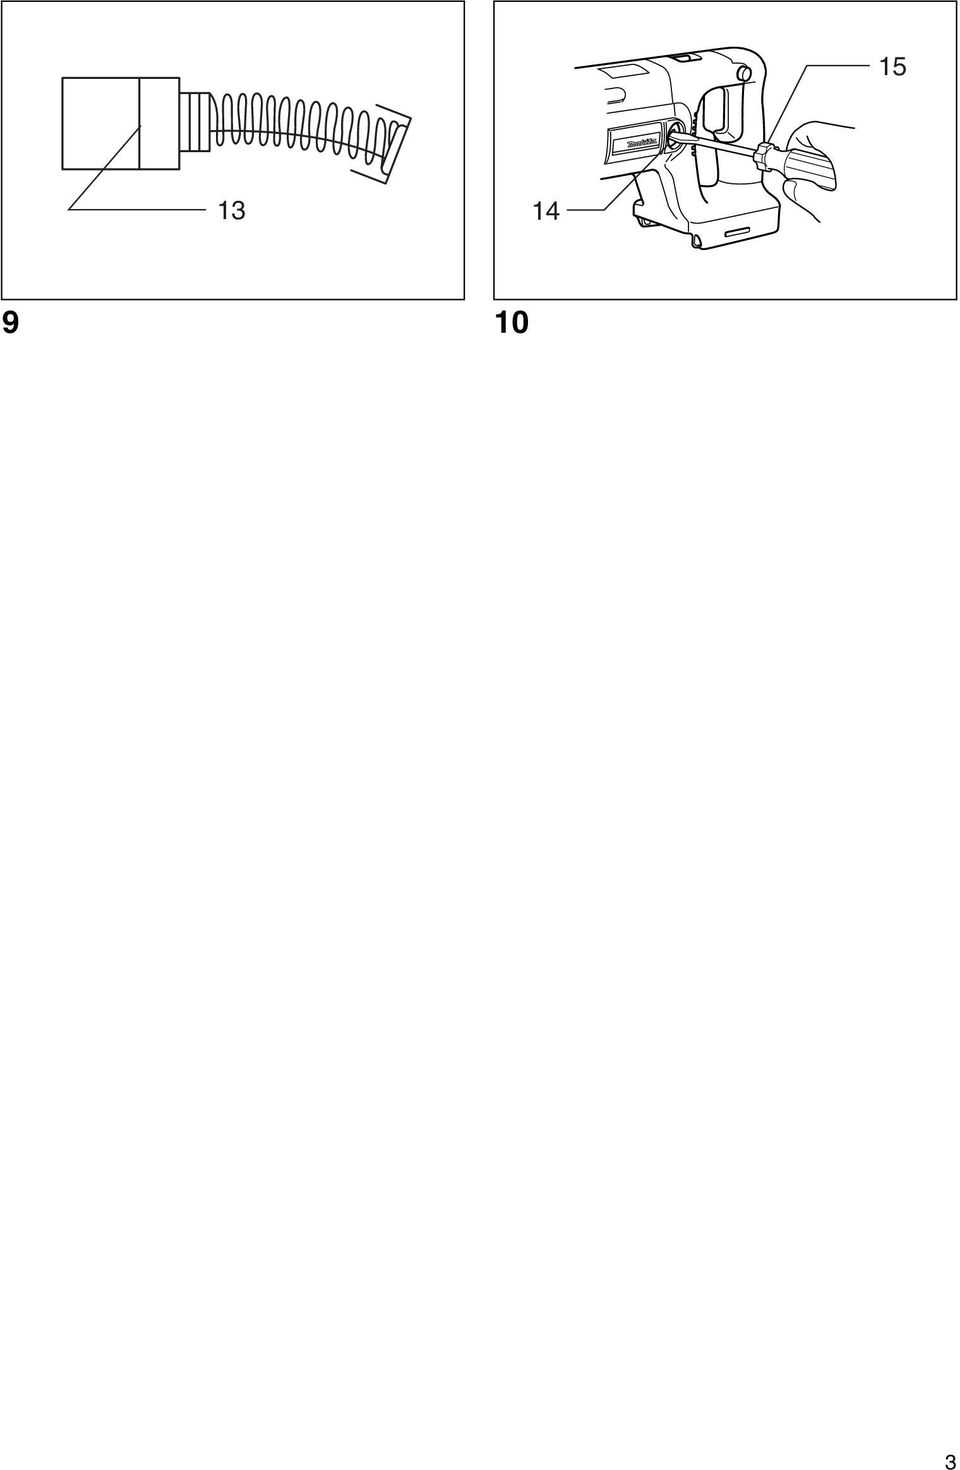
4 ENGLISH 1 Red part 2 Button 3 Battery cartridge 4 Lever 5 Shoe Explanation of general view 6 Lock-off button 7 Switch trigger 8 Speed change lever 9 Released position 10 Fixed position 11 Blade clamp sleeve 12 Blade 13 Limit mark 14 Brush holder cap 15 Screwdriver SPECIFICATIONS Model BJR240 Length of stroke mm Strokes per minute... High speed: 0 2,700 Low speed: 0 2,300 Overall length mm Net weight kg Rated voltage... D.C.24V Due to our continuing programme of research and development, the specifications herein are subject to change without notice. Note: Specifications may differ from country to country. Safety hints For your own safety, please refer to the enclosed safety instructions. IMPORTANT SAFETY INSTRUCTIONS FOR BATTERY CARTRIDGE ENC Before using battery cartridge, read all instructions and cautionary markings on (1) battery charger, (2) battery, and (3) product using battery. 2. Do not disassemble battery cartridge. 3. If operating time has become excessively shorter, stop operating immediately. It may result in a risk of overheating, possible burns and even an explosion. 4. If electrolyte gets into your eyes, rinse them out with clear water and seek medical attention right away. It may result in loss of your eyesight. 5. Do not short the battery cartridge: (1) Do not touch the terminals with any conductive material. (2) Avoid storing battery cartridge in a container with other metal objects such as nails, coins, etc. (3) Do not expose battery cartridge to water or rain. A battery short can cause a large current flow, overheating, possible burns and even a breakdown. 6. Do not store the tool and battery cartridge in locations where the temperature may reach or exceed 50 C (122 F). 7. Do not incinerate the battery cartridge even if it is severely damaged or is completely worn out. The battery cartridge can explode in a fire. 8. Be careful not to drop or strike battery. SAVE THESE INSTRUCTIONS. Tips for maintaining maximum battery life 1. Charge the battery cartridge before completely discharged. Always stop tool operation and charge the battery cartridge when you notice less tool power. 2. Never recharge a fully charged battery cartridge. Overcharging shortens the battery service life. 3. Charge the battery cartridge with room temperature at 10 C 40 C (50 F 104 F). Let a hot battery cartridge cool down before charging it. 4. Charge the Nickel Metal Hydride battery cartridge when you do not use it for more than six months. ADDITIONAL SAFETY RULES FOR TOOL ENB Be aware that this tool is always in an operating condition, because it does not have to be plugged into an electrical outlet. 2. Hold tool by insulated gripping surfaces when performing an operation where the cutting tool may contact hidden wiring. Contact with a live wire will make exposed metal parts of the tool live and shock the operator. 3. Avoid cutting nails. Inspect workpiece for any nails and remove them before operation. 4. Do not cut oversize workpiece. 5. Check for the proper clearance beyond the workpiece before cutting so that the blade will not strike the floor, workbench, etc. 6. Hold the tool firmly. 7. Make sure the blade is not contacting the workpiece before the switch is turned on. 8. Keep hands away from moving parts. 9. Always switch off and wait for the blade to come to a complete stop before removing the blade from the workpiece. 10. Do not touch the blade or the workpiece immediately after operation; they may be extremely hot and could burn your skin. SAVE THESE INSTRUCTIONS. 4

5 OPERATING INSTRUCTIONS Installing or removing battery cartridge (Fig. 1) Always switch off the tool before insertion or removal of the battery cartridge. To remove the battery cartridge, withdraw it from the tool while sliding the button on the side of the cartridge. To insert the battery cartridge, align the tongue on the battery cartridge with the groove in the housing and slip it into place. Always insert it all the way until it locks in place with a little click. If you can see the red part on the upper side of the button, it is not locked completely. Insert it fully until the red part cannot be seen. If not, it may accidentally fall out of the tool, causing injury to you or someone around you. Do not use force when inserting the battery cartridge. If the cartridge does not slide in easily, it is not being inserted correctly. Adjusting shoe (Fig. 2) When the blade loses its cutting efficiency in one place along its cutting edge, reposition the shoe to utilize a sharp, unused portion of its cutting edge. This will help to lengthen the life of the blade. To reposition the shoe, loosen the lever counter-clockwise and slide the shoe forward or back to the desired position. Then tighten the lever clockwise to firmly secure the shoe. Switch action (Fig. 3) Before inserting the battery cartridge into the tool, always check to see that the switch trigger actuates properly and returns to the OFF position when released. To prevent the switch trigger from being accidentally pulled, a lock-off button is provided. To start the tool, press in the lock-off button and pull the switch trigger. The lock-off button can be pressed in from either left or right side of the tool. Tool speed is increased by increasing pressure on the switch trigger. Release the switch trigger to stop. Speed change (Fig. 4) Always set the speed change lever fully to the correct position. If you operate the tool with the speed change lever positioned half-way, the tool may be damaged. Do not use the speed change lever while the tool is running. The tool may be damaged. To change the speed, first switch off the tool and then slide the speed change lever to the A side (2) for high speed or B side (1) for low speed. Be sure that the speed change lever is set to the correct position before operation. Use the right speed for your job. ASSEMBLY Always be sure that the tool is switched off and the battery cartridge is removed before carrying out any work on the tool. Installing or removing saw blade Always clean out all chips or foreign matter adhering to the blade, blade clamp and/or slider. Failure to do so may cause insufficient tightening of the blade, resulting in a serious injury. To install the saw blade, always make sure that the blade clamp sleeve is in released position before inserting the saw blade. If the blade clamp sleeve is in fixed position, rotate the sleeve to the released position. (Fig. 5) Insert the saw blade into the blade clamp as far as it will go. The blade clamp sleeve rotates and the saw blade is fixed. Make sure that the saw blade cannot be extracted even though you try to pull it out. (Fig. 6) NOTE: If you do not insert the saw blade deep enough, the saw blade may be ejected unexpectedly during operation. This can be extremely dangerous. To remove the saw blade, rotate the blade clamp sleeve in the direction of the arrow fully. The saw blade is removed and the blade clamp sleeve is fixed at the released position. (Fig. 7) NOTE: If you remove the saw blade without rotating the blade clamp sleeve fully, the sleeve may not be fixed. In this case, rotate the blade clamp sleeve fully to make the sleeve fixed at the released position. OPERATION (Fig. 8) Always press the shoe firmly against the workpiece during operation. If the shoe is held away from the workpiece during operation, strong vibration and/or twisting will be produced, causing the blade to snap dangerously. Always wear gloves to protect your hands from hot flying chips when cutting metal. Always use a suitable coolant (cutting oil) when cutting metal. Failure to do so will cause premature blade wear. If the tool is operated continuously until the battery cartridge has discharged, allow the tool to rest for 15 minutes before proceeding with a fresh battery. Press the shoe firmly against the workpiece. Do not allow the tool to bounce. Bring the blade into light contact with the workpiece. First, make a pilot groove, using a slower speed. Then use a faster speed to continue cutting. 5

6 MAINTENANCE Always be sure that the tool is switched off and the battery cartridge is removed before attempting to perform inspection or maintenance. Replacing carbon brushes Remove and check the carbon brushes regularly. Replace when they wear down to the limit mark. Keep the carbon brushes clean and free to slip in the holders. Both carbon brushes should be replaced at the same time. Use only identical carbon brushes. (Fig. 9) Use a screwdriver to remove the brush holder caps. Take out the worn carbon brushes, insert the new ones and secure the brush holder caps. (Fig. 10) To maintain product SAFETY and RELIABILITY, repairs, any other maintenance or adjustment should be performed by Makita Authorized or Factory Service Centres, always using Makita replacement parts. ACCESSORIES These accessories or attachments are recommended for use with your Makita tool specified in this manual. The use of any other accessories or attachments might present a risk of injury to persons. Only use accessory or attachment for its stated purpose. If you need any assistance for more details regarding these accessories, ask your local Makita service center. Recipro saw blade Various type of Makita genuine batteries and chargers 6

7 NEDERLANDS 1 Rood gedeelte 2 Knop 3 Accu 4 Hendel 5 Geleideschoen Verklaring van algemene gegevens 6 Ontgrendelknop 7 Trekschakelaar 8 Snelheidsregelknop 9 Vrije stand 10 Vaste stand 11 Zaagbladklembus 12 Zaagblad 13 Limietstreep 14 Borstelhouderdop 15 Schroevendraaier TECHNISCHE GEGEVENS Model BJR240 Slaglengte mm Aantal slagen per minuut...hoog toerental: Laag toerental: Totale lengte mm Netto gewicht... 4,4 kg Nominale spanning... DC 24 V In verband met ononderbroken research en ontwikkeling behouden wij ons het recht voor bovenstaande technische gegevens te wijzigen zonder voorafgaande kennisgeving. Opmerking: De technische gegevens kunnen van land tot land verschillen. Veiligheidswenken Voor uw veiligheid dient u de bijgevoegde Veiligheidsvoorschriften nauwkeurig op te volgen. BELANGRIJKE VEILIGHEIDSVOORSCHRIFTEN VOOR ACCU 1. Lees alle voorschriften en waarschuwingen op (1) de acculader, (2) de accu, en (3) het product waarvoor de accu wordt gebruikt, aandachtig door alvorens de acculader in gebruik te nemen. 2. Neem de accu niet uit elkaar. 3. Als de gebruikstijd van een opgeladen accu aanzienlijk korter is geworden, moet u het gebruik ervan onmiddellijk stopzetten. Voortgezet gebruik kan oververhitting, brandwonden en zelfs een ontploffing veroorzaken. 4. Als er elektrolyt in uw ogen is terechtgekomen, spoel dan uw ogen met schoon water en roep onmiddellijk de hulp van een dokter in. Elektrolyt in de ogen kan blindheid veroorzaken. 5. Voorkom kortsluiting van de accu: (1) Raak de accuklemmen nooit aan met een geleidend materiaal. (2) Bewaar de accu niet in een bak waarin andere metalen voorwerpen zoals spijkers, munten e.d. worden bewaard. (3) Stel de accu niet bloot aan water of regen. Kortsluiting van de accu kan oorzaak zijn van een grote stroomafgifte, oververhitting, brandwonden, en zelfs defecten. 6. Bewaar het gereedschap en de accu niet op plaatsen waar de temperatuur kan oplopen tot 50 C of hoger. 7. Werp de accu nooit in het vuur, ook niet wanneer hij zwaar beschadigd of volledig versleten is. De accu kan namelijk ontploffen in het vuur. 8. Wees voorzichtig dat u de accu niet laat vallen en hem niet blootstelt aan schokken of stoten. BEWAAR DEZE VOORSCHRIFTEN. Tips voor een maximale levensduur van de accu 1. Laad de accu op voordat hij volledig ontladen is. Stop het gebruik van het gereedschap en laad de accu op telkens wanneer u vaststelt dat het vermogen van het gereedschap is afgenomen. 2. Laad een volledig opgeladen accu nooit opnieuw op. Als u de accu te veel oplaadt, zal hij minder lang meegaan. 3. Laad de accu op bij een kamertemperatuur tussen 10 C en 40 C. Laat een warme accu afkoelen alvorens hem op te laden. 4. Laad de nikkel-metaalhydride accu op telkens wanneer u hem langer dan zes maanden niet hebt gebruikt. AANVULLENDE VEILIGHEIDSVOORSCHRIFTEN VOOR HET GEREEDSCHAP 1. Denk eraan dat dit gereedschap altijd gebruiksklaar is, omdat het niet op een stopcontact hoeft te worden aangesloten. 2. Houd het gereedschap bij de geïsoleerde handgrepen vast wanneer u boort op plaatsen waar het gereedschap met verborgen elektrische bedrading in aanraking kan komen. Door contact met een onder spanning staande draad, zullen ook de niet-geïsoleerde metalen delen van het gereedschap onder spanning komen te staan en zal de gebruiker een elektrische schok krijgen. 3. Vermijd het zagen op spijkers. Inspecteer het werkstuk alvorens met het zagen te beginnen en haal alle spijkers eruit. 4. Zaag geen werkstukken die te groot zijn. 5. Controleer vooraf of er voldoende ruimte voorbij het werkstuk is, zodat het zaagblad niet tegen de vloer, een werkbank e.d. zal stoten. 6. Houd het gereedschap stevig vast. 7. Zorg dat het zaagblad het werkstuk niet raakt voordat u de trekschakelaar indrukt. 8. Houd uw handen uit de buurt van bewegende delen. 9. Schakel het gereedschap uit en wacht totdat het zaagblad volledig tot stilstand is gekomen alvorens het zaagblad van het werkstuk te verwijderen. 10. Raak het zaagblad of het werkstuk niet aan onmiddellijk na het werk; deze kunnen gloeiend heet zijn en brandwonden veroorzaken. BEWAAR DEZE VOORSCHRIFTEN. 16

8 BEDIENINGSVOORSCHRIFTEN Installeren of verwijderen van de accu (Fig. 1) Schakel het gereedschap altijd uit alvorens de accu te installeren of te verwijderen. Om de accu te verwijderen, haalt u deze uit het gereedschap terwijl u de knop op de zijkant van de accu verschuift. Om de accu te installeren, doet u de tong op de accu overeenkomen met de groef in het huis en dan schuift u de accu erin. Schuif de accu altijd zo ver mogelijk erin, totdat hij op zijn plaats vastklikt. Wanneer het rode gedeelte op de bovenkant van de knop nog zichtbaar is, zit de accu niet volledig erin. Schuif hem volledig erin totdat het rode gedeelte niet meer zichtbaar is. Als u dit niet doet, kan de accu per ongeluk eruit vallen zodat uzelf of anderen in uw omgeving verwond raken. Als de accu moeilijk in de houder gaat, moet u niet proberen hem met geweld erin te duwen. Indien de accu er niet gemakkelijk ingaat, betekent dit dat u hem niet op de juiste wijze erin steekt. Bijstellen van de geleideschoen (Fig. 2) Wanneer een bepaald gedeelte van het zaagblad niet meer goed snijdt, moet u de geleideschoen bijstellen om een ongebruikt scherp gedeelte van het zaagblad te gebruiken. Hierdoor zal het zaagblad langer meegaan. Om de geleideschoen bij te stellen, maakt u de hendel naar links los en schuift u de geleideschoen naar voren of naar achteren naar de gewenste positie. Draai daarna de hendel weer goed naar rechts vast om de geleideschoen vast te zetten. Werking van de trekschakelaar (Fig. 3) Alvorens de accu in het gereedschap te plaatsen, moet u altijd controleren of de trekschakelaar naar behoren werkt en bij het loslaten naar de OFF positie terugkeert. Een ontgrendelknop is voorzien om te voorkomen dat de trekschakelaar per ongeluk wordt ingedrukt. Om het gereedschap te starten, drukt u eerst de ontgrendelknop en daarna de trekschakelaar in. De ontgrendelknop kan zowel vanaf de linker- als rechterzijde van het gereedschap worden ingedrukt. Hoe groter de druk op de trekschakelaar, hoe sneller het gereedschap draait. Laat de trekschakelaar los om het gereedschap te stoppen. Snelheidsregelknop (Fig. 4) Zet de snelheidsregelknop altijd volledig in de juiste positie. Als u het gereedschap gebruikt met deze knop halverwege tussen de posities geplaatst, kan het gereedschap beschadigd raken. Verander de instelling van de snelheidsregelknop niet terwijl het gereedschap draait. Het gereedschap zou daardoor beschadigd kunnen raken. Om de snelheid te veranderen, schakelt u eerst het gereedschap uit en daarna schuift u de snelheidsregelknop naar de zijde A (2) voor hoge snelheid, of naar de zijde B (1) voor lage snelheid. Zorg dat de snelheidsregelknop in de juiste positie staat voordat u begint te zagen. Gebruik de snelheid die geschikt is voor het werk. INEENZETTEN Zorg altijd dat het gereedschap is uitgeschakeld en de accu ervan is verwijderd alvorens werk aan het gereedschap uit te voeren. Installeren of verwijderen van het zaagblad Verwijder altijd alle spaanders en verontreinigingen van het zaagblad, de zaagbladklem en/of de slede. Als u dit niet doet, kan het zaagblad niet goed vastgezet zijn, hetgeen ernstige verwonding kan veroorzaken. Om het zaagblad te installeren, moet u eerst controleren of de zaagbladklembus in de vrije stand staat alvorens het zaagblad erin te steken. Indien de klembus in de vaste stand staat, draait u de klembus naar de vrije stand. (Fig. 5) Steek het zaagblad zo ver mogelijk in de zaagbladklem. De zaagbladklembus roteert en het zaagblad wordt vastgezet. Controleer of het zaagblad niet eruit komt wanneer u eraan trekt. (Fig. 6) OPMERKING: Als het zaagblad niet diep genoeg erin zit, kan het zaagblad tijdens het zagen onverwachts eruit geworpen worden, hetgeen bijzonder gevaarlijk is. Om het zaagblad te verwijderen, draait u de zaagbladklembus volledig in de richting van het pijltje. Het zaagblad wordt verwijderd en de zaagbladklembus wordt in de vrije stand vastgezet. (Fig. 7) OPMERKING: Als u het zaagblad verwijdert zonder de klembus volledig te draaien, zal de klembus mogelijk niet in de vrije stand worden vastgezet. Draai in dat geval de klembus volledig in de richting van het pijltje om hem vast in de vrije stand te zetten. BEDIENING (Fig. 8) Druk de schoen tijdens het zagen altijd flink tegen het werkstuk aan. Als u tijdens het zagen de schoen van het werkstuk afneemt, zullen sterke vibraties en/of kromtrekken van het zaagblad het gevolg zijn. Het zaagblad kan dan breken, hetgeen zeer gevaarlijk is. Draag altijd handschoenen wanneer u in metaal zaagt, om uw handen te beschermen tegen wegvliegende hete metaaldeeltjes. Gebruik voor het zagen in metaal altijd een geschikt koelmiddel (snijolie). Als u dit niet doet, zal het zaagblad minder lang meegaan. Als u het gereedschap doorlopend gebruikt totdat de accu leeg is, moet u het 15 minuten laten rusten alvorens verder te werken met een verse accu. Druk de schoen flink tegen het werkstuk aan. Zorg ervoor dat het gereedschap niet schokt. Breng daarna het zaagblad lichtjes in contact met het werkstuk. Zaag eerst op lage snelheid om een geleidegroef te maken. Daarna kunt u op grotere snelheid verder zagen. 17

9 ONDERHOUD Controleer altijd of het gereedschap is uitgeschakeld en de accu ervan is verwijderd vooraleer inspectie of onderhoud aan het gereedschap uit te voeren. Vervangen van koolborstels Verwijder en controleer regelmatig de koolborstels. Vervang de koolborstels wanneer ze tot aan de limietmarkering versleten zijn. Houd de koolborstels schoon, zodat ze gemakkelijk in de houders glijden. Beide koolborstels dienen gelijktijdig te worden vervangen. Gebruik uitsluitend gelijksoortige koolborstels. (Fig. 9) Gebruik een schroevendraaier om de kappen van de koolborstelhouders te verwijderen. Haal de versleten koolborstels eruit, schuif de nieuwe erin, en zet daarna de kappen weer goed vast. (Fig. 10) Om de VEILIGHEID en BETROUWBAARHEID van het gereedschap te verzekeren, dienen alle reparaties, onderhoudsbeurten of afstellingen te worden uitgevoerd bij een erkend Makita Servicecentrum of Fabriekservicecentrum, en dit uitsluitend met gebruik van Makita vervangingsonderdelen. ACCESSOIRES Deze accessoires of hulpstukken worden aanbevolen voor gebruik met het Makita gereedschap dat in deze gebruiksaanwijzing is beschreven. Bij gebruik van andere accessoires of hulpstukken bestaat er gevaar voor persoonlijke verwonding. Gebruik de accessoires of hulpstukken uitsluitend voor hun bestemde doel. Raadpleeg het dichtstbijzijnde Makita Servicecentrum voor verder advies of bijzonderheden omtrent deze accessoires. Reciprozaagblad Diverse types originele Makita accu s en acculaders 18
 Gebruik een schroevendraaier om de kappen van de koolborstelhouders te verwijderen. Haal de versleten koolborstels eruit, schuif de nieuwe erin, en zet daarna de kappen weer goed vast. (Fig.")
GB Cordless Impact Driver Instruction Manual Tournevis à chocs sans fil Manuel d instructions Akku-Schlagschrauber Betriebsanleitung
 GB Cordless Impact Driver Instruction Manual F Tournevis à chocs sans fil Manuel d instructions D Akku-Schlagschrauber Betriebsanleitung I Avvitatrice ad impulso a batteria Istruzioni per l uso NL Snoerloze
GB Cordless Screwdriver Instruction Manual Visseuse sans fil Manuel d instructions Akku-Schrauber Betriebsanleitung
 GB Cordless Screwdriver Instruction Manual F Visseuse sans fil Manuel d instructions D Akku-Schrauber Betriebsanleitung I Avvitatrice a batteria Istruzioni per l uso NL Snoerloze schroevendraaier Gebruiksaanwijzing
12 V UB120D 14.4 V UB140D
 GB Cordless Blower Instruction Manual F Aspirateur-ventilateur sans fil Manuel d instructions D Akku-Gebläse/Sauger Betriebsanleitung I Aspiratore/soffiatrice a batteria Istruzioni per l uso NL Accu blaas-en
GB Codless Grass Shear Instruction Manual Taille-herbes sans fil Manuel d instructions Akku-Grasschere Betriebsanleitung
 GB Codless Grass Shear Instruction Manual F Taille-herbes sans fil Manuel d instructions D Akku-Grasschere Betriebsanleitung I Tosaerba a batteria Istruzioni per l uso NL Accu grasschaar Gebruiksaanwijzing
2000 Volkswagen Passat GLS
 REAR DOOR WINDOW Rear door window, assembly overview Fig. 304: Exploded View Of Rear Door Window 1 - Door Removing and installing: --> Rear door, removing and installing 2 - Spring nut Qty 2 3 - Screw
GB Cordless Angle Impact Driver Instruction Manual Visseuse d angle à chocs à batterie Manuel d instructions
 GB Cordless Angle Impact Driver Instruction Manual F Visseuse d angle à chocs à batterie Manuel d instructions D Akku-Winkel-Schlagschrauber Betriebsanleitung I Avvitatore angolare ad impulso a batteria
BFT020F BFT021F BFT040F BFT080F BFT122F BFT081F BFT123F
 GB Cordless Screwdriver Instruction Manual F Visseuse sans fil Manuel d instructions D Akku-Schrauber Betriebsanleitung I Avvitatrice a batteria Istruzioni per l uso NL Snoerloze schroevendraaier Gebruiksaanwijzing
7.2 V DA 302D 9.6 V DA392D 12V DA312D
 GB Cordless Angle Drill Instruction Manual F Perceuse d angle sans fil Manuel d instructions D Akku-Winkelbohrmaschine Betriebsanleitung I Trapano ad angolo a betteria Istruzioni per l uso NL Haakse boormachine
GB Cordless Impact Driver Instruction Manual Visseuse à chocs sans fil Manuel d instructions Akku-Schlagschrauber Betriebsanleitung
 GB Cordless Impact Driver Instruction Manual F Visseuse à chocs sans fil Manuel d instructions D Akku-Schlagschrauber Betriebsanleitung I Avvitatore ad impulso a batteria Istruzioni per l uso NL Accu-slagschroevendraaier
Flybye. Ernst Koning, Montagehandleiding / Instruction manual
 Flybye Ernst Koning, 2018 Montagehandleiding / Instruction manual GELEVERD MATERIAAL / MATERIALS SUPPLIED A. B. C. D. E. F. G. A. B. C. D. E. F. G. H. H. lichtbuis / lighting tube plafondkap / ceiling
Rhythm of Light. Susanne de Graef, Montagehandleiding / Instruction manual
 Rhythm of Light Susanne de Graef, 2016 Montagehandleiding / Instruction manual GELEVERD MATERIAAL / SUPPLIED MATERIAL B. C. D. A. E. F. A. B. C. D. E. F. armatuur / fixture fitting lange staalkabels (3)
GB Blower Instruction Manual Aspirateur Manuel d instructions Gebläse Betriebsanleitung
 GB Blower Instruction Manual F Aspirateur Manuel d instructions D Gebläse Betriebsanleitung I Soffiatrice-Aspiratore Istruzioni per l uso NL Blazer Gebruiksaanwijzing E Sopladora Aspiradora Manual de instrucciones
GB Cordless Cutter Instruction Manual Scie diamant sans fil Manuel d instructions Akku- Glas- und Fliesenschneider Betriebsanleitung
 GB Cordless Cutter Instruction Manual F Scie diamant sans fil Manuel d instructions D Akku- Glas- und Fliesenschneider Betriebsanleitung I Sega al diamante a batteria Istruzioni per l uso NL Accu tegel-
2006 Volkswagen Jetta TDI
 Door handle and door lock, assembly overview The illustration shows the left side. The right side is derived accordingly from this. Fig. 99: Door Handle And Door Lock, Assembly Overview 1 - Cable For disengaging
6207D 6217D 6317D 6337D 6347D
 GB Cordless Driver Drill Instruction Manual F Perceuse-visseuse sans fil Manuel d instructions D Akku-Bohrschrauber Betriebsanleitung I Trapano-avvitatore a batteria Istruzioni per l uso NL Snoerloze boor-schroevedraaier
6203D 6213D/6313D 6233D/6333D
 GB Cordless Driver Drill Instruction Manual F Perceuse-visseuse sans fil Manuel d instructions D Akku-Bohrschrauber Betriebsanleitung I Trapano-avvitatore a batteria Istruzioni per l uso NL Snoerloze boor-schroevedraaier
Quick start guide. Powerbank MI Mah. Follow Fast All rights reserved. Page 1
 Quick start guide Powerbank MI 16.000 Mah Follow Fast 2016 - All rights reserved. Page 1 ENGLISH The Mi 16000 Power Bank is a very good backup option for those on the move. It can keep you going for days
9.6 V 6226D 12 V 6227D 14.4 V 6228D
 GB Cordless Driver Drill Instruction Manual F Perceuse-visseuse sans fil Manuel d instructions D Akku-Bohrschrauber Betriebsanleitung I Trapano-avvitatore a batteria Istruzioni per l uso NL Snoerloze boor-schroevedraaier
GB Cordless Circular Saw Instruction Manual Scie circulaire sans fil Manuel d instructions Akku-Handkreissäge Betriebsanleitung
 GB Cordless Circular Saw Instruction Manual F Scie circulaire sans fil Manuel d instructions D Akku-Handkreissäge Betriebsanleitung I Sega circolare a batteria Istruzioni per l uso NL Accu cirkelzaag Gebruiksaanwijzing
6260D 6270D 6280D 6390D
 GB Cordless Driver Drill Instruction Manual F Perceuse-visseuse sans fil Manuel d instructions D Akku-Bohrschrauber Betriebsanleitung I Trapano-avvitatore a batteria Istruzioni per l uso NL Snoerloze boor-/schroevendraaier
OUTDOOR HD BULLET IP CAMERA PRODUCT MANUAL
 OUTDOOR HD BULLET IP CAMERA PRODUCT MANUAL GB - NL GB PARTS & FUNCTIONS 1. 7. ---- 3. ---- 4. ---------- 6. 5. 2. ---- 1. Outdoor IP camera unit 2. Antenna 3. Mounting bracket 4. Network connection 5.
Procedure Reset tv-toestellen:
 Procedure Reset tv-toestellen: Volgende procedure is te volgen wanneer er een tv-toestel, op een van de kamers niet meer werkt. TV Re-installation Factory Default Her-installeren van de TV Fabrieksinstellingen
OUTDOOR HD DOME IP CAMERA PRODUCT MANUAL GB - NL
 OUTDOOR HD DOME IP CAMERA PRODUCT MANUAL GB - NL GB PARTS & FUNCTIONS 2. ---- 1. ---- 3. ---- 7. ---------- 5. 4. 6. 1. Outdoor IP camera unit 2. Antenna 3. Mounting bracket 4. Network connection 5. Power
DA301D DA391D DA301D DA301D
 GB Cordless Angle Drill Instruction Manual F Perceuse d angle sans fil Manuel d instructions D Akku-Winkelbohrmaschine Betriebsanleitung I Trapano ad angolo a batteria Istruzioni per l uso NL Haakse boormachine
Function checklist for the ML-350 or XL-350 with a print set. Missing loop.
 Function checklist for the ML-350 or XL-350 with a 260217 print set. Below mentioned check-point should resolve function problems of the lift systems. Missing loop. When a lift is connected to an external
Montagehandleiding: doucheset
 Montagehandleiding: doucheset Installation manual: showerset 0 6 5 7 8 9 0 8 9 7 5 6 Controleer voor installatie of alle onderdelen aanwezig zijn. Check if all parts are present before installation. 5
GB Cordless Driver Drill Instruction Manual Perceuse-visseuse sans fil Manuel d instructions Akku-Bohrschrauber Betriebsanleitung
 GB Cordless Driver Drill Instruction Manual F Perceuse-visseuse sans fil Manuel d instructions D Akku-Bohrschrauber Betriebsanleitung I Trapano-avvitatore Istruzioni per l uso NL Snoerloze boor-schroevedraaier
ÓÈ ËÁ Â Ú Ûˆ DA3000R DA3000V
 GB Angle drill Instruction Manual F Perceuse d angle Manuel d Instructions D Winkelbohrer Betriebsanleitung I Trapano ad angolo Istruzioni d Uso NL Haakse boormachine Gebruiksaanwijzing E Taladro en angulo
EU Declaration of Conformity and safety instructions EU Conformiteitsverklaring en veiligheidsinstructies
 EU Declaration of Conformity and safety instructions EU Conformiteitsverklaring en veiligheidsinstructies Battery operated UNICOM 300 N51 UNICOM 300 met batterijvoeding N51 Explosion safety instructions
L.Net s88sd16-n aansluitingen en programmering.
 De L.Net s88sd16-n wordt via één van de L.Net aansluitingen aangesloten op de LocoNet aansluiting van de centrale, bij een Intellibox of Twin-Center is dat de LocoNet-T aansluiting. L.Net s88sd16-n aansluitingen
EM7680 Firmware Update by Micro SD card
 EM7680 Firmware Update by Micro SD card 2 NEDERLANDS/ENGLISH EM7680 Firmware update by Micro SD card Table of contents 1.0 (NL) Introductie... 2 2.0 (NL) Firmware installeren... 2 3.0 (NL) Opmerking...
GB Cordless Driver Drill Instruction Manual Perceuse-visseuse sans fil Manuel d instructions Akku-Bohrschrauber Betriebsanleitung
 GB Cordless Driver Drill Instruction Manual F Perceuse-visseuse sans fil Manuel d instructions D Akku-Bohrschrauber Betriebsanleitung I Trapano-avvitatore a batteria Istruzioni per l uso NL Snoerloze boor-schroevedraaier
ANT S KINGDOM Here is some advice for setting up your Master Ant Farm!
 ANT S KINGDOM Master NL EN Instructies Mierenboerderij Master Bedankt voor je bestelling van de Mierenboerderij Master. De beste keus! Installatie NL Naast de informatie die te lezen is in ons boekje
ATD Floor Fan Owner s Manual Features:
 ATD-30320 20 Floor Fan Owner s Manual Features: Made in China to ATD Tools, Inc. Specifications Visit us at www.atdtools.com General Safety Warnings: WARNING: The in and warnings ned in this manual d be
Mobile concrete base
 1 14 Mobile concrete base UMBASM8000000000 Mobile concrete base UMBASM8000000000 Congratula ons with your purchase! Please completely read and follow all the instruc ons. pg. 3 Proficiat met uw aankoop!
NEDERLANDS. Plaatselijke telefoonnummers voor de klantendienst kunt u vinden op: G-01 rev.
 For the latest User Installation Guide please visit: www.ergotron.com User's Guide - English Guía del usuario - Español Manuel de l utilisateur - Français Gebruikersgids - Deutsch Benutzerhandbuch - Nederlands
NEDERLANDS. Display Instructies. Knoppen. Geeft afwisselend Tijd, Datum en Temperatuur weer, kan ook ingesteld worden op enkel tijd
 NEDERLANDS Het ziet eruit als een simpel blokje hout, maar maak een geluid (knip met je vingers, kuch, klap in je handen, of tip op de bovenkant) en het geeft onmiddelijk en afwisselend tijd, datum en
Digitale ph-meter. Specificaties Bereik: pH Resolutie: 0.01pH Nauwkeurigheid: ±0.1pH Automatische Temperatuur Compensatie:
 Digitale ph-meter Specificaties Bereik: 0.00-14.00pH Resolutie: 0.01pH Nauwkeurigheid: ±0.1pH Automatische Temperatuur Compensatie: Batterij: 4XLR44 (1.5V) Knoopcel Gebruikstemperatuur: Kalibratie: Handmatig
Dustless Cutter Instruction Manual Scie Diamanté Manuel d Instructions Diamantschneider Betriebsanleitung
 GB Dustless Cutter Instruction Manual F Scie Diamanté Manuel d Instructions D Diamantschneider Betriebsanleitung I Troncatrice con Aspirapolvere Istruzioni d Uso NL Diamant zaag droog Gebruiksaanwijzing
BFL080F BFL081F BFL120F BFL121F BFL200F
 GB Cordless Angle Screwdriver Instruction Manual F Visseuse angulaire sans fil Manuel d instructions D Akku-Winkelschrauber Betriebsanleitung I Avvitatore a batteria Istruzioni per l uso NL Accu haakse
EM7580 Firmware Update by Micro SD card
 EM7580 Firmware Update by Micro SD card 2 NEDERLANDS/ENGLISH EM7580 Firmware update by Micro SD card Table of contents 1.0 (NL) Introductie... 3 2.0 (NL) Firmware installeren... 3 3.0 (NL) Opmerking...
PIR DC-SWITCH. DC Passive infra-red Detector. Model No. PDS-10 GEBRUIKSAANWIJZING/INSTRUCTION MANUAL
 PIR DC-SWITCH DC Passive infra-red Detector Model No. PDS-10 GEBRUIKSAANWIJZING/INSTRUCTION MANUAL Please read this manual before operating your DETECTOR PIR DC-Switch (PDS-10) De PDS-10 is een beweging
The upside down Louisa tutorial by Dorothée: Noortjeprullemie.blogspot.be Written for Compagnie M.: m.com
 The upside down Louisa tutorial by Dorothée: Noortjeprullemie.blogspot.be Written for Compagnie M.: www.compagnie- m.com Dorothée heeft een unieke Compagnie M. hack gemaakt: de Louisa op zijn kop. Als
ÛÙË ËÁ Â Ú Ûˆ HK1800 HK1810
 GB Power Scraper Instruction Manual F Burineur Manuel d Instructions D Kratzer Betriebsanleitung I Scalpellatore Istruzioni d Uso NL Bikhamer Gebruiksaanwijzing E Raspadora Manual de Instrucciones P Hartelo
liniled Cast Joint liniled Gietmof liniled Castjoint
 liniled Cast Joint liniled Gietmof liniled is een hoogwaardige, flexibele LED strip. Deze flexibiliteit zorgt voor een zeer brede toepasbaarheid. liniled kan zowel binnen als buiten in functionele en decoratieve
GB Cordless Driver Drill Instruction Manual Perceuse-visseuse sans fil Manuel d instructions Akku-bohrschrauber Betriebsanleitung
 GB Cordless Driver Drill Instruction Manual F Perceuse-visseuse sans fil Manuel d instructions D Akku-bohrschrauber Betriebsanleitung I Trapano-avvitatore a batteria Istruzioni per l uso NL Snoerloze boor-schroevedraaier
L.Net s88sd16-n aansluitingen en programmering.
 De L.Net s88sd16-n wordt via één van de L.Net aansluitingen aangesloten op de LocoNet aansluiting van de centrale, bij een Intellibox of Twin-Center is dat de LocoNet-T aansluiting. L.Net s88sd16-n aansluitingen
EM7680 Firmware Update by OTA
 EM7680 Firmware Update by OTA 2 NEDERLANDS/ENGLISH EM7680 Firmware update by OTA Table of contents 1.0 (NL) Introductie... 3 2.0 (NL) Firmware installeren... 3 3.0 (NL) Release notes:... 3 4.0 (NL) Overige
Dagelijkse checklist Daily checklist
 Dagelijkse checklist Daily checklist Sluiting met snelspanner Verstelbare hoofdsteun Verstelbare en aanpasbare riem Verstelbare voetsteunen Verstelbare riemen van de voetsteun Quick release locked Head
Montagehandleiding servo drive / Assembly instructions servo drive
 Bodemmontage houder transfo / Floor mounting transformer 1. Communicatiekabel / Communication cable 2. Draagprofielkabel / Bracket profile cable 3. Verdeelkabel / Distribution cable 4. Stroomkabel / Power
SAVE THESE INSTRUCTIONS
 MNPV12 & 16 Combiner Instructions SAVE THESE INSTRUCTIONS Applications: Features: All aluminum powder coated housing. Won t rust or degrade due to sun exposure Flip up cover that can stay in the open position
Limpid Light. design Esther Jongsma & Sam van Gurp, Montagehandleiding / Assembly Instructions
 Limpid Light design Esther Jongsma & Sam van Gurp, 05 Montagehandleiding / Assembly Instructions GELEVERD MATERIAAL / SUPPLIED MATERIAL A. A. B. B. C. D. E. F. G. G. H. I. J. K. / / ophanging / suspension:
256 kb Memory in NMS 8250, 8255 and 8280
 256 kb Memory in NMS 8250, 8255 and 8280 Supplied by Bastiaan Huber, 2001 Converted to PDF by HansO, 2001 Dutch text follows the english text! MEMORY-UPGRADE to 256Kb This description is only for people
!!!! Wild!Peacock!Omslagdoek!! Vertaling!door!Eerlijke!Wol.!! Het!garen!voor!dit!patroon!is!te!verkrijgen!op! Benodigdheden:!!
 WildPeacockOmslagdoek VertalingdoorEerlijkeWol. Hetgarenvoorditpatroonisteverkrijgenopwww.eerlijkewol.nl Benodigdheden: 4strengenWildPeacockRecycledSilkYarn rondbreinaaldnr8(jekuntnatuurlijkookgewonebreinaaldengebruiken,maar
GB Cordless Angle Drill Instruction Manual F Perceuse d Angle sans Fil Manuel d instructions D Akku-Winkelbohrmaschine Betriebsanleitung
 GB Cordless Angle Drill Instruction Manual F Perceuse d Angle sans Fil Manuel d instructions D Akku-Winkelbohrmaschine Betriebsanleitung I Trapano Angolare a Batteria Istruzioni per l uso NL Snoerloze
EU Declaration of Conformity and safety instructions EU Conformiteitsverklaring en veiligheidsinstructies ISC 230B
 EU Declaration of Conformity and safety instructions EU Conformiteitsverklaring en veiligheidsinstructies ISC 230B Explosion safety instructions (Ex) (EN) ISC230B is approved for use outside the explosion-hazardous
1/8 ATLAS Atlas cabinet cabinet 1 7
 TLS cabinet / / / 0 D E F G H / L x Lx x L / x x D E Dx Ex / x x x x x x Fx x Hx Gx Fx Fx Fx Fx G H G H H G 0 0 0 0 0 / L / 0 NL: Deze kast bevat twee gaten aan de achterkant om aan de wand te kunnen bevestigen.
User manual Gebruikershandleiding. Version 1.0 March
 User Manual Hotel Safe GB NL User manual Gebruikershandleiding 1 User Manual Overview LED display Override key cover * button # button General Thank you for choosing a SafetyFirst Hotel Safe. Before operating
Κατσαβίδι μπαταρίας Οδηγίες χρήσης
 GB Cordless Screwdriver Instruction manual F Visseuse sans Fil Manuel d instructions D Akku-Schrauber Betriebsanleitung I Avvitatore senza fili Istruzioni per l uso NL Accuschroefmachine Gebruiksaanwijzing
Alistair LED stairwell luminaire Handleiding Alistair (Emergency UC03 sensor)
") Alistair LED stairwell luminaire Handleiding Alistair (Emergency UC03 sensor) Let op: Als het flexibele draad van dit licht beschadigd is, dient het te worden vervangen door iemand van de technische service,
Alistair LED stairwell luminaire Handleiding Alistair (Emergency UC03 sensor) Let op: Als het flexibele draad van dit licht beschadigd is, dient het te worden vervangen door iemand van de technische service,
Smeertechniek Rotterdam Cairostraat 74 3047 BC Rotterdam Tel.: 010 466 62 55 Fax 010 466 66 55 Internet: www.smeertechniek.
 DEZE KOPPELINGEN WORDEN GEBRUIKT IN OLIE- EN VETSMEERSYSTEMEN IN PLAATS VAN DE SNIJRINGKOPPELINGEN ( SNIJRING & DRUKMOER ) KOPPELEN EN ONTKOPPELEN VAN DE LEIDING KAN HERHAALD WORDEN ZONDER BESCHADIGING
Firewall van de Speedtouch 789wl volledig uitschakelen?
 Firewall van de Speedtouch 789wl volledig uitschakelen? De firewall van de Speedtouch 789 (wl) kan niet volledig uitgeschakeld worden via de Web interface: De firewall blijft namelijk op stateful staan
GB Blower Instruction Manual F Souffleur Manuel d instructions D Gebläse Betriebsanleitung
 GB Blower Instruction Manual F Souffleur Manuel d instructions D Gebläse Betriebsanleitung I Soffiatore Istruzioni per l uso NL Luchtblazer Gebruiksaanwijzing E Sopladora Manual de instrucciones P Soprador
DALISOFT. 33. Configuring DALI ballasts with the TDS20620V2 DALI Tool. Connect the TDS20620V2. Start DALISOFT
 TELETASK Handbook Multiple DoIP Central units DALISOFT 33. Configuring DALI ballasts with the TDS20620V2 DALI Tool Connect the TDS20620V2 If there is a TDS13620 connected to the DALI-bus, remove it first.
FSW-VW-2X2 FSW-VW. Handleiding / Manual
 FSW-VW-2X2 FSW-VW Handleiding / Manual Rev. 1.0 17-03-2014 I Pakketinhoud / Content Accessoires Benodigde gereedschappen / Required Tools Montage / Assembling Onderhoud / Maintenance Veel Gestelde Vragen
GB Cordless Driver Drill Instruction Manual F Perceuse-Visseuse sans Fil Manuel d instructions D Akku-Bohrschrauber Betriebsanleitung
 GB Cordless Driver Drill Instruction Manual F Perceuse-Visseuse sans Fil Manuel d instructions D Akku-Bohrschrauber Betriebsanleitung I Trapano avvitatore a batteria Istruzioni per l uso NL Snoerloze boor-schroevendraaier
Bijlage 2: Informatie met betrekking tot goede praktijkvoorbeelden in Londen, het Verenigd Koninkrijk en Queensland
 Bijlage 2: Informatie met betrekking tot goede praktijkvoorbeelden in Londen, het Verenigd Koninkrijk en Queensland 1. Londen In Londen kunnen gebruikers van een scootmobiel contact opnemen met een dienst
EM7680 Firmware Auto-Update for Kodi 17.2
 EM7680 Firmware Auto-Update for Kodi 17.2 2 NEDERLANDS/ENGLISH EM7680 Firmware Auto-update for Kodi 17.2 Table of contents 1.0 (NL) Introductie... 3 2.0 (NL) Firmware installeren... 3 3.0 (NL) Opmerking...
Illustrator Tutorial - How to Create a Watch
 Illustrator Tutorial - How to Create a Watch «Andrew Bannecker - Simple, True and Tender Vector Movie Posters by GABZ» Categories: Tutorials Have you ever seen print advertising of some watch brand before?
KIDSMILL BLADVERGROTER LARS/FYNN
 KIDSMILL BLADVERGROTER LARS/FYNN Zorg ervoor dat de montagematerialen (schroeven, bouten e.d.) altijd goed vast zitten. Controleer dit regelmatig. Wees bewust van het risico van open vuur of andere sterke
2019 SUNEXCHANGE USER GUIDE LAST UPDATED
 2019 SUNEXCHANGE USER GUIDE LAST UPDATED 0 - -19 1 WELCOME TO SUNEX DISTRIBUTOR PORTAL This user manual will cover all the screens and functions of our site. MAIN SCREEN: Welcome message. 2 LOGIN SCREEN:
GB Recipro Saw Instruction Manual Scie recipro Manuel d instructions Reciprosäge Betriebsanleitung
 GB Recipro Saw Instruction Manual F Scie recipro Manuel d instructions D Reciprosäge Betriebsanleitung I Seghetto diritto Istruzioni per l uso NL Reciprozaag Gebruiksaanwijzing E Sierra alternativa Manual
MONTAGE INSTRUCTIE ASSEMBLY INSTRUCTION
 MONTAGE INSTRUCTIE ASSEMBLY INSTRUCTION - 1. Waterpas stellen. De groef aan de zijkant van de beschermdeksel moet gelijk staan met de deellijn van het inbouw box. 2. Zet de inbouw box vast in de muur.
Preschool Kindergarten
 Preschool Kindergarten Objectives Students will recognize the values of numerals 1 to 10. Students will use objects to solve addition problems with sums from 1 to 10. Materials Needed Large number cards
EM7680 Firmware Update by Micro SD card or USB
 EM7680 Firmware Update by Micro SD card or USB 2 NEDERLANDS/ENGLISH EM7680 Firmware update by Micro SD card or USB Table of contents 1.0 (NL) Introductie... 3 2.0 (NL) Firmware installeren... 3 3.0 (NL)
GB Cordless Rotary Hammer Instruction Manual Marteau perforateur à batterie Manuel d instructions Akku-Bohrhammer Betriebsanleitung
 GB Cordless Rotary Hammer Instruction Manual F Marteau perforateur à batterie Manuel d instructions D Akku-Bohrhammer Betriebsanleitung I Martello rotativo a batteria Istruzioni per l uso NL Snoerloze
EM7680 Firmware Update by Micro SD card or USB stick
 EM7680 Firmware Update by Micro SD card or USB stick 2 NEDERLANDS/ENGLISH EM7680 Firmware update by Micro SD card or USB stick Table of contents 1.0 (NL) Introductie... 3 2.0 (NL) Firmware installeren...
Handleiding Zuludesk Parent
 Handleiding Zuludesk Parent Handleiding Zuludesk Parent Met Zuludesk Parent kunt u buiten schooltijden de ipad van uw kind beheren. Hieronder vind u een korte handleiding met de mogelijkheden. Gebruik
GB Cordless Impact Wrench Instruction Manual Boulonneuse à batterie Manuel d instructions Akku-Schlagschrauber Betriebsanleitung
 GB Cordless Impact Wrench Instruction Manual F Boulonneuse à batterie Manuel d instructions D Akku-Schlagschrauber Betriebsanleitung I Avvitatrice ad impulso a batteria Istruzioni per l uso NL Snoerloze
Handleiding Digipass DP310
 Handleiding Digipass DP310 Deze handleiding geeft u uitleg over het activeren en gebruik maken van uw Digipass. Toetsen van de Digipass OK: voor het aan- of uitschakelen van het apparaat of om een handeling
GB Cordless Blower Instruction Manual F SOUFFLEUR SANS FIL Manuel d instructions D Gebläse Betriebsanleitung
 GB Cordless Blower Instruction Manual F SOUFFLEUR SANS FIL Manuel d instructions D Gebläse Betriebsanleitung I Soffiatrice a batteria Istruzioni per l uso NL Accu Bladblazer Gebruiksaanwijzing E Sopladora
Κρουστικό δραπανοκατσάβιδο Οδηγίες χρήσης μπαταρίας
 GB Cordless Hammer Driver Drill Instruction manual F Perceuse à percussion sans fil Manuel d instructions D Akku-Schlagbohrschrauber Betriebsanleitung I Trapano avvitatore a batterie Istruzioni per l uso
Introductie in flowcharts
 Introductie in flowcharts Flow Charts Een flow chart kan gebruikt worden om: Processen definieren en analyseren. Een beeld vormen van een proces voor analyse, discussie of communicatie. Het definieren,
LOAD SECURING PROCEDURE IN 15 FT/20 FT HOT CONTAINER
 Page: 1 of 5 Page: 2 of 5 Load securing SNS Pool procedure Den Helder in the Procedure 15 ft/20 ft vastzetten hot containers lading according in de 15 ft/20 ft to the NOGEPA guidelines hot containers volgens
MyDHL+ Van Non-Corporate naar Corporate
 MyDHL+ Van Non-Corporate naar Corporate Van Non-Corporate naar Corporate In MyDHL+ is het mogelijk om meerdere gebruikers aan uw set-up toe te voegen. Wanneer er bijvoorbeeld meerdere collega s van dezelfde
KIDSMILL BLADVERGROTER SHAKERY II /LOFT
 KIDSMILL BLADVERGROTER SHAKERY II /LOFT Zorg ervoor dat de montagematerialen (schroeven, bouten e.d.) altijd goed vast zitten. Controleer dit regelmatig. Wees bewust van het risico van open vuur of andere
MyDHL+ Uw accountnummer(s) delen
 delen") MyDHL+ Uw accountnummer(s) delen met anderen Uw accountnummer(s) delen met anderen in MyDHL+ In MyDHL+ is het mogelijk om uw accountnummer(s) te delen met anderen om op uw accountnummer een zending te
MyDHL+ Uw accountnummer(s) delen met anderen Uw accountnummer(s) delen met anderen in MyDHL+ In MyDHL+ is het mogelijk om uw accountnummer(s) te delen met anderen om op uw accountnummer een zending te
Lockable Tablet Mount
 Benutzerhandbuch Lockable Tablet Mount resulting resulting in in possible possible equipment equipment damage. damage. create create an an unsecured unsecured installation installation and and may may
POWERXTREME X75 / X125
 POWERXTREME X75 / X125 NL GEBRUIKSAANWIJZING & INSTALLATIE INSTRUCTIES UK USER MANUAL & INSTALLATION INSTRUCTIONS www.powerxtreme.nl Copyright, 2016 POWERXTREME R3 1 1 Introductie PowerXtreme is een professioneel
GB Cordless Nibbler Instruction Manual F Grignoteuse Sans Fil Manuel d instructions D Akku-Knabber Betriebsanleitung
 GB Cordless Nibbler Instruction Manual F Grignoteuse Sans Fil Manuel d instructions D Akku-Knabber Betriebsanleitung I Roditrice a batteria Istruzioni per l uso NL Snoerloze knabbelschaar Gebruiksaanwijzing
Δραπανοκατσάβιδο μπαταρίας Οδηγίες χρήσης
 GB Cordless Driver Drill Instruction manual F Perceuse-visseuse sans fil Manuel d instructions D Akku-Bohrschrauber Betriebsanleitung I Trapano avvitatore a batteria Istruzioni per l uso NL Accuschroefboormachine
Hairdryer. Register your product and get support at www.philips.com/welcome HP4997/22. Gebruiksaanwijzing
 Register your product and get support at www.philips.com/welcome Hairdryer HP4997/22 NL Gebruiksaanwijzing d e c b f a i g h Nederlands Gefeliciteerd met uw aankoop en welkom bij Philips! Registreer uw
GB Cordless Percussion-Driver Drill Instruction Manual Perceuse percussion-visseuse sans fil Manuel d instructions
 GB Cordless Percussion-Driver Drill Instruction Manual F Perceuse percussion-visseuse sans fil Manuel d instructions D Akku-Schlagbohrschrauber Betriebsanleitung I Trapano avvitatore percussione Istruzioni
B1 Woordkennis: Spelling
 B1 Woordkennis: Spelling Bestuderen Inleiding Op B1 niveau gaan we wat meer aandacht schenken aan spelling. Je mag niet meer zoveel fouten maken als op A1 en A2 niveau. We bespreken een aantal belangrijke
Συρόμενο σύνθετο φαλτσοπρίονο Οδηγίες χρήσης
 GB Slide Compound Miter Saw Instruction manual F Scie à onglet radiale Manuel d instructions D Kapp- und Gehrungssäge Betriebsanleitung I Troncatrice radiale per legno Istruzioni per l uso NL Schuifbare
Hairdryer HP4940/00. Register your product and get support at. Gebruiksaanwijzing
 Register your product and get support at www.philips.com/welcome Hairdryer HP4940/00 NL Gebruiksaanwijzing 1 a b c d f e Nederlands Gefeliciteerd met uw aankoop en welkom bij Philips! Registreer uw product
Gebruiksaanwijzing Pagina 14. Koelkast met explosieveilige binnenkuip Voor de inbedrijfstelling de gebruiksaanwijzing lezen 7083 099-00.
 Gebruiksaanwijzing Pagina 14 Koelkast met explosieveilige binnenkuip Voor de inbedrijfstelling de gebruiksaanwijzing lezen NL 7083 099-00 LKexv Changing over door hinges Door hinges should only be changed
Hair Styler HP8650 HP8651. Register your product and get support at NL Gebruiksaanwijzing
 Register your product and get support at www.philips.com/welcome Hair Styler HP8650 HP8651 NL Gebruiksaanwijzing Nederlands Gefeliciteerd met uw aankoop en welkom bij Philips! Registreer uw product op
RECEPTEERKUNDE: PRODUCTZORG EN BEREIDING VAN GENEESMIDDELEN (DUTCH EDITION) FROM BOHN STAFLEU VAN LOGHUM
 FROM BOHN STAFLEU VAN LOGHUM") Read Online and Download Ebook RECEPTEERKUNDE: PRODUCTZORG EN BEREIDING VAN GENEESMIDDELEN (DUTCH EDITION) FROM BOHN STAFLEU VAN LOGHUM DOWNLOAD EBOOK : RECEPTEERKUNDE: PRODUCTZORG EN BEREIDING VAN STAFLEU
Read Online and Download Ebook RECEPTEERKUNDE: PRODUCTZORG EN BEREIDING VAN GENEESMIDDELEN (DUTCH EDITION) FROM BOHN STAFLEU VAN LOGHUM DOWNLOAD EBOOK : RECEPTEERKUNDE: PRODUCTZORG EN BEREIDING VAN STAFLEU