Bedankt voor de aanschaf van de Mobile WiFi. Deze Mobile WiFi biedt u een mobiele netwerkverbinding met een hoge snelheid naar het Internet.
|
|
|
- Pieter Lenaerts
- 8 jaren geleden
- Aantal bezoeken:
Transcriptie
1

2

3 Bedankt voor de aanschaf van de Mobile WiFi. Deze Mobile WiFi biedt u een mobiele netwerkverbinding met een hoge snelheid naar het Internet. Dit document geeft u inzicht in uw Mobile WiFi, zodat u deze meteen in gebruik kunt nemen. Lees dit document zorgvuldig door voordat u uw Mobile WiFi gebruikt. Voor meer informatie over de functies en configuraties van de Mobile WiFi raadpleegt u de online Help op de webbeheerpagina van de Mobile WiFi. Voor nadere instructies over het aanmelden bij de webbeheerpagina raadpleegt u 'Aanmelden bij de webbeheerpagina' op pagina 20. 1

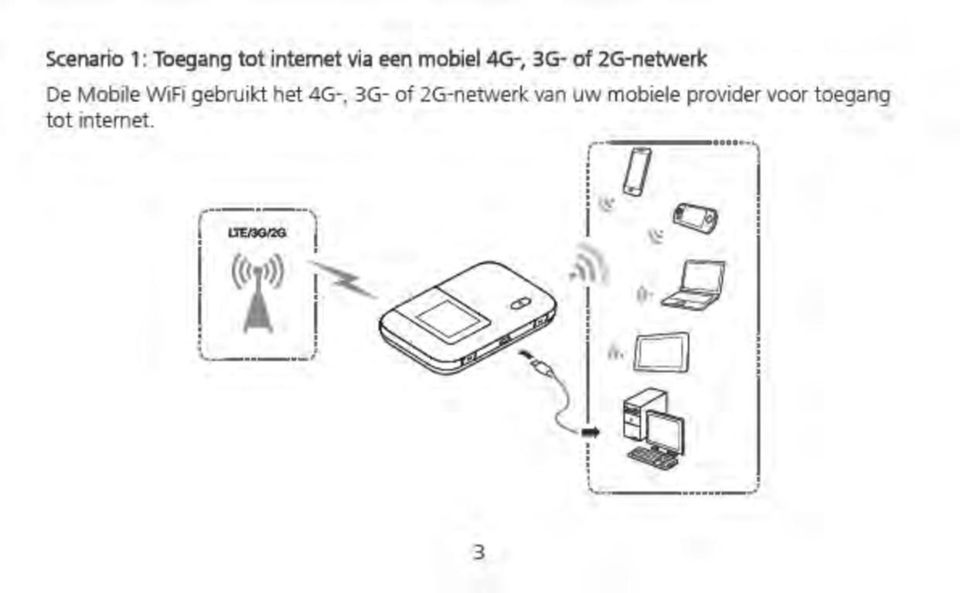
4 Uw Mobile WiFi leren kennen Opmerking: De beschrijvingen en illustraties van de functies van de Mobile WiFi in dit document zijn alleen bedoeld ter referentie. Het door u aangeschafte product kan hiervan afwijken. Toepassingsscenario's Wi-Fi-apparaten (zoals smartphones, tablets en gameconsoles) of computers kunnen allemaal via de Mobile WiFi toegang verkrijgen tot internet. De feitelijke verbindingsprocedure hangt af van het besturingssysteem van het Wi-Fi-apparaat of de computer. Breng een verbinding tot stand volgens de instructies van uw specifieke apparaat. Voor toegang tot internet via een USB-verbinding installeert u het stuurprogramma volgens de instructies. 2

5
6
7 Uiterlijke kenmerken Aan/Uit-knop Scherm Micro USB-poort MENU-knop Opening voor koord 5

8

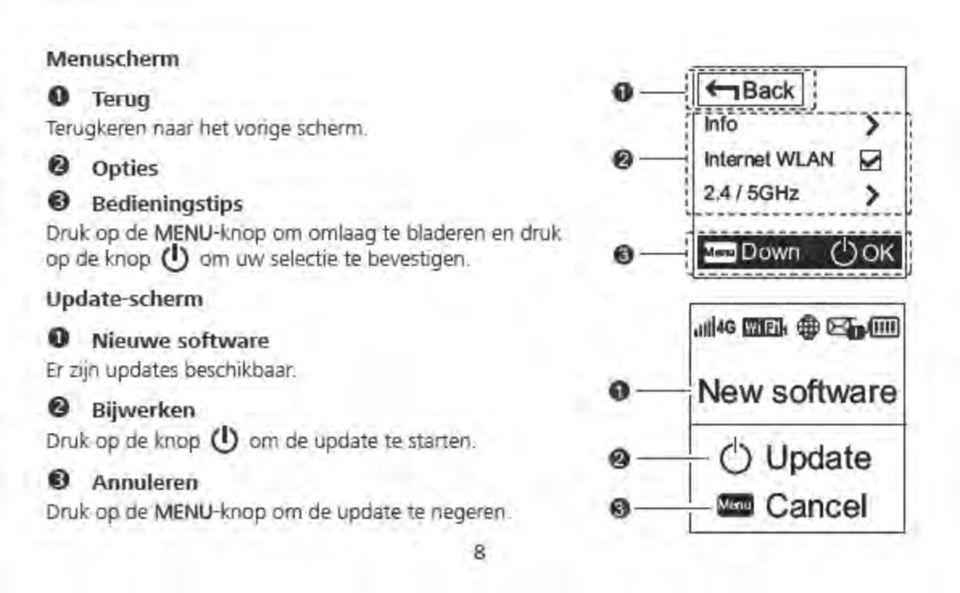
9 SMS Nieuwe berichten. Aantal nieuwe berichten. Netwerkverbindingsstatus Verbinding met Internet actief. Status internet via WLAN Internet via WLAN uitgeschakeld. Verkeersstatistieken Dataverbruik deze maand Maandelijkse limiet voor dataverbruik Opmerking: Als u de startdatum voor de maandelijkse statistieken voor dataverbruik wilt instellen, gaat u naar de webbeheerpagina. De informatie over dataverkeer is alleen bedoeld ter referentie. Voor meer nauwkeurige gegevens over dataverkeer raadpleegt u uw serviceprovider. 7

10
11
12
13
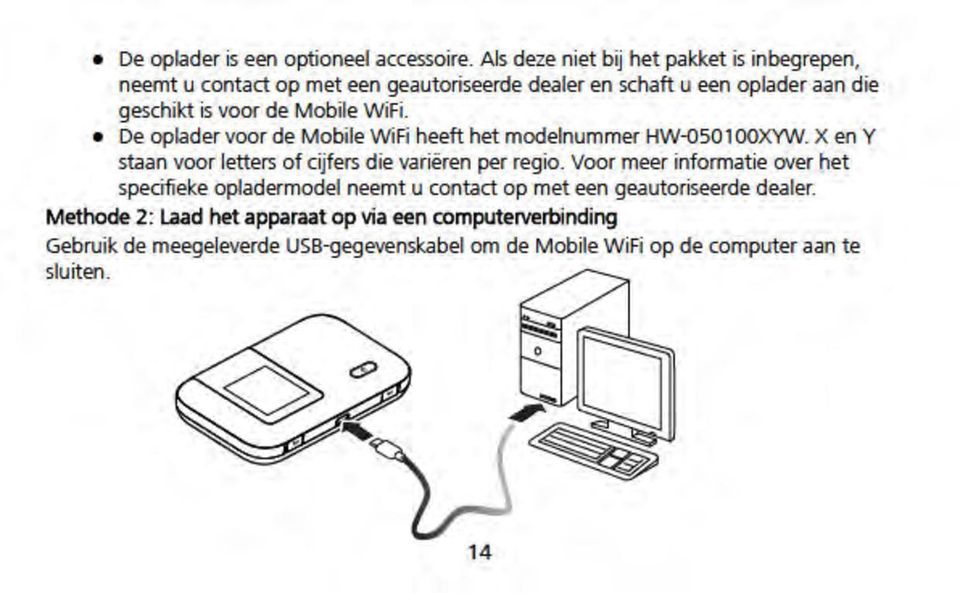
14
15
16
17

18 De Mobile WiFi inschakelen Houd de knop ingedrukt totdat het scherm oplicht ten teken dat de Mobile WiFi is ingeschakeld. U kunt zich aanmelden bij de webbeheerpagina en de functie voor snel opstarten in- of uitschakelen. Door deze functie wordt de opstarttijd van de Mobile WiFi aanzienlijk verkort. Opmerking: Houd de knop ingedrukt om de Mobile WiFi uit te schakelen. Als uw Mobile WiFi niet werkt of niet goed kan worden uitgeschakeld, houdt u op de knop gedurende minimaal tien seconden ingedrukt om de Mobile WiFi geforceerd uit te schakelen. Schakel de functie voor snel opstarten uit wanneer u aan boord van een vliegtuig bent. 16

19 Verbinding maken met internet Een mobiel 4G-, 3G- of 2G-netwerk gebruiken De instellingen en beheerparameters van de Mobile WiFi zijn vooraf ingesteld volgens de vereisten van uw mobiele provider. Deze Mobile WiFi is vooraf zo geconfigureerd dat het apparaat, wanneer het wordt ingeschakeld, automatisch de PIN-code van de SIM-kaart invult (deze is standaard 0000) en vervolgens automatisch verbinding met internet maakt. U ziet op het scherm het symbool van de wereldbol, wat aangeeft dat er een geldige en actieve internetverbinding is. Vervolgens kunt u eenvoudig via Wi-Fi verbinding met het apparaat maken en over internet surfen, en etc. Als er gegevens worden overgedragen, maakt de Mobile WiFi ook automatisch verbinding met internet. Als er gedurende een bepaalde periode geen gegevens worden overgedragen, verbreekt de Mobile WiFi automatisch de internet-verbinding. 17

20 De Mobile WiFi gebruiken in het buitenland (Roaming) Deze Mobile WiFi kan probleemloos worden gebruikt in het buitenland. Dit wordt 'Roaming' genoemd. De Mobile WiFi registreert zich automatisch bij een beschikbaar netwerk in het desbetreffende land, net als elke andere mobiele telefoon. Om veiligheidsredenen, en om een ongewenst hoog dataverbruik tegen te gaan, maakt de Mobile WiFi op een buitenlands netwerk niet automatisch verbinding met internet. Als u een verbinding tot stand wilt brengen, sluit u de Mobile WiFi met behulp van een USB-kabel aan op een pc, voert u de installatie uit en brengt u handmatig een verbinding tot stand via de webbeheerpagina. Zie hiervoor ook pagina 20. Opmerking: Het dataverbruik in een roaming-situatie is normaal gezien niet inbegrepen in uw standaard databundel. Met een Mobile WiFi is uw dataverbruik vrijwel onzichtbaar, vooral wanneer er meerdere gebruikers via Wi-Fi op het apparaat zijn geregistreerd en tegelijkertijd data verbruiken. Het aantal MB's wordt in de kleine display van de Mobile WiFi gerapporteerd, zodat de gebruikers een indicatie krijgen van de hoeveelheid verkeer. 18

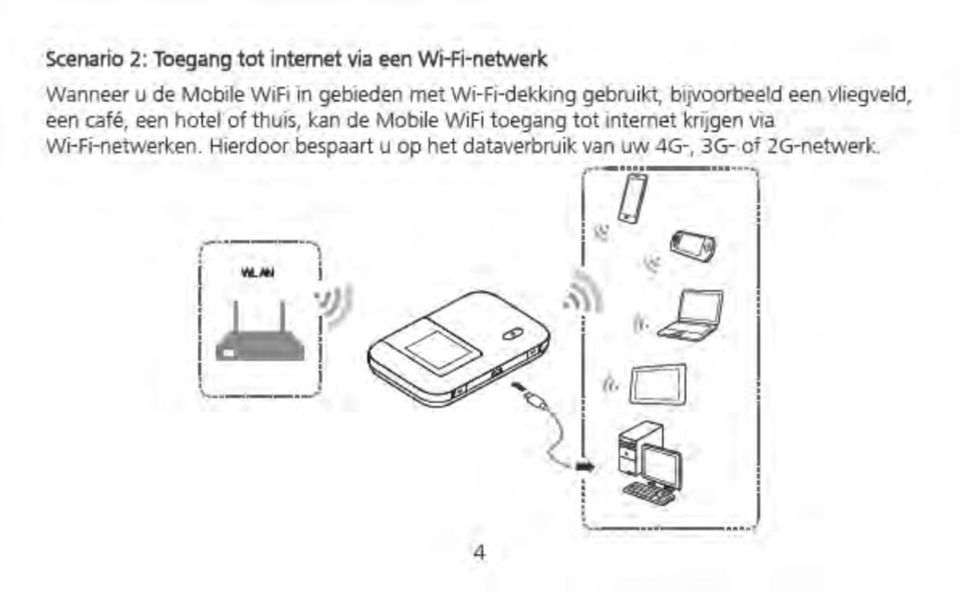
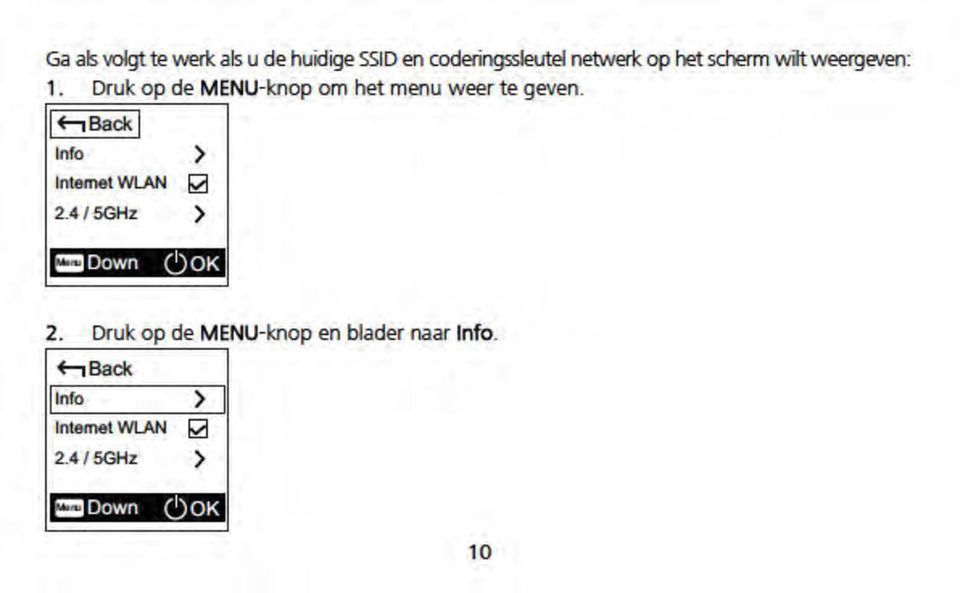
21 Een Wi-Fi-netwerk gebruiken 1. Zorg dat de Internet WLAN-functie is ingeschakeld. 2. De Mobile WiFi maakt automatisch verbinding met een Wi-Fi-hotspot die door u of uw provider is ingesteld. Wanneer de Mobile WiFi met een Wi-Fi-netwerk is verbonden, worden en de SSID van de Wi-Fi-hotspot op het scherm weergegeven. Opmerking: Nadat u met een Wi-Fi-netwerk bent verbonden, maakt de Mobile WiFi automatisch opnieuw verbinding met het netwerk als u de volgende keer binnen het bereik van dat netwerk komt. Voor meer informatie over het toevoegen van Wi-Fi-hotspots, zie 'Een Wi-Fi-hotspot toevoegen' op pagina
22 Aanmelden bij de webbeheerpagina 1. Controleer of de verbinding tussen de Mobile WiFi en het Wi-Fi-apparaat of de computer normaal functioneert. 2. Open de browser en voer in het adresveld in. Opmerking: Als er een conflict is tussen dit IP-adres en andere IP-adressen in het netwerk, wordt het IP-adres van de Mobile WiFi automatisch gewijzigd. U kunt het huidige IP-adres controleren op het scherm van de Mobile WiFi. 3. Voer de gebruikersnaam en het wachtwoord in en meld u aan bij de webbeheerpagina. Opmerking: De standaard gebruikersnaam is admin. Het standaard wachtwoord is admin. 20
23 Nu kunt u op de webbeheerpagina (gebruikersinterface van de Mobile WiFi) bijvoorbeeld het volgende doen: 1. Alle instellingen van de Mobile WiFi configureren, zoals verbindingsinstellingen, Wi-Fi-instellingen en beveiligings- en systeeminstellingen. 2. SMS-berichten lezen en opstellen. 3. De status van het apparaat en rapporten over het dataverbruik bekijken. 4. De inhoud van de microsd-kaart openen (indien geplaatst). 5. Etc. 21
24 Dagelijks gebruik Energiebesparende modus Als de Mobile WiFi gedurende een periode inactief is geweest, schakelt deze over naar de stand-bymodus. In deze modus wordt de display uitgeschakeld. Als u op een willekeurige knop drukt, licht de display weer op. Wanneer de Mobile WiFi alleen door de batterij wordt gevoed, kunt u ervoor kiezen de automatische Wi-Fi-uitschakelfunctie in of uit te schakelen. Als deze functie is ingeschakeld en er gedurende een bepaalde periode geen Wi-Fi-apparaten verbinding met de Mobile WiFi maken, wordt de Wi-Fi-functie automatisch uitgeschakeld. U kunt op een willekeurige knop drukken om de Wi-Fi-functie weer in te schakelen. De PIN-code controleren Als de PIN-verificatiefunctie is ingeschakeld, meld u zich aan bij de webbeheerpagina en voert u de juiste PIN-code in volgens de instructies. De PIN/PUK-codes worden samen met de SIM-kaart door uw provider geleverd. Neem voor meer informatie contact op met uw mobiele provider. 22
25 Internet WLAN in- of uitschakelen 1. Druk drie keer achter elkaar op de MENU-knop om naar Internet WLAN te bladeren. 2. Druk op de knop om Internet WLAN in of uit te schakelen. Opmerking: U kunt zich ook aanmelden bij de webbeheerpagina van de Mobile WiFi om Internet WLAN in of uit te schakelen. Nadat de functie Internet WLAN is ingeschakeld, kunnen er maximaal negen Wi-Fi-apparaten verbinding maken met de Mobile WiFi. Een Wi-Fi-hotspot toevoegen 1. Meld u aan bij de webbeheerpagina. 2. Kies op de instellingenpagina Internet WLAN. 3. Scan naar Wi-Fi-hotspots en maakt verbinding met de gewenste hotspot. 23
26
27 Voorbeeld 1: Verbinden met een computer (bijvoorbeeld met het besturingssysteem Windows 7) via Wi-Fi 1. Zorg dat de Wi-Fi-functie van de Mobile WiFi is ingeschakeld. 2. Selecteer Start > Configuratiescherm (Control Panel) > Netwerk en internet (Network and Internet) > Verbinding met een netwerk maken (Connect to a network). Opmerking: Voordat u een Wi-Fi-verbinding tot stand brengt, controleert u of de computer is voorzien van een draadloze netwerkadapter. Als de computer een draadloze netwerkverbinding aangeeft, kan de draadloze netwerkadapter worden gebruikt. Zo niet, dan controleert u of uw draadloze netwerkadapter correct functioneert. 3. Selecteer de draadloze netwerkverbinding met de SSID van de Mobile WiFi en klik op Verbinden (Connect). 25
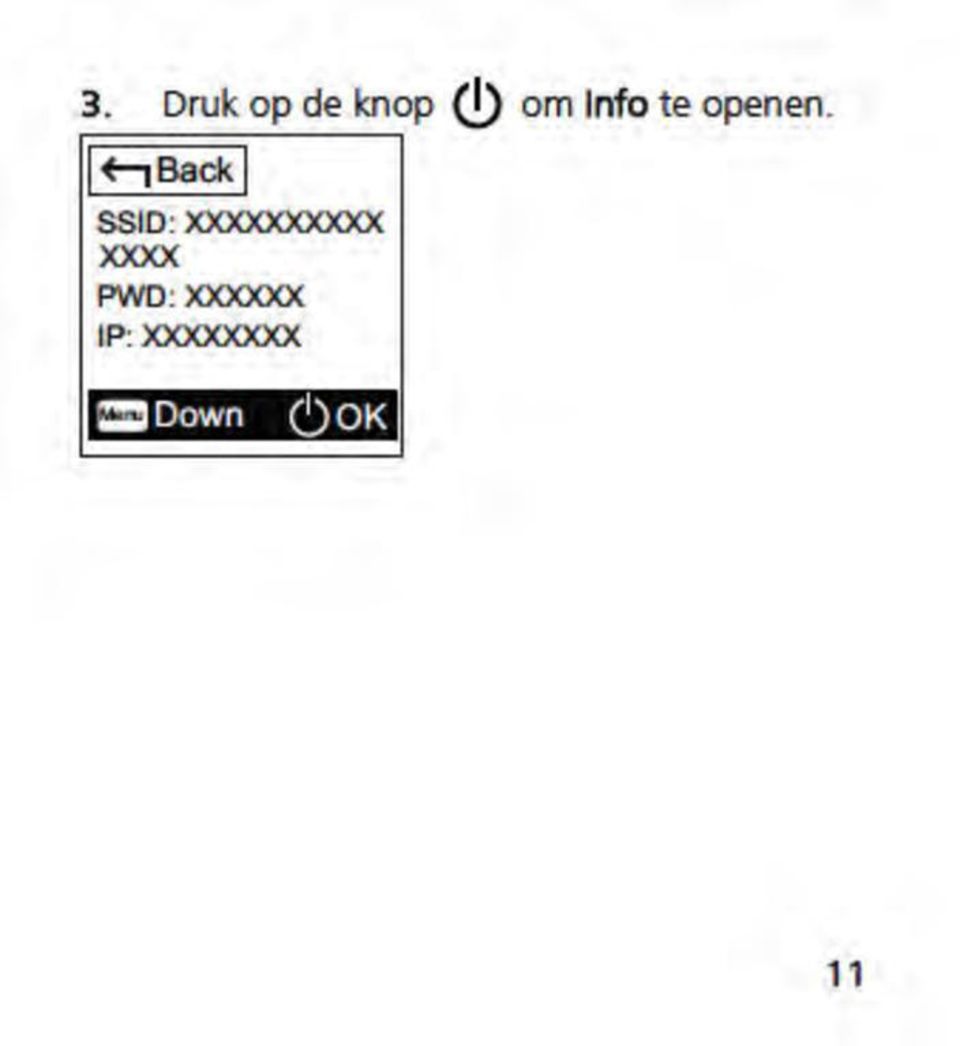
28 Opmerking: Als de draadloze netwerkverbinding is gecodeerd, voert u de coderingssleutel draadloos netwerk in (WEP- of WPA/WPA2 key). Als u de SSID en de coderingssleutel draadloos netwerk wilt bekijken, raadpleegt u de stappen in het gedeelte 'SSID en coderingssleutel draadloos netwerk' op pagina Wacht een moment totdat het pictogram van de draadloze netwerkverbinding in het systeemvak in de rechterbenedenhoek van het computerscherm verschijnt. De draadloze netwerkverbinding is nu tot stand gebracht. 26
29 Voorbeeld 2: Verbinden met een gameconsole (bijvoorbeeld PSP) via Wi-Fi 1. Schakel de WLAN-functie op de PSP in. 2. Kies Instellingen (Settings) > Netwerkinstellingen (Network Settings). 3. Selecteer Infrastructuurmodus (Infrastructure Mode). 4. Selecteer Nieuwe verbinding (New Connection) en voer de verbindingsnaam in. 5. Selecteer Scannen (Scan) om naar draadloze netwerken te zoeken. Er wordt een lijst met toegangspunten op het scherm weergegeven. 27
30 6. Selecteer het toegangspunt met de SSID van de Mobile WiFi en druk vervolgens op de knop op de PSP. Bevestig de SSID en voer de coderingssleutel draadloos netwerk in (WEP- of WPA/WPA2 key). 7. Druk op de knop om door te gaan met de volgende stap en druk vervolgens op de knop X om de instellingen op te slaan. 8. Selecteer Verbinding testen (Test Connection) om na te gaan of de netwerkverbinding is geslaagd. 9. U kunt nu de browser openen en hebt toegang tot het netwerk. 28
31 Voorbeeld 3: Verbinden met een tablet (bijvoorbeeld ipad) via Wi-Fi 1. Raak Instellingen (Settings) > WLAN aan om WLAN in te schakelen. 2. De tablet zoekt automatisch naar draadloze verbindingen en toont een lijst met toegangspunten. 3. Selecteer het toegangspunt met de SSID van de Mobile WiFi. 4. Indien hierom wordt gevraagd, voert u de juiste coderingssleutel draadloos netwerk in (WEP- of WPA/WPA2 key), en tikt u op Verbinden (Join). (Het slotpictogram geeft aan dat de coderingssleutel is vereist om verbinding met dit draadloze netwerk te maken.) Opmerking: Wi-Fi-apparaten, zoals een iphone, ipod touch, PS3 en NDSi, kunnen ook een internetverbinding via de Mobile WiFi maken. Raadpleeg voor specifieke instructies de gebruikershandleiding van het Wi-Fi-apparaat. 29
32 Tips Wanneer de Mobile WiFi gedurende een langere periode in gebruik is, kan deze warm worden en oververhit raken. Mocht dit gebeuren, dan verbreekt de Mobile WiFi automatisch de Internetverbinding en mobiele netwerkverbinding en schakelt het apparaat zichzelf uit om schade te voorkomen. Als dit gebeurt, plaatst u de Mobile WiFi in een goed geventileerde ruimte om de warmte te laten afvoeren. Vervolgens schakelt u het apparaat in en gebruikt u het als gebruikelijk. Als u de Mobile WiFi niet als gebruikelijk kunt gebruiken, probeert u het volgende: Raadpleeg de online Help op de webbeheerpagina. Herstart de Mobile WiFi. Herstel de fabrieksinstellingen van de Mobile WiFi. Raadpleeg uw mobiele provider. Versie: V100R001_01 Onderdeelnummer: 31010QEG 30
33
34 Thank you for purchasing the Mobile WiFi. This Mobile WiFi brings you a high speed wireless network connection. This document will help you understand your Mobile WiFi so you can start using it right away. Please read this document carefully before using your Mobile WiFi. For detailed information about the functions and configurations of the Mobile WiFi, refer to the online help on the web management page that comes with the Mobile WiFi. For detailed instructions for logging in to the web management page, refer to "Logging In to the Web Management Page" on page 20. 1
35 Getting to Know Your Mobile WiFi Note: The Mobile WiFi function descriptions and illustrations in this document are for your reference only. The product you have purchased may vary. Application Scenarios Wi-Fi devices (such as smartphones, tablet computers, and game consoles) or computers can all access the Internet through Mobile WiFi. The specific connection procedure depends on the operating system of the Wi-Fi device or computer. Establish a connection according to your device's specific instructions. To access the Internet through a USB port connection, install the driver according to the instructions. 2
36
37
38 Appearance Power button Screen Micro USB port MENU button Lanyard hole 5
39
40 SMS New messages. Number of new messages. Network connection status Internet connection is set up. Internet WLAN status Internet WLAN turned on. Traffic statistics Data usage this month Monthly data usage limit Note: To set the start date of the monthly data usage statistics and data usage limit, go to the web management page. Data traffic information is for your reference only. For more accurate data traffic information, please consult your service provider. 7
41
42
43
44
45
46
47
48
49 Turning on the Mobile WiFi Press and hold the button until the screen lights up, indicating that the Mobile WiFi is turned on. You can log in to the web management page and turn the fast boot function on or off. This function greatly reduces the Mobile WiFi's boot-up time. Note: Press and hold the button to turn off the Mobile WiFi. If your Mobile WiFi malfunctions or cannot be properly powered off, press and hold the button for at least 10 seconds to forcibly power off your Mobile WiFi. Please turn the fast boot function off when you are on an airplane. 16
50 Connecting to the Internet Using a 4G, 3G, or 2G Mobile Network The Mobile WiFi's management parameters have been preset according to your mobile operator's requirements. This Mobile WiFi has been pre-configured in that way, that when it is switched on, it will automatically enter the PIN-code of the SIM (which is default 0000), and after that automatically makes a connection the Internet. You will see the World Globe symbol in the display them, that tells you that there is a valid and active connection to the Internet. After that, you can easily make a connection via WiFi to the device and start browsing the Internet. If data is transmitted, the Mobile WiFi will also automatically connect to the Internet. If data is not transmitted for a period of time, the Mobile WiFi will automatically disconnect from the network connection. 17
51 Using the Mobile WiFi abroad (Roaming) This Mobile WiFi can be used without problems when travelling abroad. This is called Roaming. The Mobile WiFi will register automatically to an available network in that country, just like any other mobile phone. For security reasons, and to prevent from unwanted high data-use, the Mobile WiFi will not make an automatic Internet-connection on a foreign network. To establish a connection, the Mobile WiFi must be connected to a PC via a USB-cable, the installation must be completed, and the connection must be manually made in the Web Management Page. See also page 20 for that. Note: Data use abroad in roaming situation is normally not included in your standard data-bundle. With a Mobile WiFi you will use data almost invisibly, especially when multiple users have been registered to the device via WiFi and using data at the same time. The number of MB s is reported in the small display of the Mobile WiFi, for the users to have an indication of the amount of traffic. 18
52 Using a Wi-Fi Network 1. Ensure that the Internet WLAN function is enabled. 2. The Mobile WiFi automatically connects to a Wi-Fi hotspot set by your service provider or yourself. When the Mobile WiFi is connected to a Wi-Fi network, and the Wi-Fi hotspot SSID are displayed on the screen. Note: After connecting to a Wi-Fi network, the Mobile WiFi automatically reconnects to the network the next time you are under that network's coverage. For details about adding Wi-Fi hotspots, see Adding a Wi-Fi Hotspot on page
53 Logging In to the Web Management Page 1. Make sure the connection between the Mobile WiFi and the Wi-Fi device or computer is working normally. 2. Open the browser, and enter in the address box. Note: If the IP address conflicts with other IP addresses on the network, the IP address of the Mobile WiFi automatically changes. Check the current IP address on the Mobile WiFi screen. 3. Enter the user name and password to log in to the web management page. Note: The default user name is admin. The default password is admin. 20
54 In the Web Management Page (Mobile WiFi User Interface), now you can for example: 1. Configure all settings of the Mobile WiFi, like connection settings, WiFi settings, and security- and system-settings. 2. Read and create SMS messages. 3. View the status of the device and data usage reports. 4. Access the content of the microsd card (when inserted). 5. Etc. 21
55 Daily Use Battery Saving Mode If the Mobile WiFi has been inactive for some time, the Mobile WiFi enters the standby mode, in which the display screen turns off. Pressing any button causes the display screen to light up. When the Mobile WiFi is being powered only by the battery, you can choose to enable or disable the automatic Wi-Fi turnoff function. If this function is enabled and if no Wi-Fi devices access the Mobile WiFi for a period of time, the Wi-Fi turns off automatically. You can press any button to turn the Wi-Fi on again. Verifying the PIN If the PIN verification function is enabled, log in to the web management page and enter the correct PIN according to the instructions. PIN/PUK codes are supplied by your mobile operator along with the SIM card. For details, please consult your mobile operator. 22
56 Turning Internet WLAN On or Off 1. Press the MENU button three consecutive times to scroll to Internet WLAN. 2. Press the button to turn Internet WLAN on or off. Note: Alternatively, you can log in to the Mobile WiFi's web management page to enable or disable Internet WLAN. After the Internet WLAN function is enabled, up to nine Wi-Fi devices can be connected to the Mobile WiFi. Adding a Wi-Fi Hotspot 1. Log in to the web management page. 2. From the settings page, choose Internet WLAN. 3. Scan for Wi-Fi hotspots and connect to the desired one. 23
57
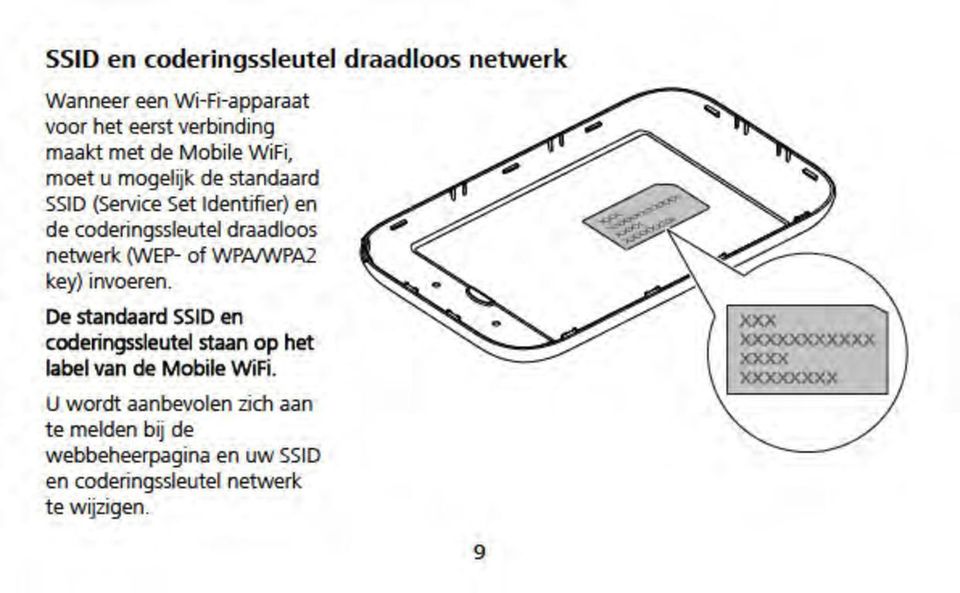
58 Example 1: Connecting to a Computer (for example, running the Windows 7 operating system) through Wi-Fi 1. Ensure that the Mobile WiFi's Wi-Fi function is on. 2. Select Start > Control Panel > Network and Internet > Connect to a network. Note: Before establishing a Wi-Fi connection, ensure that the computer is equipped with a wireless network adapter. If the computer indicates a wireless network connection, the wireless network adapter can be used. Otherwise, verify that your wireless network adapter is working properly. 3. Select the wireless network connection with the Mobile WiFi's SSID and click Connect. Note: If the wireless network connection is encrypted, enter the correct wireless network encryption key. To view the current SSID and wireless network encryption key, see the operations in the SSID and Wireless Network Encryption Key section on page 9. 25
59 4. Wait a moment for the wireless network connection icon to appear in the system tray in the lower right corner of the computer screen. The wireless network connection is then established. 26
60 Example 2: Connecting to a Game Console (for example, PSP) through Wi-Fi 1. On the PSP, turn on the WLAN. 2. Choose Settings > Network Settings. 3. Select Infrastructure Mode. 4. Select New Connection, and enter the connection name. 5. Select Scan to search for wireless networks. A list of access points will be displayed on the screen. 6. Select the access point with the Mobile WiFi's SSID, and press the button on the PSP. Confirm the SSID, and enter the correct wireless network encryption key. 7. Press the button to proceed to the next step, and then press the X button 27
61 to save settings. 8. Select Test Connection to test whether the network connection is successful. 9. You can now open the browser and access the network. 28
62 Example 3: Connecting to a Tablet Computer (for example, ipad) through Wi-Fi 1. Touch Settings > WLAN to turn on WLAN. 2. The tablet computer automatically searches for wireless connections and displays a list of access points. 3. Select the access point with the Mobile WiFi's SSID. 4. If required, enter the correct wireless network encryption key, and tap Join. (The lock icon indicates that the encryption key is required to connect to this wireless network.) Note: Wi-Fi devices, such as an iphone, ipod touch, PS3 and NDSi, can all access the Internet through the Mobile WiFi. For specific operations, refer to the Wi-Fi device's user manual. 29
63 Tips When the Mobile WiFi is in use for an extended period of time, it will become warm and may overheat. Should this happen, the Mobile WiFi will automatically close the network connection and turn off to protect itself from damage. If this occurs, place the Mobile WiFi in a well ventilated space to allow the heat to dissipate, then turn it on and continue to use it as normal. If you are unable to use the Mobile WiFi as normal, try the following: Consult the online help on the web management page. Restart the Mobile WiFi. Restore the Mobile WiFi to the factory settings. Consult your mobile operator. Version: V100R001_01 30 Part Number: 31010QEG
64
Bedankt voor de aanschaf van de Mobile WiFi. Deze Mobile WiFi biedt u een draadloze netwerkverbinding met een hoge snelheid.
 Snelstartgids Snelstartgids 97 Bedankt voor de aanschaf van de Mobile WiFi. Deze Mobile WiFi biedt u een draadloze netwerkverbinding met een hoge snelheid. Dit document geeft u inzicht in uw Mobile WiFi,
Bedankt voor de aanschaf van de Mobiele WiFi. Deze Mobiele WiFi biedt u een draadloze netwerkverbinding met een hoge snelheid.
 Bedankt voor de aanschaf van de Mobiele WiFi. Deze Mobiele WiFi biedt u een draadloze netwerkverbinding met een hoge snelheid. Dit document geeft u inzicht in uw Mobiele WiFi, zodat u deze meteen in gebruik
Snelstartgids TM is een handelsmerk van ETSI.
 Snelstartgids Bedankt voor de aanschaf van de Mobile WiFi. Deze Mobile WiFi biedt u een mobiele netwerkverbinding met een hoge snelheid naar het Internet. Dit document geeft u inzicht in uw Mobile WiFi,
Bedankt voor de aanschaf van de Mobile WiFi. Deze Mobile WiFi biedt u een mobiele netwerkverbinding met een hoge snelheid naar het Internet.
 Snelstartgids Bedankt voor de aanschaf van de Mobile WiFi. Deze Mobile WiFi biedt u een mobiele netwerkverbinding met een hoge snelheid naar het Internet. Dit document geeft u inzicht in uw Mobile WiFi,
Bedankt voor uw keuze voor HUAWEI Mobile WiFi
 Bedankt voor uw keuze voor HUAWEI Mobile WiFi De ondersteunde functies en feitelijke verschijningsvorm hangen af van de specifieke modellen die u heeft aangeschaft. De illustraties dienen uitsluitend voor
Settings for the C100BRS4 MAC Address Spoofing with cable Internet.
 Settings for the C100BRS4 MAC Address Spoofing with cable Internet. General: Please use the latest firmware for the router. The firmware is available on http://www.conceptronic.net! Use Firmware version
Bedankt voor de aanschaf van de Mobile WiFi. Deze Mobile WiFi biedt u een mobiele netwerkverbinding met een hoge snelheid naar het Internet.
 Snelstartgids Bedankt voor de aanschaf van de Mobile WiFi. Deze Mobile WiFi biedt u een mobiele netwerkverbinding met een hoge snelheid naar het Internet. Dit document geeft u inzicht in uw Mobile WiFi,
Hartelijk dank voor uw keuze voor Mobile WiFi van HUAWEI
 Hartelijk dank voor uw keuze voor Mobile WiFi van HUAWEI De ondersteunde functies en het uiterlijk van het apparaat zijn afhankelijk van het specifieke model dat u hebt gekocht. De afbeeldingen zijn louter
Hartelijk dank voor uw keuze voor Mobile WiFi van HUAWEI
 Hartelijk dank voor uw keuze voor Mobile WiFi van HUAWEI De ondersteunde functies en het uiterlijk van het apparaat zijn afhankelijk van het specifieke model dat u hebt gekocht. De afbeeldingen zijn louter
EM6250 Firmware update V030507
 EM6250 Firmware update V030507 EM6250 Firmware update 2 NEDERLANDS/ENGLISH Table of contents 1.0 (NL) Introductie... 3 2.0 (NL) Firmware installeren... 3 3.0 (NL) Release notes:... 5 1.0 (UK) Introduction...
MobiDM App Handleiding voor Windows Mobile Standard en Pro
 MobiDM App Handleiding voor Windows Mobile Standard en Pro Deze handleiding beschrijft de installatie en gebruik van de MobiDM App voor Windows Mobile Version: x.x Pagina 1 Index 1. WELKOM IN MOBIDM...
Shipment Centre EU Quick Print Client handleiding [NL]
![Shipment Centre EU Quick Print Client handleiding [NL]](/thumbs/78/76906513.jpg "Shipment Centre EU Quick Print Client handleiding [NL]") Shipment Centre EU Quick Print Client handleiding [NL] Please scroll down for English. Met de Quick Print Client kunt u printers in Shipment Centre EU configureren. De Quick Print Client kan alleen op
Shipment Centre EU Quick Print Client handleiding [NL] Please scroll down for English. Met de Quick Print Client kunt u printers in Shipment Centre EU configureren. De Quick Print Client kan alleen op
Handleiding Zuludesk Parent
 Handleiding Zuludesk Parent Handleiding Zuludesk Parent Met Zuludesk Parent kunt u buiten schooltijden de ipad van uw kind beheren. Hieronder vind u een korte handleiding met de mogelijkheden. Gebruik
MyDHL+ Van Non-Corporate naar Corporate
 MyDHL+ Van Non-Corporate naar Corporate Van Non-Corporate naar Corporate In MyDHL+ is het mogelijk om meerdere gebruikers aan uw set-up toe te voegen. Wanneer er bijvoorbeeld meerdere collega s van dezelfde
EM4594 Firmware update
 EM4594 Firmware update EM4594 Firmware update 2 NEDERLANDS/ENGLISH Table of contents 1.0 (NL) Introductie... 3 2.0 (NL) Firmware installeren... 3 4.0 (NL) Overige informatie:... 7 1.0 (UK) Introduction...
Procedure Reset tv-toestellen:
 Procedure Reset tv-toestellen: Volgende procedure is te volgen wanneer er een tv-toestel, op een van de kamers niet meer werkt. TV Re-installation Factory Default Her-installeren van de TV Fabrieksinstellingen
Firewall van de Speedtouch 789wl volledig uitschakelen?
 Firewall van de Speedtouch 789wl volledig uitschakelen? De firewall van de Speedtouch 789 (wl) kan niet volledig uitgeschakeld worden via de Web interface: De firewall blijft namelijk op stateful staan
LDAP Server on Yeastar MyPBX & tiptel 31xx/32xx series
 LDAP Server on Yeastar MyPBX & tiptel 31xx/32xx series Tiptel b.v. Camerastraat 2 1322 BC Almere tel.: +31-36-5366650 fax.: +31-36-5367881 info@tiptel.nl Versie 1.2.0 (09022016) Nederlands: De LDAP server
EM7680 Firmware Update by Micro SD card
 EM7680 Firmware Update by Micro SD card 2 NEDERLANDS/ENGLISH EM7680 Firmware update by Micro SD card Table of contents 1.0 (NL) Introductie... 2 2.0 (NL) Firmware installeren... 2 3.0 (NL) Opmerking...
Deze instructie moet gezien worden als een toevoeging op de bijgevoegde Engelstalige Quick Guide.
 Eerste gebruik van de Huawei E5220 Introductie: De Huawei E5220 mobiele wireless 3G router is de opvolger van de E5331 router en behoort tot de kleinste pocket routers van dit moment in zijn soort. Met
EM7680 Firmware Update by OTA
 EM7680 Firmware Update by OTA 2 NEDERLANDS/ENGLISH EM7680 Firmware update by OTA Table of contents 1.0 (NL) Introductie... 3 2.0 (NL) Firmware installeren... 3 3.0 (NL) Release notes:... 3 4.0 (NL) Overige
Handleiding Digipass DP310
 Handleiding Digipass DP310 Deze handleiding geeft u uitleg over het activeren en gebruik maken van uw Digipass. Toetsen van de Digipass OK: voor het aan- of uitschakelen van het apparaat of om een handeling
Het beheren van mijn Tungsten Network Portal account NL 1 Manage my Tungsten Network Portal account EN 14
 QUICK GUIDE C Het beheren van mijn Tungsten Network Portal account NL 1 Manage my Tungsten Network Portal account EN 14 Version 0.9 (June 2014) Per May 2014 OB10 has changed its name to Tungsten Network
NEDERLANDS. Display Instructies. Knoppen. Geeft afwisselend Tijd, Datum en Temperatuur weer, kan ook ingesteld worden op enkel tijd
 NEDERLANDS Het ziet eruit als een simpel blokje hout, maar maak een geluid (knip met je vingers, kuch, klap in je handen, of tip op de bovenkant) en het geeft onmiddelijk en afwisselend tijd, datum en
ICARUS Illumina E653BK on Windows 8 (upgraded) how to install USB drivers
 how to install USB drivers") ICARUS Illumina E653BK on Windows 8 (upgraded) how to install USB drivers English Instructions Windows 8 out-of-the-box supports the ICARUS Illumina (E653) e-reader. However, when users upgrade their Windows
ICARUS Illumina E653BK on Windows 8 (upgraded) how to install USB drivers English Instructions Windows 8 out-of-the-box supports the ICARUS Illumina (E653) e-reader. However, when users upgrade their Windows
INSTALLATIE HANDLEIDING
 INSTALLATIE HANDLEIDING Powerwifi USB Router in combinatie met de Powerwifi USB buitenantenne INLEIDING De Powerwifi USB Router kan worden gebruikt in combinatie met de Powerwifi USB buitenantenne. Hierdoor
Handleiding NL pagina 2. Manual UK page 6. Network Settings
 Handleiding NL pagina 2 Manual UK page 6 Network Settings 2 NEDERLANDS Netwerkinstellingen Inhoudsopgave Netwerkinstellingen voor Windows 98 en ME... 2 Netwerkinstellingen voor Windows 2000 en XP... 3
Handleiding Installatie ADS
 Handleiding Installatie ADS Versie: 1.0 Versiedatum: 19-03-2014 Inleiding Deze handleiding helpt u met de installatie van Advantage Database Server. Zorg ervoor dat u bij de aanvang van de installatie
Hoe met Windows 8 te verbinden met NDI Remote Office (NDIRO) How to connect With Windows 8 to NDI Remote Office (NDIRO
 How to connect With Windows 8 to NDI Remote Office (NDIRO") Handleiding/Manual Hoe met Windows 8 te verbinden met NDI Remote Office (NDIRO) How to connect With Windows 8 to NDI Remote Office (NDIRO Inhoudsopgave / Table of Contents 1 Verbinden met het gebruik van
Handleiding/Manual Hoe met Windows 8 te verbinden met NDI Remote Office (NDIRO) How to connect With Windows 8 to NDI Remote Office (NDIRO Inhoudsopgave / Table of Contents 1 Verbinden met het gebruik van
FAAC DRIVER. Driver install procedure for FAAC boards. Installatieprocedure voor driver voor FAAC-kaarten.
 FAAC DRIVER Driver install procedure for FAAC boards Installatieprocedure voor driver voor FAAC-kaarten www.record-toegangstechniek.nl 1 When a FAAC board (E124 or E145) is connected to the USB port, it
Downloaded from www.vandenborre.be PIXMA MG5500. series. Installatiehandleiding
 PIXMA MG5500 series Installatiehandleiding CANON INC. 2013 Installatiehandleiding In deze handleiding leest u hoe u een netwerkverbinding voor de printer instelt. Netwerkverbinding Draadloze verbinding
INSTALLATIE HANDLEIDING ZTE MIFI ROUTER
 INSTALLATIE HANDLEIDING ZTE MIFI ROUTER Copyright 2016. Alle rechten voorbehouden. Niets uit deze uitgave mag worden verveelvoudigd, opgeslagen in een geautomatiseerd gegevensbestand en/of openbaar gemaakt
OUTDOOR HD DOME IP CAMERA PRODUCT MANUAL GB - NL
 OUTDOOR HD DOME IP CAMERA PRODUCT MANUAL GB - NL GB PARTS & FUNCTIONS 2. ---- 1. ---- 3. ---- 7. ---------- 5. 4. 6. 1. Outdoor IP camera unit 2. Antenna 3. Mounting bracket 4. Network connection 5. Power
MyDHL+ Uw accountnummer(s) delen
 delen") MyDHL+ Uw accountnummer(s) delen met anderen Uw accountnummer(s) delen met anderen in MyDHL+ In MyDHL+ is het mogelijk om uw accountnummer(s) te delen met anderen om op uw accountnummer een zending te
MyDHL+ Uw accountnummer(s) delen met anderen Uw accountnummer(s) delen met anderen in MyDHL+ In MyDHL+ is het mogelijk om uw accountnummer(s) te delen met anderen om op uw accountnummer een zending te
INSTALLATIE HANDLEIDING
 INSTALLATIE HANDLEIDING Powerwifi USB Router in combinatie met de Powerwifi USB buitenantenne INLEIDING De Powerwifi USB Router kan worden gebruikt in combinatie met de Powerwifi USB buitenantenne. Hierdoor
Hoe te verbinden met NDI Remote Office (NDIRO): Apple OS X How to connect to NDI Remote Office (NDIRO): Apple OS X
: Apple OS X How to connect to NDI Remote Office (NDIRO): Apple OS X") Handleiding/Manual Hoe te verbinden met (NDIRO): Apple OS X How to connect to (NDIRO): Apple OS X Inhoudsopgave / Table of Contents 1 Verbinden met het gebruik van Apple OS X (Nederlands)... 3 2 Connect
Handleiding/Manual Hoe te verbinden met (NDIRO): Apple OS X How to connect to (NDIRO): Apple OS X Inhoudsopgave / Table of Contents 1 Verbinden met het gebruik van Apple OS X (Nederlands)... 3 2 Connect
Leeftijdcheck (NL) Age Check (EN)
 Age Check (EN)") Leeftijdcheck (NL) Age Check (EN) [Type text] NL: Verkoopt u producten die niet aan jonge bezoekers verkocht mogen worden of heeft uw webwinkel andere (wettige) toelatingscriteria? De Webshophelpers.nl
Leeftijdcheck (NL) Age Check (EN) [Type text] NL: Verkoopt u producten die niet aan jonge bezoekers verkocht mogen worden of heeft uw webwinkel andere (wettige) toelatingscriteria? De Webshophelpers.nl
WWW.EMINENT-ONLINE.COM
 WWW.EMINENT-OINE.COM HNDLEIDING USERS MNUL EM1016 HNDLEIDING EM1016 USB NR SERIEEL CONVERTER INHOUDSOPGVE: PGIN 1.0 Introductie.... 2 1.1 Functies en kenmerken.... 2 1.2 Inhoud van de verpakking.... 2
General info on using shopping carts with Ingenico epayments
 Inhoudsopgave 1. Disclaimer 2. What is a PSPID? 3. What is an API user? How is it different from other users? 4. What is an operation code? And should I choose "Authorisation" or "Sale"? 5. What is an
EM7680 Firmware Update by Micro SD card or USB
 EM7680 Firmware Update by Micro SD card or USB 2 NEDERLANDS/ENGLISH EM7680 Firmware update by Micro SD card or USB Table of contents 1.0 (NL) Introductie... 3 2.0 (NL) Firmware installeren... 3 3.0 (NL)
EM7680 Firmware Update by Micro SD card or USB stick
 EM7680 Firmware Update by Micro SD card or USB stick 2 NEDERLANDS/ENGLISH EM7680 Firmware update by Micro SD card or USB stick Table of contents 1.0 (NL) Introductie... 3 2.0 (NL) Firmware installeren...
DALISOFT. 33. Configuring DALI ballasts with the TDS20620V2 DALI Tool. Connect the TDS20620V2. Start DALISOFT
 TELETASK Handbook Multiple DoIP Central units DALISOFT 33. Configuring DALI ballasts with the TDS20620V2 DALI Tool Connect the TDS20620V2 If there is a TDS13620 connected to the DALI-bus, remove it first.
Huawei E3272 4G LTE-HSPA+ Dongel. Snel-start Handleiding
 Huawei E3272 4G LTE-HSPA+ Dongel Snel-start Handleiding Wij danken u voor uw keuze van de Mobile Broadband USB-Modem (Dongel). Met uw USB-Modem krijgt u toegang tot een hoge snelheid draadloos netwerk.
MyDHL+ ProView activeren in MyDHL+
 MyDHL+ ProView activeren in MyDHL+ ProView activeren in MyDHL+ In MyDHL+ is het mogelijk om van uw zendingen, die op uw accountnummer zijn aangemaakt, de status te zien. Daarnaast is het ook mogelijk om
EM7680 Firmware Auto-Update for Kodi 17.2
 EM7680 Firmware Auto-Update for Kodi 17.2 2 NEDERLANDS/ENGLISH EM7680 Firmware Auto-update for Kodi 17.2 Table of contents 1.0 (NL) Introductie... 3 2.0 (NL) Firmware installeren... 3 3.0 (NL) Opmerking...
EM7580 Firmware Update by Micro SD card
 EM7580 Firmware Update by Micro SD card 2 NEDERLANDS/ENGLISH EM7580 Firmware update by Micro SD card Table of contents 1.0 (NL) Introductie... 3 2.0 (NL) Firmware installeren... 3 3.0 (NL) Opmerking...
INSTALLATIE HANDLEIDING Nauticwifi USB Router in combinatie met de Nauticwifi USB buitenantenne
 INSTALLATIE HANDLEIDING Nauticwifi USB Router in combinatie met de Nauticwifi USB buitenantenne Inleiding NLEIDING De Nauticwifi USB Router kan worden gebruikt in combinatie met de Nauticwifi USB buitenantenne.
Technicolor TG670: draadloze configuratie
 Technicolor TG670: draadloze configuratie 1. Inleiding Dit document beschrijft de draadloze functies van uw Technicolor Gateway en bevat aanwijzingen voor de configuratie ervan. Het Technicolor Gateway-toegangspunt
Deze instructie moet gezien worden als een toevoeging op de bijgevoegde Engelstalige Quick Guide.
 Eerste gebruik van de Huawei E589u-12 Introductie: De Huawei E589 4G LTE mobiele hotspot ondersteund gelijktijdig tot maximaal 10 users. Dit betekent dat je met de E589 samen met nog 9 andere vrienden
Voor je met de installatie begint controleer of alle benodigde onderdelen aanwezig zijn. In de verpakking dient aanwezig te zijn:
 H A N D L E I D I N G N I - 7 0 7 5 0 2 1 I N H O U D V A N D E V E R P A K K I N G 4 T E C H N I S C H E S P E C I F I C AT I E 4 T O E P A S S I N G M O G E L I J K H E D E N 4 H A R D W A R E I N S
Deze instructie moet gezien worden als een toevoeging op de bijgevoegde Engelstalige Quick Guide.
 Eerste gebruik van de ZTE MF80 Introductie: Met de MF80 mobiele wireless router kan men Wi-Fi-apparaten verbinding laten maken met het internet. De snelheden die gehaald kunnen worden zijn indrukwekkend
WWW.EMINENT-ONLINE.COM
 WWW.EMINENT-ONLINE.COM NL HANDLEIDING USERS MANUAL EM1033 HANDLEIDING NL EM1033 TWEE POORTS AUTOMATISCHE KVM SWITCH INHOUDSOPGAVE: PAGINA 1.0 Introductie.... 2 1.1 Functies en kenmerken.... 2 1.2 Inhoud
SpeedTouch 570 Standaard 128 WEP-beveiliging
 SpeedTouch 570 Standaard 128 WEP-beveiliging 1 Beveiligen 1.1 Draadloos netwerk beveiligen Over het algemeen zijn netwerken gevoeliger voor misbruik door derden dan computers die niet onderling zijn verbonden.
Quick start guide. Powerbank MI Mah. Follow Fast All rights reserved. Page 1
 Quick start guide Powerbank MI 16.000 Mah Follow Fast 2016 - All rights reserved. Page 1 ENGLISH The Mi 16000 Power Bank is a very good backup option for those on the move. It can keep you going for days
Cameramanager LSU Installation Guide
 Cameramanager LSU Installation Guide Network based video surveillance server Version 1.3 / November 2011 Copyright 2011 - Cameramanager.com Page 1 LSU installation guide index 1. Connecting the LSU to
Registratie- en activeringsproces voor de Factuurstatus Service NL 1 Registration and activation process for the Invoice Status Service EN 11
 QUICK GUIDE B Registratie- en activeringsproces voor de Factuurstatus Service NL 1 Registration and activation process for the Invoice Status Service EN 11 Version 0.14 (July 2015) Per May 2014 OB10 has
Registratie- en activeringsproces voor de Factuurstatus Service NL 1 Registration and activation process for the Invoice Status Service EN 10
 QUICK GUIDE B Registratie- en activeringsproces voor de Factuurstatus Service NL 1 Registration and activation process for the Invoice Status Service EN 10 Version 0.19 (Oct 2016) Per May 2014 OB10 has
Nederlandse versie. Inleiding. Installatie Windows 2000, XP en Vista. LW303 Sweex Wireless LAN USB 2.0 adapter 300 Mbps
 LW303 Sweex Wireless LAN USB 2.0 adapter 300 Mbps Inleiding Stel de Sweex Wireless LAN USB 2.0 adapter 300 Mbps 802.11n niet bloot aan extreme temperaturen. Plaats het apparaat niet in direct zonlicht
Activant Prophet 21. Prophet 21 Version 12.0 Upgrade Information
 Activant Prophet 21 Prophet 21 Version 12.0 Upgrade Information This class is designed for Customers interested in upgrading to version 12.0 IT staff responsible for the managing of the Prophet 21 system
IOS and Android APP instruction
 IOS and Android APP instruction - Open de APP Store of Google Play op uw toestel - Open the APP Store or Google Play on your device IOS Android - Download de Eurom Heating APP: - Download the Eurom Heating
Cameramanager LSU Installation Guide
 Cameramanager LSU Installation Guide Network based video surveillance server Version 1.1 / August 2009 Copyright 2010 - Cameramanager.com Page 1 LSU installation guide index 1. Connecting the LSU to your
2019 SUNEXCHANGE USER GUIDE LAST UPDATED
 2019 SUNEXCHANGE USER GUIDE LAST UPDATED 0 - -19 1 WELCOME TO SUNEX DISTRIBUTOR PORTAL This user manual will cover all the screens and functions of our site. MAIN SCREEN: Welcome message. 2 LOGIN SCREEN:
Gebruikershandleiding / User manual. Klappers bestellen in de webshop Ordering readers from the webshop
 Gebruikershandleiding / User manual Klappers bestellen in de webshop Ordering readers from the webshop Gebruikershandleiding klappers bestellen Voor het bestellen van klappers via de webshop moeten de
OUTDOOR HD BULLET IP CAMERA PRODUCT MANUAL
 OUTDOOR HD BULLET IP CAMERA PRODUCT MANUAL GB - NL GB PARTS & FUNCTIONS 1. 7. ---- 3. ---- 4. ---------- 6. 5. 2. ---- 1. Outdoor IP camera unit 2. Antenna 3. Mounting bracket 4. Network connection 5.
PLUS & PRO. Addendum installatie aanvullende MID 65A kwh-meter - Addendum installation additional MID 65A kwh-meter SET
 PLUS & PRO Addendum installatie aanvullende MID 65A kwh-meter - Addendum installation additional MID 65A kwh-meter 1 Aansluiten MID 65A kwh-meter Adres instellen MID 65A kwh-meter Maxem kan verschillende
gedeeld om dit zoveel wordt mogelijk door alle te aangesloten beperken. computers, noemt men dit wel een shared WEP-key.
 1 Beveiligen SpeedTouch 570 Standaard 128 WEP-beveiliging 1.1 Draadloos netwerk beveiligen Over het algemeen zijn netwerken gevoeliger voor misbruik door derden dan comput verbonden. Draadloze netwerken
Installatie-instructies
 Installatie-instructies NB Het in deze instructies getoonde productmodel is TL-MR3040, bij wijze van voorbeeld. Voor meer informatie over de installatie raadpleegt u de Engelse installatie-instructies
Wi-Fi Range Extender Add-on Device Quickstart Guide
 Wi-Fi Range Extender Add-on Device Quickstart Guide Model No. WRP1220 What s inside: 1x Wi-Fi Range Extender 1x Power Adapter All Home8 add-on devices have to work with Home8 systems. Nederlands Stap 1:
Mobile Watch Snelle Handleiding. Bezoek voor meer informatie
 Mobile Watch Snelle Handleiding Ⅰ. Software installatie - Software download: Zoek voor "360Eye"in de Iphone App Store en installeer de applicatie. Of scan de QR Code aan de rechterzeide. Voor meer details
MyDHL+ Tarief berekenen
 MyDHL+ Tarief berekenen Bereken tarief in MyDHL+ In MyDHL+ kunt u met Bereken tarief heel eenvoudig en snel opvragen welke producten er mogelijk zijn voor een bestemming. Ook ziet u hierbij het geschatte
Datum 15 juni 2006 Versie 1.0.6. Exchange Online. Handleiding voor gebruiker Release 1.0
 Datum 1.0.6 Exchange Online Handleiding voor gebruiker Release 1.0 1.0.6 Inhoudsopgave 1 Instellingen e-mail clients 2 1.1 Gebruik via Outlook 2003 2 1.2 Gebruik via ActiveSync 15 1.3 Gebruik via andere
Handleiding Archos 40 Titanium
 Handleiding Archos 40 Titanium Inhoud van de verpakking Controleer of de volgende onderdelen in de verpakking zitten: -- ARCHOS 40 Titanium -- Batterij -- Headset -- Micro SIM-adapter -- USB-kabel -- Lader
Nederlandse versie. Inleiding. Installatie Windows 2000 en XP. LW058 Sweex Wireless LAN USB 2.0 Adapter 54 Mbps
 LW058 Sweex Wireless LAN USB 2.0 Adapter 54 Mbps Inleiding Stel de Sweex Wireless LAN USB 2.0 Adapter 54 Mbps niet bloot aan extreme temperaturen. Plaats het apparaat niet in direct zonlicht of in de dichte
1. Voor het installeren wordt geadviseerd een backup te maken van uw database en bestanden.
 NL: KiyOh.nl gebruikers kunnen met deze plug in automatisch klantbeoordelingen verzamelen, publiceren en delen in social media. Wanneer een klant een bestelling heeft gemaakt in uw Magento Shop, wordt
LW057 SWEEX WIRELESS LAN PCI CARD 54 MBPS. Windows zal het apparaat automatisch detecteren en het volgende venster weergeven.
 Installatie Windows 2000 en XP LW057 SWEEX WIRELESS LAN PCI CARD 54 MBPS Windows zal het apparaat automatisch detecteren en het volgende venster weergeven. Selecteer Deze keer niet ( No, not this time
HANDLEIDING HUAWEI MIFI ROUTER
 HANDLEIDING HUAWEI MIFI ROUTER Copyright 2016. Alle rechten voorbehouden. Niets uit deze uitgave mag worden verveelvoudigd, opgeslagen in een geautomatiseerd gegevensbestand en/of openbaar gemaakt in enige
AlarmShield Interactive Security System Quickstart Guide. Model No. OPG2204
 AlarmShield Interactive Security System Quickstart Guide Model No. OPG2204 Nederlands Stap 1: Installatie Zorg dat u toegang heeft tot uw router (max. 3 meter afstand). Verbind de Security Shuttle met
Telenet Hotspot: login flow. Baalse Hei
 Telenet Hotspot: login flow Baalse Hei SSID s op Baalse Hei Drie SSID s van Telenet zijn zichtbaar op de camping: Baalse Hei Telenethotspot Dit zijn twee SSID namen voor hetzelfde open portaal waar een
2 Functieoverzicht. 1 Draadloze router 2 WS320 3 en 4 pc s met elk een geïnstalleerde draadloze netwerkadapter 8
 2 Functieoverzicht De HUAWEI WS320 draadloze repeater (hierna aangeduid als WS320) is een draadloze signaalrepeater, die in combinatie met een draadloze router de draadloze netwerkdekking kan vergroten.
Instellen van de WiFi-Repeater in Repeater mode
 Instellen van de WiFi-Repeater in Repeater mode U kunt de repeater eenvoudig draadloos configureren voor uw netwerk. 1) Steek de repeater in een stopcontact welke in het bereik ligt van uw draadloze netwerk
Veel gestelde vragen nieuwe webloginpagina
 Veel gestelde vragen nieuwe webloginpagina Op deze pagina treft u een aantal veel gestelde vragen aan over het opstarten van de nieuwe webloginpagina http://weblogin.tudelft.nl: 1. Ik krijg de melding
Technote. EnGenius Senao EOM Mesh Layer 2 configuratie Transparant netwerk
 Technote EnGenius / Senao EOM-8670 Mesh Layer 2 configuratie Transparant netwerk Merk Model Firmware Datum EnGenius Senao EOM-8670 2.1.10 09-04-2009 Pagina 1 van 29 Inhoudsopgave Inhoudsopgave...2 Node
Fall Detector Add-on Device Quickstart Guide
 Fall Detector Add-on Device Quickstart Guide Model No. FDS1300 What s inside: 1x Fall Detector 1x Lanyard 1x Power Cable All Home8 add-on devices have to work with Home8 systems. Nederlands Stap 1: Apparaat
Aansluiten op uw PC Sluit het Philips Wireless Music Station aan op uw PC voor:
 CD/MP3-CD HD SOURCE SEARCH REC MARK/UNMARK DBB Wireless Music Station WAS7000 Aansluiten op uw PC Sluit het Philips Wireless Music Station aan op uw PC voor: Het openen avan muziekbestanden die op uw PC
Installatiehandleiding. WNP-RP-001 WiFi-repeater, 300 mbps
 Installatiehandleiding WNP-RP-001 WiFi-repeater, 300 mbps NL Instellen van de WiFi-Repeater in Repeater mode In deze handleiding leest u stap voor stap hoe u uw Gembird WNP-RP-001 WiFi-repeater kunt instellen.
User manual Gebruikershandleiding. Version 1.0 March
 User Manual Hotel Safe GB NL User manual Gebruikershandleiding 1 User Manual Overview LED display Override key cover * button # button General Thank you for choosing a SafetyFirst Hotel Safe. Before operating
Installatie. NETGEAR 802.11ac Wireless Access Point WAC120. Inhoud van de verpakking
 Handelsmerken NETGEAR, het NETGEAR-logo en Connect with Innovation zijn handelsmerken en/of gedeponeerde handelsmerken van NETGEAR, Inc. en/of diens dochterondernemingen in de Verenigde Staten en/of andere
Verbinding maken met een wifi-netwerk
 Verbinding maken met een wifi-netwerk Windows 10 1. Klik op het icoontje Netwerk dat eruit ziet als: of in de taakbalk, rechts onderaan. 2. Selecteer een wifi-netwerk. De naam van je wifi-netwerk staat
HANDLEIDING HUAWEI E-5331 POCKET MIFI ROUTER
 HANDLEIDING HUAWEI E-5331 POCKET MIFI ROUTER Copyright 2012. Alle rechten voorbehouden. Niets uit deze uitgave mag worden verveelvoudigd, opgeslagen in een geautomatiseerd gegevensbestand en/of openbaar
USB 2.0 ETHERNET PRINTSERVER
 USB 2.0 ETHERNET PRINTSERVER DN-13014-3 DN-13003-1 Snel installatiegids DN-13014-3 & DN-13003-1 Voordat u begint, moet u de volgende items voorbereiden: Windows 2000/XP/2003/Vista/7 computer met printserver
More speed. Less stress.
 More speed. Less stress. Wireless broadband Internet access for your laptop or PDA. Available here. Draadloos breedbandinternet voor uw laptop of PDA. Hier beschikbaar. What is T-Mobile HotSpot? Wat is
Vervang UW SERVERNAAM, UW SERVERNAAM ZONDER VPN en COMPUTERNAAM door de naam van de server en computer welke wij u doorgegeven hebben.
 VPN ONDER WINDOWS 7 VOOR JE BEGINT Deze handleiding is geschreven voor Windows 7. Bij het doorlopen van de handleiding zal je regelmatig handelingen moeten uitvoeren. Hierbij wordt een vaste schrijfwijze
Automatic Medication Dispenser Add-on Device Quickstart Guide
 Automatic Medication Dispenser Add-on Device Quickstart Guide Model No. WMD1201 What s inside: 1x Automatic Medication Dispenser 6x Dosage Templates 1x Key 4x AA Battery All Home8 add-on devices have to
PIR DC-SWITCH. DC Passive infra-red Detector. Model No. PDS-10 GEBRUIKSAANWIJZING/INSTRUCTION MANUAL
 PIR DC-SWITCH DC Passive infra-red Detector Model No. PDS-10 GEBRUIKSAANWIJZING/INSTRUCTION MANUAL Please read this manual before operating your DETECTOR PIR DC-Switch (PDS-10) De PDS-10 is een beweging
Installatie van Windows 10 op laptops. Windows 10 installation on laptops
 Installatie van Windows 10 op laptops In mei vindt de migratie naar Windows 10 plaats op de laptops. Per dag worden ongeveer 25 laptops gemigreerd. Elke laptop heeft een ISSC-sticker met een laptop-nummer.
Medication Tracking Sensor Add-on Device Quickstart Guide
 Medication Tracking Sensor Add-on Device Quickstart Guide Model No. ADS1302 What s inside: 1x Medication Tracking Sensor All Home8 add-on devices have to work with Home8 systems. Nederlands Stap 1: Apparaat
Installatiehandleiding. WNP-RP-003 WiFi-repeater, 300 mbps
 Installatiehandleiding WNP-RP-003 WiFi-repeater, 300 mbps NL Instellen van de WiFi-Repeater In deze handleiding leest u stap voor stap hoe u uw Gembird WNP-RP-003 WiFi-repeater kunt instellen. Deze instellingen
it600 Smart Home Range
 MAKING LIFE SIMPLE Smart Thermostat VS20 and TRV10RFM Door/Window Sensor OS600 Smart Plug SPE600 it600 Smart Home Range 2 Index Introduction... 5 The SALUS it600 Smart Home App... 6 Gateway and VS20 Thermostat...
Gebruikershandleiding. Wi-Fi Versterker
 Gebruikershandleiding Wi-Fi Versterker De gesprekskosten bedragen 0,18 /minuut 2 INHOUD Introductie van de Wi-Fi versterker... 5 Inhoud van de verpakking... 5 Systeemvereisten... 6 Hardware Installatie...