Chaffe-eau thermodynamique Warmtepompboiler Heat pump water heater. conf
|
|
|
- Pepijn Hendrickx
- 6 jaren geleden
- Aantal bezoeken:
Transcriptie

1 FR NL GB Chaffe-eau thermodynamique Warmtepompboiler Heat pump water heater conf
2
3 Cher Client, Nous vous remercions d avoir préféré notre chauffe-eau thermodynamique lors de votre achat. Nous souhaitons qu il puisse satisfaire toutes vos attentes et vous fournisse pendant de nombreuses années les meilleurs services et le maximum d économies d énergie. Notre groupe dédie en effet beaucoup de temps, d énergie et ressources économiques à la réalisation d innovations qui favorisent les économies d énergie de nos produits. Avec votre choix, vous avez démontré sensibilité et attention afin de contenir la consommation d énergie, directement liée aux problèmes d environnement. Notre engagement permanent à réaliser des produits innovants et efficaces ainsi que votre comportement responsable dans l emploi rationnel d énergie pourront donc contribuer activement à la sauvegarde de l environnement et des ressources naturelles. Conserver avec soin ce livret d instructions, qui est conçu pour vous informer, vous avertir et conseiller, sur le correct emploi et entretien de l appareil. Notre SAV local reste à votre complète disposition pour tous vos besoins. INTRODUCTION Ce livret est destiné à l installateur et à l utilisateur final, qui devront respectivement installer et utiliser le chauffe-eau thermodynamique. La non-observation des indications de cette notice entraine la perte du bénéfice de la garantie. Cette notice constitue une partie intégrante et essentielle de l appareil. Ce livret est à conserver avec soin par l utilisateur et doit toujours accompagner l appareil, même en cas de cession à un autre propriétaire ou utilisateur et/ou de transfert dans une autre installation. Afin d utiliser correctement et en toute sécurité l appareil, l installateur et l utilisateur, pour leurs compétences respectives, sont priés de lire les instructions et les avertissements contenus dans ce livret d instruction, car il vous fournira d importantes informations de sécurité et d installation, ainsi que d utilisation et d entretien. Ce livret est divisé en quatre parties: - CONSIGNES DE SÉCURITÉ Cette rubrique contient toutes les consignes de sécurité à observer selon la norme internationale IEC INFORMATIONS GENERALES Cette partie contient toutes les informations générales utiles, relatives à la description du chauffe-eau et de ses caractéristiques techniques, ainsi que les informations sur l emploi des symboles, unités de mesures, termes techniques. Dans cette section vous trouverez les données techniques et les dimensions du chauffe-eau. - NOTICES TECHNIQUES POUR L'INSTALLATEUR Cette partie est destinée à l installateur. Elle regroupe toutes les indications et les prescriptions que le professionnel qualifié doit observer pour la réalisation optimale de l installation. - INSTRUCTIONS D'UTILISATION ET D ENTRETIEN POUR L'UTILISATEUR Cette partie est destinée à l utilisateur final et contient toutes les informations nécessaires pour le bon fonctionnement de l appareil, pour les contrôles périodiques et l entretien à effectuer directement par l utilisateur. Dans le but d améliorer la qualité de ses produits, la société constructrice se réserve le droit de modifier, sans préavis, les données et contenus de ce livret. Afin de faciliter la compréhension du contenu, ce livret été traduit dans plusieurs langues et destiné à différents pays, toutes les illustrations sont reportées à la fin de ce manuel et sont donc communes pour toutes les langues.
4 CONSIGNES DE SÉCURITÉ INFORMATIONS GENERALES 1. AVERTISSEMENTS GENERAUX 1.1 Signification des symboles utilisés 1.2 Champ d application 1.3 Prescription et normes techniques 1.4 Certification - Marquage CE 1.5 Emballage et accessoires fournis 1.6 Transport et déplacements 1.7 Identification de l appareil 2. CARACTERISTIQUES TECHNIQUES 2.1 Principe de fonctionnement 2.2 Schéma de composants 2.3 Dimensions et encombrements 2.4 Schéma électrique 2.5 Caractéristiques techniques NOTICE TECHNIQUE POUR L INSTALLATION 3. AVERTISSEMENTS 3.1 Qualifications de l installateur 3.2 Utilisation des instructions 3.3 Normes de sécurité 4. INSTALLATION 4.1 Emplacement du produit 4.2 Positionnement au sol 4.3 Raccordement aérauliques 4.4 Raccordement hydraulique 4.5 Raccordement électrique 5. PREMIÉRE MISE EN SERVICE SOMMAIRE INSTRUCTIONS D'UTILISATION ET D ENTRETIEN POUR L'UTILISATEUR 6. AVERTISSEMENTS 6.1 Première mise en service 6.2 Recommandations 6.3 Norme de sécurité 7. INSTRUCTIONS DE FONCTIONNEMENT 7.1 Description du panneau de contrôle 7.2 Comment allumer et éteindre le chauffe-eau 7.3 Réglage de la température 7.4 Mode de fonctionnement 7.5 Réglage de l'heure 7.6 Menu informations 7.7 Menu installateur 7.8 Protection anti-légionnelle 7.9 Réglages d usine 7.10 Fonctionnement avec tarif bi-horaire 7.11 Hors gel 7.12 Erreurs 8. NORMES D ENTRETIEN (pour personnes autorisées) 8.1 Vidange de l appareil 8.2 Entretien périodique 8.3 Dépannage 8.4 Entretien ordinaire réservé à l utilisateur 8.5 Recyclage du chauffe eau ILLUSTRATIONS 2
5 chauffe-eau thermodynamique CONSIGNES DE SÉCURITÉ CONSIGNES DE SÉCURITÉ ATTENTION! Cet appareil peut être utilisé par des enfants à partir de 8 ans et par des personnes dont les capacités physiques, sensorielles ou mentales sont réduites ou qui ne disposent pas des connaissances ou de l'expérience nécessaires, à condition qu ils soient encadrés ou aient été formés de façon appropriée pour une utilisation sûre de l appareil et informés des dangers qui y sont liés. Les enfants ne doivent pas jouer avec l appareil. Les opérations de nettoyage et d entretien à la charge de l utilisateur ne peuvent en aucun cas être effectuées par des enfants sans surveillance. ATTENTION! Les emballages ne doivent pas être laissés à la portée des enfants, car ils peuvent être dangereux. ATTENTION! L installation et la première mise en service de l appareil doivent être faite par des personnes qualifiées/ professionnels, en conformité avec les normes nationales d installation en vigueur et selon les éventuelles prescriptions des autorités locales et d organismes de santé publique. A tout moment avant d'accéder aux bornes, tous les circuits d'alimentation doivent être débranchés. ATTENTION! Il est strictement interdit aux personnes non qualifiées d'enlever les couvercles, d'intervenir et/ou d'effectuer des raccordements électriques. ATTENTION! Si l'appareil est doté d'un câble d'alimentation, si celui-ci doit être remplacé, s'adresser à un centre de réparation agréé ou à un technicien qualifié. ATTENTION! Une installation erronée peut causer des dégats aux personnes, animaux et objets pour lesquelles le fabricant n est pas responsable. ATTENTION! Il est obligatoire d'installer, au plus près de l'entrée d'eau froide du chauffe-eau, un groupe de sécurité. Ce dispositif doit être conforme à la norme EN 1487:2000, pression maximale de 0,7 MPa (7 bar) et doit avoir au moins: un robinet d arrêt, un clapet de retenue, un dispositif de contrôle du clapet de retenue, une soupape de sécurité, un dispositif d interruption de la charge hydraulique. 3
6 chauffe-eau thermodynamique CONSIGNES DE SÉCURITÉ ATTENTION! Le groupe de sécurité doit être testé régulièrement une fois par mois pour vérifier qu il ne soit pas bloqué ou pour retirer les éventuels dépots de tartre. ATTENTION! Un écoulement du dispositif contre les surpressions est normal durant la phase de chauffe; pour cette raison il est nécessaire de raccorder l évacuation, en la laissant tout de même toujours ouverte à l atmosphère, avec un tube de drainage placé en pente continue vers le bas et dans un endroit à l abri du gel. Au même conduit il est opportun de raccorder aussi le drainage du condensat par le raccord prévu à cet effet, situé dans la partie arrière du chauffeeau. ATTENTION! Il est indispensable de vider l appareil s il doit rester inutilisé dans un local soumis au gel. Lorsqu une vidange est nécessaire procéder comme indiqué ci-dessous: - débrancher de manière permanente l alimentation électrique de l appareil; - fermer le robinet d'arrêt, du groupe de sécurité, ou le robinet central de l installation domestique; - ouvrir le robinet d eau chaude (lavabot ou baignoire); - ouvrir le robinet de vidange placé sur le groupe de sécurité. ATTENTION! L eau chaude fournie à une température supérieure à 50 C aux robinets d utilisation, peut provoquer immédiatement de graves brûlures. Les enfants, handicapés et personnes agées sont plus exposés à ce risque. C est pourquoi, il est conseillé d utiliser un mitigeur thermostatique placé sur le tube de sortie d eau du chauffeeau indiqué par un collier de couleur rouge. ATTENTION! Si l'appareil est doté de batteries rechargeables, cellesci doivent être enlevées avant la mise au rebut de l'appareil et rangées dans les conteneurs adéquats. L'appareil doit être débranché lorsque les batteries sont enlevées. 4
7 chauffe-eau thermodynamique NOTICE TECHNIQUE POUR L INSTALLATION 1.1 Signification des symboles utilisés INFORMATIONS GENERALES En ce qui concerne les aspects liés à la sécurité d installation, et d utilisation, des symboles ont été utilisés pour mettre en évidence les avertissements des risques. Leur signification est expliquée dans le tableau suivant. Symbole Signification Le non respect de l avertissement entraîne des risques de lésions, et des risques mortels dans certaines circonstances pour les personnes. Le non respect de l avertissement entraîne des risques de dommages, très graves dans certaines circonstances pour les animaux, plantes ou objets. Obligation de respecter les normes de sécurité générales et spécifiques du produit. 1.2 Champ d application Cet appareil est destiné à produire de l eau chaude sanitaire, c'est-à-dire à une température inférieure à la température d ébullition, dans un environnement domestique. Il doit être raccordé hydrauliquement à un réseau d eau sanitaire et à un réseau électrique. Il peut utiliser des gaines pour aspirer et rejeter l air. Il est interdit d utiliser cet appareil pour des applications différentes de celles spécifiées ci-dessus, et notamment pour des cycles industriels et/ou l utilisation dans un environnement en atmosphère corrosive ou explosive. Le fabricant ne peut être tenu responsable pour d éventuels dommages consécutifs à une erreur d installation, un usage impropre, ou au non respect des instructions du présent livret. Cet appareil n est pas prévu pour être utilisé par des enfants ou par des personnes aux capacités physiques ou sensorielles réduites, ou par des personnes sans expérience ou connaissance à moins qu elles ne soient contrôlées et formées pour l utilisation de l appareil par des personnes se portant garantes de leur sécurité. Les enfants doivent rester sous la surveillance de personnes responsables qui s assureront qu ils ne jouent pas avec l appareil. 1.3 Prescriptions et normes techniques L installation est à la charge de l acheteur et doit impérativement être réalisée par un professionnel qualifié, conformément aux normes en vigueur et aux prescriptions du présent livret. Le fabricant est responsable de la conformité de l appareil aux directives, lois et normes de fabrication qui le concernent en vigueur au moment de la première mise sur le marché de l appareil. La connaissance et l observation des dispositions légales et des normes techniques relatives au dimensionnement, à l installation, et à la maintenance sont à la charge exclusive des différents intervenants dans ces domaines. Les références à des lois, normes, ou règles techniques citées dans le présent livret sont fournies à titre indicatif ; une modification de ces dispositions légales ne constitue en aucun cas une obligation du fabricant de modifier le présent livret ou d informer des tiers. Il est impératif de s assurer que le réseau d alimentation électrique auquel le produit est raccordé est conforme à la norme EN50160, que l installation électrique est conforme à la norme NFC sous peine de non application de la garantie. La modification du produit et/ou des accessoires fournis annule la garantie. 5
8 1.4 Certifications - Marquage CE chauffe-eau thermodynamique NOTICE TECHNIQUE POUR L INSTALLATION Le marquage CE atteste de la conformité aux directives communautaires suivantes : /95/EC relative à la sécurité électrique; /108/EC relative à la compatibilité électromagnétique. Les tests ont été effectués selon les normes: EN 255-3; EN ; EN/IEC ; EN ; EN ; EN ; EN ; EN 50366; EN CAHIER DE CHARGE_103-15/B 2011 Chauffe-eau Thermodynamiques POUR LA MARQUE NF elettricitè performance. 1.5 Emballage et accessoires fournis L appareil est fixé sur une palette en bois et est protégé par des coins de polystyrène expansé et du carton puis recouvert par une pellicule en plastique transparent ; tous ces matériaux sont recyclables et écologiques. Les accessoires contenus dans le colis sont les suivants: - Sangle de manutention pour faciliter les déplacements du chauffe-eau (à retirer après l installation du produit); - Tube de raccordement des condensats - Livret d instructions et documents de garantie; - 2 raccord diélectrique G3/4 plus joints 1.6 Transport et déplacement A la livraison du produit, contrôler que l emballage et le produit ne soient pas visiblement endommagés extérieurement durant le transport. En cas de constat de dégats, faites immédiatement une réclamation au transporteur. ATTENTION! Il est préférable de déplacer et stocker l appareil en position verticale. Le transport en position horizontale n est autorisé que pour de bref trajets couché exclusivement du coté postérieur indiqué par la partie carton de l'emballage. Dans ce cas attendez au moins 3 heures avant de allumer l appareil afin d assurer l'élimination adéquate de l'huile présente dans le circuit réfrigérant et pour éviter d'endommager le compresseur. L appareil emballé peut être déplacé à la main ou avec un chariot èlévateur équipé de fourches en prenant soin de respecter les indications précedentes. Nous conseillons de laisser l appareil dans son emballage original jusqu au moment de l installation à l endroit choisi surtout s il s agit d un chantier. Après avoir retiré l emballage, contrôler l état de l appareil et la présence de tous les accessoires fournis. En cas de problèmes, adressez vous au revendeur, en prenant soin d effectuer la communication dans les temps prévus par la loi. ATTENTION! Les emballages ne doivent pas être laissés à la portée des enfants, car ils peuvent être dangereux. Pour les éventuels transports et déplacements nécessaires après la première installation, observer les mêmes recommandations précédemment indiquées en ce qui concerne l inclinaison autorisée, en plus de s assurer d avoir complètement vidé la cuve de l eau. En l absence de l emballage original, se pourvoir d une protection équivalente pour l appareil afin d éviter des dommages pour lesquels le constructeur n est pas responsable. 6
9 chauffe-eau thermodynamique NOTICE TECHNIQUE POUR L INSTALLATION Positions autorisées Positions non autorisées 1.7 Identification de l appareil Les principales informations d identification de l appareil sont indiquées sur la plaque signalétique collée sur le corps du chauffe-eau. A B C D E F G H I L M N modèle litrage cuve N de série tension d alimentation, fréquence, puissance maximale absorbée pression maximum/minimum circuit réfrigérant protection cuve puissance absorbée par la résistance marques et symboles puissance thermique restituée par la pompe à chaleur puissance moyenne/maximum de la pompe à chaleur type de réfrigérant et charge Pression maximale de la cuve 2. CARACTERISTIQUES TECHNIQUES 2.1 Principe de fonctionnement L efficacité d un cycle de pompe à chaleur est mesurée par l intermédiaire du coefficient de performances COP, qui exprime le rapport entre l énergie fournie par l appareil (dans ce cas, la chaleur cédée pour chauffer l eau) et l énergie électrique consommée (par le compresseur et par les dispositifs auxilliaires de l appareil). Le COP varie selon le type de pompe à chaleur et de ses conditions de fonctionnement. Par exemple, pour un COP de 3; cela signifie que pour 1 kwh d énergie électrique consommée, la pompe à chaleur restitue 3 kwh de chaleur au dispositif à chauffer, avec 2 kwh extrait de la source d énergie gratuite. 7
10 chauffe-eau thermodynamique NOTICE TECHNIQUE POUR L INSTALLATION 2.2 Schéma de composants Référence fig Ventilateur 2 Vanne 4 voies de dégivrage 3 Pressostat de sécurité 4 Compresseur hermetique type rotatif 5 Panneau de contrôle 6 Pieds réglables 7 Résistance électrique 8 Anode à courant actif 9 Sonde NTC fonctionnement et sécurité 10 Condenseur 11 Sonde NTC température eau de sortie 12 Anode magnésium 13 Condensateur de marche compresseur 14 Evacuation de condensats 15 Valve d expansion thermostatique 16 Evaporateur 2.3 Dimensions et encombrements Référence fig. 2. A B C D E F G H Tube ¾ eau froide à l entrée Tube ¾ eau chaude à la sortie Raccordement évacuation des condensats Tube ¾ sortie circuit auxiliaire (seulement version SYS) Tube ¾ entrée circuit auxiliaire (seulement version SYS) Gaine sonde supérieure (S3) (seulement version SYS) Gaine sonde inférieure (S2) (seulement version SYS) Tube ¾ circuit recirculation (seulement version SYS) 2.4 Schéma électrique Référence fig. 3. A Alimentation ( V 50Hz) B Accumulateurs (3x1,2V AA rechargeable) C Carte de l interface D Résistance électrique 2000W E Sondes NTC bas de cuve F Anode à courant imposé G Masse de la cuve H Carte de port série I Carte puissance (mainboard) L Condensateur (15µF 450V) M Compresseur N Ventilateur O Vanne de dégivrage 4 voies P Pressostat de sécurité Q Sonde NTC haut de cuve R Sondes NTC évaporateur et entrée d air EDF Signal HCHP (EDF) du fournisseur d électricité (non fourni) 8
11 chauffe-eau thermodynamique NOTICE TECHNIQUE POUR L INSTALLATION 2.5 Caractéristiques techniques Description Unité SYS Capacité nominale du réservoir l Epaisseur moyenne de l isolement mm 35 Type de protection interne émaillée Type de protection contre la corrosion Anode de titane à courant actif + anode de magnésium Pression maximum de travail MPa 0,6 Diamètre raccordements hydrauliques II G 3/4 M Diamètre raccordement évacuation condensat mm 14 Diamètre raccordement expulsion/aspiration air mm Dureté minimum de l eau F 12 Conductivité minimale de l'eau µs/cm 150 Poids à vide kg Surface d échange circuit solaire m ,65 Pompe à chaleur Puissance électrique moyenne absorbée W 500 Puissance électrique absorbée maxi W 670 EN 255/3 (7 C) Puissance thermique ( A ) W COP ( A ) 2,8 2,8 2,8 Temps de chauffe ( A ) h:min 7:58 8:50 8:50 Energie absorbée en chauffe ( A ) kwh 3,20 3,98 3,98 Quantité maxi d eau chaude avec unique prelèvement V40 ( A ), Temp. de 55 C l QPr (en 24h) KWh 0,91 1,06 1,06 EN 255/3 (20 C) Puissance thermique ( B ) W COP ( B ) 3,1 3,1 3,1 Temps de chauffe ( B ) h:min 6:05 7:17 7:17 Energie absorbée en chauffe ( B ) kwh 2,77 3,56 3,56 Quantité maxi d eau chaude avec unique prelèvement V40 ( B ), Temp. de 55 C l QPr (en 24) 0,89 1,0 1,0 EN (Cahier de Charge _ /B 2011) COP ( C ) 2,41 2,6 2,6 Temps de chauffe ( C ) h:min 8:16 9:40 9:40 Energie absorbée en chauffe ( C ) kwh 3,57 4,37 4,37 Quantité maxi d eau chaude avec unique prelèvement V40 ( C ), Temp. de 55 C l Pes W Tapping L XL XL Température maxi eau avec pompe de chaleur C 55 (d usine) Quantité de fluide réfrigérant R134a Kg 0,9 Pression maxi circuit réfrigérant coté basse pression MPa 1 Pression maxi circuit réfrigérant coté haute pression MPa 2,4 9
12 chauffe-eau thermodynamique NOTICE TECHNIQUE POUR L INSTALLATION Description Unité SYS Element chauffant Puissance résistance W 2000 Température maxi de l eau avec résistance C 75 (65 d usine) Courant maximun absorbé A 8,7 Alimentation électrique Tension / Puissance maximum absorbé ( A ) V / W monophase / 2670 Fréquence Hz 50 Degré de protection IP IP24 Coté air Aéraulique débit d air (régulation automatique) m 3 /h Pression statique disponible Pa Puissance sonore ( F ) db(a) Volume minimum du local d installation ( D ) m Hauteur minimum plafond local d installation ( D ) m 2,06 2,28 2,28 Température mini local d installation C Température maxi local d installation C Température minimum air b.u. a 90% h.r. ( E ) C Température maximum air b.u. a 90% h.r. ( E ) C (A) (B) (C) (D) (E) (F) Valeur obtenue, avec température de l air 7 C et humidité relative 85%, température de l eau d entrée 15 C et sortie 55 C (selon norme EN255-3). Valeur obtenue, avec température de l air 20 C et humidité relative 37%, température de l eau d entrée 15 C et sortie 55 C (selon norme EN255-3). Valeur obtenue, avec température de l air 7 C et humidité relative 87%, température de l eau d entrée 10 C et sortie 55 C (selon norme NF Chaier de Charges /B_2011). Dans le cas d installation sans gaines. Au dehors de l intervalle de température de fonctionnement de la pompe de chaleur le réchauffage de l eau est assuré par la résistance électrique. Testé en chambre réverbérante selon la norme de mesure UNI EN ISO 3741 (sortie air gainée avec tube rigid D200 longueur 2m, T air = 25 ±2 C, H.r. 55 ±5 %, T eau chaude = 45 ±2 C) Valeur moyenne obtenue sur un nombre significatif de produits. 10
13 3. AVERTISSEMENTS 3.1 Qualification de l installateur chauffe-eau thermodynamique NOTICE TECHNIQUE POUR L INSTALLATION NOTICE TECHNIQUE POUR L INSTALLATION ATTENTION! L installation et la première mise en service de l appareil doivent être faite par des personnes qualifiées/ professionnels, en conformité avec les normes nationales d installation en vigueur et selon les éventuelles prescriptions des autorités locales et d organismes de santé publique. Le chauffe-eau est fourni avec une quantité suffisante de réfrigérant R134a pour son fonctionnement. Il s agit d un fluide réfrigérant qui n est pas nocif pour la couche d ozone de l atmosphère, il n est pas inflammable et ne peut pas provoquer d explosions. Toutefois les travaux d entretien et les interventions sur le circuit réfrigérant doivent être réalisés exclusivement par des personnes habilitées avec les équipements adéquats. 3.2 Utilisation des instructions ATTENTION! Une installation erronée peut causer des dégats aux personnes, animaux et objets pour lesquelles le fabricant n est pas responsable. L installateur se doit d observer les instructions contenues dans ce livret. L'installateur devra informer l'utilisateur sur le fonctionnement du chauffe-eau, une fois l'installation terminée. Il devra également lui remettre le livret d'utilisation. 3.3 Normes de sécurité Pour la signification des symboles utilisés dans le tableau suivant, voir le paragraphe 1.1, dans la section INFORMATIONS GENERALES. N Avertissement Risque Symbole Protéger les tubes et les câbles pour éviter qu ils ne soient endommagés S assurer que l environnement de l installation et les éléments auxquels l appareil doit être raccordé sont conformes aux normes en vigueur. Utiliser des outils et des protections conformes à l usage (en particulier, s assurer que l outil n est pas endommagé et que son manche est fixé solidement). Utiliser les outils correctement en s assurant qu ils ne puissent pas tomber et les ranger après usage. Utiliser des équipements électriques adéquats, les utiliser de manière adéquate. Ne pas laisser des câbles électriques dans les zones de passage. Utiliser les outils correctement en s assurant qu ils ne puissent pas tomber et les ranger après usage. Electrocution par contact avec des conducteurs sous tension Dommages consécutifs à une fuite d eau Electrocution par contact avec des conducteurs sous tension Dommages sur l appareil causés par des conditions d utilisation non conformes Lésions par projection de fragments, de poussières ou par coupure ou abrasion. Dommages sur l appareil causés par des projections de fragments, de poussières ou par coupure ou abrasion. Lésions par projection de fragments, de poussières ou par coupure ou abrasion. Dommages sur l appareil causés par des projections de fragments, de poussières ou par coupure ou abrasion. 11
14 chauffe-eau thermodynamique NOTICE TECHNIQUE POUR L INSTALLATION Effectuer le détartrage en respectant les prescriptions de la fiche technique des produits utilisés, en aérant l environnement, en portant les équipements de protection individuelle adéquats, en évitant les mélanges de produits, en protégeant l appareil et les objets proches. S assurer que les échelles ou escabeaux soient stables, solides, que les marches ou échelons soient en bon état et solidement fixés. Tout travail en hauteur doit être effectué sous la surveillance d une tierce personne. S assurer que l environnement de travail est conforme aux règles notamment en termes d hygiène, d éclairage, d aération, et de solidité. Pour travailler, porter les équipements de protection individuelle adéquats. Les opérations à l intérieur de l appareil doivent être effectuées avec les précautions nécessaires pour éviter le contact avec des parties abrasives ou tranchantes. Lésions par contact avec les yeux ou la peau, ou inhalation d agents chimiques nocifs. Dommages sur l appareil ou sur les objets proches par corrosion de substances acides. Lésion par chute ou par cisaillement. Lésions par coups, chute, etc Lésions par électrocution, projection de poussières ou de fragments, inhalation de poussières, coups, coupures, abrasions, bruits, vibrations. Lésions par coupure ou abrasion. 10 Vider toute partie pouvant contenir de l eau chaude. Lésion par brûlure Effectuer les raccordements électriques avec des câbles de dimension adéquate. Protéger l appareil avec le matériel adéquat à proximité des zones de travail. Manipuler l appareil avec les précautions nécessaires en utilisant la sangle de manutention. Incendie par surchauffe de câbles sousdimensionnés. Dommages sur l appareil par projection de fragments ou de poussières Dommages sur l appareil par chute ou casse du socle ou des pieds réglables. 14 Lors de la manutention de l appareil, s assurer que le passage est dégagé. Dommages sur l appareil par chocs. 15 Après une intervention de maintenance ou de dépannage, s assurer que tous les dispositifs de sécurité soient fonctionnels avant de remettre l appareil en service. Dommages sur l appareil par absence de dispositif de sécurité. 12
15 4. INSTALLATION chauffe-eau thermodynamique NOTICE TECHNIQUE POUR L INSTALLATION ATTENTION! Suivre scrupuleusement les avertissements généraux et les normes de sécurité énumérés dans les paragraphes précédents, se conformer obligatoirement à ce qui est indiqué. 4.1 Emplacement du produit ATTENTION! Avant de procéder à n importe quelle opération d installation, vérifier que l emplacement choisi respecte les conditions suivantes: a) que le local d installation, dans le cas ou le chauffe-eau est utilisé sans conduit d expulsion d air, ait un volume non inférieur à 20 m 3, avec un renouvellement d air suffisant. Eviter d installer l appareil dans des endroits où il peut y avoir formation de gel. Ne pas installer le produit dans un local qui abrite un appareil nécessitant de l air pour son fonctionnement (par ex. chaudière et chauffe-eau à gaz à chambre ouverte). Les performances et la sécurité du produit ne sont pas garanties dans le cas d installation à l extérieur; b) qu à l emplacement choisi il soit possible d atteindre l extérieur avec le conduit d expulsion et/ou d extraction de l air, au cas où l utilisation en soit prévue. Le positionnement des raccords pour les conduits d expulsion et d aspiration d air soient situés dans la partie supérieure de l appareil; c) que le lieu d installation et les installations électriques et hydrauliques où sera raccordé l appareil soient conformes aux normes en vigueur ; d) que soit disponible, à l emplacement choisi, une source d alimentation électrique monophasé Volts ~ 50 Hz; e) qu à l endroi choisi, il soit possible, à partir du raccord spécialement prévu à cet effet dans la partie arrière de l appareil, de réaliser l évacuation des condensats avec un siphon adéquat. f) qu à l endroi choisi, il soit possible de respecter les distances prévues par rapport aux parois et au plafond pour un bon fonctionnement et pour un entretien aisé; g) que le plan choisi permette un positionnement de fonctionnement parfaitement horizontal; Références fig.2 h) que le lieu choisi soit conforme au grade IP (protection contre la pénétration de fluides) de l appareil selon les normes en vigueur; i) que l appareil ne soit pas directement exposé aux rayons solaires, même en présence de vitrage; j) que l appareil ne soit pas exposé aux milieux particulièrement agressifs tel que vapeurs acides, poussières ou saturé de gaz; k) que l appareil ne soit pas installé directement sur des lignes électriques non protégées contre les fluctuations de tension; l) que l appareil soit installé le plus près possible des points d utilisation pour limiter les pertes de chaleur le long des conduits; m) que l air aspiré par le produit ne contienne pas de poussières, vapeurs acides, ou solvants. Dans le cas d installations sans gaines, respecter les distances par rapport aux parrois indiquées figure Positionnement au sol Références fig. 5 1) Lorsque vous avez trouvé la position adéquate pour l installation, enlever l emballage et retirer les fixations visibles sur la palette où le produit est fixé. 2) En s aidant de la sangle prévue à cet effet, faite descendre l appareil de la pallette. 3) Fixer au sol les pieds (par les trous appropriés) en utilisant des vis et des chevilles adéquates, une fois le travail terminé oter la sangle en tissu en dévissant les 2 vis. 13
16 4.3 Raccordements aérauliques chauffe-eau thermodynamique NOTICE TECHNIQUE POUR L INSTALLATION Nous signalons que l utilisation d air en provenance de milieu réchauffé pourrait pénaliser la performance thermique du logement. Le produit possède dans la partie supérieure gauche une prise d aspiration et une de sortie. Il est important de ne pas enlever ou manipuler les deux grilles. La température de l air en sortie du produit peut atteindre des températures 5 à 10 C de moins par rapport à celle d entrée. Si l'air expulsé n'est pas gainé, la température du local d installation peut baisser sensiblement. Dans le cas où de l'appareil est prévu avec expulsion et aspiration par l extérieur (ou dans un autre local) de l air circulant par la pompe à chaleur, des gaines devront être utilisées pour le passage d air. S assurer que les gaines soient raccordées et fixées solidement au produit afin d éviter qu elles se désassemblent accidentellement (utiliser par exemple un silicone adéquat). En aucun cas, il faut manipuler ou casser les grilles d entrée et de sortie d air. Même si le produit n'est pas canalisé, il est conseillé d'installer une courbe dans la ligne d'aspiration pour éviter un mélange entre l'entrée et sortie d'air (fig. 4). Dans le cas du produit canalisé avec des tubes rigides adopter toutes les précautions nécessaires pour assurer les opérations de maintenance (fig. 4). AVERTISSEMENT: Ne pas utiliser de grilles extérieures ayant des pertes de charge importantes, comme les grilles avec moustiquaires (anti-insectes). Les grilles utilisées doivent permettre un passage d air suffisant. La distance entre l entrée et la sortie d air ne doit pas être inférieure à 50cm. Protéger la gaine du vent extérieur. L'expulsion de l'air dans la cheminée n'est autorisée que si le projet est approprié un nettoyage périodique de la cheminée, foyer et accessoires est nécessaire. La perte totale est calculée en additionnant les pertes des composants individuels installés. Le maximum doit être inférieur ou égal à la pression statique du ventilateur (55 Pa). Voir le diagramme sur la dernière page. Un type de canalisation qui ne respecte pas ces consignes peut affecter les performances du produit et faire augmenter sensiblement le temps de chauffage. Figure 6 Figure 7 Figure 8 Figure 9 EXEMPLE Air à l entrée: sans gaine / Air à la sortie: gainé vers l'extérieur Air à l entrée: gainé depuis une autre pièce / Air à la sortie: gainé vers l'extérieur Air à l entrée: gainée depuis l'extérieur / Air à la sortie: gainé vers l'extérieur Installation sans gaine 4.4 Raccordement hydraulique Raccorder l entrée et la sortie du chauffe-eau avec des tubes ou raccords supportant un couple température pression de 75 C / 7 bar constante. Pour cela, les matériaux qui ne résistent pas à de telles températures et pressions sont déconseillés (tuyaux en PER particulièrement). Il faut obligatoirement poser le raccord diélectrique (y compris le joint fourni avec le produit) sur le tube de sortie de l eau chaude avant d effectuer la connexion. Visser sur le tube d entrée d eau de l appareil, indiqué par un collier de couleur bleu, un raccord en forme de T. Voir figure 10. Il est obligatoire d'installer, au plus près de l'entrée d'eau froide du chauffeeau, un groupe de sécurité. Ce dispositif doit être conforme à la norme EN 1487:2000, pression maximale de 0,7 MPa (7 bar) et doit avoir au moins : un robinet d arrêt, un clapet de retenue, un dispositif de contrôle du clapet de retenue, une soupape de sécurité, un dispositif d interruption de la charge hydraulique. 14
17 chauffe-eau thermodynamique NOTICE TECHNIQUE POUR L INSTALLATION L orifice de décharge du groupe de sécurité doit être raccordé à une conduite d évacuation avec un diamètre non inférieur à celui de raccordement de l appareil (3/4 ), par l intermédiaire d un siphon avec une distance d air d au moins 20 mm, avec la possibilité d inspection visuelle afin d éviter qu en cas d intervention du dispositif même, on ne provoque pas de dégâts aux personnes, animaux et objets, pour lesquelles le constructeur n est pas responsable. Raccorder avec un tuyau flexible, au tube d eau froide du réseau, l entrée du dispositif contre les surpressions, si nécessaire en utilisant un robinet d arrêt. Prévoir en outre, dans le cas d ouverture du robinet de vidange, un tuyau d évacuation d eau sur la sortie. Lors du vissage du dispositif contre les surpressions ne pas le forcer en fin de course. Un écoulement du dispositif contre les surpressions est normal durant la phase de chauffe; pour cette raison il est nécessaire de raccorder l évacuation, en la laissant tout de même toujours ouverte à l atmosphère, avec un tube de drainage placé en pente continue vers le bas et dans un endroit à l abri du gel. Au même conduit il est opportun de raccorder aussi le drainage du condensat par le raccord prévu à cet effet, situé dans la partie arrière du chauffe-eau. L appareil ne doit pas travailler avec des eaux de dureté inférieure à 12 F, cependant avec des eaux de dureté particulièrement élevées (>25 F), il est conseillé d utiliser un adoucisseur, avec un réglage contrôlé. Dans ce cas la dureté résiduelle ne doit pas descendre au dessous de 15 F. Dans le cas où la pression du réseau soit proche de la valeur de tarage du groupe de sécurité, il est nécessaire de monter un réducteur de pression le plus loin possible de l appareil. Dans la version SYS est prévu un tuyau G3/4 pour le circuit de recirculation (s il présent dans le circuit hydraulique) ATTENTION! Il est conseillé d effectuer un lavage soigné des tuyauteries de l installation pour éliminer les éventuels résidus de filettage, soudures ou saletés qui puissent compromettre le bon fonctionnement de l appareil. 4.5 Raccordement électrique limentation permanente (câble fourni avec l appareil) Cable 3G 1.5mm 2 Protection Signal EDF (cable non fourni avec l appareil) H05V2V2-F 2G 0.75mm 2 2A 16A ATTENTION: Avant d'accéder aux terminaux, tous les circuits d alimentation doivent être débranchés La protection du produit contre la corrosion est assurée par les batteries lorsqu il n est pas alimenté. ATTENTION: L entretien et les connexions électriques ne peuvent être effectués que par une personne qualifiée. L appareil est équipé d un câble d alimentation (dans le cas ou son remplacement soit nécessaire; il faudra utiliser exclusivement la pièce de rechange d origine fournie par le constructeur). Il est conseillé d effectuer un contrôle de l installation électrique en vérifiant la conformité aux normes en vigueur. Vérifier que l installation soit adaptée pour la puissance maximale absorbée par le chauffe-eau (voir les données sur la plaque signalétique), aussi bien à ce qui est de la section des conducteurs que pour leur conformité aux normes en vigueur. Les prises multiples, les rallonges électriques et les adaptateurs sont interdits. Il est également interdit d utiliser les tuyauteries de l installation hydraulique, de chauffage ou du gaz pour le raccordement de la mise à la terre de l appareil. Avant sa mise en fonction, contrôler que la tension du réseau soit conforme à la valeur indiquée sur la plaque signalétique de l appareil. Le constructeur de l appareil ne peut pas être retenu responsable pour les éventuels dégâts causés par l absence de mise à la terre de l installation ou pour des anomalies d alimentation électrique. Pour isoler l appareil du réseau électrique, il faut utiliser un interrupteur bipolaire conforme aux normes CEI-EN en vigueur (ouverture des contacts d au moins 3 mm, mieux encore si équipé de fusibles). L'appareil doit être conforme aux règles européennes et nationales (NFC en France), et doit être protégé par un disjoncteur différentiel de courant résiduel 30mA. 15
18 chauffe-eau thermodynamique NOTICE TECHNIQUE POUR L INSTALLATION Fig. 11 Fig. 12 Fig.13 Fig 15 RACCORDEMENT ELECTRIQUE PERMANENT Dans le cas ou vous ne disposez pas de tarif électrique bi-horaire, Le chauffe-eau sera toujours alimenté par le réseau électrique, le fonctionnement est assuré 24h\24h. Retirer les 3 accumulateurs Ni-MH, qui ne servent qu en cas de connexion sur contacteur jour / nuit (voir figure 14). RACCORDEMENT ELECTRIQUE AVEC TARIF BI-HORAIRE ET CONTACTEUR JOUR/NUIT Dans le cas ou l on dispose de tarif électrique bi-horaire et d un compteur spécifique, on peut choisir d alimenter le produit exclusivement pendant les heures ou le prix du kwh est le moins cher. Pendant les heures ou le produit n est pas alimenté, la protection contre la corrosion de la cuve est assurée par l anode à courant actif, alimentée par les accumulateurs rechargeables livrés d usine. Pour les mettre en service, retirer la façade du tableau de bord (voir figure 14). Ôter la languette de protection des accumulateurs. RACCORDEMENT ELECTRIQUE AVEC TARIF BI-HORAIRE ET SIGNAL HC-HP Mêmes avantages économiques que la configuration avec tarif bi-horaire, il est en plus possible d avoir une chauffe rapide durant les heures pleines grâce au mode BOOST sans action sur le contacteur jour / nuit. 1) Brancher un câble bipolaire sur les contacts correspondants au signal sur le compteur d énergie. 2) Brancher le câble bipolaire du signal au bornier indiqué «EDF» qui se trouve dans la boite electrique a droite du produit. ATTENTION : Le câble de signal doit être introduit dans le trou situé sous le câble d alimentation, il faut le fixer à l aide de passe-câbles spéciaux internes au produit et le serrer dans les presse-étoupes à proximité de la borne correspondante. 3) Activer la fonction HC-HP dans le menu installateur. (Voir paragraphe 7.7). Pour le connexion de la version SYS à la chaudière / poêle il est recommandé de utiliser le porte-sonde supérieure. Pour le connexion de la version SYS a l unité solaire il est possible utiliser la seule sonde inférieure (S2) ou encore S2 et S3. 5 PREMIERE MISE EN SERVICE Lorsque vous avez réalisé les raccordements hydrauliques et électriques, procéder au remplissage du chauffe-eau avec l eau du réseau. Pour cela il est nécessaire d ouvrir le robinet central de l installation domestique et celui d eau chaude le plus près, s assurer que tout l air s échappe de la cuve. Vérifier visuellement les éventuelles fuites d eau et des raccords, éventuellement visser avec modération. Supprimer la languette batteries (C) qui est situé au sous le couvercle (B) en bas dans le longement batteries, Fig
19 chauffe-eau thermodynamique INTRUCTIONS D UTILISATION ET D ENTRETIEN POUR L UTILISATEUR INSTRUCTIONS D'UTILISATION ET D ENTRETIEN POUR L'UTILISATEUR 6. AVERTISSEMENTS 6.1 Première mise en service ATTENTION! L installation et la première mise en service de l appareil doivent être faites par des professionnels qualifiés, en conformité avec les normes nationales d installation en vigueur et selon les éventuelles prescriptions des autorités locales et d organismes de santé publique. Dans tous les cas, l entreprise qui réalise les travaux devra effectuer les contrôles de sécurité et de bon fonctionnement de l ensemble de l installation. Avant de faire fonctionner le chauffe-eau, vérifier que l installateur ait complété toutes les opérations. Soyez certains d avoir bien compris les explications de l installateur sur le bon fonctionnement de l appareil et de son utilisation. Au premier allumage de la pompe à chaleur, le temps d attente est de 5 minutes. 6.2 Recommandations En cas de panne ou de mauvais fonctionnement, éteindre l appareil, n essayer pas de le réparer, mais adressez vous au SAV. Les éventuelles réparations devront être effectuées en utilisant exclusivement des pièces de rechange d origine constructeur et par des professionnels qualifiés. Le non respect des consignes ci-dessus, peut compromettre la sécurité de l appareil et désengager toutes les responsabilités du constructeur. En cas d inutilisation prolongée du chauffe eau, il est recommandé de: - Couper l alimentation électrique de l appareil, par exemple en positionnant l interrupteur en amont sur s il est prévu. - Fermer les robinets de l installation sanitaire d alimentation. ATTENTION! L eau chaude fournie à une température supérieure à 50 C aux robinets d utilisation, peut provoquer immédiatement de graves brûlures. Les enfants, handicapés et personnes agées sont plus exposés à ce risque. C est pourquoi, il est conseillé d utiliser un mitigeur thermostatique placé sur le tube de sortie d eau du chauffe-eau indiqué par un collier de couleur rouge. Modèles SYS un mitigeur thermostatique devient obligatoire. ATTENTION! (exclusivement pour la version SYS) S assurer que la température détectée par la sonde S2 et S3 du régulateur du système auxiliair, à l intérieur du chauffe-eau, ne doit pas excéder 75 C fig
20 chauffe-eau thermodynamique INTRUCTIONS D UTILISATION ET D ENTRETIEN POUR L UTILISATEUR 6.3 Normes de sécurité Pour la signification des symboles utilisés dans le tableau suivant, voir le précédent chapitre 1.1. N Avertissement Risque Symbole 1 Ne pas bouger l appareil une fois installé. Electrocution par contact avec des conducteurs sous tension Dommages consécutifs à une fuite d eau Lésions par chute de l objet due aux vibrations 2 Ne rien poser sur l appareil. Dommages sur l appareil ou sur les objets voisins suite à la chute de l objet Lésions suite à la chute de l appareil 3 Ne pas monter sur l appareil. 4 Ne pas ouvrir l appareil. Dommages sur l appareil ou sur des objets voisins suite à la chute de l appareil Lésions par électrocution ou brûlure ou coupure Ne pas tirer sur le(s) câble(s) d alimentation de l appareil. Ne pas utiliser d échelle, d escabeau ou de chaise instable pour effectuer le nettoyage de l appareil. Ne pas effectuer d opération de maintenance sans avoir au préalable mis l appareil hors tension. Ne pas utiliser l appareil pour d autres usages que ceux prévus dans le présent livret. Ne pas laisser des enfants ou des personnes non formées utiliser l appareil. Ne pas nettoyer l appareil avec des détergents, solvants, insecticides. Lésions par électrocution suite à un contact avec des câbles sous tension dénudés Lésions par chute ou par cisaillement Lésions par électrocution Dommages sur l appareil liés à une surcharge de fonctionnement Dommages sur l appareil liés à une utilisation non conforme Dommages sur les parties plastiques et peinture 11 Ne rien poser sous l appareil. Dommages sur les objets posés sous l appareil en cas de fuite 12 Ne boire pas l eau de condensation. Lésions par intoxication 18
21 chauffe-eau thermodynamique INTRUCTIONS D UTILISATION ET D ENTRETIEN POUR L UTILISATEUR 7. INSTRUCTIONS DE FONCTIONNEMENT 7.1 Description du panneau de contrôle Référence figure 14. A Boutons Molette ON/ - MODE Le panneau de contrôle, simple et rationnel, est constitué de deux boutons et d une molette/bouton central. Dans la partie supérieure un écran montre, la température réglée (set) ou la température relevée, en plus d autres indications spécifiques comme la signalisation du mode de fonctionnement, pannes, réglages, informations sur l état de l appareil. 7.2 Comment allumer et éteindre le chauffe-eau Allumage: pour allumer le chauffe-eau il suffit d appuyer le bouton ON/. Maintenant vous pouvez régler l heure actuelle (voir paragraphe 7.5). L écran montre la température réglée set, le mode de fonctionnement, le symbole HP et/ou le symbole de la résistance indiquent le fonctionnement de la pompe à chaleur et/ou de la résistance. Extinction: pour éteindre le chauffe-eau, il suffit d appuyer sur le bouton ON/, il reste exclusivement l indication sur l écran. La protection contre la corrosion reste assurée et l appareil se met en mode hors-gel, la température de l eau à l intérieur de la cuve est maintenue au-dessus de 5 C. 7.3 Réglage de la température Le réglage de la température de consigne de l eau chaude s effectue en tournant la molette dans le sens horaire ou anti horaire (la visualisation sera momentanément clignotante). Pour visualiser la température de l eau dans la cuve, appuyer et relacher le bouton/molette, la température sera indiquée pendant 8 secondes, la température d'eau chaude de consigne s'affichera de nouveau. Les températures que l on peut obtenir en mode pompe à chaleur varient de 50 C à 55 C réglé d usine, et de 40 C à 55 C en modifiant le réglage dans le menu installateur. La température maximum que l on peut obtenir, avec la résistance, est de 65 C, réglé d usine, et de 75 C en modifiant le réglage dans le menu installateur. 19
22 chauffe-eau thermodynamique INTRUCTIONS D UTILISATION ET D ENTRETIEN POUR L UTILISATEUR 7.4 Mode de fonctionnement Le bouton "mode" permet de définir le mode de chauffe que le chauffe-eau utilise pour atteindre la température de consigne. Le mode de fonctionnement sélectionné est visible dans la ligne en dessous de la température. Lorsque la pompe à chaleur est active, apparait le symbole: Lorsque la résistance électrique est active, apparait le symbole: Mode AUTO: gère la chauffe par la pompe à chaleur et la résistance électrique, si nécessaire, pour atteindre la température de consigne dans un nombre d'heures maximum. Le nombre d heures maximum utilisé dépend du paramétre P9 - TIME_W (voir paragraphe 7.7), par défaut réglé à 8 heures. (recommandée pour l hiver) Mode BOOST: le chauffe-eau utilise simultanément la pompe à chaleur et la résistance pour atteindre la température de consigne avec le minimum de temps possible. Une fois la température atteinte, le fonctionnement retourne sur mode AUTO. Mode GREEN: le chauffe-eau exclu le fonctionnement de la résistance, en utilisant seulement la pompe à chaleur, on réalise le maximum d économies d énergie. La température maximale que l on peut atteindre est de 55 C. La résistance est ainsi activée en cas d erreurs, anti-légionnelle. Ce mode est recommandé pour des températures extérieures supérieures à 0 C. PROGRAM:Ce mode est conçu pour vous offrir un confort d eau chaude optimisé à vos besoins, tout en limitant la consommation d énergie. Il vous offre la possibilité de créer deux programmes de chauffe P1 et P2, qui peuvent fonctionner individuellement ou en combinaison l un avec l autre durant la journée (P1 + P2). Le produit activera la phase de chauffe pour atteindre la température fixée à l heure programmée, en donnant la priorité au chauffage par pompe à chaleur et, si nécessaire par la résistance électrique. Appuyez sur la touche pour sélectionner le mode Program souhaité (P1/P2/P1+P2), tourner le bouton pour régler la température désirée, appuyez à nouveau sur le bouton/molette pour confirmer, tournez le bouton pour régler l'heure à laquelle l eau chaude doit être disponible et appuyez sur le bouton/molette pour confirmer. Si vous souhaitez utiliser le mode P1+P2, vous devez définir les informations pour les deux programmes. Même dans le cas de raccordement électrique heures creuses / heures pleines avec signal HC / HP est possible programmer l eau chaude n importe quel heures du journée. Afin d utiliser ce mode, vous devez régler l heure comme indiqué dans le paragraphe 7.5. Note: Pour assurer le confort, dans le cas d un fonctionnement en mode P1+P2 avec des temps très proches entre eux, il est possible que la température de l'eau soit supérieure à la température de consigne. 7.5 Réglage de l'heure Le réglage de l'heure est requis: Lors du premier démarrage Si il se vérifie en même temps l'absence d'alimentation du réseau électrique et les batteries sont déchargées ou déconnexées (le produit redémarre en mode Auto). Vous pouvez régler l'heure par le paramètre P1 (section 7.7). L'affichage clignote, montrant les heures et les minutes. Tournez le bouton/molette jusqu'à l affichage de l heure, confirmez en appuyant sur le bouton, répétez la procédure pour régler les minutes. 20
23 chauffe-eau thermodynamique INTRUCTIONS D UTILISATION ET D ENTRETIEN POUR L UTILISATEUR 7.6 Menu informations Par l intermédiaire du menu informations on obtient la visualisation des donnés pour le paramètrage du produit. Pour accéder au menu appuyer sur la molette pendant 5 secondes. Tourner la molette pour sélectionner les paramètres L1, L2, L3 L9 Pour sélectionner un paramètre, appuyer sur la molette pour visualiser la valeur. Pour revenir à la sélection des paramètres appuyer de nouveau sur la molette ou sur le bouton MODE. Pour quitter le menu info/installateur appuyer sur le bouton mode. (L appareil quitte automatiquement le menu après 10 minutes d inactivité). Paramètre Nom Description paramètre L1 T W1 Température relevée sonde 1 résistance L2 T W2 Température relevée sonde 2 résistance L3 TW3 Température relevée sonde tube eau chaude L4 T AIR Température relevée sonde air d entrée L5 T EVAP Température relevée sonde évaporateur L6 HP h Compteur paramètre interne 1 L7 HE h Compteur paramètre interne 2 L8 SW MB Version logiciel circuit imprimé électronique Mainboard L9 SW HMI Version logiciel circuit imprimé interface utilisateur 21
24 chauffe-eau thermodynamique INTRUCTIONS D UTILISATION ET D ENTRETIEN POUR L UTILISATEUR 7.7 Menu installateur ATTENTION: LA PROGRAMMATION DES PARAMETRES SUIVANTS DOIT ETRE EFFECTUEE PAR DES PERSONNES QUALIFIEES Par l intermédiaire du menu installateur on peut modifier certains réglages du produit. Le symbole entretien sera visualisé sur la gauche de l écran Pour entrer dans le menu maintenir appuyer sur bouton/molette pendant 5 secondes, parcourir les paramètres du menu L - INFO jusqu à arriver à l indication «P» parameter. Tourner la molette pour sélectionner les paramétres P1, P2, P3 P8. Lorsque vous avez sélectionné le paramètre à modifier, appuyer sur la molette pour visualiser la valeur du paramètre, tourner maintenant la molette pour obtenir la valeur désirée. Pour revenir à la sélection des paramètres, appuyer sur la molette si vous souhaitez mémoriser la valeur choisie, appuyer sur mode (ou attendez 10 secondes) si vous souhaitez en terminer avec les réglages sans mémoriser la valeur choisie. Pour quitter le menu info/installateur appuyer sur le bouton mode. (L appareil quitte automatiquement le menu après 10 minutes d inactivité). Paramètre Nom Description paramètre P1 TIME Reglage de l heure P2 T Max Réglage de la température maximale que l on peut obtenir (de 65 C à 75 C). Une valeur plus élevée de température permet d avoir une quantité d eau chaude supérieure. P3 ANTI_B Activation/désactivation de la fonction Anti légionnelle (on/off). Voir paragraphe 7.8 P4 TIME_W Valeur maximale d heures de chauffe journalières (de 5h à 24h). P5 HC-HP Activation/désactivation du fonctionnement avec tarif bi-horaire. Voir paragraphe 7.10 P6 RESET Restauration de tous les paramètres d usine. P7 T Min Réglage de la température minimale que l on peut obtenir (de 50 C à 40 C). Une valeur de température réglée plus basse permet de réaliser des économies d énergie majeures dans le cas où les besoins d eau chaude soient faibles. P8 DEFROS Activation/désactivation de la logique de dégivrage (on/off). Si activé permet à la pompe à chaleur de fonctionner avec une température de l air en entrée jusqu à -5 C. 22
25 chauffe-eau thermodynamique INTRUCTIONS D UTILISATION ET D ENTRETIEN POUR L UTILISATEUR 7.8 Protection anti-légionnelle (Fonction activable dans le menu installateur) L'activation de ce mode est conseillée uniquement dans le cas où la température de consigne est inférieure à 50 C. Si elle est activée, la température de l eau sera chauffée tous les mois à la température de 65 C, pour un temps maximum de 15 minutes. Ce temps est suffisant pour éviter la formation de germes dans la cuve et dans les conduits (dans le cas où l eau ait atteint au moins une fois la température T>57 C pour au moins 15 minutes). Le premier cycle de chauffe se produit 3 jours après l activation de la fonction. De telles températures peuvent provoquer des brûlures, il est conseillé d utiliser un mitigeur thermostatique. Pendant le cycle, ANTI_B sera affiché alternativement du mode de fonctionnement. Une fois que le cycle est terminé la température reste celle d'origine. Lorsque le produit fonctionne en tarif Heures Creuses / Heures Pleines, Le cycle de chauffe aura lieu pendant les heures creuses. Pour arrêter appuyez sur "On/off". 7.9 Réglages d usine Le chauffe-eau est livré d'usine selon la configuration ci-dessous. Paramètre Etat réglage d usine TEMPERATURE PREREGLEE 55 C P2 TEMP. MAXI REGL. RESISTANCE 65 C P3 ANTILEGIONNELLE DESACTIVÉ P4 TIME_W (nombre d heures d alimentation accepté) 8h P5 HC-HP (fonctionnement avec tarif bi-horaire) DESACTIVÉ P7 TEMP. MINI REGLABLE 50 C P8 DEFROST (dégivrage actìf) ACTIVE TEMPERATURE PREREGLEE P1 55 C TEMPS PREREGLEE P1 06:00 TEMPERATURE PREREGLEE P2 55 C TEMPS PREREGLEE P2 18: Fonctionnement avec tarif bi-horaire Pour pouvoir aussi fonctionner dans des installations avec tarif bi-horaire, le logiciel de contrôle calcule la moyenne journalière d heures de disponibilité de l alimentation électrique avec tarif économique (HC). La fonction d auto apprentissage permet à l appareil d atteindre la température réglée dans la limite d heures disponibiles avec tarif économique; la limite d heures maximum est donné par le paramètre P9 TIME_W; au premier allumage. (ou après une extinction hardware) la valeur par défaut est de 8 heures Hors gel Lorsque le produit est alimenté, si la température de l eau à l intérieur de la cuve descend en dessous de 5 C, la résistance (2000 W) est automatiquement activée pour réchauffer l eau jusqu à 16 C. 23
26 chauffe-eau thermodynamique INTRUCTIONS D UTILISATION ET D ENTRETIEN POUR L UTILISATEUR 7.12 Erreurs Dans le cas où une panne survient, l écran clignote et montre le code d erreur. Le chauffe-eau va continuer a fournir de l eau chaude si l erreur concerne seulement l un des deux groupes de chauffe, en faisant fonctionner soit la pompe de chaleur soit la résistance électrique. Si l erreur concerne la pompe de chaleur, sur l écran apparaît le symbole HP clignotant, si l erreur concerne la résistance électrique, le symbole de la résistance va clignoter. Si le problème concerne les deux, les deux vont clignoter. Code d erreur E1 E2 E4 E5 H1 H2 H3 Cause Réchauffement avec abscence d eau dans la cuve Température excessive de l eau dans le réservoir Problèmes de sondes résistance Mesure d une différence excessive de température entre les sondes, tube eau chaude et résistance Pression excessive dans le circuit réfrigérant, ou erreur de lecture pressostat Basse pression circuit pompe à chaleur Problème ventilateur Problème compresseur ou fuite de gaz. Problème sonde air Fonctionnement résistance ON ON ON Fonctionnement pompe de chaleur H4 Evaporateur obstrué ON ON H5 Problème ventilateur Problème sonde évaporateur ON H6 Problème sonde air ON Comment agir Verifier les causes du manque d eau (fuites, raccords hydrauliques etc.). Eteindre et rallumer l appareil, si l erreur persiste contacter le SAV. Vérifier et éventuellement changer les sondes résistance. Contrôler et éventuellement changer les sondes. Eteindre et rallumer l appareil, si l erreur persiste contacter le SAV. Eteindre l appareil. Vérifier que l évaporateur est propre. Vérifier le bon fonctionnement du ventilateur. Vérifier la vanne de degivrage et la sonde air. Eteindre l appareil. Vérifier que l évaporateur est propre. Vérifier les câblages, e le bon fonctionnement du compresseur et/ou faire vérifier les éventuelles fuites de gaz réfrigérant. Vérifier la sonde de l évaporateur. Vérifier que l évaporateur, le raccordement et/ou les grilles ne sont pas obstruées (si sale ou partiellement obstruée les nettoyer). Eteindre l appareil. Vérifier que le ventilateur, ne soit pas obstrué. Vérifier les câblages entre les cartes. Vérifier la sonde de l évaporateur. Contrôler le branchement et la position, remplacer la sonde si nécessaire. H7 Problème sonde évaporateur ON Contrôler le branchement et la position, remplacer la sonde si nécessaire. H8 Problème sonde tube eau chaude ON Contrôler le branchement et la position, remplacer la sonde si nécessaire. 24
27 chauffe-eau thermodynamique INTRUCTIONS D UTILISATION ET D ENTRETIEN POUR L UTILISATEUR H9 F1 F2 F3 F4 F5 Problème dégivrage actif Problème circuit imprimé Nombre de ON/ o RESET excessif Absence de communication entre circuit imprimé et interface Cuve vide (EMPTY), Circuit anode active ouvert Circuit anode à courant actif en court circuit ON ON (T air <5 C) ON Vérifier le bon fonctionnement ou éventuellement changer la vanne 4 voies. Vérifier que l évaporateur, le raccordement et/ou le grilles ne sont pas obstruées (si sale ou partiellement obstruée le nettoyer). Eteindre et rallumer l appareil, Remplacer les cartes électroniques si nécessaire. Déconnecter momentanément le produit et les batteries. Eteindre et rallumer l appareil, Remplacer les cartes électroniques si nécessaire Vérifier la présence d eau dans la cuve, contrôler et éventuellement changer l anode en titanium Contrôler et éventuellement changer l anode en titanium 8. NORMES D ENTRETIEN (pour personnes autorisées) ATTENTION! Suivre scrupuleusement les avertissements généraux et les normes de sécurité énumérées dans les paragraphes précédents, en respectant obligatoirement ce qui est indiqué. Toutes les interventions et les opérations d entretien doivent être effectuées par des personnes habilitées (possédant les qualités requises par les normes, en vigueur). Suite à une intervention d'entretien ordinaire ou extraordinaire, il convient de remplir l appareil et le vider complètement, afin d'éliminer toutes les impuretés résiduelles. 8.1 Vidange de l appareil Il est indispensable de vider l appareil s il doit rester inutilisé dans un local soumis au gel. Lorsqu une vidange est nécessaire procéder comme indiqué ci-dessous: - débrancher de manière permanente l alimentation électrique de l appareil; - fermer le robinet d'arrêt, du groupe de sécurité, autrement le robinet central de l installation domestique; - ouvrir le robinet d eau chaude (lavabot ou baignoire); - ouvrir le robinet de vidange placé sur le groupe de sécurité. 8.2 Entretien périodique Il est conseillé d effectuer tous les ans le nettoyage de l évaporateur pour enlever la poussière ou les obstructions. Pour accéder à l'évaporateur retirez les vis retenant le couvercle frontal et superieur. Nettoyer les ailettes avec une brosse en prenant soin de ne pas les endommager ; si des ailettes sont pliées utiliser un peigne spécial (1,6mm de hauteur). Assurez-vous que le tuyau d'échappement de la condensation sur l'unité extérieure est dégagé de tout obstacle. Assurez-vous que la canalisation d air et les grilles soient propres Utilisez uniquement des pièces de rechange originales. Après chaque demontage de bride il est conseillé de remplacer le joint. 25
28 chauffe-eau thermodynamique INTRUCTIONS D UTILISATION ET D ENTRETIEN POUR L UTILISATEUR 8.3 Dépannage Problème Cause possible Comment agir La sortie d'eau est froide ou insuffisamment chaude Réglage de la consigne trop bas Dysfonctionnement de machine Aucune connexion électrique, le câblage est débranché ou endommagé Aucun signal HC / HP (si le produit est installé avec le câble de signal HC-HP) Mauvais fonctionnement du contacteur J/N (si le produit est installé dans cette configuration) Debit d air insuffisant à l évaporateur Regler la température de consigne plus haute. Vérifier les erreurs sur l'écran, procéder comme indiqué dans le tableau des "erreurs". Vérifier les bornes de la tension d'alimentation, vérifier l'état et les connexions par câble. Pour vérifier le bon fonctionnement du produit lancer le mode «Boost», si oui vérifier le signal HC / HP à partir du compteur, et vérifier l'état le câblage du signal. Vérifier le fonctionnement du contacteur J/N et que le délai fixé est suffisant pour chauffer l'eau. Nettoyer les grilles et les gaines. L'eau est chaude (avec la présence possible de vapeur du robinet) Fonctionnement réduit de la pompe à chaleur, exploitation semi-permanente de la résistance électrique Flux insuffisant de l'eau chaude Ecoulement d eau par le dispositif contre les surpressions Si l on entend une augmentation du bruit durant le fonctionnement de la pompe à chaleur Problèmes pour afficher l'écran ou désactiver Produit arrêté Vérifier la présence du courant. Vous utilisez une grande quantité d'eau chaude instantanément et le produit ne peut pas réchauffer suffisamment l'eau. Probleme sonde Haut niveau de l'encrassement de la cuve et des composants Probleme sonde Température de l'air hors de portée Reglage Time W trop bas Installation réalisée non conforme à la tension (trop faible) Évaporateur obstrué ou congelé Problèmes de pompe à chaleur 8 jours ne se sont pas écoulés depuis: -Premier démarrage -changement du paramètre Time W -absence d alimentation ou de batteries Fuites ou obstructions du circuit d'eau Un écoulement d eau par le dispositif est normal durant la periode de chauffe Présence d'éléments obstructifs Vibration de certains éléments Dommages ou déconnexion des câbles reliant la carte électronique et la carte d'interface absence d alimentation ou de batteries Vérifier la présence, même occasionnelle, d'erreur E5 Couper l'alimentation électrique, effectuer une vidange, enlever le fourreau de la résistance et enlever le calcaire dans la cuve, faire attention à ne pas endommager l'émail de la cuve et la résistance de la gaine. Remettre le produit selon la configuration d'origine, il est recommandé de remplacer le joint. Vérifier la présence, même occasionnelle, d'erreur E5 Définir une température plus basse ou un time W" plus important. Verification de la presence d une bonne tension Nettoyer l évaporateur Assurez-vous qu'il n'y a aucune erreur sur l'écran Vérifiez qu'il n'y ait pas de fuites le long du circuit, vérifier l'intégrité du tube déflecteur et l'intégrité de l'arrivée d'extraction des tuyaux d'eau froide et d eau chaude Si l on veut éviter cet écoulement, il est nécessaire d installer un vase d expansion sur l alimentation d eau froide du réseau. Si l écoulement continue durant la phase de non chauffe, faites vérifier : le tarage du dispositif; la pression de l eau du réseau. Attention: Ne jamais obstruer le trou d évacuation du dispositif! Vérifier les pièces mobiles de l'unité extérieure, nettoyer le ventilateur et les autres organes qui peuvent générer du bruit Vérifier le serrage des composants raccordés au produit Vérifier l'état de la connexion, vérifier le fonctionnement des cartes électroniques Vérifier la présence et l état de l'alimentation et des batteries, les remplacer si nécessaire 26
29 chauffe-eau thermodynamique INTRUCTIONS D UTILISATION ET D ENTRETIEN POUR L UTILISATEUR Mauvaise odeur provenant du produit Consommation anormale ou plus excessive que prévu Autre Pas de presence de siphon, ou siphon vide Perte ou partielle obstructions du circuit frigorifique Température de l'air en dehors de la plage de fonctionnement Évaporateur obstrué ou congelé Installation incorrecte Installer un siphon ou vérifier la presence d eau Allumer le produit en mode pompe à chaleur, utiliser un détecteur de fuite pour R134a pour vérifier qu'il n'y a pas de fuites Vérifier la propreté de la grille et conduits évaporateur Contactez le SAV 8.4 Entretien ordinaire réservé a l utilisateur Il est conseillé d effectuer un lavage de l appareil aprés chaque opération d entretien ordinaire ou particuliaire. Le dispositif contre les surpressions doit être testé régulièrement une fois par mois pour vérifier qu il ne soit pas bloqué ou pour oter les éventuels dépots de tartre. Vérifier que le tube d évacuation du condensat ne soit pas obstrué. Vérifier la propreté des grilles et les conduits. Le remplacement des batteries rechargeables doit être fait tous les 2 ans. S assurer qu elles soient correctement recyclées et remplacées exclusivement par des accumulateurs de type AA rechargeable, 2100 mah minimum, veiller à respecter les polarités comme indiqué sur le porte batteries, voir figure 14. L'appareil doit être débranché lorsque vous retirez les piles. 8.5 Recyclage du chauffe-eau L appareil contient du gaz réfrigérant de type R134a, qui ne doit pas être relaché dans l atmosphère. Aussi dans le cas de désactivation définitive du chauffe-eau, les travaux doivent être effectués par des professionnels qualifiés. Ce produit est conforme à la directive EU/2002/96-CE. Le symbole «poubelle barrée» sur la plaque signalétique indique que le produit en fin de vie doit être traité séparément des déchets domestiques. Il doit être rapporté dans un centre de tri pour appareils électriques et électroniques ou rapporté au revendeur lors de l achat d un nouvel appareil. Le tri sélectif permet le recyclage de l appareil en fin de vie. Son traitement permettra d éviter les effets négatifs sur l environnement et sur la santé en favorisant le recyclage des matières qui le composent. Pour en savoir plus sur les centres de collecte des déchets existants, adressez vous au service local de collecte ou à votre distributeur. De même, les 3 accumulateurs Ni-MH fournis avec l appareil devront être traités séparément des déchets domestiques et rapportés dans un centre de collecte approprié (bac spécifique de votre déchetterie, bacs présents dans les points de vente distribuant des piles et accumulateurs). Qui est situé au sous le couvercle en bas dans le longement batteries. 27
30 Geachte klant, wij danken u voor de aanschaf van onze warmtepompboiler. Wij hopen dat dit apparaat aan uw verwachtingen voldoet, u een maximale energiebesparing zal verschaffen en wensen dat u er voor vele jaren plezier aan zult beleven. Ons bedrijf wijdt veel tijd, energie en financiële middelen aan het realiseren van innovatieve oplossingen die de energiebesparing van de producten kan bevorderen. Uw keuze zal ertoe bijdragen dat er minder energie zal worden verbruikt, hetgeen op zijn beurt weer zal bijdragen tot een vermindering van algemene milieuproblemen. Onze voortdurende inzet om moderne en efficiënte producten te produceren en uw verantwoordelijke gedrag in het rationele gebruik van de energie kunnen dus actief bijdragen aan het behoud van het milieu en de natuurlijke energiebronnen. Bewaar deze gebruiksaanwijzing zorgvuldig. Hij is ontwikkeld om u te informeren, m.b.v. waarschuwingen en raadgevingen, betreffende het juiste gebruik van het apparaat zodat u al zijn kwaliteiten zult kunnen waarderen. Onze technische dienst in uw woongebied staat altijd voor u klaar. INLEIDING Deze handleiding is gericht tot de installateur en de eindgebruiker, die respectievelijk de warmtepompboiler moeten installeren en gebruiken. Het niet opvolgen van de aanwijzingen in deze handleiding heeft het vervallen van de garantie als gevolg. Dit boekje is een integraal en essentieel deel van het product zelf. Het moet met zorg door de gebruiker worden bewaard en altijd bij het apparaat blijven, ook als dit aan een nieuwe eigenaar wordt gegeven of verkocht en/of op een andere installatie wordt gemonteerd. Teneinde een correct en veilig gebruik van het apparaat te kunnen waarborgen moeten de installateur en de gebruiker, m.b.t. hun respectievelijke bevoegdheden, de instructies en de aanwijzingen in deze handleiding aandachtig doorlezen aangezien zij belangrijke gegevens bevatten betreffende de veiligheid van de installatie, het gebruik en het onderhoud. Deze handleiding is in vier verschillende secties verdeeld: - INFORMATIE BETREFFENDE DE VEILIGHEID Deze sectie bevat alle veiligheidsinformatie die u in acht moet nemen volgens de International Standard IEC ALGEMENE INFORMATIE Deze sectie bevat nuttige algemene informatie zoals de beschrijving van de boiler en zijn technische eigenschappen en informatie betreffende de symbolen, de meeteenheden en de technische terminologie. In deze sectie vindt u technische gegevens terug en de afmetingen van de boiler. - TECHNISCHE GEGEVENS VOOR DE INSTALLATEUR Deze sectie is gericht tot de installateur. Het is een verzameling van aanwijzingen en voorschriften die het gekwalificeerde professionele personeel moet navolgen voor een optimale verwezenlijking van de installatie. - GEBRUIKSAANWIJZIGEN EN ONDERHOUD T.B.V. DE GEBRUIKER Deze sectie is gericht tot de eindgebruiker en bevat alle nodige informatie voor de juiste werking van het apparaat, de periodieke controles en het onderhoud dat door de gebruiker zelf kan worden uitgevoerd. Teneinde de kwaliteit van zijn producten te verbeteren behoudt het bedrijf zich het recht voor de gegevens en de inhoud van deze handleiding zonder voorafgaande waarschuwing te wijzigen. Teneinde de inhoud beter te kunnen begrijpen, en aangezien deze handleiding in meerdere talen, en voor verschillende landen is samengesteld heeft men besloten alle afbeeldingen aan het einde van de gebruiksaanwijzing samen te vatten, aangezien deze hetzelfde zijn voor alle talen. 28
31 INHOUDSOPGAVE INFORMATIE BETREFFENDE DE VEILIGHEID ALGEMENE INFORMATIE 1. ALGEMENE INFORMATIE 1.1 Betekenis van de gebruikte symbolen 1.2 Toepassing 1.3 Voorschriften en technische normen 1.4 Certificaties - CE Markering 1.5 Verpakking en bijgeleverde accessoires 1.6 Transport en verplaatsing 1.7 Identificatie van het apparaat 2. TECHNISCHE EIGENSCHAPPEN 2.1 Werkingsprincipe 2.2 Bouwkundige eigenschappen 2.3 Afmetingen en plaatsruimte 2.4 Elektrisch schema 2.5 Tabel technische eigenschappen TECHNISCHE GEGEVENS VOOR DE INSTALLATEUR 3. VOORSCHRIFTEN 3.1 Kwalificatie van de installateur 3.2 Gebruik van de instructies 3.3 Veiligheidsnormen 4. INSTALLATIE 4.1 Plaatsing apparaat 4.2 Plaatsing op de grond 4.3 Aansluiting lucht 4.4 Hydraulische aansluiting 4.5 Elektrische aansluiting 5. EERSTE INBEDRIJFSTELLING GEBRUIKSAANWIJZIGEN EN ONDERHOUD T.B.V. DE GEBRUIKER 6. VOORSCHRIFTEN 6.1 Eerste inbedrijfstelling 6.2 Advies 6.3 Veiligheidsnormen 7. INSTRUCTIES VOOR HET GEBRUIK 7.1 Beschrijving van het bedieningspaneel 7.2 Het in- en uitschakelen van de boiler 7.3 Instellen van de temperatuur 7.4 Bedrijfsmodus 7.5 Instellen van de tijd 7.6 Informatiemenu 7.7 Installatiemenu 7.8 Anti legionella bescherming 7.9 Fabrieksinstellingen 7.10 Werking met twee verschillende tijdstarieven 7.11 Antivriesfunctie 7.12 Storingen 8. ONDERHOUD 8.1 Legen van het apparaat 8.2 Normaal onderhoud 8.3 Probleemoplossing 8.4 Normaal onderhoud t.b.v. de gebruiker 8.5 Verwijdering van de boiler ILLUSTRATIES 29
32 warmtepompboiler INFORMATIE BETREFFENDE DE VEILIGHEID INFORMATIE BETREFFENDE DE VEILIGHEID OPGELET! Het apparaat mag worden gebruikt door kinderen van 8 jaar en ouder of door personen met een beperkt lichamelijk, sensorieel of mentaal vermogen, of personen zonder de nodige ervaring of nodige kennis, mits onder toezicht, ofwel nadat zij instructies hebben ontvangen betreffende het veilige gebruik van het apparaat en betreffende de eventuele gevaren die uit het gebruik ervan zouden kunnen voortvloeien. Kinderen mogen niet met het apparaat spelen. De gebruiker moet zorg dragen over de reiniging en het onderhoud van het apparaat. Deze mogen niet door kinderen zonder toezicht worden uitgevoerd. OPGELET! De verschillende delen van de verpakking mogen niet in het bereik van kinderen worden gelaten, aangezien ze een bron van gevaar zijn. OPGELET! De installatie en de eerste inbedrijfstelling van de ketel moeten door gekwalificeerd personeel worden uitgevoerd, in overeenkomst met de geldige nationale normen voor installatie en eventuele voorschriften van de locale autoriteiten en van overheidsinstellingen voor de volksgezondheid. Voor u de klemmen aanraakt moet u in ieder geval alle voedingscircuits loskoppelen. OPGELET! Het is verboden voor niet gekwalificeerd personeel deksels te verwijderen of onderhoudsoperaties en/of elektrische aansluitingen uit te voeren. OPGELET! Als het apparaat beschikt over een voedingskabel moet u zich, als deze dient te worden vervangen, wenden tot een geautoriseerd servicecenter of tot gekwalificeerde technici. OPGELET! Een verkeerde installatie kan schade veroorzaken aan personen, dieren of dingen, waarvoor de fabrikant niet verantwoordelijk kan worden gesteld. OPGELET! Het apparaat moet de norm EN 1487:2000 respecteren, d.w.z. een maximale druk hebben van 0,7 Mpa (7 bar) en minstens beschikken over: een afsluitkraan, een terugslagklep, een 30
33 warmtepompboiler INFORMATIE BETREFFENDE DE VEILIGHEID regelmechanisme van de terugslagklep, een veiligheidsklep en een mechanisme voor de onderbreking van de hydraulische belasting. OPGELET! Het overdrukmechanisme moet geregeld ingeschakeld worden om te controleren of het niet geblokkeerd is, en om eventuele kalkafzettingen te verwijderen. OPGELET! Een licht druppelen van het mechanisme tegen de overdruk is normaal in de verwarmingsfase, daarom raden wij u aan de afvoer aan te sluiten (deze moet altijd in verbinding staan met de atmosfeer) op een draineerbuis die in een doorlopende helling naar beneden is geïnstalleerd, in een omgeving vrij van ijs. Op dezelfde buis is het bovendien noodzakelijk een condensdrainage aan te sluiten d.m.v. de speciale koppeling aan de achterkant van de boiler. OPGELET! U dient het apparaat te legen indien het ongebruikt in een vertrek wordt geplaatst waar het mogelijk kan vriezen. Als dit nodig is kunt u het apparaat zoals volgt legen: - schakel het apparaat op permanente wijze los van het elektriciteitsnet; - sluit de stopkraan af indien deze is gemonteerd. Als dit niet het geval is sluit u de hoofdwaterkraan af; - open de warmwaterkraan (wastafel of badkuip); - open de kraan op de veiligheidsklep. OPGELET! Het warme water dat met een temperatuur van meer dan 50 C uit de kranen komt kan ernstige verbrandingen veroorzaken. Kinderen, gehandicapten en ouderen lopen de meeste risico's. We raden u daarom aan een thermostatische mengkraan te monteren op de wateruitgang van het apparaat, d.w.z. de buis waar een rood bandje omheen zit. OPGELET! In het geval het apparaat beschikt over oplaadbare batterijen moeten deze worden verwijderd vóór u het apparaat wegdoet. Werp de batterijen in de speciale verzamelbakken. Voor u de batterijen vervangt moet u het apparaat loskoppelen van het elektriciteitsnet. 31
34 1.1 Betekenis van de gebruikte symbolen warmtepompboiler ALGEMENE INFORMATIE ALGEMENE INFORMATIE Voor wat betreft de veiligheidsaspecten van installatie en gebruik, en teneinde de aanwijzingen betreffende de risico's te benadrukken, worden een aantal symbolen gebruikt wiens betekenis in de hier volgende tabel wordt uitgelegd. Symbool Betekenis Het niet opvolgen van deze aanwijzing leidt tot risico van verwondingen van personen, die in bepaalde omstandigheden zelfs dodelijk kunnen zijn. Het niet opvolgen van deze aanwijzingen leidt tot risico van beschadiging van voorwerpen, planten of dieren, die in bepaalde omstandigheden zelfs ernstig kunnen zijn. Verplichting om zich aan de algemene veiligheidsvoorschriften en productspecificaties te houden. 1.2 Toepassing Dit apparaat dient voor het verwarmen van tapwater, dus tot een temperatuur die lager is dan het kookpunt, in een huiselijke of soortgelijke omgeving. Het apparaat moet een hydraulische aansluiting hebben op een tapwaternet en een elektrische voeding. Het kan toevoer- en afvoerleidingen hebben voor de in- en uitgang van de gebruikte lucht. Het is verboden om het apparaat voor andere doeleinden te gebruiken dan hetgeen wordt beschreven in deze handleiding. Elk ander oneigenlijk gebruik is niet toegestaan. Het is in het bijzonder verboden het apparaat te gebruiken in industriële installaties en/of het apparaat te installeren in een corrosieve of explosieve omgeving. De fabrikant kan niet aansprakelijk worden gesteld voor eventuele schade die voortkomt uit een foute installatie, oneigenlijk gebruik, irrationeel gedrag en van een niet complete of onnauwkeurige toepassing van de aanwijzingen in deze handleiding. Dit apparaat is niet geschikt voor het gebruik door personen (inclusief kinderen) met een beperkt lichamelijk of sensorieel vermogen of door personen zonder de nodige ervaring of kennis, tenzij zij worden gecontroleerd of onderwezen betreffende het gebruik van het apparaat door personen die verantwoordelijk zijn voor hun veiligheid. Kinderen moeten worden gecontroleerd door personen die verantwoordelijk zijn voor hun veiligheid en die zich ervan verzekeren dat zij niet met apparaat spelen. 1.3 Voorschriften en technische normen De installatie is voor rekening van de koper en moet worden uitgevoerd door gekwalificeerd personeel, overeenkomstig de geldende nationale installatienormen en eventuele voorschriften van de locale autoriteiten en van instellingen voor de volksgezondheid, volgens de specifieke aanwijzingen die de fabrikant in de huidige handleiding beschrijft. De fabrikant is verantwoordelijk voor de conformiteit van het product aan de richtlijnen, wetten en constructienormen die het product aangaan en die gelden op het moment dat het product voor de eerste keer op de markt wordt gebracht. De kennis en het naleven van de wetsbepalingen en de technische normen betreffende het ontwerp van de installaties, de plaatsing, de werking en het onderhoud zijn een exclusieve taak van de ontwerper, de installateur en de gebruiker, ieder voor hun specifieke taken. De verwijzingen naar wetten, normen of technische regels worden in de huidige handleiding puur ter informatie geciteerd. Het in werking treden van nieuwe bepalingen of wijzigingen op de geldende normen verplicht de fabrikant op geen enkele wijze t.o.v. derden. U dient zich ervan te verzekeren dat het elektriciteitsnet waarop het apparaat wordt aangesloten conform is aan de norm EN (indien dit niet het geval is, vervalt de garantie). Voor Frankrijk: controleer of de installatie conform is aan de norm NFC Bij het aanbrengen van onprofessionele wijzigingen aan de producten en/of aanhorige onderdelen vervalt de garantie. 32
35 1.4 Certificaties - CE Markering warmtepompboiler ALGEMENE INFORMATIE De plaatsing van de CE markering op het apparaat garandeert de conformiteit aan de volgende EU Richtlijnen, aan wiens fundamentele rekwisieten het voldoet: /95/EC betreffende de elektrische veiligheid /108/EC betreffende de elektromagnetische compatibiliteit De controle wordt uitgevoerd in navolging van de volgende technische normen: EN 255-3; EN ; EN/IEC ; EN ; EN ; EN ; EN ; EN 50366; EN CAHIER DE CHARGE_103-15/B 2011 Chauffe-eau Thermodynamiques POUR LA MARQUE NF elettricitè performance. 1.5 Verpakking en bijgeleverde accessoires Het apparaat is bevestigd op een houten pallet en wordt beschermd door hoekvormige piepschuim beschermelementen, karton en doorzichtig plastic folie aan de buitenkant. Alle materialen kunnen worden gerecycled en zijn milieuvriendelijk. De inbegrepen accessoires zijn: - Riem voor het bewegen van de boiler (moet worden verwijderd na de installatie van het apparaat); - Verbindingsbuis condenswater; - Handleiding en garanties; - 2 Diëlektrisch verbindingsstuk van ¾ en pakkingen. 1.6 Transport en behandeling Controleer bij het afleveren van het apparaat of het tijdens het transport geen zichtbare schade heeft ondervonden, zowel op de verpakking als op het product zelf. In het geval u schade waarneemt dient u direct een klacht in te dienen bij het transportbedrijf. OPGELET! Het is van fundamenteel belang dat u het apparaat in verticale positie verplaatst en opbergt. Een horizontaal transport is alleen toegestaan voor zeer korte trajecten en alleen als het apparaat op de achterzijde ligt, zoals aangegeven. In dit geval dient u minstens 3 uur te wachten voor u het apparaat inschakelt, mits het opnieuw verticaal staat en/of is geïnstalleerd. Dit is nodig om ervoor te zorgen dat de smeerolie in het koelcircuit goed wordt verdeeld en om te vermijden dat de compressor schade lijdt. Het ingepakte apparaat kan met de hand worden verplaatst of met een vorkheftruck. Zorg ervoor bovenstaande aanwijzingen op te volgen. We raden u aan het apparaat in zijn originele verpakking te laten totdat het op de gewenste plek wordt geïnstalleerd, in het bijzonder wanneer het een bouwterrein betreft. Nadat u de verpakking heeft verwijderd moet u controleren of het apparaat in orde is en of alle onderdelen die erbij horen aanwezig zijn. Als het apparaat niet in orde is dient u contact op te nemen met de verkoper. Zorg ervoor dat deze signalering plaatsvindt binnen de door de wet vastgestelde termijnen. OPGELET! De verschillende delen van de verpakking mogen niet in het bereik van kinderen worden gelaten, aangezien ze een bron van gevaar zijn. Voor het eventuele bewegen of vervoeren van het apparaat na de eerste installatie, dient u dezelfde raadgevingen op te volgen betreffende de toegestane helling. U dient zich er bovendien van te verzekeren dat het water in het reservoir volledig is verwijderd. Bij afwezigheid van de originele verpakking dient u voor een evenwaardige bescherming van het apparaat te zorgen om schade te vermijden waarvoor de fabrikant niet verantwoordelijk is. 33
36 warmtepompboiler ALGEMENE INFORMATIE Toegestane standen Niet toegestane standen 1.7 Identificatie van het apparaat De voornaamste informatie voor de identificatie van het apparaat staat op het typeplaatje dat op de mantel van de boiler is bevestigd. A B C model inhoud in liters van het reservoir registratienummer voedingsspanning, frequentie, maximum opgenomen D vermogen E maximale/minimale druk van het koelcircuit F bescherming reservoir G opgenomen vermogen in weerstand modus H merken en symbolen I verwarmingsvermogen in pompmodus L gemiddeld/maximaal vermogen in pompmodus M type koelmiddel en vulling N maximum druk reservoir 2. TECHNISCHE EIGENSCHAPPEN 2.1 Werkingsprincipe te gebruiken. De efficiëntie van een cyclus met een warmtepompboiler wordt gemeten met behulp van een performance coëfficiënt COP, die het verband uitdrukt tussen de energie die door het apparaat wordt geleverd (in dit geval de warmte die wordt afgegeven aan het water dat moet worden verwarmd) en de verbruikte elektrische energie (van de compressor en van de hulpapparaten van het product). De COP varieert naar gelang het type warmtepomp en de omstandigheden waar de werking betrekking op heeft. Bv., een COP waarde van 3 geeft aan dat voor iedere 1 kwh verbruikte elektrische energie de warmtepomp 3 kwh warmte af zal geven aan het te verwarmen element, waarvan 2 kwh worden onttrokken aan de gratis bron. 34
37 warmtepompboiler ALGEMENE INFORMATIE 2.2 Bouwkundige eigenschappen Verwijzing afb ventilator 2 4-weg klep voor het ontdooien 3 veiligheidspressostaat 4 roterende hermetische compressor 5 elektronisch bedieningspaneel 6 stelbare regelvoetjes (in de hoogte) 7 elektrische weerstand 8 titanium anode met stroomopdruksysteem 9 functionele en veiligheids- NTC sonde 10 condensator 11 NTC sonde watertemperatuur in uitgang 12 opofferingsanode van magnesium 13 elektrolytische condensator voor de compressor 14 afvoerbuis voor condens 15 thermostatische expansieklep 16 verdamper 2.3 Afmetingen en plaatsruimte Verwijzing afb. 2. A B C D E F G H Ingangsleiding ¾ koud tapwater Uitgangsleiding ¾ warm tapwater Aansluiting condensafvoer Ingangsleiding ¾ hulp-circuit (alleen SYS versie) Uitgangsleiding ¾ hulp-circuit (alleen SYS versie) Huls voor bovenste sonde (S3) (alleen SYS versie) Huls voor onderste sonde (S2) (alleen SYS versie) ¾ buis voor hercirculatie circuit (alleen SYS versie) 2.4 Elektrisch schema Verwijzing afb. 3. A Voeding ( V 50Hz) B Batterijen (3x1,2V AA herlaadbaar) C Interface kaart D Elektrische weerstand E NTC sonde weerstand zone F Titanium anode met stroomopdruksysteem G Aarde reservoir H Kaart seriële aansluiting I Elektronische kaart (mainboard) L Continucondensator (15µF 450V) M Compressor N Ventilator O 4-weg klep P Veiligheidspressostaat Q NTC sonde zone warmwaterleiding R NTC sonde verdamper en luchtingang EDF HCHP Signaal (EDF) kabel niet bij het product geleverd 35
38 warmtepompboiler ALGEMENE INFORMATIE 2.5 Tabel technische eigenschappen Beschrijving Eenheid SYS Nominale capaciteit reservoir l Dikte isolering mm 35 Type interne bescherming glazuursel Type corrosiebescherming titanium anode met stroompodruksysteem + magnesiumanode Maximale bedrijfsdruk MPa 0,6 Diameter wateraansluitingen II G 3/4 M Diameter koppeling condensafvoer mm 14 Diameter buizen afvoer/toevoer lucht mm Minimum waterhardheid F 12 Minimale geleidbaarheid van het water µs/cm 150 Ledig gewicht kg Warmteoverdrachtsoppervlak serpentijn m ,65 Warmtepomp Gemiddeld opgenomen elektrisch vermogen W 500 Maximum opgenomen elektrisch vermogen W 670 EN 255/3 (7 C) Verwarmingsvermogen ( A ) W COP ( A ) 2,8 2,8 2,8 Verwarmingstijd ( A ) h:min 7:58 8:50 8:50 Opgenomen verwarmingsenergie ( A ) kwh 3,20 3,98 3,98 Max hoeveelheid warm water in een enkele afname V40 ( A ), Afgeleverd op 55 C l QPr (per 24hr) kwh 0,91 1,06 1,06 EN 255/3 (20 C) Verwarmingsvermogen ( B ) W COP ( B ) 3,1 3,1 3,1 Verwarmingstijd ( B ) h:min 6:05 7:17 7:17 Opgenomen verwarmingsenergie ( B ) kwh 2,77 3,56 3,56 Max hoeveelheid warm water in een enkele afname V40 ( B ), Afgeleverd op 55 C l QPr (per 24hr) KWh 0,89 1,0 1,0 EN (Cahier de Charge _ /B 2011) COP ( C ) 2,41 2,6 2,6 Verwarmingstijd ( C ) h:min 8:16 9:40 9:40 Opgenomen verwarmingsenergie ( C ) kwh 3,57 4,37 4,37 Max hoeveelheid warm water in een enkele afname V40 ( C ) Afgeleverd op 55 C l Pes W Tapping L XL XL Max. watertemperatuur met warmtepomp C 55 (vanuit fabriek) Hoeveelheid koelvloeistof R134a Kg 0,9 Max. druk koelcircuit (lagedrukzijde) MPa 1 Max. druk koelcircuit (hogedrukzijde) MPa 2,4 36
39 warmtepompboiler ALGEMENE INFORMATIE Beschrijving Eenheid SYS Verwarmingselement Vermogen weerstand W 2000 Max. watertemperatuur met elektrische weerstand C 75 (65 vanuit fabriek) Maximum opgenomen stroom A 8,7 Elektrische voeding Spanning / Maximum opgenomen vermogen ( A ) V / W eenfase / 2670 Frequentie Hz 50 Beschermingsgraad Luchtzijde Standaard luchtaanvoer (modulerende automatische regeling) m 3 /h Beschikbare statische druk Pa Geluidsvermogen ( F ) db(a) Minimum inhoud van het vertrek waar de installatie wordt uitgevoerd ( D ) m Minimum hoogte plafond van het vertrek waar de installatie wordt uitgevoerd ( D ) m 2,06 2,28 2,28 Min. temperatuur vertrek waar installatie wordt uitgevoerd C Max. temperatuur vertrek waar installatie wordt uitgevoerd C Minimum temperatuur lucht (NB bij 90% RV ( E ) C Maximum temperatuur lucht (NB bij 90% RV) ( E ) C IP24 (A) (B) (C) (D) (E) (F) Waarden verkregen bij luchttemperatuur van 7 C en relatieve vochtigheid van 85%, temperatuur van het water bij ingang 15 C en uitgang 55 C (volgens EN255-3). Waarden verkregen bij luchttemperatuur van 20 C en relatieve vochtigheid van 37%, temperatuur van het water bij ingang 15 C en uitgang 55 C (volgens EN255-3). Waarden verkregen bij luchttemperatuur van 7 C en relatieve vochtigheid van 87%, temperatuur van het water bij ingang 10 C en uitgang 55 C (volgens hetgeen wordt voorgeschreven door de NF Cahier de Charge_ /B_2011). Voor niet-geleide. Buiten het interval van de bedrijfstemperaturen van de warmtepomp wordt de verwarming van het water gegarandeerd door de elektrische weerstand. Getest in weerkaatsend kamer op een standaard van de meting UNI EN ISO 3741 (geleide luchtafvoer met een buigzame leiding D200 lengte 2m, T lucht = 25 ±2 C, U.r. 55 ±5 %, T warm water = 45 ±2 C). Gemiddelde waarde verkregen op een groot aantal producten. 37
40 3. VOORSCHRIFTEN warmtepompboiler TECHNISCHE GEGEVENS VOOR DE INSTALLATEURUIKER 3.1 Kwalificatie van de installateur TECHNISCHE GEGEVENS VOOR DE INSTALLATEUR OPGELET! De installatie en de eerste inbedrijfstelling van de ketel moeten door gekwalificeerd personeel worden uitgevoerd, in overeenkomst met de geldige nationale normen voor installatie en eventuele voorschriften van de locale autoriteiten en van overheidsinstellingen voor de volksgezondheid. De boiler wordt geleverd met een hoeveelheid koelvloeistof R134a die voldoende is voor de werking ervan. Deze koelvloeistof beschadigt de ozonlaag in de atmosfeer niet, hij is niet ontvlambaar en kan geen explosies veroorzaken. Het onderhoud en de ingrepen op het koelcircuit moeten echter uitsluitend worden uitgevoerd door gespecialiseerde vaklui die voorzien zijn van de juiste uitrusting. 3.2 Gebruik van de instructies OPGELET! Een verkeerde installatie kan schade veroorzaken aan personen, dieren of dingen, waarvoor de fabrikant niet verantwoordelijk kan worden gesteld. De installateur moet de instructies in deze handleiding nauwkeurig in acht nemen. De installateur moet aan het einde van de werkzaamheden de gebruiker nauwkeurige instructies geven betreffende het gebruik van de boiler en betreffende de correcte uitvoering van de voornaamste handelingen. 3.3 Veiligheidsnormen Voor de betekenis van de symbolen die in de volgende tabel worden gebruikt dient u paragraaf 1.1 na te slaan, onder het hoofdstuk ALGEMENE INFORMATIE. Ref. Waarschuwing Risico Symbool Bescherm leidingen en verbindingskabels om ze voor beschadiging te behoeden. Controleer of het vertrek waar men de installatie uitvoert en het net waar men het apparaat op aansluit aan alle voorschriften voldoen. Gebruik geschikt gereedschap en werktuig. Controleer in het bijzonder of het gereedschap niet beschadigd of versleten is en dat het handvat in orde is en er stevig opzit. Verder moet u het gereedschap op de juiste manier gebruiken, voorkomen dat het valt en het na gebruik weer opbergen. Gebruik geschikte elektrische apparatuur op de juiste wijze. Belemmer de doorgang niet met de voedingskabel. Zorg dat de apparatuur niet naar beneden kan vallen. Haal de voedingskabel aan het einde uit de contactdoos en berg alle apparatuur weer op. 38 Elektrocutie door het aanraken van geleiders die onder spanning staan. Overstroming door waterlek uit beschadigde leidingen. Elektrische schokken door aanraken van niet goed geïnstalleerde geleiders, die onder spanning staan. Beschadiging van het apparaat door verkeerde bedrijfsomstandigheden. Persoonlijk letsel door rondvliegende splinters of brokken, inademen van stof, wonden door stoten, snijden, prikken of schaven. Beschadiging van het apparaat zelf of omliggende voorwerpen door rondvliegende splinters, stoten en sneden. Persoonlijk letsel door rondvliegende splinters of brokken, inademen van stof, wonden door stoten, snijden, prikken of schaven. Beschadiging van het apparaat zelf of omliggende voorwerpen door rondvliegende splinters, stoten en sneden.
41 warmtepompboiler TECHNISCHE GEGEVENS VOOR DE INSTALLATEURUIKER Ontkalk onderdelen waar kalk op is afgezet volgens de specificaties in de veiligheidskaart van het gebruikte product. Het vertrek moet geventileerd zijn, u moet beschermende kleding dragen, geen verschillende producten mengen en het apparaat en omliggende voorwerpen beschermen. Controleer dat verplaatsbare trappen op de juiste manier neer worden gezet, dat ze van degelijke kwaliteit zijn, dat de treden heel zijn en niet glad, dat niemand er tegenaan kan lopen of rijden terwijl er iemand op staat. Laat eventueel iemand dit controleren. Zorg ervoor dat de werkplaats gezonde condities biedt voor wat betreft verlichting, ventilatie en stevigheid. Trek, voordat u aan het werk gaat, beschermkleding aan en gebruik de speciale individuele veiligheidsvoorzieningen. De werkzaamheden aan de binnenkant van het apparaat moeten zeer voorzichtig worden uitgevoerd om niet plotseling tegen scherpe of snijdende delen aan te stoten. Leeg de onderdelen die warm tapwater kunnen bevatten door eventuele ontluchtingsgaten te activeren voordat u ze aanraakt. Voer de elektrische aansluitingen uit met behulp van geleiders die een juiste diameter hebben. Gebruik geschikt materiaal voor de bescherming van het apparaat en de omgeving rond de werkplek. Behandel het apparaat met de juiste beschermingsmaatregelen en voorzichtigheid. Gebruik de speciale riem voor de verplaatsing van het apparaat. Organiseer de verplaatsingen van materiaal en gereedschappen zodanig dat dit op een veilige manier kan gebeuren. Voorkom dat materiaal wordt opgestapeld en kan vallen of schuiven. Heractiveer alle veiligheidsvoorzieningen en controles die u gedurende een ingreep op het apparaat heeft moeten uitschakelen en controleer, voordat u het apparaat weer inschakelt, dat deze voorzieningen weer werken. Persoonlijk letsel door contact van huid of ogen met zuurhoudende substanties, inademen of inslikken van schadelijke chemische stoffen. Beschadiging van het apparaat zelf of omliggende voorwerpen vanwege corrosie door zuurhoudende stoffen. Persoonlijk letsel door vallen of door beklemming (bij een vouwtrap). Persoonlijk letsel door stoten, struikelen, enz. Persoonlijk letsel door schokken, rondvliegende splinters of brokken, inademen van stof, wonden door stoten, snijden, prikken, schaven, lawaai of vibraties. Persoonlijk letsel door snijden, prikken, schaven. Persoonlijk letsel door brandwonden. Brand door oververhitting als gevolg van het passeren van elektrische stroom in te smalle kabels. Beschadiging van het apparaat zelf of omliggende voorwerpen door rondvliegende splinters, stoten en sneden. Beschadiging van het apparaat zelf of nabije voorwerpen door stoten, klemmen en snijden. Beschadiging van het apparaat zelf of nabije voorwerpen door stoten, klemmen en snijden. Beschadiging of blokkering van het apparaat door ongecontroleerde werking. 39
42 4. INSTALLATIE warmtepompboiler TECHNISCHE GEGEVENS VOOR DE INSTALLATEURUIKER WAARSCHUWING! Let op de algemene waarschuwingen en veiligheidsvoorschriften die in de vorige leden en zich strikt aan de aanwijzingen daarin. 4.1 Plaatsing apparaat OPGELET! Voor u overgaat tot de installatie moet u controleren of, op de plaats waar u de boiler wenst te installeren, de volgende voorwaarden worden voldaan: a) het vertrek waar men de boiler zonder luchtafvoerbuis wenst te gaan gebruiken moet een volume van niet minder dan 20 m 3 hebben, met voldoende luchtverversing. Vermijd het apparaat te gebruiken in vertrekken waar ijsvorming kan plaatsvinden. Installeer het apparaat niet in een vertrek waar een ander apparaat staat dat lucht verbruikt tijdens de werking (bv. gasketel met open systeem, gasboiler met open systeem, enz...). De fabrikant garandeert de prestaties en de veiligheid van het product niet wanneer het buitenshuis wordt geïnstalleerd. b) Het is noodzakelijk vanaf het punt van plaatsing de buitenkant van het gebouw te kunnen bereiken met een luchttoevoer- of luchtafvoerkanaal, mits het gebruik hiervan is voorzien. De plaatsing van de koppelingen voor de toe- en afvoerkanalen zijn aan de bovenzijde van het apparaat geplaatst. c) Controleer of het vertrek waar men de installatie uitvoert en het elektrische net en het waternet waar men het apparaat op aansluit aan alle geldende voorschriften voldoen. d) Er moet op de gekozen installatieplek een elektrische voedingsbron aanwezig zijn, eenfase Volt ~ 50 Hz. Als die bron niet aanwezig is moet hij kunnen worden aangemaakt. e) Het moet mogelijk zijn om op het gekozen punt vanaf de speciale aansluiting aan de zijkant van het apparaat met een geschikte sifon een condensafvoer te creëren.; f) het moet mogelijk zijn in de gekozen plek de voorziene afstanden te respecteren van wanden en plafond, voor een correcte werking en een toegankelijker onderhoud. g) de ondergrond moet zodanig plat zijn dat de het apparaat volledig horizontaal is (verwijzing afb. 2). h) de gekozen installatieplek moet conform zijn aan de IP graad (bescherming tegen het binnendringen van vloeistoffen) van het apparaat, volgens de geldende normen. i) het apparaat mag niet rechtstreeks worden blootgesteld aan zonnestralen, ook niet bij aanwezigheid van ramen. j) het apparaat mag niet blootgesteld worden aan agressieve stoffen zoals zure damp, stoffen of verzadigd gas. k) het apparaat mag niet direct op elektrische leidingen worden geïnstalleerd die niet zijn beschermd tegen spanningsschommelingen. l) het apparaat moet zo dicht mogelijk bij de gebruikspunten worden geïnstalleerd om zo warmtedispersie via de buizen tegen te gaan. m) de lucht die door het apparaat wordt aangezogen moet vrij zijn van stof, zuurdampen en oplosmiddelen. In het geval van een niet gekanaliseerde installatie dient u de afstanden van de wanden respecteren, zoals aangegeven in afbeelding Plaatsing op de grond Verwijzing afb. 5 1) Zodra u de geschikte plek voor de installatie heeft gevonden verwijdert u de verpakkingsmaterialen en verwijder de bevestigingen zichtbaar op de pallet berust op de twee stroken waar het product. 2) M.b.v. de speciale riem schuift u het apparaat van de pallet. 3) Bevestig de voetjes (d.m.v. de speciale gaten) aan de grond m.b.v. geschikte schroeven en pluggen. Zodra het apparaat geplaatst is verwijdert u de stoffen riem door de bouten los te schroeven. 40
43 4.3 Aansluiting lucht warmtepompboiler TECHNISCHE GEGEVENS VOOR DE INSTALLATEURUIKER Houd er rekening mee dat het gebruik van lucht uit verwarmde vertrekken de verwarmingsprestaties van het gebouw zouden kunnen benadelen. Het apparaat heeft aan de bovenzijde een luchttoevoeropening en twee openingen voor de afvoer van de lucht. Het is belangrijk de twee roosters niet te verwijderen of te bewegen. De temperatuur van de uitgaande lucht van het product kan temperaturen bereiken van 5-10 C minder dan de binnenkomende lucht. Als deze niet gekanaliseerd wordt kan de temperatuur van het vertrek aanzienlijk dalen. Als de lucht die door de warmtepomp wordt bewerkt naar buiten toe wordt afgevoerd of vanuit buiten naar binnen wordt aangezogen (of vanuit een ander vertrek) kunnen er geschikte buizen worden gebruikt voor de luchtdoorvoer. Controleer of de buizen goed zijn aangesloten en bevestigd op het apparaat om te voorkomen dat ze plotseling per ongeluk losschieten (gebruik bijvoorbeeld geschikte silicone). Beweeg of breek de roosters van de in- en uitgangen van de lucht nooit en op geen enkele wijze. Zelfs in het geval van een product zonder leiding is het raadzaam om een bocht in de aanzuiging te installeren om bypass tussen de aanzuiging en afvoer van lucht te voorkomen (fig. 4). In het geval van een product dat geleid wordt met onbuigzame leidingen, tijdens de installatie alle nodige maatregelen nemen om ervoor te zorgen dat onderhoudswerkzaamheden kunnen worden uitgevoerd (fig. 4). OPGELET: Gebruik geen buiten roosters met grote druk verliezen, bv anti insecten gaas. De roosters moeten een grote luchtdoorlaat hebben, en de afstand tussen de twee verschillende roosters moet minimaal 50cm bedragen. Bescherm de leidingen tegen de buitenwind. Lucht uit de schouw gebruiken is toegelaten wanneer de toevoer van deze schouw voldoende is, en periodiek onderhoud van de schouw en de bijbehorende toebehoren wordt uitgevoerd. De totale drukverliezen is de som van alle drukverliezen van alle componenten van aan en afvoer van de lucht, en moet kleiner zijn dan de maximale statische druk van de ventilator ( 55 Pa ). Zie schema op de laatste pagina. OPGELET! Wanneer gebruikte toebehoren voor de lucht aan en afvoer kunnen de performantie van het toestel veranderen en de opwarmtijd verlengen! Afbeelding 6 Afbeelding 7 Afbeelding 8 Afbeelding 9 VOORBEELDEN Inkomende lucht: niet gekanaliseerd / Uitgaande lucht: aan de buitenkant gekanaliseerd Inkomende lucht: aan de binnenkant gekanaliseerd / Uitgaande lucht: aan de buitenkant gekanaliseerd Inkomende lucht: aan de buitenkant gekanaliseerd / Uitgaande lucht: aan de buitenkant gekanaliseerd Installatie zonder kanalisering 4.4 Hydraulische aansluiting Sluit zowel de in- als de uitgang van de boiler aan d.m.v. buizen of verbindingsstukken die zowel bestand zijn tegen de bedrijfsdruk als tegen de temperatuur van het warme water dat de 75 C / 7 bar kan bereiken. We raden u daarom aan materialen te gebruiken die tegen die temperaturen bestand zijn. Voor u de aansluiting uitvoert, moet u het diëlektrische verbindingselement (bij het product geleverd) aan de warmwater toevoerbuis bevestigen. Schroef op de toevoerbuis van het apparaat, waar een blauw bandje om zit, een T verbindingsstuk aan. Zie afbeelding 10. Het apparaat moet de norm EN 1487:2000 respecteren, d.w.z. een maximale druk hebben van 0,7 Mpa (7 bar) en minstens beschikken over: een afsluitkraan, een terugslagklep, een regelmechanisme van de terugslagklep, een veiligheidsklep en een mechanisme voor de onderbreking van de hydraulische belasting. 41
44 warmtepompboiler TECHNISCHE GEGEVENS VOOR DE INSTALLATEURUIKER De afvoer van het systeem moet verbonden worden aan een afvoerbuis met een diameter die niet minder is dan die van de aansluiting aan het apparaat (3/4 ), door middel van een sifon die een beluchtingsopening van minstens 20 mm mogelijk maakt en die een visuele controle toestaat, om te vermijden dat in het geval van het in werking treden van het systeem zelf, schade wordt veroorzaakt aan personen, dieren of voorwerpen, waarvoor de fabrikant niet aansprakelijk kan worden gesteld. Sluit de ingang van het mechanisme ter voorkoming van de overdruk m.b.v. een flexibele buis aan op de koudwaterkraan. Indien noodzakelijk kunt u een afsluitkraan gebruiken. Indien de leegloopkraan wordt opengedraaid dient u bovendien te zorgen voor een afvoerbuis die aan de uitgang wordt verbonden. Als u het mechanisme tegen de overdruk vastschroeft moet u deze op het einde niet forceren en er niet aan sleutelen. Een licht druppelen van het mechanisme tegen de overdruk is normaal in de verwarmingsfase, daarom raden wij u aan de afvoer aan te sluiten (deze moet altijd in verbinding staan met de atmosfeer) op een draineerbuis die in een doorlopende helling naar beneden is geïnstalleerd, in een omgeving vrij van ijs. Op dezelfde buis is het bovendien noodzakelijk een condensdrainage aan te sluiten d.m.v. de speciale koppeling aan de achterkant van de boiler. Het apparaat mag niet werken met water waarvan de hardheid lager is dan 12 F. Aan de andere kant wordt bij extreem hard water het gebruik van een (>25 F) ontharder aangeraden die correct is afgesteld en gecontroleerd. In dit geval mag de resterende hardheid niet onder de 15 F raken. Mocht de waterdruk dichtbij de ijkingwaarden van de klep liggen, dan moet een drukverlager worden aangebracht, zo ver mogelijk van het apparaat. In de versie SYS wordt een verbinding 3/4G voor de recirculatie (indien aanwezig in het sanitair). OPGELET! Spoel de leidingen van de installatie grondig door, zodat eventuele resten van gesneden schroefdraden, soldeerwerk of ander vuil, die de normale werking van het apparaat kunnen verhinderen, verwijderd worden. 4.5 Elektrische aansluiting Kabel Bescherming Permanente voeding 3G 1.5mm (kabel wordt bij het apparaat geleverd) 2 16A EDF signaal (kabel wordt niet bij het apparaat geleverd) H05V2V2-F 2G 0.75mm 2 2A WAARSCHUWING: Voordat u toegang tot terminals, moeten alle voedingsstroomkringen worden losgekoppeld. De corrosiebescherming van het apparaat wordt door batterijen gegarandeerd wanneer dit niet wordt gevoed. OPGELET!: Het is verboden voor niet gekwalificeerd personeel deksels te verwijderen of onderhoudsoperaties en/of elektrische aansluitingen uit te voeren. Het apparaat wordt geleverd met een voedingskabel (wanneer deze vervangen moet worden, dient men een originele vervangingskabel te gebruiken die door de fabrikant wordt geleverd). Het is noodzakelijk een controle uit te voeren van de elektrische installatie en de conformiteit te toetsen aan de geldende normen. Controleer of de installatie geschikt is voor het maximaal opgenomen vermogen van de boiler (kijk op het typeplaatje), zowel voor wat betreft de doorsnede van de kabels als voor wat betreft hun conformiteit aan de geldende normen. Meervoudige stekkers, verlengsnoeren of adapters zijn verboden. Het is verboden om de leidingen van het hydraulische systeem, het verwarmingssysteem en het gas te gebruiken voor de aardaansluiting van het apparaat. Vóór de inbedrijfstelling moet u controleren of de netspanning overeenkomt met de waarde op het typeplaatje van de apparaten. De fabrikant is niet aansprakelijk voor eventuele schade veroorzaakt door afwezigheid van een aardaansluiting of vanwege problemen in de elektriciteitstoevoer. Voor het van het net uitschakelen van het apparaat gebruikt u een tweepolige schakelaar die voldoet aan de geldende normen CEI-EN (min. afstand tussen de contactpunten 3 mm, beter indien voorzien van zekeringen). Het apparaat moet voldoen aan de Europese en nationale normen, en moet worden beschermd door een 30mA aardlekschakelaar. 42
45 warmtepompboiler TECHNISCHE GEGEVENS VOOR DE INSTALLATEURUIKER Afb. 11 Afb. 12 Afb. 13 Afb. 15 PERMANENTE ELEKTRISCHE AANSLUITING Als u niet beschikt over een elektrisch tarief met dal- en piekuren gebruikt u deze configuratie. De bo7iler zal altijd op het elektrische net zijn aangesloten, waardoor het 24 hr per dag zal werken. Verwijder de 3 NI-MH batterijen als u niet beschikt over een tweeledig tarief met HC/HP-signaal (zie fig.14). ELEKTRISCHE AANSLUITING MET DAL- EN PIEKTARIEF Als u beschikt over een elektrisch tarief met dal- en piekuren en over een geschikte elektriciteitsmeter kunt u beslissen het apparaat alleen op te laden tijdens de daluren. Tijdens de uren waarin het apparaat niet wordt gevoed zal de corrosiebescherming met titanium anode met stroompodruksysteem worden gegarandeerd door oplaadbare batterijen. Om deze batterijen te gebruiken, de batterijklep openen (zie figuur14) en het beschermlipje van de batterijen verwijderen. ELEKTRISCHE AANSLUITING MET DAL- EN PIEKTARIEF EN HC-HP SIGNAAL Dit heeft dezelfde economische voordelen als de configuratie met dal- en piekuren. Het is bovendien mogelijk een directe verwarming te hebben m.b.v. de BOOST modus die de verwarming ook activeert tijdens het HP tarief. 1) Sluit een tweepolige kabel aan op de speciale signaalcontacten op de meter. 2) Sluit de tweepolige kabel van het signaal aan op het met "EDF" gemarkeerde klemmetje dat zich aan de binnenkant van de elektricteitskast rechts van het product bevindt. OPGELET: De signaalkabel moet in de opening worden gestoken onder de voedingskabel. Hij moet worden bevestigd m.b.v. speciale draadleiders in het product. Hij moet bovendien worden vastgemaakt in de kabelwartels vlakbij de speciale klem. Maak een opening in de rubbertjes om een geschikte diameter voor de doorvoering te verkrijgen. 3) Activeer de HC-HP functie d.m.v. het installatiemenu. (Zie paragraaf 7.7). In het geval van een aansluiting van de versie 240SYS op de ketel/kachel, raden wij u aan de bovenste sondehouder te gebruiken (S3). In het geval van een aansluiting van de versie 240SYS op de zonnecentrale, kunt u ofwel alleen de onderste sondehouder gebruiken (S2) ofwel beide (S2) en (S3) 5. EERSTE INBEDRIJFSTELLING Zodra u de hydraulische en elektrische aansluitingen heeft uitgevoerd vult u de boiler met water uit het waternet. Voor het vullen opent u de hoofdkraan van de waterleiding en die van het dichtstbijzijnde warme water en controleert u of alle lucht uit het reservoir is gelopen. Voer een visuele inspectie uit op eventuele waterlekken vanuit de flens en de verbindingsstukken, en draai eventueel voorzichtig vaster aan. Verwijder het lipje (C) van de batterijen, u vindt het batterijvakje onder het deksel (B) in de kap aan de onderkant, Fig
46 warmtepompboiler GEBRUIKSAANWIJZIGEN EN ONDERHOUD T.B.V. DE GEBRUIKER 6.1 Eerste inbedrijfstelling 6. VOORSCHRIFTEN OPGELET! Volg de algemene waarschuwingen en de veiligheidsnormen die in de voorgaande paragrafen worden opgesomd nauwkeurig op. U dient zich te allen tijde houden aan hetgeen beschreven staat. In alle gevallen zal het bedrijf dat het werk verricht controles uit moeten voeren met betrekking tot de veiligheid en de goede werking van het gehele systeem. Voor u de boiler in werking stelt moet u controleren of de installateur alle handelingen heeft uitgevoerd die tot zijn bevoegdheid behoren. Verzeker u ervan alle uitleg van de installateur te hebben begrepen betreffende de werking van de boiler en de correcte uitvoering van de belangrijkste handelingen van het apparaat. De wachttijd bij de eerste ontsteking van de warmtepomp is 5 minuten. 6.2 Aanbevelingen In het geval van een storing en/of een verkeerde werking van het apparaat moet u het uitschakelen en er niet zelf aan sleutelen, maar u tot een erkende installateur wenden. Eventuele reparaties moeten altijd met originele onderdelen en door erkende vaklui worden uitgevoerd. Het veronachtzamen van het bovenstaande kan de veiligheid van het apparaat in gevaar brengen en sluit iedere aansprakelijkheid van de fabrikant uit. Als de boiler lang niet gebruikt wordt raden we u aan: - de elektrische voeding los te koppelen of, indien er een speciale schakelaar vóór het apparaat is, deze schakelaar op de stand te zetten. - de kranen van het tapwatercircuit dicht te draaien. OPGELET! Het warme water dat met een temperatuur van meer dan 50 C uit de kranen komt kan ernstige verbrandingen veroorzaken. Kinderen, gehandicapten en ouderen lopen de meeste risico's. We raden u daarom aan een thermostatische mengkraan te monteren op de wateruitgang van het apparaat, d.w.z. de buis waar een rood bandje omheen zit. Thermische mengkraan verplicht voor solar modellen. OPGELET!( enkel SYS modellen)de gedetecteerde hulp-controller temperatuur (S2, S3), in de boiler, mag niet hoger zijn dan 75 C fig
47 warmtepompboiler GEBRUIKSAANWIJZIGEN EN ONDERHOUD T.B.V. DE GEBRUIKER 6.3 Veiligheidsnormen Voor de betekenis van de symbolen die in de volgende tabel worden gebruikt dient u paragraaf 1.1 na te slaan. Ref. Waarschuwing Risico Symbool 1 2 Voer geen handelingen uit waarbij u het apparaat van zijn plaats moet halen. Laat geen voorwerpen op het apparaat staan. Elektrische schokken door elementen die onder spanning staan. Lekkage als gevolg van water dat uit losgeraakte leidingen stroomt. Persoonlijk letsel door voorwerpen die vallen doordat ze op een trillend voorwerp liggen. Beschadiging van het apparaat of onderliggende voorwerpen door het vallen van het apparaat als gevolg van trillingen. Persoonlijk letsel door het vallen van apparaat. 3 Niet op het apparaat klimmen. Beschadiging van het apparaat of onderliggende voorwerpen doordat het apparaat van de muur losraakt Voer geen handelingen uit waarbij u het apparaat moet openen. Zorg ervoor dat u de elektrische voedingskabel niet beschadigt. Klim niet op instabiele stoelen, krukken, trappen of andere voorwerpen om het apparaat schoon te maken. Reinig het apparaat nooit voor u het eerst heeft uitgeschakeld, de stekker eruit heeft gehaald of de externe schakelaar op de stand heeft gezet. Gebruik het apparaat niet voor andere doeleinden dan voor een normaal huishoudelijk gebruik. Laat het apparaat niet gebruiken door kinderen of onkundige personen. Gebruik geen insectenverdelgers, oplosmiddelen of agressieve schoonmaakmiddelen om het apparaat te reinigen. Elektrische schokken door elementen die onder spanning staan. Persoonlijk letsel door verbranden met hete onderdelen of wonden door aanwezigheid van scherpe randen of uitstekende delen. Elektrische schokken door ongeïsoleerde kabels die onder spanning staan. Persoonlijk letsel door vallen of door beklemming (bij een vouwtrap). Elektrische schokken door elementen die onder spanning staan. Beschadiging van het apparaat door overbelasting. Beschadiging van verkeerd gebruikte onderdelen. Beschadiging van het apparaat door onjuist gebruik. Beschadiging van de plastic onderdelen of de gelakte onderdelen. 45
48 warmtepompboiler GEBRUIKSAANWIJZIGEN EN ONDERHOUD T.B.V. DE GEBRUIKER 11 Plaats nooit andere voorwerpen en/of apparaten onder de boiler Beschadiging door eventuele waterlekkage. 12 Drink het condenswater niet Persoonlijk letsel door vergiftiging. 7. INSTRUCTIES VOOR HET GEBRUIK 7.1 Beschrijving van het bedieningspaneel Referentie afbeelding 14. A Toetsen Knop ON/ - MODE Het eenvoudige en rationele bedieningspaneel bestaat uit twee toetsen en een centrale knop. In het bovenste deel toont een DISPLAY de ingestelde temperatuur (set) of de waargenomen temperatuur. Bovendien verschijnt er specifieke informatie zoals de werkingswijze, de storingscodes, de instellingen en de informatie over de staat van het apparaat. 7.2 Het in- en uitschakelen van de boiler Ontsteking: doe de boiler aan door op de ON/ toets te drukken. Nu kunt u de huidige tijd instellen (zie paragraaf 7.5). Het DISPLAY toont de ingestelde temperatuur set, de werkingsmodus en het HP symbool en/of het symbool van de weerstand. Deze geven de betreffende werking van de warmtepomp en/of de weerstand weer. Uitschakelen: schakel de boiler uit door op de ON/ toets te drukken. Alleen de tekst blijft op het display staan. De corrosiebescherming blijft gegarandeerd en het apparaat zal er automatisch voor zorgen dat de temperatuur van het water in het reservoir nooit onder de 5 C zal dalen. 7.3 Instellen van de temperatuur Het instellen van de gewenste temperatuur van het warme water doet u door de knop met de klok mee te draaien of tegen de klok in (de tekst zal tijdelijk knipperen). Om de huidige temperatuur van het water in het reservoir te tonen drukt u de knop in en laat u hem gelijk los. De waarde verschijnt 8 seconden lang, waarna de ingestelde temperatuur weer zal verschijnen. De temperaturen die kunnen worden bereikt in de modus warmtepomp variëren in de fabrieksinstellingen van 50 C tot 55 C in de fabriekswaarde, en 40 C-55 C als u de instelling in het installatiemenu varieert. De maximum temperatuur die u kunt bereiken m.b.v. de elektrische weerstand, is 65 C in de fabriekswaarde, en 75 C als u de instelling in het installatiemenu varieert. 46
49 7.4 Bedrijfsmodus warmtepompboiler GEBRUIKSAANWIJZIGEN EN ONDERHOUD T.B.V. DE GEBRUIKER Bij een normale werking kunt u d.m.v. de mode toets de werkingsmodus wijzigen waarmee de boiler de ingestelde temperatuur bereikt. De geselecteerde modus. Verschijnt in de regel onder de temperatuur. Als de warmtepomp actief is verschijnt het symbool: Als de elektrische weerstand actief is verschijnt het symbool: Bedrijfsmodus AUTO: de boiler beslist vanzelf hoe hij de gewenste temperatuur in een zo kort mogelijk tijdsbestek kan bereiken. De warmtepomp wordt op een rationele manier gebruikt en de weerstand wordt alleen indien noodzakelijk ingezet. Het maximaal aantal uur dat hieraan kan worden besteed hangt af van de parameter P9 - TIME_W (Zie paragraaf 7.7), die normaalsgewijs op 8 uur staat ingesteld. (aanbevolen voor de winter). Bedrijfsmodus BOOST: modus wanneer u deze modus activeert gebruikt de boiler tegelijkertijd de warmtepomp en de weerstand om de gewenste temperatuur binnen zo kort mogelijke tijd te bereiken. Zodra de temperatuur bereikt is zal de boiler weer overschakelen op de AUTO modus. Bedrijfsmodus GREEN: modus (kan worden geactiveerd m.b.v. het installatiemenu): de boiler sluit de werking van de weerstand uit, gebruikt uitsluitend de warmtepomp en garandeert zo een maximale energiebesparing! De maximaal bereikbare temperatuur is 55 C.De weerstand wordt bovendien actief in geval van storingen of antilegionella. Deze functie wordt aanbevolen voor luchttemperaturen van boven de 0 C tijdens de verwarmingsuren. Bedrijfsmodus PROGRAM: er zijn twee programma s, P1 en P2, beschikbaar die tijdens een dag zowel afzonderlijk als gezamenlijk kunnen werken (P1+P2). Het apparaat zal in staat zijn om de verwarmingsfase te activeren zodat de gekozen temperatuur op het vooraf ingestelde tijdstipt bereikt is, waarbij verwarming door middel van de warmtepomp de voorkeur heeft en alleen indien noodzakelijk de elektrische weerstand gebruikt worden. Een aantal keren op de mode toets drukken totdat het gewenste Program (P1/P2/P1+P2) geselecteerd kan worden, de knop draaien om de gewenste temperatuur in te stellen, op de knop drukken om te bevestigen, de knop draaien om het gewenste tijdstip in te stellen en op de knop drukken om te bevestigen; in P1+P2 modus de gegevens voor beide programma s instellen. In het geval van een elektriciteitsvoorziening met dubbel tarief met HC/HP-signaal, is het toch mogelijk om de verwarming van het water op elk moment van de dag in te schakelen. Voor deze functie moet de huidige tijd worden ingesteld, zie volgende paragraaf. Waarschuwing: ter garantie van uw comfort kan in het geval van werking in P1+P2 modus met zeer dicht bij elkaar liggende tijden gebeuren dat de temperatuur van het water hoger is dan de ingestelde temperatuur. 7.5 Instellen van de tijd De tijd instelling is vereist: Bij de eerste keer aanzetten; Als tegelijkertijd de stroomvoorziening van het elektriciteitsnet onderbroken wordt en de batterijen leeg of afgekoppeld zijn (het product zal weer opgestart worden in de Auto-modus). Daarnaast kan de tijd middels parameter L0 worden ingesteld (paragraaf 7.7). De display zal knipperen en de cijfers van de uren en minuten tonen. De knop draaien totdat de huidige uurtijd bereikt is en bevestigen door op de knop te drukken. De procedure herhalen om de minuten in te stellen. 47
50 7.6 Informatiemenu warmtepompboiler GEBRUIKSAANWIJZIGEN EN ONDERHOUD T.B.V. DE GEBRUIKER M.b.v. het informatiemenu kunt u de gegevens aflezen waarmee u het apparaat controleert. Om het menu te zien drukt u 5 seconden lang op de knop. Draai aan de knop om de parameters L1, L2, L3 L9 te selecteren. Zodra u de gewenste parameter heeft gevonden drukt u op de parameter om de waarde te bekijken. Om terug te keren naar de selectie van de parameters drukt u nogmaals op de knop of op de MODE toets. Om het informatiemenu te verlaten drukt u op de mode toets. (Het apparaat verlaat het menu automatisch nadat het 10 minuten niet gebruikt is). Parameter Naam Beschrijving parameter L1 T W1 Afgelezen temperatuur sonde 1 weerstandgroep L2 T W2 Afgelezen temperatuur sonde 2 weerstandgroep L3 TW3 Afgelezen temperatuur sonde warmwaterleiding L4 T AIR Afgelezen temperatuur sonde luchtingang L5 T EVAP Afgelezen temperatuur sonde verdamper L6 HP h Meter interne parameter 1 L7 HE h Meter interne parameter 2 L8 SW MB Software Versie Elektronische kaart Mainboard L9 SW HMI Software Versie Interface kaart 48
51 warmtepompboiler GEBRUIKSAANWIJZIGEN EN ONDERHOUD T.B.V. DE GEBRUIKER 7.7 Menu voor de installateur OPGELET: HET WIJZIGEN VAN DE VOLGENDE PARAMETERS MOET DOOR DESKUNDIG PERSONEEL WORDEN UITGEVOERD. D.m.v. het installatiemenu kunt u enkele instellingen van het apparaat wijzigen. Links verschijnt het symbool voor het onderhoud. Om het menu te openen drukt u 5 seconden op de knop, loopt u langs de parameters van het menu L - INFO totdat u op de tekst P komt. Draait u aan de knop om de parameters P1, P2, P3 P8 te selecteren. Zodra u de parameter heeft gevonden die u wenst te wijzigen drukt u op de knop om de waarde ervan te bekijken. Draai daarna aan de knop om de gewenste waarde te selecteren. Om op de selectie van de parameters terug te keren drukt u op de knop om de ingestelde waarde op te slaan. Druk op mode (of wacht 10 seconden) als u de afregegelingsmodus wilt verlaten zonder de ingevoerde waarde op te slaan. Om het installatiemenu te verlaten drukt u op de mode toets. (Het apparaat verlaat het menu automatisch nadat het 10 minuten niet gebruikt is). Parameter Naam Beschrijving parameter P1 TIME Instellen van de huidige tijd P2 T Max Regeling van de maximum bereikbare temperatuur (van 65 C tot 75 C). Een hogere temperatuurwaarde zorgt ervoor dat u over een grotere hoeveelheid warm water kunt beschikken. P3 ANTI_B In-/uitschakeling van de Antilegionella functie (on/off). Zie paragraaf 7.8 P4 TIME_W Maximum waarde verwarming per dag (van 5hr tot 24hr). P5 HC-HP In-/uitschakeling werkingsstatus met dal-/piektarief. Zie paragraaf 7.10 P6 RESET Reset van alle fabriekswaarden. P7 T Min Regeling van de minimum bereikbare temperatuur (van 50 C tot 40 C). Een lager ingestelde temperatuur zorgt voor een grotere energiebesparing wanneer u een beperkt warmwatergebruik heeft. P8 DEFROS In-/uitschakeling ontdooi functie (on/off). Als deze functie wordt geactiveerd zal de warmtepomp ook functioneren met een toegangslucht met temperaturen tot -5 C. 49
52 warmtepompboiler GEBRUIKSAANWIJZIGEN EN ONDERHOUD T.B.V. DE GEBRUIKER 7.8 Anti-legionella bescherming (Functie activeerbaar d.m.v. het installatiemenu) Als deze functie geactiveerd is kunt u, op geheel automatische wijze, de functie antilegionella bescherming uitvoeren. Een keer per maand wordt het water op een temperatuur van 65 C gebracht voor een maximum tijd van 15 minuten. Dit is voldoende om de vorming van bacteriën in het reservoir en de buizen tegen te gaan (dit indien in deze periode het water niet minstens eenmaal op T>57 C voor minstens 15 minuten is gebracht). De eerste verwarmingscyclus vindt 3 dagen vanaf de activering van de functie plaats. Het water op deze temperatuur kan verbrandingen veroorzaken, daarom raden wij u aan een thermostatische mengkraan te gebruiken. Tijdens de anti-legionella cyclus zal op de display in de plaats van de werkingsmodus de tekst ANTI_B verschijnen; nadat de anti-legionella cyclus beëindigd is blijft de ingestelde temperatuur de oorspronkelijke temperatuur. In het geval dat het dubbele tarief met HC-HP signaal geldt, zal de functie worden uitgevoerd tijdens de uren van het goedkope tarief. Om de functie te onderbreken op de on/off toets drukken. 7.9 Fabrieksinstellingen Het apparaat krijgt in de fabriek een bepaalde configuratie toegewezen waardoor enkele bedrijfsmodussen, functies of waarden reeds zijn ingesteld, volgens hetgeen wordt aangegeven in de volgende tabel. Parameter Fabrieksinstelling INGESTELDE TEMPERATUUR 55 C P2 MAX. IN TE STELLEN TEMPERATUUR MET 65 C WEERSTAND P3 ANTILEGIONELLA UITGESCHAKELD P4 TIME_W (aantal uren geaccepteerde voeding) 8h P5 HC-HP (werking met dal-/piektarief) UITGESCHAKELD P7 MINIMALE IN TE STELLEN TEMPERATUUR 50 C P8 DEFROST (activering ontdooien actief) INGESCHAKELD INGESTELDE TEMPERATUUR PROGRAM P1 55 C INGESTELDE TIJD PROGRAM P1 06:00 INGESTELDE TEMPERATUUR PROGRAM P2 55 C INGESTELDE TIJD PROGRAM P2 18: Werking met twee verschillende tijdstarieven Om te kunnen werken in installaties die beschikken over twee verschillende tijdstarieven zal de controlelogica het gemiddelde aantal uren per dag berekenen waarin de elektrische stroom beschikbaar is tegen het goedkopere tarief (HC). Een automatische waarneemfunctie zorgt ervoor dat het product de ingestelde temperatuur bereikt in het (beperkte) tijdsbestek waarin het goedkope tarief geldt. Het maximale aantal uren wordt aangegeven door de parameter P9 TIME_W. Bij de eerste ontsteking (of na een uitschakeling van de hardware) is de defaultwaarde 8 uur Antivriesfunctie In ieder geval zal, wanneer het apparaat onder spanning staat, en de temperatuur van het water in het reservoir onder de 5 C daalt, automatisch de weerstand worden geactiveerd (2000W) om het water tot op 16 C te verwarmen. 50
53 7.12 Storingen warmtepompboiler GEBRUIKSAANWIJZIGEN EN ONDERHOUD T.B.V. DE GEBRUIKER Op het moment dat zich een defect voordoet schakelt het apparaat over naar een storingsstatus. Het display begint te knipperen en toont een storingscode. De boiler zal warm water blijven produceren mits de storing slechts één van de twee verwarmingsgroepen betreft, en zal de warmtepomp of de weerstand laten werken. Als de storing de warmtepomp betreft verschijnt op het scherm het knipperende symbool HP. Als de storing de weerstand betreft zal het symbool van de weerstand gaan knipperen. Als de storing beide betreft zullen ze beide gaan knipperen. Storings code E1 E2 E4 E5 H1 H2 H3 Oorzaak Verwarming zonder water in het reservoir Te hoge temperatuur van het water in het reservoir Storing sonde weerstand zone Waarneming van een te groot temperatuursverschil tussen de sondes weerstand zone Overmatige druk in het koelcircuit, of storing aflezen pressostaat Lage druk circuit warmtepomp of ventilatorfout Fout compressor of gaslek, fout verdampingssonde Werking weerstand Werking warmtepomp Wat te doen Controleer de oorzaken van de afwezigheid van het water (lekkages, hydraulische aansluitingen, enz.). Schakel het apparaat eerst uit en dan weer aan. Als de storing blijft aanhouden schakelt u de servicedienst in. Controleer of vervang eventueel de sonde weerstand zone Controleer of vervang eventueel de sondes. ON ON ON H4 Verdamper verstopt ON ON H5 Storing ventilator/ fout verdampingssonde ON Probeer het apparaat te herstarten. Als de storing blijft aanhouden schakelt u de servicedienst in. Zet het product uit. Controleer de werking of vervang eventueel de heet gas klep. Controleer of de ventilator niet defct is. Controleer of de verdamper, de kanalen of de roosters proper zijn Controleer de verdamper sonde. Zet het product uit. Controleer de werking van de compressor en/of controleer of er geen lekkages van het koelgas zijn. Controleer de correcte aansluiting en plaatsing en vervang eventueel de verdamper sonde. Controleer of de verdamper, de de kanalen of de rooster proper zijn. Het product uitschakelen Controleren of er geen fysieke belemmeringen voor de beweging van de ventilatorbladen zijn, de aansluitkabels met de printplaten laten controleren. Controleer probe van 'verdamper. H6 Storing luchtsonde ON Controleer de correcte aansluiting en plaatsing en vervang eventueel de sonde. H7 Storing sonde verdamper ON Controleer de correcte aansluiting en plaatsing en vervang eventueel de sonde. H8 Storing sonde warmwaterleiding ON Controleer de correcte aansluiting en plaatsing en vervang eventueel de sonde. 51
54 warmtepompboiler GEBRUIKSAANWIJZIGEN EN ONDERHOUD T.B.V. DE GEBRUIKER H9 Storing ontdooien actief ON (T lucht <5 C) Controleer de werking of vervang eventueel de gasklep met 4 aansluitingen klep. Controleer of de ventilator niet defct is. Controleer of de verdamper, de kanalen of de roosters proper zijn F1 Storing elektronische kaart F2 F3 F4 F5 Te hoog aantal ON/ (RESET) Geen communicatie tussen elektronische kaart en interface Reservoir leeg (EMPTY) circuit anode met stroompodruksysteem open Circuit anode met stroomopdruksysteem in kortsluiting ON ON Probeer het apparaat eerst uit en daarna weer in te schakelen. Controleer eventueel de werking van de kaarten Schakel tijdelijk het product en de batterijen uit Probeer het apparaat eerst uit en daarna weer in te schakelen. Controleer eventueel de werking van de kaarten of vervang deze Controleer de aanwezigheid van water in het reservoir, controleer of vervang eventueel de anode met stroomopdruksysteem Controleer of vervang eventueel de anode met stroomopdruksysteem 8. ONDERHOUD voor geautoriseerd personeel WAARSCHUWING! Let op de algemene waarschuwingen en veiligheidsvoorschriften die in de vorige leden en zich strikt aan de aanwijzingen daarin. Alle ingrepen en onderhoudsactiviteiten moeten door erkende installateurs worden uitgevoerd (installateurs die in het bezit zijn van de rekwisieten die door de geldende normen worden vastgesteld). Na gewoon of buitengewoon onderhoud, is het raadzaam om het reservoir te reinigen om eventuele resterende verontreinigingen te verwijderen. 8.1 Legen van het apparaat U dient het apparaat te legen indien het ongebruikt in een vertrek wordt geplaatst waar het mogelijk kan vriezen. Als dit nodig is kunt u het apparaat zoals volgt legen: - schakel het apparaat los van het elektriciteitsnet - sluit de stopkraan af indien deze is gemonteerd. Als dit niet het geval is sluit u de hoofdwaterkraan af. - open de warmwaterkraan (wastafel of badkuip) - open de kraan op de veiligheidsklep. 8.2 Normaal onderhoud We raden u aan de verdamper jaarlijks te reinigen om stof en brokstukken te verwijderen. Voor toegang tot de verdamper, die zich op de externe eenheid bevindt, moeten de bevestigingsschroeven van het beschermingsrooster verwijderd worden. Reinigen met een flexibile borstel en uitkijken dat u de ventilator niet beschadigt. In het geval dat u gebogen lamellen tegenkomt, deze door middel van een speciale kam (tussenruimte 1,6mm) weer rechttrekken. Controleer of de buis voor de condensafvoer niet verstopt is. Controleer of de roosters en de kanalisering perfect schoon zijn. Alleen originele reserveonderdelen gebruiken. Het is aan te raden om na elke verwijdering de pakking van de flens te vervangen. 52
55 warmtepompboiler GEBRUIKSAANWIJZIGEN EN ONDERHOUD T.B.V. DE GEBRUIKER 8.3 Probleemoplossing Probleem Mogelijke oorzaak Wat te doen Lage temperatuur ingesteld De temperatuur voor het uitgaande water verhogen. Storing van de machine Op de display controleren of er fouten zijn en handelen op de in de Error -tabel aangegeven wijze. Geen elektrische aansluiting, De spanning op de voedingsklemmen controleren, controleren of afgekoppelde of beschadigde kabels de kabels in orde en aangesloten zijn. Om de werking van het product te controleren, de Boost -modus Geen HC/HP-signaal (als het product inschakelen: als de uitslag positief is controleren of het HC/HPsignaal geïnstalleerd is me de EDF-signaalkabel) van de gasmeter aanwezig is, controleren of de EDF- kabels in orde zijn. Het uitgaande water is koud of niet warm genoeg Het water is zeer heet (met mogelijk damp uit de kranen) Verminderde werking van de warmtepomp, bijna permanente werking van de elektrische weerstand Onvoldoende warmwaterstro om Waterlekkage uit het overdrukmecha nisme Toename van het lawaai Problemen met de weergave of uitgaan van de display Storing van de timer voor het dubbele tarief (als het product met deze configuratie geïnstalleerd is) Onvoldoende luchtstroom naar de verdamper Product uit De werking van de gasmeter overdag/ s nachts controleren en controleren of de ingestelde tijd voldoende is voor de verwarming van het water. Reinig de roosters en de leidingen regelmatig. De elektriciteitstoevoer controleren, het product inschakelen. Gebruik van een grote hoeveelheid warm water wanneer het product zich in de verwarmingsfase bevindt. Fout sonde Controleren of fout E5, ook onregelmatig, aanwezig is. De elektrische voeding uitschakelen, het apparaat legen, de kous van de weerstand demonteren en de kalkaanslag aan de binnenkant van de ketel verwijderen: let erop om het glazuur van Hoog niveau van kalkaanslag van de ketel de ketel en de kous van de weerstand niet te beschadigen. Het en zijn onderdelen product weer volgens de oorspronkelijke configuratie in elkaar zetten: het wordt aangeraden om de pakking van de flens te vervangen. Fout sonde Controleren of fout E5, ook onregelmatig, aanwezig is. Luchttemperatuur buiten het bereik Element dat afhankelijk is van de weersomstandigheden. Waarde Time W te laag Een lagere temperatuurparameter of een hogere parameter dan Time W instellen. Installatie uitgevoerd met niet-conforme elektrische spanning (te laag) Het product voeden met een correcte elektrische spanning. Verdamper verstopt of bevroren De staat van reiniging van de verdamper controleren. Problemen met het circuit van de Controleren of er geen foutmeldingen op de display warmtepomp weergegeven worden. Het is minder dan 8 dagen geleden dat: - Eerste ontsteking. -Wijziging van de parameter Time W. -Gebrek aan voeding bij afwezigheid van batterijen of met lege batterijen. Controleren of zich geen lekken in het circuit bevinden, Lekken of verstopping van het watercircuit controleren of de deflector van de ingangsleiding van koud tapwater en de toevoerleiding van warm water in orde zijn Als u het druppelen wilt vermijden moet u een expansievat installeren op de afvoerinstallatie. Het druppelen van water uit het systeem Als druppelen tijdens de niet-verwarmende periode door blijft moet als normaal worden beschouwd gaan, de kalibratie van het instrument en de druk van de gedurende de verwarmingsfase. waterleiding controleren. Let op: Verstop nooit de afvoeropening van het systeem! Aanwezigheid van verstoppende elementen aan de binnenkant Trillen van enkele onderdelen Beschadiging of afkoppeling van de verbindingskabels tussen de printplaat en de interfacekaart Gebrek aan voeding bij afwezigheid van batterijen of met lege batterijen. De bewegende onderdelen van de externe eenheid controleren, de ventilator en de andere onderdelen reinigen die lawaai zouden kunnen maken. De middels mobiele vergrendelingen aangesloten onderdelen controleren en kijken of de schroeven stevig zijn aangedraaid. Controleren of de verbinding in orde is, de werking van de printplaten controleren De elektrische voeding en de staat van de batterijen controleren, en laatstgenoemden indien nodig vervangen. 53
56 warmtepompboiler GEBRUIKSAANWIJZIGEN EN ONDERHOUD T.B.V. DE GEBRUIKER Vieze geur afkomstig van het product Abnormaal of overmatig gebruik in vergelijking met de verwachtingen Overig Afwezigheid van een sifon of lege sifon Ongunstige omgevings- of installatieomstandigheden Verdamper gedeeltelijk verstopt Niet-conforme installatie Zorgen voor een sifon. Controleren of het apparaat voldoende water bevat. De staat van reiniging van de verdamper controleren, raster Contact opnemen met de technische dienst. 8.4 Normaal onderhoud t.b.v. de gebruiker We raden u aan het apparaat om te spoelen na elk normaal of bijzonder onderhoud. Het overdrukmechanisme moet geregeld ingeschakeld worden om te controleren of het niet geblokkeerd is, en om eventuele kalkafzettingen te verwijderen. Controleer of de buis voor de condensafvoer niet verstopt is. Verifier de roosters en de luchtkanalen en reinig indien nodig. De batterijen dienen elke 2 jaar te worden vervangen of in geval van verlies. Controleer dat de oude batterijen correct worden weggegooid en dat ze alleen worden vervangen door 3 oplaadbare AA batterijen van minimum 2100 mah. Controleer dat de polen worden gerespecteerd zoals aangegeven in het batterijenvakje. Het batterijenvakje bevindt zich onder de lijst, rechts van de interface. Zie afbeelding 14. Het apparaat moet worden getrokken wanneer u de batterijen te verwijderen. 8.5 Verwijdering van de boiler Het apparaat bevat koelgas van het type R134a, wat niet in de atmosfeer mag geraken. Een definitieve uitschakeling van de boiler moet daarom door een bevoegde installateur worden uitgevoerd. Dit product is conform aan de EU Richtlijn 2002/96/EC. Het symbool van de "afvalemmer met een kruis" op het typeplaatje van het apparaat betekent dat het product aan het einde van zijn levenscyclus niet met het gewone huisvuil mag worden meegegeven. Het moet gescheiden worden ingezameld in een speciale vuilstortplaats voor elektrische en elektronische apparatuur of worden ingeruild bij de verkoper tijdens de aanschaf van een nieuw, soortgelijk apparaat. De gebruiker is verwantwoordelijk voor het apart laten inzamelen van het apparaat aan het einde van zijn levensduur. De juiste inzameling van het apparaat dat niet meer wordt gebruikt, teneinde het te recyclen, te behandelen en het op een milieuvriendelijke wijze te vernietigen zorgt er mede voor dat er geen mogelijk negatieve effecten worden geproduceerd op het milieu en de volksgezondheid en helpt de materialen waaruit het product is vervaardigd te hergebruiken. Voor meer informatie betreffende de beschikbare verzamelmogelijkheden dient u zich te wenden tot de gemeentelijke reinigingsdienst of tot de verkoper van het product. Het apparaat beschikt over oplaadbare batterijen. Deze moeten worden verwijderd vóór u het apparaat wegdoet en in de speciale houders worden geplaatst. U vindt het batterijvakje onder het deksel in de kap aan de onderkant. 54
57 Dear Customer: We wish to thank you for having purchased the heat pump water heater. We hope that it meets your expectations and may offer you optimal service coupled with maximum energy saving for many years to come. Our group invests a lot of time, energy and economic resources in creating innovative solutions aimed at reducing the energy consumption of its products. Your choice shows sensibility and awareness towards reducing energy consumption, an issue directly related to environmental protection. Our constant commitment to creating innovative and efficient products coupled with your responsible behaviour in the rational use of energy both actively contribute to safeguarding the environment and natural resources. Store this manual with care; it is intended to provide information, warnings and suggestions on the correct use and maintenance of the appliance, so that you may fully appreciate all its qualities. Our technical assistance centre closest to you is at your complete disposal for answering any of your queries. INTRODUCTION This manual is intended for final users of the heat pump water heater and plumbers responsible for the latter installation. Failure to observe the indications contained in this manual shall void the warranty. This manual is an integral and essential part of the appliance. It must be stored with care by the user and should always be passed on to new owners or users of the appliance, and/or when the latter is transferred to another system. In order to ensure correct and safe use of the appliance, both installer and user, each for his/her respective requirements, must read the instructions and precautions contained in this manual carefully, as they provide important safety indications concerning installation, use and maintenance of the appliance. This manual is divided into four distinct sections: - SAFETY INFORMATION This section contains all the safety precautions to be observed according to International Standard IEC GENERAL INFORMATION This section contains useful general information relating to the description of the appliance and its technical features, besides information on the symbols, units of measurement and technical terms used. This section includes the water heater s technical data and dimensions. - TECHNICAL INFORMATION FOR INSTALLERS This section is intended for installers. It contains all the indications and instructions that professionally qualified personnel must observe in order to ensure optimal installation of the appliance. - OPERATING AND MAINTENANCE INSTRUCTIONS FOR THE USER This section is intended for final users and contains all the information necessary for operating the appliance correctly and for assisting the user in carrying out regular checks and maintenance operations on the appliance. The manufacturer reserves the right to modify the data and contents of this manual without prior notice, with the aim of improving the quality of the relative products. To facilitate understanding of the contents herein, given that the manual is published in multiple languages and is valid for use in several countries, all the illustrations are grouped in the final pages and are common to the various languages. 55
58 TABLE OF CONTENTS SAFETY INFORMATION GENERAL INFORMATION 1. GENERAL INFORMATION 1.1 Description of the symbols used 1.2 Field of application 1.3 Instructions and technical norms 1.4 Certifications CE marking 1.5 Packaging and supplied accessories 1.6 Transport and handling 1.7 Identification of the appliance 2. TECHNICAL FEATURES 2.1 Operating principle 2.2 Construction features 2.3 Overall dimensions 2.4 Electrical diagram 2.5 Technical data table TECHNICAL INFORMATION FOR INSTALLERS 3. WARNINGS 3.1 Installer qualification 3.2 Implementing the instructions 3.3 Safety regulations 4. INSTALLATION 4.1 Location of the appliance 4.2 Positioning on the ground 4.3 Air supply connections 4.4 Hydraulic connections 4.5 Electrical connections 5. INITIAL START UP OPERATING AND MAINTENANCE INSTRUCTIONS FOR THE USER 6. WARNINGS 6.1 Initial start-up 6.2 Recommendations 6.3 Safety regulations 7. INSTRUCTIONS FOR USE 7.1 Control panel description 7.2 Turning the water heater on/off 7.3 Setting the temperature 7.4 Mode of operation 7.5 Time setting 7.6 Information menu 7.7 Installer menu 7.8 Anti-legionnaire s disease protection 7.9 Default settings 7.10 Operation with two-tier electricity rate 7.11 Anti-frost function 7.12 Faults 8. MAINTENANCE 8.1 Draining the appliance 8.2 Routine maintenance 8.3 Troubleshooting 8.4 Routine maintenance performed by users 8.5 Water heater disposal ILLUSTRATIONS 56
59 Heat pump water heater SAFETY INFORMATION SAFETY INFORMATION WARNING! This appliance can be used by children aged from 8 years and above and persons with reduced physical, sensory or mental capabilities or lack of experience and knowledge if they have been given supervision or instruction concerning use of the appliance in a safe way and understand the hazards involved. Children shall not play with the appliance. Cleaning and user maintenance shall not be made by children without supervision. WARNING! Keep the packaging elements out of the reach of children, as they are potentially dangerous. WARNING! The installation and initial start-up of the appliance must be performed by qualified personnel in compliance with the national regulations in force regarding installation, and in conformity with any regulations issued by local authorities and public health bodies. At all events, disconnect all power supply circuits before intervening on the terminals. WARNING! Unqualified personnel must not remove covers nor perform maintenance operations and/or electrical connections. WARNING! If the appliance includes a power cord, contact an authorised technical assistance centre or qualified personnel whenever it needs to be replaced. WARNING! Incorrect installation can harm persons or animals and damage possessions; the manufacturer shall not be held liable for any damage in such cases. WARNING! It is mandatory to fit a safety valve onto the appliance s water inlet pipe. The device must comply with the EN 1487:2002 standard and must have a maximum pressure of 0.7 Mpa (7 bar). Moreover, it must at least include the following components: a cut-off valve, a non-return valve, a control mechanism for the non-return valve, a safety valve and a water pressure shut-off device. WARNING! The pressure safety device must be operated regularly to verify that it is not clogged and to remove any limescale deposits. 57
60 Heat pump water heater SAFETY INFORMATION WARNING! It is normal for water to trickle from the pressure safety device during the heating phase; for this reason, it is necessary to connect the outlet, which must always be left exposed to the atmosphere, to a drainage pipe that slopes downwards and towards an area not subject to frost. It is advisable to also connect the condensate outlet to the same pipe, through the connection located on the back side of the water heater. WARNING! The appliance must be drained if left inactive in a room subject to frost. When necessary, empty the appliance as follows: - Permanently disconnect the appliance form the mains electricity; - Close the shut-off valve, if installed, or the central tap of the domestic water supply network; - Open the hot water tap (washbasin or bathtub); - Open the tap located on the safety valve. WARNING! Hot water at temperatures above 50 C running from taps may immediately cause serious burns. Children, the disabled and the elderly run a greater risk in this regard. Therefore, it is advisable to use a thermostatic mixing valve connected to the appliance s water outlet pipe, which is identified by a red collar. WARNING! If the appliance includes rechargeable batteries, these must be removed before disposing of the appliance and placed in specific disposal containers. Before removing the batteries, the appliance must be disconnected from the power supply. 58
61 1.1 Description of the symbols used Heat pump water heater GENERAL INFORMATION GENERAL INFORMATION In terms of installation and operation safety, the symbols described in the table below are used in order to stress the importance of the relative risk warnings: Symbol Description Failure to comply with this warning may result in injury to persons or, in some cases, death. Failure to comply with this warning may result in serious damage to property and plants or injury to animals. It is mandatory to comply with the general and appliance-specific safety measures. 1.2 Field of application This appliance is intended for hot water production for domestic use or similar, at temperatures below boiling point. The appliance must be hydraulically connected to a domestic water supply line and to a power supply network. Exhaust ducts may be used for the entry and discharge of processed air. It is forbidden to use of the appliance for uses other than those specified. Any alternative use of the appliance constitutes improper use and is prohibited; in particular, the appliance may not be used in industrial cycles and/or installed in environments exposed to corrosive or explosive materials. The manufacturer shall not be held liable for any damage due to faulty installation, improper use or uses deriving from behaviour that is are not reasonably predictable, and incomplete or careless implementation of the instructions contained in this manual. This appliance should not be operated by individuals (including children) with reduced physical or sensory abilities, or by inexperienced or unskilled individuals, unless adequately supervised and trained regarding use of the appliance by persons responsible for their own safety. Children must be supervised by persons responsible for their safety so as to ensure that they do not use the appliance as a toy. 1.3 Instructions and technical norms The purchaser pays for the appliance s installation, which must be carried out by qualified personnel only, in conformity with national regulations in force and any provisions emitted by local authorities or bodies responsible for public health, and in accordance with the specific manufacturer indications contained in this manual. The manufacturer is responsible for the product s conformity to the relevant construction directives, laws and regulations in force at the time the product is first commercialised. The designer, installer and user are each exclusively responsible, in their respective fields, for knowing and observing the legal requirements and technical regulations concerning the design, installation, operation and maintenance of the appliance. Any reference to laws, regulations or technical specifications contained in this manual is purely for information purposes; any new laws introduced or modifications to existing laws are not in any way binding on the manufacturer towards third parties. It is necessary to ensure that the power supply network to which the product is connected complies with the EN norm (under penalty of warranty invalidation). Relative to France, ensure that installation complies with the NFC norm. The tampering of product integral parts and/or supplied accessories invalidates the warranty. 59
62 1.4 Certifications - CE marking Heat pump water heater GENERAL INFORMATION The CE marking applied to the appliance certifies that the latter conforms to the essential requirements of the following European Directives: /95/EC concerning the safety of electrical equipment /108/EC concerning electromagnetic compatibility. The inspection is carried out according to the following technical standards: EN 255-3; EN ; EN/IEC ; EN ; EN ; EN ; EN ; EN 50366; EN CAHIER DE CHARGE_ /B 2011)Chauffe-eau Thermodynamiques POUR LA MARQUE NF elettricitè performance. 1.5 Packaging and supplied accessories The appliance is anchored to a wooden pallet and is protected with polystyrene edge protectors, cardboard and a plastic transparent film on the outside; all the materials are recyclable and eco-compatible. The following accessories are included: - Belt for handling the water heater (to be removed once the product is installed). - Connection pipe for condensation water. - Instruction manual and warranty documents. - Two 3/4 dielectric coupling and joints 1.6 Transport and handling Upon delivery of the product, check that the latter has not been damaged during transport and that no signs of damage appear on the packaging. In the event of damages, immediately notify any claims to the forwarder. WARNING! The appliance should be handled and stored in a vertical position. The product may be handled in a horizontal position only for short distances, while resting on the rear end indicated; in this case, wait at least 3 hours before starting the appliance once it has been correctly repositioned in a vertical position and/or installed; this is to ensure that the lubricating oil inside the refrigeration circuit is suitably distributed and to avoid damages to the compressor. The packaged appliance may be handled either manually or with the aid of a forklift truck, while ensuring that the above indications are observed. It is advisable to keep the appliance in its original packaging until installing it in its chosen location, particularly when construction work is under way on-site. Upon removing the packaging, check whether the appliance is intact and that no parts are missing. In the event of defects or missing components, notify the dealer within the time limits specified by the law. WARNING! Keep the packaging elements out of the reach of children, as they are potentially dangerous. When transporting or handling the appliance after the initial start-up, observe the aforementioned indication concerning the allowed tilt angle and ensure that all water has been drained from the tank. Should the original packaging be missing, provide an adequate protection for the appliance to prevent any damages, for which the manufacturer shall not be held liable. 60

63 Heat pump water heater GENERAL INFORMATION Allowed positions Non-allowed positions 1.7 Identification of the appliance The main information for identifying the appliance is contained on the adhesive data plate located on the water heater casing. A B C D E F G H I L M N model tank capacity serial no. power supply voltage. frequency. maximum absorbed power max./min. pressure of the refrigeration circuit tank protection absorbed power heating element mode marks and symbols thermal power yielded in heat pump mode max./min. power in heat pump mode type of refrigerant and charge maximum tank pressure 2. TECHNICAL FEATURES 2.1 Operating principle The efficiency of a heat pump cycle is measured by the Coefficient of Performance (COP), i.e. the ratio between the energy supplied to the appliance (in this case, the heat transferred to the water to be heated) and the electrical energy used (by the compressor and the appliance's auxiliary devices). The COP varies according to the type of heat pump and to its relative conditions of operation. For example, a COP value equal to 3 indicates that for every 1 kwh of electrical energy used, the heat pump supplies 3 kwh of heat to the medium to be heated, of which 2 kwh are extracted from the free source. 61
64 Heat pump water heater GENERAL INFORMATION 2.2 Construction features Refer to Fig. 1 1 fan 2 4 Ways defrost valve (only on EXT models) 3 safety pressure switch 4 hermetic rotary compressor 5 electronic control panel 6 feet with adjustable height 7 electric heating element 8 titanium impressed cu+rrent anode 9 functional and safety NTC sensor 10 condenser 11 outlet water NTC temperature sensor 12 disposable magnesium anode 13 electrolytic condenser for compressor 14 condensate drainage pipe 15 thermostatic expansion valve 16 evaporator 2.3 Overall dimensions Refer to Fig. 2 A B C D E F G H Inlet cold water ¾ pipe Outlet hot water ¾ pipe Condensate drainage connection Auxiliary circuit ¾ inlet pipe (SYS version only) Auxiliary circuit ¾ outlet pipe (SYS version only) Sheath for upper probe (S3) (SYS version only) Sheath for bottom probe (S3) (SYS version only) Recirculation ¾ pipe (SYS version only) 2.4 Electrical diagram Refer to Fig. 3 A Power supply ( V 50Hz) B Batteries (3x1,2V AA rechargeable) C Interface board D Electric heating element (2000W) E NTC sensor for heating element zone F Impressed current anode G Water tank earth connection H Serial connection board I Mainboard L Operation condenser (15µF 450V) M Compressor N Fan O 4-ways defrost valve P Safety pressure switch Q NTC sensor for hot water pipe zone R NTC sensor for evaporator and inlet air EDF HCHP signal (EDP) - cable not supplied with the product 62
65 Heat pump water heater GENERAL INFORMATION 2.5 Technical data table Description Unit of measurement SYS Rated tank capacity l Insulation thickness mm 35 Type of internal tank protection enamelling Type of corrosion protection titanium impressed current anode + disposable magnesium anode Maximum operating pressure MPa 0,6 Diameter of hydraulic connections II G 3/4 M Diameter of condensate drainage connection mm 14 Diameter of air exhaust/intake pipes mm Minimum water hardness F 12 Minimum conductivity of the water µs/cm 150 Weight when empty kg Heating circuit exchange surface m ,65 Heat pump Average electrical power consumption W 500 Max. electrical power consumption W 670 EN 255/3 (7 C) Heat rating ( A ) W COP ( A ) 2,8 2,8 2,8 Heating time ( A ) h:min 7:58 8:50 8:50 Heating energy consumption ( A ) kwh 3,20 3,98 3,98 Max. amount of hot water in a single intake V40 ( A ), Delivered at 55 C l Qpr (over 24h) kwh 0,91 1,06 1,06 EN 255/3 (20 C) Heat rating ( B ) W COP ( B ) 3,1 3,1 3,1 Heating time ( B ) h:min 6:05 7:17 7:17 Heating energy consumption ( B ) kwh 2,77 3,56 3,56 Max. amount of hot water in a single intake V40 ( B ), Delivered at 55 C l Qpr (over 24h) kwh 0,89 1,0 1,0 EN (Cahier de Charge _ /B 2011) COP ( C ) 2,41 2,6 2,6 Heating time ( C ) h:min 8:16 9:40 9:40 Heating energy consumption ( C ) kwh 3,57 4,37 4,37 Max. amount of hot water in a single intake V40 ( C ), Delivered at 55 C l Pes W Tapping L XL XL Max. water temperature with heat pump ºC 55 (factory default setting) Quantity of R134a refrigerant fluid kg 0,9 Max. pressure of refrigerating circuit (low-pressure side) MPa 1 Max. pressure of refrigerating circuit (high-pressure side) MPa 2,4 63
66 Description Heating element Heat pump water heater GENERAL INFORMATION Unit of measurement SYS Heating element power W 2000 Max. water temperature with heating element ºC 75 (65 factory default setting) Max. current consumption A 8,7 Power supply Voltage / max. power consumption ( A ) V / W single-phase / 2670 Frequency Hz 50 Protection rating Air side Standard air flow rate (automatic modulating control) m 3 /h Available static pressure Pa Sound power ( F ) db(a) Minimum volume of room of installation ( D ) m Minimum ceiling height of room of installation ( D ) m 2,06 2,28 2,28 Min. temperature of room of installation ºC Max. temperature of room of installation ºC Minimum air temperature (w.b. at 90% r.h.) ( E ) ºC Maximum air temperature (w.b. at 90% r.h.) ( E ) ºC IP24 (A) Values obtained with air temperature of 7 C, 85% relative humidity and input water temperature of 15 C exit 55 C (in conformity with EN255-3). (B) Values obtained with air temperature of 20 C, 37% relative humidity and input water temperature of 15 C exit 55 C (in conformity with EN255-3). (C) Values obtained with air temperature of 7 C, 87% relative humidity and input water temperature of 10 C and exit 55 C (in conformity with the NF Cahier de Charge standard /B_2011). (D) In the event of installation without ducting. (E) Outside of the heat pump s interval of operation, heating of the water is ensured by the heating element. (F) Tested in reverberant chamber according to regulation UNI EN ISO 3741 (exhaust air ducted with rigid pipe D200 length 2m, T air = 25 ±2 C, H.r. 55 ±5 %, T hot water = 45 ±2 C). Average value obtained on a significant number of products. 64
67 Heat pump water heater - TECHNICAL INFORMATION FOR INSTALLERS TECHNICAL INFORMATION FOR INSTALLERS 3. WARNINGS 3.1 Installer qualification WARNING! The installation and initial start-up of the appliance must be performed by qualified personnel in compliance with the national regulations in force regarding installation, and in conformity with any regulations issued by local authorities and public health bodies. The water heater is supplied with a sufficient amount of R134a refrigerant for its operation. This refrigerant fluid does not damage the atmosphere s ozone layer, is not flammable and does not cause explosions; however any maintenance activities or work on the refrigerant circuit must exclusively be carried out by authorised personnel with the suitable equipment. 3.2 Implementing the instructions WARNING! Incorrect installation can harm persons or animals and damage possessions; the manufacturer shall not be held liable for any damage in such cases. The installer is required to observe the instructions outlined in this manual. Once installation is complete, it is the installer s duty to inform and instruct the user on how to operate the water heater and carry out the main operations correctly. 3.3 Safety regulations Refer to Paragraph 1.1 under the section GENERAL INFORMATION for the description of the symbols used in the table below. Ref. Warning Type of risk Symbol Protect connection piping and cables so as to avoid them being damaged. Make sure the installation site and any systems to which the appliance must be connected fully comply with the regulations in force. Use manual tools and equipment that are suitable for the intended use (in particular, ensure that the tool is not worn and that the handle is intact and securely fixed); use them correctly and prevent them falling from a height. Put them safely back in place after use. Use electrical equipment that is suitable for the intended use; use the equipment correctly, keep passages clear of the power supply cable, prevent the equipment falling from a height, disconnect and put back in place after use. Electrocution caused by exposure to live wires. Flooding due to water leaking from damaged pipes. Electrocution from contact with live wires that have been incorrectly installed. Damage to the appliance caused by improper operating conditions. Personal injury caused by flying splinters or fragments, inhalation of dust, knocks, cuts, puncture wounds and abrasions. Damage to the appliance or surrounding objects caused by falling splinters, knocks and incisions. Personal injury caused by flying splinters or fragments, inhalation of dust, knocks, cuts, puncture wounds and abrasions. Damage to the appliance or surrounding objects caused by falling splinters, knocks and incisions. 65
68 Heat pump water heater - TECHNICAL INFORMATION FOR INSTALLERS Descale the components, in accordance with the instructions of the safety data sheet included with the product used, while ventilating the room and wearing protective clothing; avoid mixing different products and protect the appliance and surrounding objects. Make sure that any portable ladders are securely positioned, that they are sufficiently resistant, that the steps are intact and not slippery, that these do not move around when someone climbs on them and that someone supervises at all times. Make sure that the work area has adequate hygiene and health conditions in terms of lighting, ventilation and the solidity of relevant structures. Wear individual protective clothing and equipment during all work phases. All operations inside the appliance must be performed with the necessary caution in order to avoid sudden contact with sharp parts. Before handling, empty all components which may contain hot water and perform bleeding where necessary. Make all electrical connections using suitably-sized conductors. Protect the appliance and all areas in the vicinity of the work area using suitable material. Handle the appliance with care, while using suitable protection equipment. Use the appropriate handling belt. Arrange materials and equipment in such a way as to make handling easy and safe, and avoid the formation of any piles which could give way or collapse. Reset all safety and control functions affected by any work performed on the appliance and make sure that they operate correctly before restarting the appliance. Personal injury caused by acidic substances coming into contact with skin or eyes; inhaling or swallowing harmful chemical agents. Damage to the appliance or surrounding objects due to corrosion caused by acidic substances. Personal injury caused by falling from a height or cuts (stepladders shutting accidentally). Personal injury caused by knocks, stumbling etc. Personal injury caused by electrocution, falling splinters or fragments, inhalation of dust, shocks, cuts, puncture wounds, abrasions, noise and vibration. Personal injury caused by cuts, puncture wounds and abrasions. Personal injury caused by burns. Fire caused by overheating due to electrical current passing through undersized cables. Damage to the appliance or surrounding objects caused by falling splinters, knocks and incisions. Damage to the appliance or surrounding objects caused by shocks, knocks, incisions and crushing. Damage to the appliance or surrounding objects caused by shocks, knocks, incisions and crushing. Damage or shutdown of the appliance caused by out-of-control operation. 66
69 Heat pump water heater - TECHNICAL INFORMATION FOR INSTALLERS 4. INSTALLATION WARNING! Observe the general warnings and safety instructions listed in the previous paragraphs and strictly adhere to the indications therein contained. 4.1 Location of the appliance WARNING! Prior to starting any installation activities, ensure that the location where the water heater is to be installed satisfies the following requirements: a) In the event of water heaters without an air exhaust duct, the room of installation should have a volume of no less than 20 m 3 and must be adequately ventilated. Avoid installing the appliance in rooms which may favour frost build-up. Do not install the product in a room containing an appliance that requires air to function (e.g. an openchamber gas boiler, open-chamber gas water heater, etc.). The product s safety and performance levels are not guaranteed in the event of outdoor installation. b) The appliance s air exhaust and/or extraction duct (if present) must have access to the outside from the point where the appliance is installed. The connections for the air exhaust and aspiration ducts are located on the upper part of the appliance. c) Ensure that the installation site and the electrical and hydraulic systems to which the appliance must be connected fully comply with the regulations in force. d) The chosen site must have, or must be suitable to house, a single-phase V ~ 50 Hz power supply socket. e) The chosen site must be suitable to house a condensate drainage outlet connected to the back of the appliance with a suitable siphon. f) The chosen site must ensure that the appropriate safety distances from the wall and ceiling can be observed, for the appliance to operate properly and to facilitate maintenance operations. g) The support surface must ensure a perfectly horizontal operating position (Refer to fig. 2). h) The chosen site must conform to the appliance s IP protection rating (protection against the penetration of liquids) as specified by the regulations in force. i) The appliance must not be exposed to direct sunlight, even when windows are present. j) The appliance must not be exposed to particularly aggressive substances such as acidic vapours, dust or gasfilled environments. k) The appliance must not be directly installed on telephone lines that are unprotected against overvoltage. l) The appliance must be installed as close as possible to the points of use to limit heat dispersion along the piping. m) The air aspirated by the product must be free of dust, acicid vapours and solvents. In the event of non-ducted installation, observe the distances from the walls as indicated in Fig Positioning on the ground Refer to Fig. 5 1) Once the suitable installation position has been located, remove the packaging and remove the fixings visible on the pallet where the product is based. 2) Using the appropriate belt, remove the product from the pallet. 3) Fix the feet on the ground (through the appropriate holes) using suitable screws and rawlplugs; after positioning the appliance, remove the fabric belt by loosening the relative bolts. 67

70 4.3 Air supply connections Heat pump water heater - TECHNICAL INFORMATION FOR INSTALLERS Please bear in mind that using air from heated environments may hamper the building s thermal performance. There is one connection for the air intake and one for the air exhaust on the rear side of the appliance. It is important to not remove or tamper the two grilles. The outlet air may reach temperatures that are 5-10 C lower compared to that of the inlet air and, if not ducted, the temperature of the room of installation may drop sensibly. If the water heater is intended to function by externally (or through another room) expelling or intaking the air processed by the heat pump, pipes specifically designed for the passage of air may be used. Make sure that the pipes are securely connected and fixed to the product so as to avoid any accidental detachments (for example, use suitable silicone). Do not in any way manipulate or break the air intake/exhaust grilles. Even if the product is not ducted it is advisable to install a curve in the suction line to prevent by-pass between the air inlet and outlet (fig. 4). In the case of product ducted with rigid tubes adopt during installation all the precautions necessary to ensure the maintenance operations (fig.4) WARNING: Do not use outdoor grills resulting in high losses, such as anti-insect grilles. The grids used should allow good air flow, the distance between the inlet and outlet air should not be less than 50cm. Protect pipes from the external wind. The expulsion of air in the chimney is allowed only if the draft is appropriate, is also required periodic maintenance of the barrel, and chimney accessories. The total static pressure loss due to installation is calculated by adding the loss of the single installed components; this sum must be lower than the static pressure of the fan which is equal to (55 Pa). See diagram on the last page. WARNING! A type of canalization not suitable affects product performance and significantly increases the heating time! EXAMPLES Figure 6 Figure 7 Figure 8 Figure 9 Inlet air: Not ducted / Outlet air: externally ducted Inlet air: internally ducted / Outlet air: externally ducted Inlet air: externally ducted / Outlet air: externally ducted Installation without ducting 4.4 Hydraulic connections Connect the water heater inlet and outlet to pipes or pipe fittings that can withstand the operating pressure and temperature of the hot water, which may reach 75 C. It is not advisable to use materials that cannot withstand such temperatures. The dielectric union fitting (with joint supplied with the product) must be applied to the hot water outlet pipe, prior to performing the connection. Screw a T fitting identified by a blue collar onto the appliance s water inlet pipe. See Figure 10. It is mandatory to fit a safety valve onto the appliance s water inlet pipe. The device must comply with the EN 1487:2002 standard and must have a maximum pressure of 0.7 Mpa (7 bar). Moreover, it must at least include the following components: a cutoff valve, a non-return valve, a control mechanism for the non-return valve, a safety valve and a water pressure shut-off device. 68
71 Heat pump water heater - TECHNICAL INFORMATION FOR INSTALLERS The device s relief outlet must be connected to a relief pipe with a diameter no less than that of the appliance s connection (3/4 ), with the aid of a siphon creating an air gap of at least 20 mm to allow for visual inspection; this is to prevent any harm to persons and animals or damage to objects should the device activate and for which the manufacturer shall not be held liable. Use a flexible pipe to connect the pressure safety device inlet to the cold water system pipe, using a cut-off valve if necessary. Additionally, a water discharge pipe must be fitted to the outlet in case the drainage tap is opened. Avoid overtightening the pressure safety device and do not tamper with it. It is normal for water to trickle from the pressure safety device during the heating phase; for this reason, it is necessary to connect the outlet, which must always be left exposed to the atmosphere, to a drainage pipe that slopes downwards and towards an area not subject to frost. It is advisable to also connect the condensate outlet to the same pipe, through the connection located on the back side of the water heater. The appliance must not operate with water hardness levels below 12 F; on the other hand (>25 F), it is advisable to use a suitably calibrated and monitored water softener in the event of particularly hard water; in this event, the residual hardness must not fall below 15 F. If the mains pressure is close to the calibrated valve values, a pressure reducer must be installed as far as possible from the appliance. The SYS version is provided with a connection G3/4 for recirculation circuit (if present in hydraulic circuit). WARNING! It is advisable to carefully wash the system s pipes in order to remove any residues of screw thread, welding or dirt which may hamper the correct operation of the appliance. 4.5 Electrical connections Permanent power supply (cable supplied with the appliance) Cable 3G 1.5mm 2 Protection EDF signal (cable not supplied with the appliance) H05V2V2-F 2G 0.75mm 2 2A 16A WARNING: BEFORE YOU GET ACCESS TO TERMINALS, ALL SUPPLY CIRCUITS MUST BE DISCONNECTED The batteries ensure that the product is protected against corrosion, when the appliance is not powered. WARNING: Is forbidden remove covers and do maintenance and / or electrical connections by unqualified personnel The appliance is supplied with a power supply cable (should the latter need to be replaced, use only original spare parts supplied by the manufacturer). It is advisable to carry out a check on the electrical system to verify conformity to the regulations in force. Verify that the electrical system can suitably withstand the water heater s maximum power consumption values (refer to the data plate), in terms of the size of the cables and their conformity to the regulations in force. It is forbidden to use multiple outlet sockets, extension cables or adaptors. It is forbidden to use piping from the water, heating and gas systems for earthing the appliance. Prior to operating the machine, make sure that the electricity mains voltage conforms to the value indicated on the appliance s data plate. The manufacturer of the appliance shall not be held liable for any damage caused by failure to earth the system or due to anomalies in the electric power supply. To disconnect the appliance from the mains, use a bipolar switch complying with all applicable CEI-EN regulations in force (minimum distance between contacts 3 mm, switch preferably equipped with fuses). The appliance must comply with the European and national standards, and must be protected by a 30mA RCD. 69
72 Heat pump water heater - TECHNICAL INFORMATION FOR INSTALLERS Fig. 11 Fig. 12 Fig. 13 Fig. 15 PERMANENT ELECTRICAL CONNECTION Use this configuration whenever users do not have a two-tier electricity rate. The water heater will always be connected to the power supply network to ensure 24h operation. Remove the 3 NI-MH batteries if you do not use the two-rate time-of-day tariff with HC/HP signal (see Fig. 14). ELECTRICAL CONNECTION WITH TWO-TIER ELECTRICITY RATE If users have a two-tier electricity rate and a suitable meter, the product may be powered only while the lowest rate applies. During the period in which the appliance is not powered, protection against corrosion through the impressed current anode is ensured by the rechargeable batteries. To put them into service, open the battery cover (see Fig. 14) and remove the battery protection tab ELECTRIC CONNECTION WITH TWO-TIER RATE AND HC-HP SIGNAL Offers the same cost advantages compared to the two-tier rate configuration but, additionally, it allows for obtaining rapid heating thanks to the BOOST mode that activates heating even with the HP rate. 1) Connect a bipolar cable to the appropriate signal contacts on the meter. 2) Connect the signal bipolar cable to the terminal EDF which is located inside the electric box at right side of the product. WARNING: the signal cable must be inserted in the hole beneath the power supply cable then anchored with suitable cable clips located inside the product and tightened in the cable glands near the appropriate terminal; make a suitably-sized hole in the rubber rings for the passage of the cable. 3) Activate the HC-HP function through the installer menu (see Paragraph 7.7). In case of connection of boiler/heater to 240SYS heating pump version is recommended to use upper shealt (S3) In case of connection of solar panel to 240SYS heating pump version is recommended to use both upper and bottom shealt (S3) and (S2) 5. INITIAL START-UP Once the appliance is connected to the hydraulic and electric systems, the water heater must be filled with water from the domestic water supply network. In order to fill the water heater, it is necessary to open the central tap of the domestic network supply and the nearest hot water tap, while making sure that all the air in the tank is gradually expelled. Remove the tab (C) from the batteries, the battery housing is located beneath the cover (B) on the lower side of the product refer to the picture
73 Heat pump water heater - OPERATING AND MAINTENANCE INSTRUCTIONS FOR THE USER OPERATING AND MAINTENANCE INSTRUCTIONS FOR THE USER 6. WARNINGS 6.1 Initial start-up WARNING! The installation and initial start-up of the appliance must be performed by qualified personnel in compliance with the national regulations in force regarding installation, and in conformity with any regulations issued by local authorities and public health bodies. In all cases, the company performing the work must carry out checks to verify the safety and correct operation of the entire system. Before starting up the water heater, verify whether the installer has completed all the relative installation operations. Make sure to have clearly understood the installer's indications on how to operate the water heater and perform the main operations on the appliance. The heat pump requires 5 minutes to become fully operational when starting it for the first time. 6.2 Recommendations In the event of a malfunction and/or faulty operation, turn the appliance off and do not attempt any repairs, but contact qualified personnel. Only original spare parts must be used and any repairs must be carried out exclusively by qualified personnel. Failure to comply with the above-mentioned recommendations may jeopardise the appliance s safety and void the manufacturer s liability. In the event of prolonged inactivity of the water heater, it is advisable to carry out the following: - Disconnect the appliance from the power supply or, if a switch is mounted upstream from the appliance, turn the switch itself to the position. - Close all taps of the domestic water supply system. WARNING! Hot water at temperatures above 50 C running from taps may immediately cause serious burns. Children, the disabled and the elderly run a greater risk in this regard. Therefore, it is advisable to use a thermostatic mixing valve connected to the appliance s water outlet pipe, which is identified by a red collar. The mixing valve is compulsory on SYS models. WARNING! (SYS version only) Make sure the temperature detected by the control unit probes S2 and S3 does not exceed 75 C Fig
74 Heat pump water heater - OPERATING AND MAINTENANCE INSTRUCTIONS FOR THE USER 6.3 Safety regulations Refer to paragraph 1.1 for the description of the symbols used in the table below. Ref. Warning Type of risk Symbol 1 2 Do not perform operations that involve removing the appliance from its housing. Do not leave objects lying on the appliance. Electrocution due to exposure to live components. Flooding caused by water leaking from disconnected piping. Personal injury caused by the object falling off the appliance as a result of vibrations. Damage to the appliance or any underlying items caused by the object falling off as a result of vibrations. Personal injury caused by the appliance falling down. 3 Do not climb onto the appliance. Damage to the appliance or any underlying objects caused by the appliance detaching from its fixing brackets and falling. 4 Do not perform any operations that involve opening the appliance. Electrocution due to exposure to live components. Personal injury caused by burns due to overheated components, or wounds caused by sharp edges or protrusions. 5 Do not damage the power supply cable. Electrocution from non-insulated live wires Do not climb onto chairs, stools, ladders or unstable supports to clean the appliance. Do not attempt to clean the appliance without first switching it off, removing the plug or turning the external switch to the position. Do not use the appliance for any purpose other than normal household operation. Personal injury caused by falling from a height or cuts (stepladders shutting accidentally). Electrocution due to exposure to live components. Damage to the appliance caused by operation overload. Damage to objects caused by improper use. 9 Do not allow children or inexperienced persons to operate the appliance. Damage to the appliance caused by improper use. 10 Do not use insecticides, solvents or aggressive detergents to clean the appliance. Damage to plastic or painted parts. 11 Avoid placing any objects and/or appliance beneath the water heater Damage due to possible water leakage. 12 Do not drink the water of condensation Injury from positioning 72
75 Heat pump water heater - OPERATING AND MAINTENANCE INSTRUCTIONS FOR THE USER 7. INSTRUCTIONS FOR USE 7.1 Control panel description Refer to Fig. 14. A Buttons Knob ON/ - MODE The control panel, constructed in a simple and rational way, comprises two buttons and a central knob. In the upper section, a DISPLAY shows the set temperature or the detected temperature, besides other specific indications such as the operation mode signal, fault codes, settings and information of the product s condition. 7.2 Turning the water heater on/off Turning the appliance on: simply press the ON/ button to turn the water heater on. Now you can set the current time (see section 7.5) The DISPLAY visualises the set temperature and operation mode, while the HP symbol and/or heating element symbol indicate the operation of the heat pump and/or heating element respectively. Turning the appliance off: simply press the ON/ button to turn the water heater off, only appears on the display. The protection against corrosion is still ensured, while the product will automatically ensure that the temperature of the water in the tank does not fall below 5 C. 7.3 Setting the temperature The desired temperature for the hot water can be set by turning the knob clockwise or anti-clockwise (the visualised temperature will flash temporarily). To visualise the current temperature of the water in the tank, press and release the knob; the relative value will appear for 8 seconds then the set temperature will reappear once again. The temperatures that can be obtained in the heat pump mode vary between 50 C and 55 C, by factory default setting, and 40 C-55 C, by varying the setting on the installer menu. The maximum temperature that can be obtained with the heating element is 65 C, by factory default setting, and 75 C, by varying the setting on the installer menu. 73
76 7.4 Mode of operation Heat pump water heater - OPERATING AND MAINTENANCE INSTRUCTIONS FOR THE USER In normal operating conditions, the mode button can be used to vary the operating mode through which the water heater reaches the set temperature. The selected mode will be visualised on the line below the temperature. If the heat pump is active, the following symbol will appear: If the heating element is active, the following symbol will appear: AUTO mode: the water heater understands how to reach the desired temperature in a few hours, through the rational use of the heat pump and, only if necessary, of the heating element. The maximum number of hours it takes depends on the P9 TIME_W parameter (see Paragraph 7.7), which is set to 8 hours by default. (recommended for winter). BOOST mode: by activating this mode, the water heater simultaneously uses the heat pump and heating element to reach the desired temperature in the shortest possible time. Once this temperature is reached, the AUTO operating mode is restored. GREEN mode: the water heater will use the heat pump, thereby ensuring maximum energy saving! The maximum temperature that can be reached is 55 C. The heating element may also turn in case of errors or anti-legionnaire s disease. This function is recommended for air temperatures above 0 C during the hours of heating. PROGRAM mode: You have two programs P1 and P2, which may act either individually or in combination with each other during the day (P1 + P2). The device will be able to activate the heating phase to reach the selected temperature set in the timetable, giving priority to heating by heat pump and, if necessary, through the heating element. Press the mode button to select the desired Program mode (P1/P2/P1+P2), turn the knob to set the desired temperature, press it again to confirm, turn the knob to set the desired time and press to confirm; mode P1 + P2 can set the information for both programs. In the case of electrical connection with two-tier price signal HC / HP, you still possible program the water heater at any time of day. For this function is required the setting of the current time, see the next paragraph. Note: To ensure comfort, in the case of P1 + P2 mode operation with very close times between them, it is possible that the temperature of water is higher than the temperature set. 7.5 Time setting The time setting is required: At initial start-up; Occur simultaneously absence of power from the mains and battery (the product will restart in Auto mode). You can also change the current time through the parameter P1 (paragraph 7.7). The display flashes up showing hours and minutes. Turn the knob until you find the current time and confirm by pressing the knob. Repeat the procedure to set the minutes. 74
77 7.6 Information menu Heat pump water heater - OPERATING AND MAINTENANCE INSTRUCTIONS FOR THE USER The information menu allows for visualising data for monitoring the product. To enter the menu, press the relative knob and hold for 5 seconds. Turn the knob to select the parameters L1, L2, L3 L9 Upon reaching the desired parameter, press the knob to visualise its value. Press the knob or MODE button to return to the parameter selection area once again. To exit the information menu, press the mode button (the appliance will ensure that the menu is automatically exited after the latter has been idle for 10 minutes). Parameter Name Parameter description L1 T W1 Temperature recorded by the heating element unit sensor 1. L2 T W2 Temperature recorded by the heating element unit sensor 2. L3 TW3 Temperature recorded by the hot water pipe sensor. L4 T AIR Temperature recorded by the inlet air sensor. L5 T EVAP Temperature recorded by the evaporator sensor. L6 HP h Meter for internal parameter 1. L7 HE h Meter for internal parameter 2. L8 SW MB Mainboard software version. L9 SW HMI Interface board software version. 75
78 7.7 Installer menu Heat pump water heater - OPERATING AND MAINTENANCE INSTRUCTIONS FOR THE USER CAUTION: THE FOLLOWING PARAMETERS MUST BE ADJUSTED BY QUALIFIED PERSONNEL. Several of the appliance s settings can be modified through the installer menu. The maintenance symbol is visualised on the left. To enter the menu, keep the knob pressed for 5 seconds then scroll the parameters of the L INFO menu until reaching "P1". After entering the code (illustrated in the table that follows), turn the knob to select the parameters P1, P2, P3 P8 Upon reaching the parameter to be modified, press the knob to visualise the parameter s value then turn the knob to set the desired value. To return to the parameter selection area, press the knob to store the entered parameter or press "mode" (or wait 10 seconds) to exit without storing the entered value. To exit the installer menu, press the mode button (the appliance will ensure that the menu is automatically exited after the latter has been idle for 10 minutes). Parameter Name Parameter description P1 TIME Time setting P2 Adjustment of the maximum obtainable temperature (from 65 C to 75 C). T Max A higher temperature value allows for using a greater amount of hot water. Activation/deactivation of the Anti-Legionnaire s Disease function (on/off). See Paragraph P3 ANTI_B 7.8 P4 TIME_W Maximum number of hours of daily heating (from 5h to 24h). P5 HC-HP Activation/deactivation of the two-tier rate operation mode. See Paragraph 7.10 P6 RESET Resetting of all factory default settings. P7 P8 T Min DEFROS Adjustment of the minimum obtainable temperature (from 50 C to 40 C). A lower temperature setting allows for more energy-efficient operation in the event of limited hot water consumption. Activation/deactivation of the defrost mode (on/off). If activated, this mode allows the heat pump to function at air temperatures as low as - 5 C. 76
79 Heat pump water heater - OPERATING AND MAINTENANCE INSTRUCTIONS FOR THE USER 7.8 Anti-legionnaire s disease protection (function activated only through the installer menu) If activated, the water heater automatically carries out the anti-legionnaire s disease protection function. The water is brought to a temperature of 65 C on a monthly basis and for a maximum time of 15 minutes, so as to avoid germs from developing in the water tank and piping (provided the water has not been brought to T>57 C at least once for at least 15 minutes). The first heating cycle is performed 3 days after the function has been activated. As these temperatures may cause burns, it is advisable to use a thermostatic mixer. During the cycle of antilegionella will be displayed ANTI_B alternately to the mode of operation, once the cycle is done the set temperature remains the original one. In the event that is enabled the two-tier rate signal HC-HP, the function will take place during the economic tariff. To stop press "on/off". 7.9 Default settings The appliance is manufactured with a series of default modes, functions or values, as indicated in the table below: Parameter Factory default setting PRE-SET TEMPERATURE 55 C P2 MAX. TEMPERATURE SETTABLE WITH THE HEATING ELEMENT 65 C P3 ANTI-LEGIONNAIRE S DISEASE PROTECTION DEACTIVATED P4 TIME_W (no. of accepted hours of powering) 8h P5 HC-HP (two-tier rate operation mode) DEACTIVATED P7 MINIMUM SETTABLE TEMPERATURE 50 C P8 DEFROST (active defrost activation) ACTIVATED PROGRAM P1 TEMPERATURE PRESET 55 C PROGRAM P1 TIME PRESET 06:00 PROGRAM P2 TEMPERATURE PRESET 55 C PROGRAM P2 TIME PRESET 18: Operation with two-tier electricity rate To be able to operate also on appliances with a two-tier rate system, the control logic calculates the number of average hours a day during which the power supply is available in the economy mode (HC). A self-learning function ensures that the appliance reaches the pre-set temperature in the time range during which the economy rate applies; the maximum limit of hours is determined by the P9 TIME_W parameter; after the initial start-up (or after switching off the hardware), the default setting is 8 hours Anti-frost function In any event, if the temperature of the water in the tank falls below 5 C while the appliance is powered, the heating element (2000 W) will be automatically activated to heat the water up to 16 C. 77
80 7.12 Faults Heat pump water heater - OPERATING AND MAINTENANCE INSTRUCTIONS FOR THE USER As soon as a fault occurs, the appliance enters into the fault mode while the display emits flashing signals and visualises the error code. The water heater will continue supplying hot water provided the fault affects only one of two the heating units, by activating the heat pump or heating element. If the fault involves the heat pump, the symbol "HP" will flash on the screen, while the heating element symbol will flash if the fault involves this component. If both components are affected, both symbols will flash. Error code E1 Cause Heating occurs without any water in the water tank Heating element operation Heat pump operation What to do Verify the causes of the lack of water (leakage, faulty hydraulic connections, etc.). E2 Excessive temperature of the water in the tank Turn the appliance off then on again; if the problem persists, contact the technical assistance service. E4 E5 H1 H2 H3 Sensor fault heating element zone Excessive difference between the temperatures of the heating element zone sensors Excessive pressure in the refrigeration circuit, or faulty reading on the pressure switch Heat pump circuit low pressure or fan fault Compressor or evaporator sensor fault, gas leak Check or replace the heating element zone sensors, if necessary. Check or replace the sensors, if necessary. ON ON ON Try restarting the machine; if the error persists, contact the technical assistance service. Turn off the appliance. Check that the fan is not broken and that the evaporator is not obstructed. Check whether the 4 ways valve functions properly and replace it if necessary. Check the evaporator sensor. Turn off the appliance. Verify whether the compressor functions properly and/or check for any refrigerant gas leakages. Verify whether the evaporator sensor is properly connected and positioned, and replace it if necessary. H4 Evaporator obstructed ON ON Check the perfect cleaning of grids and ducts H5 Fan fault / evaportora sensor error ON H6 Air sensor fault ON H7 Evaporator sensor fault ON Turn off the appliance. Verify that there are no physical impediments to the movement of fan blades, check the wiring of connection with circuit boards. Check the evaporator sensor. Verify whether the sensor is properly connected and positioned, and replace it if necessary Verify whether the sensor is properly connected and positioned, and replace it if necessary H8 Hot water pipe sensor fault ON H9 Active defrost fault ON (if T air <5 C) Verify whether the sensor is properly connected and positioned, and replace it if necessary Check that the fan is not broken and that the evaporator is not obstructed. Check whether the 4- way valve functions properly and replace it if necessary. Check the perfect cleaning of grids and ducts 78
81 Heat pump water heater - OPERATING AND MAINTENANCE INSTRUCTIONS FOR THE USER F1 PCB fault F2 F3 F4 F5 Excessive number of ON/ (RESET) Lack of communication between the PCB and interface Empty tank (EMPTY), impressed current anode circuit open Short-circuit on the impressed current anode circuit ON ON Try turning the appliance off then on again and verify the operation of the control boards, if necessary Temporarily disconnect the product and the batteries Try turning the appliance off then on again and verify the operation of the control boards or replace them, if necessary Verify whether there is any water in the tank, check or replace the impressed current anode, if necessary Check or replace the impressed current anode if necessary 8. MAINTENANCE (for authorized personnel) WARNING! Observe the general warnings and safety instructions listed in the previous paragraphs and strictly adhere to the indications therein contained. All maintenance operations and interventions should be performed by qualified personnel (i.e. with the necessary requirements as outlined in the applicable norms in force). During maintenance it is advisable to wash the tank in order to remove any remaining impurities. 8.1 Draining the appliance The appliance must be drained if left inactive in a room subject to frost. When necessary, empty the appliance as follows: - Permanently disconnect the appliance form the mains electricity. - Close the shut-off valve, if installed, or the central tap of the domestic water supply network. - Open the hot water tap (washbasin or bathtub). - Open the tap located on the safety valve. 8.2 Routine maintenance It is advisable to clean the evaporator on an annual basis in order to remove any dust or obstructions. To access the evaporator, placed on the external unit, it is necessary to remove the fixing screws of the frontal and top cover. Verify that the external terminal of the air exhaust duct, and the duct itself, are not obstructed or have not deteriorated. Clean the evaporator with a flexible brush taking care not damage it. In the case you found some bended fins, straighten them with a special comb, according to the fins spacing (1.6mm). ). Carry out the same check for the intake duct, if present. Ensure that the condensate water runs out in a suitable drain and make sure the discharge is made without hindrance. Check and clean canalizations and grills. Use only original spare parts. After each removal is advisable to replace the gasket flange. 79
82 8.3 Troubleshooting Heat pump water heater - OPERATING AND MAINTENANCE INSTRUCTIONS FOR THE USER Problem Possible reason What to do Low temperature set Increase the temperature set for the outlet water. Device functioning errors Check for errors on the display and act in the way specified on the chart "Faults". No electrical connection, disconnected or Check the voltage at the supply terminals, verify the damaged wirings integrity and connections of the cables. Try to put the product in Boost mode, if is ok in this way, Absence of HC/HP signal (if the product is Water comes check the connection of the meter, check the integrity of the installed with the HC/HP signal cable) out cold or HC/HP cable. insufficiently warm Malfunctioning of the timer for two-tier rate (if the product is installed in this configuration) Check the operation of the contactor day / night and that the set time is enough to heat water. Insufficient air flow to the evaporator. Clean the grilles and ducts regularly. Product off Usage of a large amount of hot water when the product is heating up phase. Check availability of electricity, turn on the product. The water is boiling (with the possible presence of steam from the taps) Reduced functioning of the heat pump, semipermanent operation of the electrical resistance Insufficient flow of hot water Overflowing water by the the safety valve Increase of the noise Problems of visualization or display off Probe error Control the presence, even if occasional E5. High level of scaling of the boiler and components Turn off the power, drain the unit, remove the sheath of the resistance and remove lime scale inside the boiler, be careful not to damage the enamel of the boiler and the sheath resistance. Repackage the product as in the original configuration, it is recommended to replace the flange gasket. Probe error Control the presence, even if occasional E5. Air temperature out of range Time W value too low Installation done not in accordance with electric voltage (too low) Evaporator clogged or frozen Problems with the heat pump circuit Depending from the climatic conditions. Set a parameter for lower temperature or a longer unit of Time W". Provide a proper Electric voltage. Check the cleaning of the evaporator. Make sure that there are no errors on the display. Are not yet past 8 days by: -First Time instalation. -Change of the parameter Time-W. -No power from mains in absence of batteries or exhausted batteries. Verify that there are no leaks along the circuit, check Leaks or obstructions by the water circuit the integrity of the the deflector pipe, the integrity of incoming cold water pipe and hot water pipe. A drip of water by the device should be considered normal during the heating Presence of obstructive elements inside Components vibration Damage or disconnection of the wiring connecting electronic board and interface board No power from mains in absence of batteries or exhausted batteries. If you want to avoid the drip, install an expansion vessel on the plant supply. If leakage continues during the period of no heating, check the calibration of the device and the pressure of the water network. Caution: Do not obstruct the hole for evacuation of the device! Check the components in movement, clean the fan and the other parts who can generate noise or vibrations. Check the components fixed with screws, be sure that the screws are tight. Check the integrity of the connection, check the operation of electronic boards. Check if there is electric mains supply and check the conditions of the batteries. 80
83 Heat pump water heater - OPERATING AND MAINTENANCE INSTRUCTIONS FOR THE USER Bad odor coming from the the product Abnormal or excessive consumption than expected Other Absence of a siphon or siphon empty Loss or partial obstructions of the refrigerant circuit Bad environmental conditions or improper installation Partially clogged evaporator Incorrect installation Provide a siphon, with the proper quantity of water. Start your product in heat pump mode, use a leak detector for R134a to verify that there are no leaks. Check the cleanliness of the evaporator grid and ducts. Contact the technical support. 8.4 Routine maintenance performed by users It is advisable to rinse out the appliance after each routine or extraordinary maintenance intervention. The pressure safety device must be operated regularly to verify that it is not clogged and to remove any limescale deposits. Check that the condensate drainage pipe is not obstructed. Check the perfect cleaning of grids and ducts. Check that the condensate drainage pipe is not obstructed. The batteries must be replaced every 2 years or in case of losses. Make sure that they are correctly disposed of and exclusively replace them with 3 AA-type rechargeable batteries (minimum 2100 mah); observe the polarities as illustrated in the battery housing. See fig. 14. The appliance should be unplugged when you remove the batteries. 8.5 Water heater disposal The appliance contains R134a-type refrigerant gas which must not be released into the atmosphere. In case of permanent decommissioning of the water heater, ensure that disposal procedures are carried out by qualified personnel only. This product conforms to EU Directive 2002/96/EC. The barred dustbin symbol appearing on the appliance s data plate indicates that the product must be disposed of separately from household waste once it reaches the end of its lifespan, and transferred to a waste disposal site for electric and electronic equipment, or returned to the dealer when purchasing a new appliance of the same kind. The user is responsible for delivering the decommissioned appliance to a suitable waste disposal site. Proper separated collection of the decommissioned appliance and its successive eco-compatible recycling, treatment and disposal contributes to preventing negative effects on the environment and health and favours the reuse of the materials comprising the product. For further details on the available waste collection systems, contact your local waste disposal office, or the dealer from which the product was purchased. This appliance includes rechargeable batteries: these must be removed before disposing of the appliance and placed in specific disposal containers. The battery housing is located beneath the cover on the lower side of the product. 81
84 BROWN/ MARRON ILLUSTRATIONS - ILLUSTRATIES - ILLUSTRATIONS M N L BROWN/ MARRON (S) WHITE/BLANC 15uF 450V (C) (R) BLUE/BLEU O BLUE/BLEU BLUE/BLEU BLACK/NOIR BLACK/NOIR U U 4 N L 2 BLUE/BLEU BROWN/ MARRON N L EDF A I R H Q F D P 2000 W G BROWN/MARRON BLUE/BLEU JAUNE - VERT JELLOW - GREEN E 3x1,2V AA B C 82

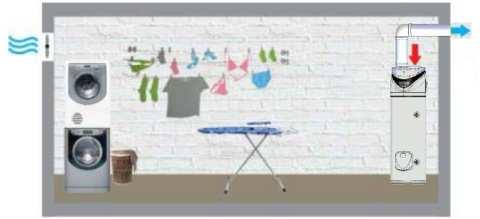

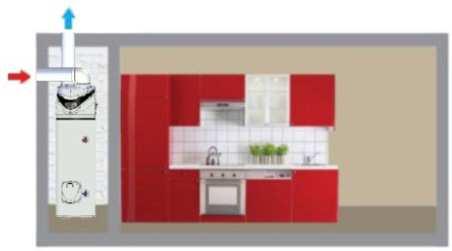

85 4 ILLUSTRATIONS - ILLUSTRATIES - ILLUSTRATIONS 5 M
86 ILLUSTRATIONS - ILLUSTRATIES - ILLUSTRATIONS
87 ILLUSTRATIONS - ILLUSTRATIES - ILLUSTRATIONS

 Recommandé grille, gerwijd raster,")
88 ILLUSTRATIONS - ILLUSTRATIES - ILLUSTRATIONS Ø150 Ø200 Pa m equivalent Pa m equivalent 1m PVC 2,7 1 0,8 1 1m Al 5,1 1,9 1,5 1,9 Grille A 5,4 2 4,2 5,3 Pa MAX: PVC 8,1 3 2, Al 6,5 1,4 2,0 1,7 Silencer 11,7 14,6 (A) Recommandé grille, gerwijd raster, dedicated grid. 86
m MAX equivalent 10 52 6 48 11 56 6 30")
89 ILLUSTRATIONS - ILLUSTRATIES - ILLUSTRATIONS Ø150 (a + b)m MAX equivalent Ø200 (a + b)m MAX equivalent
Le non respect de l avertissement entraîne des risques de dommages, très graves dans certaines circonstances pour les animaux, plantes ou objets.
 Cher Client, nuos vous remercions d avoir préféré notre chauffe-eau thermodynamique lors de votre achat. Nous souhaitons qu il puisse satisfaire toutes vos attentes et vous fournisse pendant de nombreuses
handleiding mode d emploi
 SCHIJNWERPER 3 LED s en 9 LED s handleiding PROJECTEUR 3 DEL et 9 DEL mode d emploi www.pondtechnics.com - 2 - NL / F Technische gegevens Type Lamptype: Spanning: Stroomverbruik: Bescherming: Kleurtemperatuur:
Chaffe-eau à pompe de chaleur Warmtepompboiler Heat pump water heater
 FR NL EN Chaffe-eau à pompe de chaleur Warmtepompboiler Heat pump water heater Cher Client, ARISTON THERMO vous remercie d avoir préféré notre chaffe-eau à pompe de chaleur lors de votre achat. Nous souhaitons
MIELE SERVICE. Tot uw dienst / A votre service
 MIELE SERVICE Tot uw dienst / A votre service Miele Service Certificate 2 Miele Service Certificate 10 jaar totale zekerheid Sinds meer dan 100 jaar is het merk Miele synoniem van kwaliteit, duurzaamheid,
FON. CombiView. Principaux avantages. CombiSerie. Applications. Données techniques. Entrée. Relais. Affichage. Données CEM
 CombiView e Principaux avantages CombiSerie Applications Données techniques Entrée Données configurables par l'utilisateur Relais Affichage Données CEM Communication Conditions d'essai Conformité Conforme
Oppervlaktereiniger. Nettoyeur de surfaces. Nederlands Gebruiksaanwijzing 2. Français Manuel d instructions (11/09)
") Oppervlaktereiniger Nettoyeur de surfaces Nederlands Gebruiksaanwijzing 2 Français Manuel d instructions 4 59618460 (11/09) Nederlands Veiligheidsvoorschriften VOORZICHTIG! Gebruik het apparaat niet zonder
Oppervlaktereiniger Nettoyeur de surfaces Nederlands Gebruiksaanwijzing 2 Français Manuel d instructions 4 59618460 (11/09) Nederlands Veiligheidsvoorschriften VOORZICHTIG! Gebruik het apparaat niet zonder
Open haarden Feux ouverts
 Open haarden Feux ouverts Vaartstraat 64 B-3920 Lommel Tel.: 011 60 00 60 Fax: 011 60 00 70 E-mail: info@bemal.be URL: http://www.bemal.be De Bemal open haarden worden vervaardigd uit vuurvast materiaal.
Installatie van versie 2.2 van Atoum
 Version française en seconde partie du document. Installatie van versie 2.2 van Atoum U moet in uw databases een nieuwe tabel aanmaken na de installatie van versie 2.2 van de toepassing Atoum. Hiervoor
Technische fiche details Solidstone Fiche technique détaillée Solidstone. 1. Gewicht. De berekening van de gewichten gaat als volgt :
 1. Gewicht De berekening van de gewichten gaat als volgt : - Gewicht douchebak = 0 9 * lengte (mm) * breedte (mm) * 30 mm * 2,1/1.000000 Gemiddeld is dit ongeveer 50 kg/m2 voor de douchebak. 2. Afmetingen
Conseils de sécurité importants
 Conseils de sécurité importants SKF Lubrication Systems Germany GmbH Heinrich-Hertz-Strasse 2-8, 69190 Walldorf, Allemagne Pompe ZPU Pompe HJ 2 Mesures volontaires de sécurité relatives à des pompes utilisées
TERRASVERWARMING MET PELLETS - CHAUFFAGE TERRASSE AU PELLET, POUR L EXTÉRIEUR. FARO Innovatieve verwarmingssystemen Système de chauffage innovant
 TERRASVERWARMING MET PELLETS CHAUFFAGE TERRASSE AU PELLET, POUR L EXTÉRIEUR FARO Innovatieve verwarmingssystemen Système de chauffage innovant TROEVEN VAN FARO POURQUOI FARO? Convectie en straling Convection
SPOT UV Vernis Sélectif UV
 SPOT UV Vernis Sélectif UV Taal Nederlands Langue Français SPOT UV Nederlands Eén van de opties voor luxe-afwerking, bijvoorbeeld bij visitekaartjes, is SPOT UV. SPOT UV is een glanzende lak die je op
NGI Vision Debat
 NGI Vision 2030 Debat Résultats que nous voulons obtenir Les sources authentiques de données géographiques sont des données de qualité et mises à jour, à disposition comme «données ouvertes». Les services
Eco bedrukte envelop C4 Enveloppes ECO imprimées C4
 Eco bedrukte envelop C4 Enveloppes ECO imprimées C4 Taal Langue Eco Bedrukte envelop C4 Formaat 229 x Opmaakformaat 235 x Voorkeur plaatsing *1 110 mm 110 mm Aan te leveren formaat 235 x (breedte x hoogte)
MONTAGEHANDLEIDING/NOTICE D INSTALLATION
 MONTAGEHANDLEIDING/NOTICE D INSTALLATION Ribbon douchecabine / cabine de douche (ref. 223216) Barna douchecabine / cabine de douche (ref. 223217)! Voor uw gemak zijn de wanden en tub van deze douchecabine
Hulpstukken Accessoires BEMAL. Vaartstraat 64 B-3920 Lommel Tel.: Fax: URL:
 Hulpstukken Accessoires Vaartstraat 64 B-3920 Lommel Tel.: 011 60 00 60 Fax: 011 60 00 70 E-mail: info@bemal.be URL: http://www.bemal.be 2 Hulpstukken Accessoires Hulpstukken Accessoires Aansluitmond type
WIJ ZIJN IN-LITE. In deze stand ziet u de LED buitenverlichting van in-lite. Eenvoudig te installeren, veilig en energiezuinig.
 WIJ ZIJN IN-LITE In deze stand ziet u de LED buitenverlichting van in-lite. Eenvoudig te installeren, veilig en energiezuinig. HET IN-LITE SYSTEEM Alle in-lite verlichting is gebaseerd op laagspanning
CLOSY PACK. Outillages conseillés (non fournis) Aanbevolen gereedschap (niet bijgeleverd)
 Aanbevolen gereedschap (niet bijgeleverd)") 1 560 350 5 30 570 600 (850) (1800) (390) 40 Outillages conseillés (non fournis) Aanbevolen gereedschap (niet bijgeleverd) glu e Mitigeur Lavabo (non fourni) lavabomengkraan (niet bijgeleverd) 80551/55
1 560 350 5 30 570 600 (850) (1800) (390) 40 Outillages conseillés (non fournis) Aanbevolen gereedschap (niet bijgeleverd) glu e Mitigeur Lavabo (non fourni) lavabomengkraan (niet bijgeleverd) 80551/55
Boire au travail = déboires
 Boire au travail = déboires 25-6-2015 2015 Hildegard Schmidt Association de la Ville et des Communes de la Région de Bruxelles-Capitale asbl Vereniging van de Stad en de Gemeenten van het Brussels Hoofdstedelijk
WHISTON. Tuinpaal. Poteau de jardin IM V09/18 NL Originele gebruiksaanwijzing F Mode d emploi original
 WHISTON Tuinpaal Poteau de jardin 626467 IM V09/8 NL Originele gebruiksaanwijzing F Mode d emploi original Lees de gebruiksaanwijzing zorgvuldig voordat u het product in gebruik neemt. Lire attentivement
Document préparé par Marie Spaey, en collaboration avec Pauline de Wouters. Novembre 2009.
 . Déclaration environnementale Document préparé par Marie Spaey, en collaboration avec Pauline de Wouters. Novembre 2009. Définition dans le cadre de Clé Verte Dans le cadre de l éco-label Clé Verte, l
Box and Blocks Test Of Manual Dexterity
 Handleiding voor de Box and Blocks Test Of Manual Dexterity Een test voor handmotoriek ADVYS art. 072280-7531 www.advys.be 1 Testprocedure: Klaarzetten van de test Open de testkoffer en plaats het tussenschot
I Olympia 100 D I I n b o u w c a s s e t t e s o p h o u t - I n s e r t s à b o i s
 I Olympia 100 D I I n b o u w c a s s e t t e s o p h o u t - I n s e r t s à b o i s 2 0 1 0-2 0 1 1 HOUTCASSETTES VAN OLYMPIA : EEN BEREDENEERDE KEUZE! UW KEUZE VOOR FUNCTIONALITEIT De houtcassettes
4 Port USB Travel Charger with universal AC plugs
 4 Port USB Travel Charger with universal AC plugs Chargeur de voyage USBx4 avec prises de courant universelles Teknihall support/ Teknihall, tel.: 03/485.63.51 2 SUMMAIRE CARACTÉRISTIQUES... 4 INSTALLATION...
RESERVOIR RONDO - TEMPO NOTICE DE MONTAGE - TECHNISCHE FICHE
 RESERVOIR RONDO - TEMPO NOTICE DE MONTAGE - TECHNISCHE FICHE DESCRIPTION Double volume Mono volume d b e f c Mono volume g a h i Double volume a b c d e f g h i Cuve Couvercle avec palette(s) de commande
SLESBROEKSTRAAT SINT-PIETERS-LEEUW TEL.: 02/ FAX.: 02/
 varia SLESBROEKSTRAAT 97 1600 SINT-PIETERS-LEEUW TEL.: 02/378 05 32 FAX.: 02/378 14 62 WWW.VACONV.BE H-137 DEHUMIDIFIER Luchtdrogers De robuuste drogers zijn perfect voor gebruik in moeilijke omstandigheden.
The professional s choice!
 GEEF UW PROJECT KLEUR COLORIEZ VOTRE PROJET The professional s choice! Geef persoonlijkheid aan uw voegwerk Een gevel bestaat voor 15 à 20% uit voegen. Die spelen een belangrijke rol in de duurzaamheid
Warmte-krachtkoppeling introduction généralle
 Warmte-krachtkoppeling introduction généralle Daan Curvers COGEN Vlaanderen Yves Lebbe Bruxelles environement Algemene inleiding WKK Algemene inleiding Trias Energetica Wat is WKK? WKK = de gelijktijdige
Telebib2 Edifact Validation - Tool introduction page 2 / 15
 Tool introduction Telebib2 Edifact Validation page 1 / 15 10.01.2012 Er is nu een tool beschikbaar die het mogelijk maakt een tekstbestand met inhoud op basis van de Telebib2 Edifact syntaxis the valideren.
Par ici! Langs hier! HOME PAGE
 Par ici! Langs hier! HOME PAGE Account Zie bladzijde 11, 12, 13 Voir page 11, 12, 13 Home Page CATALOG PAGE CATALOG PAGE Obtenir les désignations des produits en FR Productbeschrijving in het NL Recherche
Style 21 ROBE. fashion. Juillet 2017 FOURNITURES
 Juillet 2017 Style fashion 21 ROBE Dans les tailles 36 à 56 Il faut d abord lire «Quelle taille choisir?» à la page 28. La disposition des pièces en tissu se trouve à la page 2 de ce PDF. Longueur du dos
52686 MONITEUR BELGE Ed. 2 BELGISCH STAATSBLAD
 52686 VLAAMSE OVERHEID Leefmilieu, Natuur en Energie [C 2015/36016] 30 JULI 2015. Ministerieel besluit tot wijziging van de kaart van de focusgebieden, opgenomen in de bijlage bij het besluit van de Vlaamse
Remplacement de la pile sur FLAIR 22D ( version 2010) Vervangen van de batterij op FLAIR 22D (versie 2010) Distribution MT A votre service
 Vervangen van de batterij op FLAIR 22D (versie 2010) Distribution MT A votre service") Distribution MT A votre service MS-verdeling Tot uw dienst Remplacement de la pile sur FLAIR 22D ( version 2010) Vervangen van de batterij op FLAIR 22D (versie 2010) S1A5881401BE INDEX A3.DOC INSTRUCTIONS...
Distribution MT A votre service MS-verdeling Tot uw dienst Remplacement de la pile sur FLAIR 22D ( version 2010) Vervangen van de batterij op FLAIR 22D (versie 2010) S1A5881401BE INDEX A3.DOC INSTRUCTIONS...
BELGISCHE KAMER VAN CHAMBRE DES REPRÉSENTANTS
 DOC 54 2227/003 DOC 54 2227/003 BELGISCHE KAMER VAN VOLKSVERTEGENWOORDIGERS CHAMBRE DES REPRÉSENTANTS DE BELGIQUE 20 juli 2017 20 juillet 2017 WETSVOORSTEL tot wijziging van de programmawet van 27 april
OFFRE DOCUMENTATION TECHNIQUE PEUGEOT POUR REPARATEURS INDEPENDANTS AANBOD PEUGEOT TECHNISCHE DOCUMENTATIE VOOR ONAFHANKELIJKE REPARATEURS
 OFFRE DOCUMENTATION TECHNIQUE PEUGEOT POUR REPARATEURS INDEPENDANTS AANBOD PEUGEOT TECHNISCHE DOCUMENTATIE VOOR ONAFHANKELIJKE REPARATEURS OFFRE DOCUMENTATION TECHNIQUE PEUGEOT POUR REPARATEURS INDEPENDANTS
AR ASCENSEURS 09/03/2003 AR du 10/12/2012 Changements - bref résumé (MB 19/12/2012)
") AR ASCENSEURS 09/03/2003 AR du 10/12/2012 Changements - bref résumé (MB 19/12/2012) Sven De Mulder Sectormanager voor de sector Brussel Dirigeant de secteur Bruxelles Pour/ voor IMMO BALCAEN 28/05/2015
AR ASCENSEURS 09/03/2003 AR du 10/12/2012 Changements - bref résumé (MB 19/12/2012) Sven De Mulder Sectormanager voor de sector Brussel Dirigeant de secteur Bruxelles Pour/ voor IMMO BALCAEN 28/05/2015
GEBRUIKERSHANDLEIDING MODE D EMPLOI
 GEBRUIKERSHANDLEIDING MODE D EMPLOI Fork-lift crane series 03-2013 REMA HOLLAND BV Galjoenweg 47 / 6222 NS Maastricht Postbus 4303/6202 VA Maastricht Telefoon: 0031-43-3631777 Fax: 0031-43-3632922 Email:
Handleiding. SOLUS PA (Traditioneel rolluik) met Inus Keo schakelaar
 met Inus Keo schakelaar") Handleiding SOLUS PA (Traditioneel rolluik) met Inus Keo schakelaar A. Aansluiting Indien foute draadrichting: wissel de bruine en zwarte motordraad om. B. Afstelling 1. De draairichting van de oprolbuis
Handleiding SOLUS PA (Traditioneel rolluik) met Inus Keo schakelaar A. Aansluiting Indien foute draadrichting: wissel de bruine en zwarte motordraad om. B. Afstelling 1. De draairichting van de oprolbuis
PRIVA. Porte coulissante extensible pour douche Schuifdeur voor douche verstelbaar
 PRIVA Porte coulissante extensible pour douche Schuifdeur voor douche verstelbaar L R 819834 116-121 x 190cm 819835 116-121 x 190cm 819836 126-131 x 190cm 819837 126-131 x 190cm * Receveur de douche non
GSR 130 FA. Adaptation à un autre gaz. 1. Changer les injecteurs des brûleurs
 I 0 0 I 0 0 C A FRANÇAIS B NEDERLANDS GSR 0 FA Adaptation à un autre gaz Les opérations décrites ci-après doivent être effectuées par un professionnel qualifié. Après avoir effectué les opérations décrites
Bedrukte envelop EA4 Enveloppes personnalisées EA4
 Bedrukte envelop EA4 Enveloppes personnalisées EA4 Taal Nederlands Langue Français Bedrukte envelop EA4 Nederlands Formaat 220 x 312 mm Opmaakformaat 226 x 318 mm Envelop Formaat (mm) Materiaalsoort Opties
Schiedel BEMAL Hulpstukken Accessoires
 Hulpstukken Accessoires 1 Aansluitmond type PR Indien de PR zich in de kokerwand bevindt en rechtstreeks verbonden is met het betonnen kanaal, vormt de aansluiting en het afvoerkanaal één betonnen geheel,
CHAMBRE DES REPRÉSENTANTS BELGISCHE KAMER VAN
 DOC 50 1871/004 DOC 50 1871/004 BELGISCHE KAMER VAN VOLKSVERTEGENWOORDIGERS DES REPRÉSENTANTS DE BELGIQUE 22 januari 2003 22 janvier 2003 WETSONTWERP tot vaststelling van de algemene bepalingen die gelden
EDMONTON. Buitenlamp Éclairage extérieur ,626491_IM_V10-18 NL Originele gebruiksaanwijzing F Mode d emploi original
 EDMONTON Buitenlamp Éclairage extérieur 626487,626491_IM_V10-18 NL Originele gebruiksaanwijzing F Mode d emploi original Lees de gebruiksaanwijzing zorgvuldig voordat u het product in gebruik neemt. Lire
Bedrukte envelop C4 Enveloppes personnalisées C4
 Bedrukte envelop C4 Enveloppes personnalisées C4 Taal Langue Bedrukte envelop C4 Formaat 229 x Opmaakformaat 235 x * R = Rechts L = Links B = Boven(kant) Envelop Formaat (mm) Materiaalsoort Opties sluiting*
SPOT UV Vernis Sélectif UV
 SPOT UV Vernis Sélectif UV Taal Langue SPOT UV glanzende lak die je op een bepaald deel van het ontwerp kunt laten plaatsen. Wat heb je nodig om een geschikt ontwerp aan te leveren? Om een geschikt ontwerp
De l énergie verte pour tous
 De l énergie verte pour tous Gérald Semenjuk Directeur regional France et Suisse Décembre 2016 Agenda Quels enjeux? Pourquoi? 2 2016 Inc. Quels enjeux? Energies Bilan monde Besoins-Ressources 4 2016 Inc.
QUESTIONS RÉPONSES Réf. FIN/PRO/JND/KH/GVDD/2016/42
 QUESTIONS RÉPONSES Réf. FIN/PRO/JND/KH/GVDD/2016/42 Marché public de services Q1. De buitendiameter van de kern is 44,45 mm. De dikte van de kern is 6,35 mm (±0,762mm). Kunnen jullie bevestigen of de binnendiameter
Handleiding TV Simulator
 Handleiding TV Simulator NL Veiligheidsinstructies Bewaar het product en de bijbehorende accessoires buiten het bereik van kinderen. De tv-simulator en de stroomkabel zijn uitsluitend geschikt voor gebruik
Bedrukte envelop C5 Enveloppes personnalisées C5
 Bedrukte envelop C5 Enveloppes personnalisées C5 Taal Langue Bedrukte envelop C5 Formaat 229 x Opmaakformaat 235 x Envelop Formaat (mm) Materiaalsoort Opties sluiting* Opties venster* C5 229 x 162 90 gr.
22490 BELGISCH STAATSBLAD MONITEUR BELGE
 22490 BELGISCH STAATSBLAD 04.04.2016 MONITEUR BELGE FEDERALE OVERHEIDSDIENST BINNENLANDSE ZAKEN [C 2016/00214] Omzendbrief van 23 maart 2016 tot wijziging van de omzendbrief van 21 juni 2007 betreffende
Prises électriques télécommandées DUN-90210. User manual. on off A B C D E
 Prises électriques télécommandées DUN-90210 User manual on off A B C D E NL Merci de nous avoir fait confiance, et félicitations pour l acquisition de nos prises électriques télécommandées DUN-90210! L
DPM. The installer s choice cdvibenelux.com. Deurpositiecontact voor opbouwmagneten Contact de position de porte pour ventouse en applique NEDERLANDS
 NL FR NEDERLANDS FRANçAIS 300 400 500 Deurpositiecontact voor opbouwmagneten Contact de position de porte pour ventouse en applique The installer s choice INSTALLATIE HANDLEIDING Deurpositiecontact voor
ES 10 DF ES 10 DF ES 10 DF ES 10 DF
 Ergänzungssatz für Wärmespeicher WSP 1210 F bis WSP 3610 F Deutsch Ergänzung zur Gebrauchs- und Montageanweisung des WSP-F Supplementary Set for Electric Storage Heaters WSP 1210 F to WSP 3610 F English
Bedrukte envelop EA5 Enveloppes personnalisées EA5
 Bedrukte envelop EA5 Enveloppes personnalisées EA5 Taal Langue Bedrukte envelop EA5 Formaat 220 x Opmaak formaat 226 x Envelop Formaat (mm) Materiaalsoort Opties sluiting* Opties venster* EA5 220 x 156
Montagehandleiding - Notice de montage
 Montagehandleiding - Notice de montage Artikel - Article 763108 Omschrijving - Déscription Carport 304 * 510 cm ALU Nederlands : De door u gekochte constructie werd zorgvuldig gemaakt, gecontroleerd en
Wandlamp. mur lampe. Lodz. Originele gebruiksaanwijzing Lees de gebruiksaanwijzing zorgvuldig voordat u het product in gebruik neemt.
 Wandlamp mur lampe Lodz Originele gebruiksaanwijzing Lees de gebruiksaanwijzing zorgvuldig voordat u het product in gebruik neemt. Mode d emploi original Lire attentivement le mode d emploi avant d utiliser
VOOR GEBRUIK BINNENSHUIS POUR UTILISATION À L INTÉRIEUR
 VOOR GEBRUIK BINNENSHUIS POUR UTILISATION À L INTÉRIEUR RUBAN LED FLEXIBLE SÉRIE BRONZE (IP44) De Bronze serie LED strips zijn praktisch en oneindig toepasbaar! Met de Bronze LED strips is het mogelijk
38 heures pour les entreprises qui occupent moins que 50 travailleurs;
 BLANCHISSERIES - C.C.T. : DUREE DU TRAVAIL - DUREE DU C.C.T. du 07.02.1991 (A.R. 17.06.1992 - M.B. 01.08.1992) C.C.T. du (A.R. - M.B. 16.06.1994), modifiée par C.C.T. du 16.03.1995 (A.R. 19.09.1995 - M.B.
ESQU INSTALLATIEGIDS GUIDE D INSTALLATION EASY SIMPLE QUICK - UNIQUE. DOUCHEBAK RECEVEUR DE DOUCHE
 ESQU DOUCHEBAK RECEVEUR DE DOUCHE INSTALLATIEGIDS GUIDE D INSTALLATION EASY SIMPLE QUICK - UNIQUE www.vanmarcke.com Belangrijk: - Lees deze instructies aandachtig vooraleer de installatie te beginnen.
BELGISCHE KAMER VAN CHAMBRE DES REPRÉSENTANTS. houdende invoering van een taks op de effectenrekeningen. instaurant une taxe sur les comptes-titres
 DOC 54 2837/005 DOC 54 2837/005 BELGISCHE KAMER VAN VOLKSVERTEGENWOORDIGERS DES REPRÉSENTANTS DE BELGIQUE 16 januari 2018 16 janvier 2018 WETSONTWERP houdende invoering van een taks op de effectenrekeningen
FRAMES WINDOW TECHNOLOGY MOTTURA.COM
 FRAMES WINDOW TECHNOLOGY MOTTURA.COM FRAMES UNE GAMME DEDIE Rollbox 40 et 60 sont des rideaux à roulement filtrants et occultant spécifiques pour installation directe sans perçage sur bâtis en aluminium.
Clientèle Sociale / Beschermde Klanten
 Les marchés du gaz et de l électricité en région de Bruxelles-Capitale en chiffres De aardgas- en elektriciteitsmarkten in het Brussels Hoofdstedelijk gewest in cijfers Clientèle Sociale / Beschermde Klanten
Haut-Parleur Led Compact
 ENVIVO Haut-Parleur Led Compact GUIDE RAPIDE HAUT-PALEUR LED COMPACT Totalement sans fil - le haut-parleur EnVivo Bluetooth LED vous permet de diffuser votre musique préférée de n importe quel appareil.
Over dit boek. Richtlijnen voor gebruik
 Over dit boek Dit is een digitale kopie van een boek dat al generaties lang op bibliotheekplanken heeft gestaan, maar nu zorgvuldig is gescand door Google. Dat doen we omdat we alle boeken ter wereld online
Naambordjes Plaques murales
 Naambordjes Plaques murales Taal Langue Naambordjes Wijs bezoekers de weg, laat weten waar het toilet te vinden is of waarschuw aanwezigen voor de omstandigheden op jouw bedrijventerrein. Onze bordjes
FEDERALE OVERHEIDSDIENST SERVICE PUBLIC FEDERAL INTERIEUR BINNENLANDSE ZAKEN
 FEDERALE OVERHEIDSDIENST BINNENLANDSE ZAKEN Ministerieel besluit van 8 juni 2007 tot bepaling van het model van de werkkleding en het embleem van bewakingsagenten. SERVICE PUBLIC FEDERAL INTERIEUR Arrêté
INSTALLATIE VOORSCHRIFT
 INSTALLATIE VOORSCHRIFT Ontwerp Voor doorgifte van IP signalen via coax systeem. Voorzien van HF in- en uitgang voor eenvoudig plaatsen tussen coax kabel. Voorzien van RJ-45 aansluiting voor in- uitkoppeling
Comprendre et se faire comprendre commence par s exprimer en néerlandais
 Comprendre et se faire comprendre commence par s exprimer en néerlandais Begrijpen en begrepen worden begint met het spreken van de Nederlandse taal La langue néerlandaise crée un lien entre nous Wat leest
Aqua Dimension Geothermal heat pumps Aqua Dimension geothermische warmtepompen Aqua Dimension pompes à chaleur geothermique
 Aqua Dimension Geothermal heat pumps Aqua Dimension geothermische warmtepompen Aqua Dimension pompes à chaleur geothermique Met de Aqua Dimension grond-warmtepomp systemen is het mogelijk om gratis energie
VRAGEN - ANTWOORDEN Overheidsopdracht voor diensten
 VRAGEN - ANTWOORDEN Overheidsopdracht voor diensten Q1. Mogen Engelstalige CV s worden bijgevoegd bij ons dossier, of moeten dit alleen maar Nederlandse zijn? De CV s mogen Engelstalig zijn. Q2. Dans le
Collectieve arbeidsovereenkomst van 27 juni 2011 Convention collective de travail du 27 juin 2011
 Paritair Comité voor de bedienden van de nonferro metalen non ferreux Collectieve arbeidsovereenkomst van 27 juni 2011 Convention collective de travail du 27 juin 2011 Tewerkstellings- en opleidingsinitiatieven
Montagehandleiding - Notice de montage
 Montagehandleiding - Notice de montage Artikel - Article 771417 Omschrijving - Déscription Carport Hannover 604 x 760 cm Carport Hannover 604 x 760 cm Nederlands : De door u gekochte constructie werd zorgvuldig
SNCB. - Installations en panne. NMBS. - Defecte installaties.
 Vraag nr. 2139 van de heer volksvertegenwoordiger Luk Van Biesen van 10 februari 2017 aan de minister van Mobiliteit, belast met Belgocontrol en de Nationale Maatschappij der Belgische spoorwegen NMBS.
LOTIS BF MONTAGE HANDLEIDING MANUEL DE POSE
 LOTIS BF MONTAGE HANDLEIDING MANUEL DE POSE Algemene informatie Controleer de producten bij ontvangst onmiddellijk op eventuele schade, ontbrekende delen of productiefouten. Problemen dienen onmiddellijk
NUCLEAIR RISICO? BEREID JE VOOR! Meer tips op Informeer je op
 NUCLEAIR RISICO? BEREID JE VOOR! Informeer je op www.nucleairrisico.be. Schrijf je in op BE-Alert. Zo ben je meteen verwittigd in een noodsituatie. Maak een noodplan op maat op www.mijnnoodplan.be. 4 Haal
BELGISCHE KAMER VAN CHAMBRE DES REPRÉSENTANTS
 DOC 54 2753/003 DOC 54 2753/003 BELGISCHE KAMER VAN VOLKSVERTEGENWOORDIGERS DES REPRÉSENTANTS DE BELGIQUE 18 januari 2018 18 janvier 2018 WETSONTWERP houdende wijzigingen van diverse bepalingen van het
Notice technique d installation et d entretien Cette notice est destinée exclusivement aux appareils installés en France
 OK Notice technique d installation et d entretien Cette notice est destinée exclusivement aux appareils installés en France Technische instructies voor de installateur FR BE TABLE DES MATIÈRES 2Généralités
TIPS MONTAGE TUNNELSERRE SERRABRIS
 TIPS MONTAGE TUNNELSERRE SERRABRIS 1. De buizen moeten gemonteerd worden zoals aangeduid op de tekening op de handleiding. 2. De voor- en achterkant van de tunnel moeten gemonteerd worden alvorens het
Mode d emploi. Gebruiksaanwijzing
 Mode d emploi Gebruiksaanwijzing 1 Particularités / Kenmerken: 1 2 3 4 5 6 7 8 2 Particularités / Kenmerken: 1 Le multitalent pour loisirs, école et affaires: un grand casier (approprié pour un classeur
Poêles et poêles à granulés Catalogue 2013-2014
 Poêles et poêles à granulés Catalogue 2013-2014 Pelletkachels en pellet CV Katalogus 2013-2014 IL CALORE DELLA NATURA NOTRE SOCIÉTÉ ONS BEDRIJF L'expérience, la compétence, la disponibilité WINTERÖFEN
EASY FEEDER DC 40 / DS 400
 TIJD VOOR VERANDERING LE TEMPS DU CHANGEMENT EST ARRIVE CO MATIC aanvoerapparaat met DC BRUSHLESS SERVO MOTOR CO MATIC entraîneur Avec servomoteur sans balai à courant continu Het meest geavanceerde aanvoerapparaat
Sac à dos de sécurité Wolffepack
 951-464 Sac à dos de sécurité Wolffepack Réf. 218-338 Veuillez lire cette notice d utilisation attentivement avant d utiliser le produit! Consignes de sécurité Veuillez lire attentivement les indications
P 12. igas 170 highline P17. igas side P 17. igas side P 17. igas 225 window
 by highline P 15 P 15 P 7 P 14 P 8 igas 40 highline igas 40 highline long igas 75 highline igas 75/65 highline igas 110 highline 44 MODELS 2 side 3 side igas 40 2 side P 15 igas 40 2 side long P 15 igas
 E G U L O A T A C S G U O A T A L C Te l : + 3 2 5 1 2 5 0 6 8 7 sales@supremebelgium.com w w w. s u p r e m e b e l g i u m. c o m Drinkflessen/Bidons Alle drinkflessen zijn vervaardigd in de UK. De flessen
BELGISCHE KAMER VAN CHAMBRE DES REPRÉSENTANTS
 DOC 54 2395/005 DOC 54 2395/005 BELGISCHE KAMER VAN VOLKSVERTEGENWOORDIGERS DES REPRÉSENTANTS DE BELGIQUE 20 februari 2018 20 février 2018 WETSVOORSTEL tot wijziging van de wet van 13 juni 1986 betreffende
Statische zuigers type Bemal met deksel
 Statische zuigers type Bemal met deksel Aspirateurs statiques type Bemal avec couvercle Vaartstraat 64 B-3920 Lommel Tel.: 011 60 00 60 Fax: 011 60 00 70 E-mail: info@bemal.be URL: http://www.bemal.be
Montagehandleiding Timer SWK2070C
 Montagehandleiding Timer SWK2070C 459270.66.11 02/09/B Alleen voor verwarmingstoestellen VFMi 20C en VFMi 30C 1. Verwijder de bevestigingsschroef uit het rechterzijpaneel. 2. Plaats en bevestig de twee
Montagehandleiding - Notice de montage
 Montagehandleiding - Notice de montage Artikel - Article 763207 Omschrijving - Déscription Carport enkel 340 * 570 cm Carport simple 340 * 570 cm Nederlands : De door u gekochte constructie werd zorgvuldig
DORMA HSW-R. Handleiding mobiele scheidingswand Notice d'utilisation cloison mobile
 DORMA HSW-R Handleiding mobiele scheidingswand Notice d'utilisation cloison mobile 2 NL- ALGEMENE OPMERKINGEN Gelieve de volgende regels in acht te nemen om op lange termijn de functionele efficiëntie
TRAPPEN MET METAAL ESCALIERS AVEC MÉTAL
 TRAPPEN MET METAAL ESCALIERS AVEC MÉTAL MAATWERK TRAVAIL SUR MESURE INTERIEURADVIES CONSEILS D INTÉRIEUR D HONDT gaat vanaf nu als D HONDT INTERIEUR door het leven. D HONDT is niet alleen fabrikant van
MONTAGEHANDLEIDING INSTRUCTIONS DE MONTAGE
 BELGIAN PREMIUM QUALITY STEEL DOORS MONTAGEHANDLEIDING INSTRUCTIONS DE MONTAGE WWW.STEELIT.BE - WWW.STEEL-IT.NL 2 3 Beste klant, Proficiat met uw aankoop van een STEELIT stalen binnendeur! Met STEELIT
Collectieve arbeidsovereenkomst van 22 september 2017 betreffende de modernisering van de arbeidsduur
 Paritair comité 118 van de voedingsnijverheid Commission paritaire 118 de l industrie alimentaire Collectieve arbeidsovereenkomst van 22 september 2017 betreffende de modernisering van de arbeidsduur Convention
KIT DE COMMANDE POUR BALLON A DISTANCE KIT BOILERREGELING VOOR BOILER OP AFSTAND
 KIT DE COMMANDE POUR BALLON A DISTANCE KIT BOILERREGELING VOOR BOILER OP AFSTAND Ces instructions techniques font intégralement parties des instructions techniques de l appareil sur lequel est installé
www.gallon.be lineaire actuatoren vérins linéaires
 lineaire actuatoren vérins linéaires afmetingen dimensions.4 SHG-5-A -> SHG-100-A.5 SHG-5-A -> SHG-500-A.6 SHG-5-B -> SHG-100-B.7 SHG-0-B -> SHG-500-B.8 afmetingen van de accessoires dimensions des accessoires
Système de porte coulissante automatique Série Besam Frame
 Système de porte coulissante automatique Série Besam Frame Accessoires et options Types de profil : - Frame - Frame thermo (profil à rupture de pont thermique) Finition du profil : - aluminium anodisé,
SOLE. Uitschuifbaar display touch screen Boitier de commande escamotable touch screen. Afstandsbediening Télécommande
 SOLE Uitschuifbaar display touch screen Boitier de commande escamotable touch screen Afstandsbediening Télécommande 418 419 REVOLUTION VASCHE SOLE inart NOVELLINI decoration technology REVOLUTION VASCHE
Prijzen technische dienst Prix prestations service technique INHOUD / CONTENU
 INHOUD / CONTENU 1. OPSTART INBEDRIJFSTELLING INSTALLATIE / MISE EN SERVICE INSTALLATION p. 2 1a. Opstart stookolie en gasbranders / Mise en service brûleurs fioul et gaz 1b. Opstart ketels en sturing
Mefa brievenbussen. Puur design. Mefa boîtes aux lettres. Design à l état pur.
 Mefa brievenbussen. Puur design. Mefa boîtes aux lettres. Design à l état pur. Mefa brievenbussen. Puur design. Mefa brievenbussen blinken niet alleen uit door hun stijlvol design. Ze zijn ook functioneel,
Moss. Frame steel without topper rim Flat moss. Frame Polystone natural finish Round moss/flat moss
 Frame steel without topper rim Flat moss Frame Polystone natural finish Round moss/flat moss Frame Aluminium without topper rim Round moss/flat moss Frame Aluminium with topper rim Round moss/flat moss