Erica. Weaving instruction Weef instructie
|
|
|
- Fanny Desmet
- 5 jaren geleden
- Aantal bezoeken:
Transcriptie

1 Erica Weaving instruction Weef instructie Introduction Introductie... 2 Design Weefplan... 3 Making a warp Het maken van de schering... 6 Putting the warp on the loom Schering op het getouw zetten Weaving Het weven Tips and important points Tips en aandachtspunten Trouble shooting Wat er mis kan gaan Sample threading plans Voorbeelden bindingen Version: W-Erica-V2
2 1
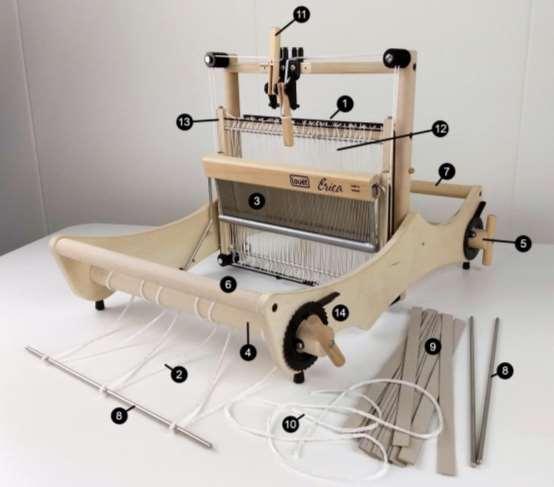
3 Introduction Loom parts 1. Raddle 2. Beam cords 3. Reed 4. Cloth beam 5. Warp beam 6. Breast beam 7. Back beam 8. Apron and lease bars 9. Warping strips 10. Cord to hold lease bars 11. Toggles 12. Heddles 13. Shafts or harnesses 14. Pall and ratchet wheel A warp consists of threads that are organized lengthwise beside each other. The weft are threads you weave from side to side through the warp threads. The combination of warp and weft is what makes your cloth. To make your warp and weft you will need: - your Erica loom - warping posts or a warping mill - a stick shuttle or shuttle with paper quills and hand bobbin winder - a heddle/reed hook Introductie Onderdelen getouw 1. Evenaar 2. Boomkoorden 3. Riet 4. Doekboom 5. Scheerboom 6. Borstboom 7. Strijkboom 8. Aanbind- en kruisstaven 9. Opboomstroken 10. Koord voor bevestiging kruisstaven 11. Hendels 12. Hevels 13. Schachten 14. Pal- en palwiel Een weefsel bestaat uit de schering (ook wel ketting), draden die in de lengterichting van de stof lopen, en de inslag, draden dwars op die richting. Om je schering te maken en te weven heb je nodig: - je Erica getouw - scheerbalkjes of een scheermolen om de schering te maken - een steeklat of schuitje met spoeltjes en handspoelmolen - een rijghaak/rietmesje 2
4 Erica comes with 200 heddles. If you plan to use a warp thread that is finer than 15 ends per inch (EPI) over the full 30 cm (12 ) weaving width, you will need additional heddles. On a 50 cm (20 ) Erica, your limit is 10 EPI over the full width before you will need additional heddles. The supplied metric reed has 4 openings per cm (10 openings per inch). Therefore, your warp can have 2, 4 or 8 threads per cm (5, 10 or 15 threads per inch), by skipping an opening or placing 1 or 2 threads through one opening. Reeds of different metric and imperial sizes (EPI) are available. Design Before you start weaving you make a design (plan): what are you weaving? You work with the following items: - Draft - Warp - Weft - Warp length - Weaving length - Weaving width - Reed - PPI (picks per inch) - Order of weft - Loom waste Standaard zijn er bij de Erica 200 hevels. Bij 30 cm weefbreedte heb je extra hevels nodig als je fijner dan 6 draden per cm wilt weven. Bij 50 cm weefbreedte heb je extra hevels nodig bij meer dan 4 draden per cm. Erica heeft een riet met 4 openingen per cm en daarmee kan je 2, 4 of 8 draden per cm weven, door een opening over te slaan of één of twee draden door een opening te rijgen. Naast het riet met 4 openingen per cm zijn rieten van 3 en 5 openingen per cm het meest gebruikt, maar ook andere maten zijn leverbaar. Weefplan Voordat je gaat weven maak je een weefplan (ontwerp): wat ga je weven? Bij een weefplan werk je met de volgende punten: - Weefbrief - Schering - Inslag - Scheringlengte - Weeflengte - Weefbreedte - Riet - Inslagdichtheid - Inslagvolgorde - Krimp- en aanbindverlies 3
5 Then you also have the post-treatment (washing). It is advisable to measure the width and length of the cloth before and after washing and note this for the next time. The warp (also called a chain or warp chain) that you put on your loom needs to be a little longer than the cloth that you wish to weave. There is loom waste (approximately 40 to 50 cm or 15 to 20 ) and the project will also get shorter because the warp threads will be stretched somewhat up and down as you weave. This depends on the elasticity of the yarn you use for your warp. The finished cloth could shrink, depending on the yarn type. After some practice and trial and error, you will learn how long of a warp you will need. The thickness of the yarn is important. The more threads per inch of width means thinner yarn; this is referred to as EPI (ends per inch) or TPI (threads per inch). The EPI you want, will depend on the type of weft yarn you use (thickness). The PPI (picks per inch) is the number of weft threads per inch of woven cloth and is determined by how hard you beat with the reed. In the simplest weave structure, called plain weave, you will see equal amount of warp and weft threads, assuming you are using the same thickness of yarn for warp and weft and you are beating evenly. Vervolgens heb je ook nog de nabehandeling (wassen). Het is verstandig om de breedte en lengte van het weefsel voor en na het wassen te meten en dit te noteren voor een volgende keer. De schering (ook wel ketting) die je op het getouw gaat zetten moet wat langer zijn dan de lap stof die je wilt gaan weven. Er is aanbindverlies (zo n 40 tot 50 cm) en de stof wordt ook iets korter doordat de draden in het weefsel enigszins op en neer lopen. Dit laatste is ook afhankelijk van het soort weefsel. De stof kan bij het wassen krimpen, afhankelijk van het materiaal. Door ervaring zal je leren hoeveel lengte je extra moet nemen. De dikte van je garen is belangrijk. Bij meer draden per cm gebruik je dunnere garens. De dichtheid van je scheringsdraden wordt bepaald door hoe hard je met het riet aanslaat. Bij het eenvoudigste weefsel, de zogenaamde linnenbinding of platbinding, zie je evenveel van de schering als van de inslag, tenminste als er per centimeter evenveel inslag- als scheringdraden zijn. Je weeft dan vierkant. 4
6 Draft To calculate the yarn you need the following information: 1. The final length of the cloth 2. The width of the warp 3. The set of the warp (the number of warp threads per cm or inch (PPI)) You determine the number of threads per cm as follows: Wrap your yarn around a ruler. Count the number of threads per 2 or 3 cm. For plain weave you take 60 to 70% of this as your number of threads per cm. For example, if you have 12 threads per 2 centimetres, you need: 12/2 * 0.65 = 3.9; so 4 threads per centimetre. A rule of thumb for a scarf is that you would use a yarn that gives you 4 threads per cm (10 EPI). Warp length calculation: Assume you would like to end up with a cloth of 5 meters (16.4 ft) long, 24 cm (9.4 ) wide and use 4 threads per cm (10 EPI). The total number of threads in your warp is then the width of your cloth in cm times the number of threads per cm. The total length of your warp is your desired length of useable fabric plus the shrinkage plus the loom waste. Weefbrief Voor de berekening van de garens staan de volgende drie gegevens vast: 1. De uiteindelijke lengte van het weefsel 2. De breedte van de schering 3. De instelling van de schering (het aantal draden per centimeter) Het aantal draden per centimeter bepaal je als volgt: Wikkel om een liniaal een draad tegen elkaar aan. Tel het aantal draden per 2 of 3 centimeter. Voor linnenbinding neem je hier 60 tot 70% van als je aantal draden per cm. Heb je bijvoorbeeld 12 draden per 2 centimeter, dan ga je uit van: 12 / 2 * 0,65 = 3,9; dus 4 draden per centimeter. Als voorbeeld kun je er ook vanuit gaan dat 4 draden per cm gelijk is aan een garendikte voor breipen 3 3,5. Berekenen van een schering: Je wilt een lap stof hebben van 5 meter lengte, 24 cm breed en 4 draden per cm. Het totale aantal draden dat je in de schering nodig hebt is de breedte van je weefsel in centimeters maal het aantal draden per cm. De totale lengte van je scheringdraden is je gewenste lengte bruikbare stof plus de te verwachten krimp plus het aanbindverlies. 5
 0,5 m loom waste 6,0 m length of warp threads So you need 96 warp threads of 6 meter length. Making a warp It is handy to tie on the warp threads per section of the tieon bar.")
7 Number of warp threads: 24 cm fabric width 4 threads per cm = 24 x 4 = 96 threads Length of warp threads: 5,0 m useable fabric length 0,5 m shrinkage after washing (appr. 10%) 0,5 m loom waste 6,0 m length of warp threads So you need 96 warp threads of 6 meter length. Making a warp It is handy to tie on the warp threads per section of the tieon bar. On the Erica 30, the sections beside and between the cords are 5, 10, 10 and 5 cm (2, 4, 4 and 2 ), see picture. On the Erica 50, the sections are 9, 16, 16, 9 cm (3.5, 6.25, 6.25 and 3.5 ), see picture. Aantal scheringsdraden: 24 cm breedte stof 4 draden per cm = 24 x 4 = 96 draden Lengte scheringsdraden: 5,0 m bruikbare lengte stof 0,5 m krimp na het wassen (ca. 10%) 0,5 m aanbindverlies 6,0 m lengte scheringdraden Dus heb je 96 scheringdraden van 6 meter lengte nodig. Het maken van de schering Het is erg handig om de gescheerde draden per tussenruimte van de aanbindlat af te binden. Bij de Erica 30 cm zijn de ruimtes naast en tussen de koorden 5, 10, 10 en weer 5 cm, zie ook foto. Bij de Erica 50 cm zijn de ruimtes 9, 16, 16 en 9 cm, zie ook foto. Erica 30 (12 ) 5 cm 10 cm 10 cm 5 cm Erica 50 (20 ) 9 cm 16 cm 16 cm 9 cm
.")

8 We are using warping posts in these instructions. In this example we are making 2 halves of warp and will combine them when winding the warp onto the loom. The warp will be 24 cm (9.5 ) wide. We want to place the warp centered on the loom, so the spaces beside and between the cords are 2, 10, 10 and 2 cm (0.8, 4, 4 and 0.8 ). With 4 threads per cm we need bundles of 8, 40, 40 and 8 threads. The threads go back and forth, so for each half of the warp we bind off groups of 4 and 20 loops at the cross. Attach the warping posts to a table. The distance between the posts depends on the length of your warp. With a longer warp, attach the posts farther apart. Make a sample thread, in a different colour yarn, with a length of more than 6 meter. Make a small loop and knot on both ends of the sample thread, so the thread including the loops will be 6 meters long. In deze instructie maken we gebruik van scheerbalkjes. We maken twee halve scheringen, die we combineren als we de schering op het getouw zetten. Het weefsel wordt 24 cm breed. We willen de schering in het midden van het getouw, dus de ruimtes naast en tussen de koorden zijn in dit geval 2, 10, 10 en 2 cm. Met 4 draden per cm hebben we bosjes van 8, 40, 40 en 8 draden nodig. De draden lopen heen en terug dus we hoeven bij het kruis maar 4 en 20 lussen af te binden voor de halve schering. Bevestig de scheerbalkjes op de tafel. Bij de afstand tussen de balkjes hou je rekening met de lengte van de schering. Bij een langere schering zet je ze verder uit elkaar. Maak een leidraad van een andere kleur dan die van je schering en van ruim 6 meter lengte. Knoop aan beide einden een lus, zodanig dat de draad inclusief lussen 6 meter lang is. 7
.")

9 Place one of the loops of your sample thread over one of the pegs on your warping post (in this case the peg on the left of the picture). Now run the sample thread past three consecutive pegs (these will be used to make the cross). Next string the sample thread from warping post to warping post, back and forth, finishing with the end loop being placed on any free peg (in this case the right peg of the front post). From now on we will call this peg the first peg. Adjust positioning of the warping posts as needed. Attach the end of your warp yarn with a loop on the first peg and follow the route of your sample thread to the other end. Make a cross with the last three pegs, weaving in and out so that your warp thread is on the outside of the middle peg on your first pass and on the second pass the warp thread will be on the inside of the middle peg. This cross is what keeps every warp thread separated and in sequential order which is critical later on in the process. Repeat this process going back to the beginning, the first peg, always following the same path, back and forth, Leg een lus van de leidraad om een pen (in dit geval de meest linker in de foto) en leidt de draad langs 3 achtereenvolgende pennen, zodat je straks daar het kruis kan maken. Zoek vervolgens een zigzag route langs de andere pennen die past voor de lengte van de leidraad. Bij het einde van de draad maak je een lus die je over een willekeurige vrije pen plaatst (in dit geval de meest rechter pen van het voorste scheerbalkje). Dit eindpunt noemen we vanaf nu de eerste pen. Pas de positie van de scheerbalkjes indien nodig aan. Bevestig het garen met een lus aan de eerste pen en volg de route naar het andere eind. Maak het kruis op de plek waar je met de leidraad langs 3 achtereenvolgende pennen bent gegaan. De draad kruist zichzelf tussen de twee laatste pennen, zoals op de foto te zien is. Dit kruis zorgt ervoor dat de scheringsdraden op volgorde blijven, wat later in het proces belangrijk is. Vervolgens ga je weer terug naar het begin, de eerste pen. Volg telkens hetzelfde pad, heen en weer, en denk eraan ook het kruis elke keer te maken. Let er op dat je het garen 8


10 making your cross each pass. Do not pull the yarn too tight, but keep it snug, don t let any part sag. If your warp plan calls for a change of colour, do this at the first or last peg. Cut your yarn and tie on the new colour, making sure the knot is at the first or last peg. If you encounter a knot in your yarn, cut out the knot and return to the first or last peg, tie on a new end and continue. It is important not to have any knots in the middle of the warp. Count your warp threads while you wrap them. For easier counting you can put a piece of yarn across the warp threads after every 10 threads. When you are finished, tie off the cross in 4 places (see picture). Make sure to tie off the cross in sections that correspond to the number of threads that comes beside and between the beam cords on the tie on bar ( in this case 4 and 20 loops). niet te strak, maar steeds ongeveer even strak om de pennen legt. Als je van kleur wisselt, knoop je de draden bij de eerste of laatste pen aan elkaar. Als je onderweg een knoopje in het garen tegenkomt, knip je dat er tussen uit en ga je terug naar een van de twee einden om daar de draden weer aan elkaar te knopen. Het is belangrijk om geen knoopjes midden in de schering te hebben. Om het tellen te vereenvoudigen kan je na bijvoorbeeld elke 10 draden een stukje garen dwars over de schering leggen. Bind bij het kruis de draden op 4 plaatsen af (zie foto). Zorg ervoor dat je afbindt in het aantal dat straks naast en tussen de boomkoorden op de aanbindstaaf komt (in dit geval 4 en 20 lussen). 9

11 Before you remove the warp from the pegs, tie your warp off every 50 to 80 cm (20 to 30 ) over the entire length of the warp. This will help to make sure your warp does not get tangled. While you are removing the first half of the warp from the pegs, make sure you leave your sample thread in place. You will need this for the second half of your warp. To keep the warp organized, you can use your hands to make a crochet stitch to tie the warp together. Take the warp off of the first peg (not where the cross is). Put a hand through the loop on the inside of the peg and grab a piece of the warp and pull it through the loop in a crochet hook method. Repeat this stitch shortening the warp with every stitch. Repeat this process to make the second half of the warp. Remember to make the group of 40 threads first and the group of 8 threads second, a mirror image of the first half of the warp. Remove the second half of the warp in the same manner as the first. You now have 2 warp chains. Voordat je de schering van de pennen haalt, bind je die nog af op een aantal extra plaatsen (tussenruimtes 50 tot 80 cm) en bij de laatste pen. Controleer voordat je de schering van de pennen haalt of je nergens de leidraad per ongeluk hebt mee gebonden. Die moet blijven zitten voor de andere helft van de schering die je op dezelfde wijze maakt. Neem de schering van de pen aan het andere eind dan waar het kruis zit. Heb je een lange schering, dan maak je met je handen een haaksteek om het geheel in te korten, terwijl je de schering van de pennen haalt, om zo een warboel te voorkomen. Maak op dezelfde wijze de andere helft van de schering. Denk eraan om eerst de groep van 40 draden en dan de tweede groep van 8 draden af te binden, dus gespiegeld ten opzichte van de eerste helft van de schering. Verwijder de tweede helft van de schering op dezelfde manier als de eerste. Je hebt nu twee halve scheringen. 10


12
13 Attaching the lease sticks Place the longer cord (left-over from the assembly) around the axles of the rollers and pull it tight. You will use this cord to attach the metal rods, used as lease sticks when you are dressing your Erica. Putting the warp on the loom Place the two halves of the warp chain over the raddle with the cross at the back of the loom and the excess warp chain in the front of the loom. Take one of the metal tie on bars. 1. Put it through the loop of the first group of threads of your warp. Use the loop of the warp at the very front of the cross. 2. Place the loop of the first warp beam cord over the same bar. 3. Place the second group of threads over the bar. 4. Add the middle warp beam cord. 5. Place the next group of threads. 6. Place the last warp beam cord (not in picture). 7. Place the final group of threads. Bevestigen kruislatten Leg het (bij montage overgebleven) langere koord aan beide kanten om de as van de wieltjes en trek het strak. Je gebruikt dit straks om de twee metalen kruisstaven te bevestigen. Schering op het getouw zetten Leg de twee halve scheringen in het getouwtje over de evenaar met het kruis naar de achterkant. Neem een van de metalen aanbindstaven. 1. Steek hem door het eerste deel schering. 2. Leg vervolgens het eerste boomkoord eromheen. Let erop dat het boomkoord om de borstboom heen ligt. 3. Steek het door het tweede deel van de schering. 4. Leg het middelste boomkoord eromheen. 5. Steek het door het derde stuk van de schering (20 lussen van 40 draden) 6. Leg het derde boomkoord eromheen (niet op foto). 7. Steek hem door de laatste 4 lussen van de schering. 12


14 Put the two lease bars through the openings on both sides of the cross. Now place the ends of these bars in a hole on the Texsolv cord. Pick a hole in the Texsolv for each bar so they are supported and the cross is held tightly. Now that your cross is supported by the lease bars and secure, so that the bars cannot fall down, you can remove the tie-ups that you placed in 4 spots on the cross, while making your warp. Steek de twee metalen kruisstaven door de openingen aan weerszijden van het kruis. De einden van deze staven steek je door het koord met een paar koordlussen tussenruimte. Nu de kruisstaven goed vast zitten en het kruis open houden kunnen de afbindingen van het kruis worden verwijderd. 13
15 Now you are going to place the warp threads in the raddle. Each slot in the raddle is 0.5 cm (0.2 ). Since the warp has 4 threads per cm (10 TPI), you will need to place 2 threads in each slot on the raddle. Since the raddle is metric, you need to do some approximating if working in imperial EPI. 5 slots per inch and divide your warp threads accordingly. Since the warp is 24 cm (9.5 ) wide, you should have 3 cm (1.2 ) left on each side. Always try to centre your warp on the raddle. With a warp of the full 30 cm (12 ) weaving width, you will find that you will come one slot short on each side. You can solve this by placing 3 threads in the first and last slots of your raddle. Nu ga je de scheringdraden in de evenaar leggen. De evenaar heeft 2 openingen per cm en bij 4 draden per cm moeten er dus 2 draden in iedere opening komen. Als je met een oneven aantal draden per cm weeft, dan leg je bv. bij 5 draden per cm om en om 2 en 3 draden in de openingen. Omdat de schering 24 cm breed is laat je aan beide kanten ca. 3 cm evenaar ongebruikt. Zorg er altijd voor dat je schering gecentreerd op de evenaar zit. Bij een schering van de hele 30 cm weefbreedte, kom je aan het eind van de evenaar 1 opening te kort en zou je in dit geval dus twee draden overhouden. Dat los je op door in de eerste en de laatste opening 3 i.p.v. 2 draden te leggen. 14


16 Winding the warp The warp needs to be wound onto the warp beam with tension. A loosely wound warp will cause you problems during weaving. You can use the warping strips or paper to separate the layers of yarn threads. During the winding of the warp, you can ask a friend to hold the warp tight while you wind the warp onto the warp beam. Opbomen Opbomen is het oprollen van de scheringsdraden op de scheerboom. Bij het opbomen gebruik je opboomstroken of papier om de lagen garen gescheiden te houden tijdens het opbomen. De schering moet met enige spanning op de scheerboom gewikkeld worden. Bij het opbomen van de schering kun je iemand vragen de schering strak te houden terwijl je de scheerboom draait. 15


17 If you are working alone, divide the warp into two sections and tie a weight to each half. Filled plastic water bottles work well, see picture. It is handy to use a rubber band to attach the bottles or something that makes it easy to continually adjust the bottles position, until the warp has been fully wound. Wind the warp until the tie on cords have been completely wound onto the warp beam. Als je het opbomen alleen doet, verdeel je de schering in een aantal gelijke delen waaraan je gelijke gewichten hangt. Plastic flessen met water zijn daar erg geschikt voor, zie foto. Het is handig om dat met koordjes te doen en die met een stropje te bevestigen, zodat je ze tijdens het opbomen kunt verschuiven. Tijdens het opbomen verwijder je steeds de volgende afbindingen van de schering. To keep the loom in place you can hook the back feet of the loom over the edge of the table. Om het getouwtje op zijn plaats te houden haak je het met twee voetjes achter de tafelrand. As you wind the warp, lay in warping strips. Place the first Draai de scheerboom tot de aanbindstaaf op de boom strip even with the metal tie on bar. During the first full terecht komt. Bij het opbomen van de schering leg je er de rotation of the warp beam, place 5-6 warping strips. This is opboomstroken tussen. De eerste strook leg je op de boom important so that the end warp threads do not slip off the vlak na de aanbindstaaf. Tijdens de eerste omwenteling edge. During the rest of the winding, you will use fewer van de boom plaats je 5 of 6 strookjes om de schering en strips. You can also use thick paper, like craft paper. The de aanbindkoorden van elkaar gescheiden te houden. key is to make sure all warp threads in the same warp Daarna hoef je minder stroken te gebruiken. Je kunt ook beam revolution are wound at the same diameter. If not, stevig papier gebruiken, of lamellen van zo n gordijn uit de you will introduce slack to some of your warp threads, kringloopwinkel. De stroken voorkomen dat de draden aan which creates difficulty during weaving. de buitenkant naar opzij wegglijden. 16
 left over.")

18 Each time your weights come up to the edge of the table, adjust them back down to the floor. Wind the warp until you have approximately 20 to 30 cm (8 to 12 ) left over. Steeds als de gewichten aan de tafelrand komen, verplaats je ze terug naar beneden door de stropje los te maken en te verschuiven. Boom de schering zover op dat je voor de evenaar nog ongeveer 20 tot 30 cm over houdt. Hoe korter de schering, hoe makkelijker je de hevels kunt inrijgen. 17
19 Intermezzo: Threading draft On the threading draft we can read: - the order the warp threads have been threaded through the heddles - which toggles to lift - the order in which the toggles need to be lifted General system Every shaft is presented horizontally. The shafts are numbered, starting with shaft 1, which is closest to the weaver when sitting in front of the loom. The threading through the heddles is shown by vertical lines. The pick is shown by horizontal lines. We read the draft from right to left. Where you can see the warp, the corresponding block is made black; where you see the weft the corresponding block is kept white. The repeat gives the smallest amount of warp and weft threads that form the pattern. Intermezzo: Bindingstekening Op de bindingstekening kunnen we aflezen: - de wijze waarop de schering is ingeregen door de hevels - welke hendels omhoog gaan - de volgorde waarop de hendels bediend moeten worden Algemeen systeem Iedere schacht wordt horizontaal weergegeven. De schachten zijn oplopend vanaf 1 genummerd. De schacht die het dichtst bij de wever/weefster is, als deze voor het getouw zit, is nummer 1. De inrijg in de hevels wordt aangegeven door verticale streepjes en de inslag door horizon. We lezen de tekening af van rechts naar links. Waar de ketting zichtbaar is, wordt het hokje zwart gemaakt; waar de inslag zichtbaar is, wordt het hokje wit gelaten. Het rapport is het kleinste aantal ketting- en inslagdraden dat het patroon vormt. Threading plan for plain weave on 2 shafts Bindingstekening voor linnenbinding op 2 schachten 18
20 Plain weave With a two shaft loom there is only one threading possibility, in principle; the straight up and down pattern is known as plain weave. The threading pattern through the heddles will be , repeat: - 1 st thread through 1 st heddle on shaft 1-2 nd thread through 1 st heddle on shaft 2-3 rd thread through 2 nd heddle on shaft 1-4 th thread through 2 nd heddle on shaft 2 Continue like this until all warp threads have been threaded. You can create effects in the following ways: - colour in weft and/or warp - contrast in material (coarse-fine; dull-glossy; structuresmooth) - threading of the reed (square; closer or wider threading, skipping reed openings) - beating (hard or soft, normal, alternating) - post-treatment Additional threading plans are displayed and explained at the end of this instruction. Threading We are now going to pull each warp thread through a heddle on the shafts. The order in which you thread will partly determine your weaving pattern. Linnenbinding Bij twee schachten is in principe maar één inrijg mogelijk; beurtelings op beide schachten. Het recht op en neer weefsel dat dan ontstaat heet de linnenbinding (ook wel platbinding). Het rijgpatroon door de hevels zal zijn etc. - 1 e draad door 1 e hevel op schacht 1-2 e draad door 1 e hevel op schacht 2-3 e draad door 2 e hevel op schacht 1-4 e draad door 2 e hevel op schacht 2 Ga op deze wijze door tot alle draden zijn ingeregen. Op de volgende manieren kun je verschillende effecten creëren: - kleur in inslag en/of ketting - contrast in materiaal (grof-fijn; dof-glanzend; structuurglad) - rietrijging (vierkant instelling; dichter of ruimer rijgen; rietopeningen overslaan) - aanslaan (hard of zacht; gewoon; afwisselend) - nabehandeling Aan het einde van deze instructie staan nog meer bindingen weergegeven en uitgelegd. Rijgen We gaan nu de scheringdraden door de hevels van de schachten inrijgen. De volgorde van inrijg is mede bepalend voor het weefpatroon. 19


21 Remove the weights and cut the loops at the end of the warp. Take the threads out of the raddle and let them hang down from the top cross-rod. Verwijder de gewichten en knip de lussen van het scheringeind door. Neem de draden uit de evenaar en laat ze van de bovenste kruis staaf naar beneden hangen. If you now look at the cross, you can see that you can identify the very first thread on the right side. Because of the cross, you can identify #2, #3 etc. Place a reed/heddle hook through the first heddle from the front. Select the first warp thread on the right side of the warp. Place the warp thread in the hook and pull it through the heddle. Repeat this process for 9 more threads. Go back and verify these first 10 threads are indeed in the correct heddles for the correct shafts, according to your pattern. Repeat this process for the entire warp. 20 Het kruis bepaald de volgorde van draden pakken. Plaats de rijghaak door de eerste hevel van rechts op de eerste schacht. Selecteer de eerste draad aan de rechterkant van de schering. Trek de draad door het oog van de hevel. Als je de eerste 10 draden hebt doorgeregen, controleer dan of de inrijg correct is. Regelmatig controleren van de inrijg is belangrijk, want hoe later je een fout ontdekt, hoe meer je moet uithalen. Herhaal dit proces voor de gehele schering.


22 Once all of the threads have been pulled through a heddle, start back on the right side and pull each thread through the reed. The warp threads must be pulled through the reed in the same order as they were pulled through the heddles. If you do not have enough slack, you can loosen the warp beam slightly. After 10 threads have been threaded we check them. Pull the group of threads tight and lift one of the shafts by pulling its lever down. Check that every 2nd thread is raised. Tie the threads in a small loop knot as shown, that can easily be undone later. Repeat this process of threading threads through the reed, pull taught, raise a shaft and tie a loop knot for the remainder of the warp. When all threads have been threaded through the heddles and the reed you can remove the lease bars. Rijg met het haakje de draden door het riet in dezelfde volgorde als waarmee ze door de hevels lopen. Als de schering niet lang genoeg is kun je de scheerboom iets losser draaien. Na 10 draden doorgeregen te hebben controleer je de inrijg: Plaats het riet bij de schachten en trek de draden strak. Trek een schacht omhoog en kijk of de draden om en om hoog en laag door het riet lopen. Maak een bundeltje van de draden met een halve strik (zie foto) die gemakkelijk weer te verwijderen is. Steeds als je weer 10 draden door het riet geregen hebt, controleer je deze en maak je er met een halve strik een bosje van. Rijg zo alle draden door het riet. Als alle draden door de hevels en het riet geregen zijn, verwijder je de kruis staven. 21


23 Attaching the warp to the cloth beam The warp threads needs to be attached to the tie up bar, in equal groups. With 96 warp threads in this warp, that works out to 12 groups of 8. The last steel bar is used to tie the warp to the cloth beam. Place this bar through the loops of the cloth beam tie-up cords. You will start by taking a middle group of warp threads closest to the middle tie-up cord. Take the 8 threads in your hand and pull them towards you so that all of the threads have the same tension. It is a good practice to pull on each thread individually to ensure any slack is taken up and you truly have equal tension within that group of threads. Het aanbinden van de schering aan de doekboom De scheringdraden moeten in bosjes worden aangebonden aan de doekboom. Met de 96 draden van deze schering is het handig om dat met 12 bosjes van 8 draden te doen. De overgebleven ijzeren staaf is de aanbindstaaf van de doekboom. Steek die door de lussen van de boomkoorden en begin met aan elke kant van het middelste koord 8 draden vast te knopen. Neem de 8 draden tussen je vingers en strijk naar je toe om op alle draden ongeveer dezelfde spanning te krijgen. Ook is het een goede methode om een voor een even aan de draden te trekken. 22


24 Place the thread group around the tie-up rod from the top, down and around and split the group into 2 x 4 threads and bring the ends back to the top. Tie a half knot with the 2 halves. Repeat this process with the group of warp threads on the immediate right of the first group, followed by the group on the immediate left. Alternate back and forth until all groups have been tied onto the tie-up rod. Check the tension of all the groups of warp threads. Tighten any groups that are loose by pulling on the half knots and pulling tight. Repeat this process until all groups have similar tension. If you are using a slippery yarn, a bow knot is better to maintain a tight knot. Leid de draden van boven af om de staaf heen en dan in 2 x 4 gesplitst, opzij weer omhoog. Leg er een halve knoop in en trek die aan. Daarna hetzelfde met de buitenste 8 draden en dan de draden, afwisselend links en rechts er tussenin. Voel de spanning van de bosjes scheringdraden; waarschijnlijk hebben de eerst aangebonden bosjes de minste spanning. Trek de halve knopen van die bosjes wat aan en herhaal dit tot je overal een ongeveer gelijke spanning hebt. Als je nogal glad garen gebruikt is het verstandig van de halve knopen halve strikken te maken. 23


25 Open the shed by pulling down one of the shaft toggles. Place a remaining warp divider in the shed. Close the shed and lift the other shaft lever and place a second warp divider inside. Close the shed again by returning the shaft lever to its rest position. Now push two warping strips down toward the tie-up rod essentially beating the warp tight. This process is called establishing a header and can be done using very thick yarn as well. Your warp is now ready to weave! Open het vak door met een hendel één van schachten omhoog te trekken. Leg er een kartonnen strip in, sluit het val en open het vak met de andere schachthendel. Leg er nog een strip in, sluit het vak en duw met het riet de strips zo dicht mogelijk tegen de aanbindstaaf. Dit kun je eventueel ook met een dik garen doen. De scheringdraden zijn nu gelijkmatiger verdeeld en je bent klaar om te gaan weven. 24

. Next close the shed and beat the weft thread with the reed.")
26 Weaving Load a stick shuttle with weft thread. If you criss-cross your thread while winding the stick shuttle you, it will be easier to unwind as you weave. Open the opposite shed that you used when placing the last warp divider, and insert the stick shuttle. Since the weft thread goes over and under every other warp thread, the actual length of weft thread needed is greater than the width of the warp. You accomplish this by laying the weft thread on an angle. Leave the end of the first weft thread stick out approximately 6 cm (2.5 ). Next close the shed and beat the weft thread with the reed. Het weven Wikkel de inslagdraad op een steeklat. Als je die draad opzij van de lat kruist en dat na een paar slagen omwisselt met de andere kant, krijg je een vorm die makkelijker door de opening tussen de scheringdraden schuift. Open het vak dat de laatste kartonnen strip insluit en schuif de steeklat erdoor. Omdat de inslagdraad min of meer op en neer tussen de scheringdraden loopt, moet je de inslag wat meer lengte geven dan de breedte van het weefsel. Dit bereik je door de inslag schuin te leggen. Laat het eindje ca. 6 cm uitsteken. Je sluit dan het vak en je slaat aan met het riet. Now that you have beat the weft thread down on the warp, the ideal situation is that you have left enough slack in the weft thread by laying it on an angle to accommodate the length of yarn needed due to the over and under path the yarn has followed. In practice, often the weaver does not leave enough yarn for the weft and width of your woven cloth begins to shrink and pull-in. 25 De inslagdraad loopt min of meer op en neer tussen de scheringdraden. Om inweven te voorkomen moet je de inslag wat meer lengte geven dan de breedte van het weefsel. Dit bereik je door de inslag schuin te leggen. Laat het eindje ca. 6 cm uitsteken. Je sluit dan het vak en je slaat aan met het riet.


27 Now open the next shed by lifting the next shaft lever. Insert the stick shuttle and lay the next weft thread in the open shed, and insert the 6 cm portion of the first thread inside the shed. Remember to angle your thread. Now beat with the reed. The weft thread and the beginning thread are now part of your cloth. Using this technique, you can weave in any ends and have clean edges in your finished cloth. Another point to keep in mind is the selvedge of your woven cloth. While you are angling the new weft thread from one side, use your other hand to hold the edge of the woven cloth. This way you can control the tension and help prevent the weaving from pulling in and becoming narrower. By constantly monitoring the tightness of both sides, you will see if you start to pull in and adjust accordingly. If you see it going wrong, you can always unweave a few picks and try again. Je opent het vak; nu weer met de andere schacht en behalve dat je de inslagdaad doorvoert, leg je ook het begineindje tussen de schering. Leg de draad opnieuw schuin en sla aan. De inslag en het begindraadje komen nu samen in het weefsel te liggen. Op deze manier werk je ook de eindjes weg als je van kleur wisselt. Een ander aandachtspunt is de zelfkant van je weefsel. Terwijl je de inslag aan één kant schuin legt hou je de draad aan de andere kant van het weefsel vast. Wat niet te ruim en niet te strak is bij dat vasthouden, leer je door ervaring, maar als je in het begin meteen al ziet dat het mis gaat, haal dan gerust wat inslagen uit en doe het opnieuw. 26
28 Weave for appr. 10 cm (4 ). It is now time to move the cloth onto the cloth beam. Take the pall out of the ratchet on the warp beam and unwind some of the warp. Turn the handle on the cloth beam so your cloth is wound on. When enough cloth is wound on you put the pall in the ratchet of the warp beam and put tension on your warp again. Now you can continue weaving. Finishing When you are finished weaving, cut the warp threads. Make sure you do not cut the beam cords. Pull the warp threads through the heddles and reed. Take the pawl of the ratchet wheel on the cloth beam and unwind your cloth. Untie the knots that hold the cloth on the front tie-on rod and remove the fabric from the loom. You can finish the ends of the warp threads in various ways. The easiest way is to knot it in bundles of 6 or 8 threads. With practice you will be able to perfect your technique and produce cloth you can be proud of. Weef ongeveer 10 cm. Het is nu tijd om je weefsel op de doekboom te doorbomen. Haal de pal van het palwiel op de scheerboom en ontspan de schering. Draai aan de doekboom en boom je weefsel zo op de doekboom. Zet vervolgens de pal weer op het palwiel van de scheerboom en breng de schering weer op spanning. Nu kun je weer verder weven. Afwerking Als je klaar bent met weven knip je de scheringsdraden door. Zorg ervoor dat je de boomkoorden niet doorknipt. Trek de scheringsdraden door de hevels en het riet naar voren. Haal de pal van het palwiel op de doekboom en rol het weefsel van de boom. Maak de knopen waarmee de schering aan de voorste aanbindlat zitten los en haal het weefsel van het getouw. Je kunt de uiteinden met de scheringsdraden op verschillende manieren afwerken. Het makkelijkste is om knoopjes te leggen in bundels van 6 of 8 draden. Oefening baart kunst en door je techniek te perfectioneren zul je al snel een weefwerk kunnen maken waar je trots op kunt zijn. 27


29 Folding the loom To fold your loom, first unscrew the thread eyes far enough to lift the castle out of the frame. Remove the pall from the warp beam ratchet and pull the beater forward so that the reed lies against the cloth beam. Place the plywood protector on the warp between the reed and the shafts. Lift the castle out of its slots and lay it flat placing the top side pegs in the same slots that held the castle upright. Replace the pall in the ratchet and tighten the warp tension slightly. Little magnets will keep the pall in the ratchet wheel during transport. Getouw opvouwen Om het getouwtje op te vouwen draai je eerst de schroefogen onder in het middendeel weer terug, zodat je het middendeel er uit kan tillen. Haal de pal uit het palwiel van de scheerboom en boom de schering zover door dat het riet helemaal tegen de borstboom ligt. Leg het triplex plankje op de schering tussen riet en schachten. Til het schachtgedeelte uit het getouw en leg het plat met de bovenste drevels in de sleuven van de getouwzijden. Leg dan de pal weer in het palwiel en geef de schering een lichte spanning. De palletjes blijven tijdens transport vast zitten door de ingebouwde magneetjes. 28
30 Tips and important points Maintenance The Erica loom requires no special maintenance. We do recommend tightening all screws and bolts annually, particularly in dry climates. Texsolv heddles Texsolv heddles are made out of a double polyester cord that is connected on specific intervals. They are bundled in a zigzag fashion in bundles of 100 heddles. Never remove the ties from the bundles before you place the shaft bars, or something else, through the top and bottom large loops. If you do the heddles will become quite tangled and disorganized and it is a major task to sort this out. Lease bars With the Erica there are 2 x 5 mm steel lease bars. While weaving, make sure these lease bars have been removed. If these bars remain in place, you are essentially reducing the depth of the loom and this will negatively affect the size of your shed. Tips en aandachtspunten Onderhoud Het Erica getouw behoeft geen speciaal onderhoud. Als het getouw in een droge ruimte staat, is het aan te bevelen om na een paar maanden de schroeven van de constructie te controleren en zo nodig vast te draaien. Herhaal dit na een jaar. Texsolv hevels Texsolv hevels bestaan uit een dubbel polyester koord dat op bepaalde afstanden verbonden is. Het is zigzag gevouwen tot bundels van honderd stuks. Verwijder de bandjes van de bundels hevels niet, voordat er schachtlatten of wat anders door de grote lussen steken om de hevels geordend te houden. Kruislatten Bij Erica zijn dat 2 van de 5 mm dikke metalen staven. Laat tijdens het weven deze kruislatten niet tussen strijkboom en schachten in de schering zitten. Je zou de nuttige diepte van je getouw verminderen en daardoor de schering onnodig zwaar belasten bij het maken van een sprong. Als je gewoon bent de kruislatten in de schering te laten, moeten ze tussen strijkboom en scheerboom blijven als je verder opboomt. 29
31 Trouble shooting The shed is too small Likely causes: - You need to advance the cloth. - You have mounted the shafts too low. The shafts should be appr. 3 mm (0.12 ) above the rollers. - You have left the lease bars in place remove the lease bars. Operating the toggles is difficult Likely causes: - You need to advance the cloth. - You have left the lease bars in place remove the lease bars. The shafts are difficult to move Likely causes: - You have installed the raddle incorrectly. - The screw eyes are not screwed in far enough. The shaft bars get loose from the shaft sides Likey cause: - You have mounted the shafts too high. The shaft bars are loose in the shaft sides, so the heddles can be moved easily from 1 shaft to another. When the shafts are mounted too high, they are not good enough between the sides of the loom anymore, so the shaft bars can get loose. Wat er mis kan gaan De sprong is te klein Mogelijke oorzaak: - Het doek moet worden opgeboomd. - Je hebt de schachten te laag gemonteerd. De schachten moeten zo n 3 mm boven de rollers rusten. - Je hebt de kruislatten tussen strijkboom en schachten in de schering laten zitten. De bediening van de hendels is te zwaar Mogelijke oorzaken: - Het doek moet worden opgeboomd. - Je hebt de kruislatten tussen strijkboom en schachten in de schering laten zitten. De schachten worden gehinderd tijdens het bewegen Mogelijke oorzaken: - Je hebt de evenaar verkeerd om gemonteerd. - De schroefoogjes zijn niet ver genoeg in de schachtzijkanten gedraaid. De schachtstaven komen los uit de schachtzijkanten Mogelijke oorzaken: - Je hebt de schachten te hoog gemonteerd. De schachtstaven zitten los in de schachtzijden, zodat hevels gemakkelijk te (ver)plaatsen zijn. Als de schachten te hoog gemonteerd zijn, zitten ze niet meer ver genoeg tussen de zijkanten van het getouw, waardoor de schachtstaven los kunnen komen. 30
 The tabby is the most simple plan. This has been explained on page 18 and 19. Extended tabby (2 shafts) You could make double threads in both your warp and weft.")

32 Sample threading plans Next various threading plans for 2, 3 and 4 shafts are shown. Voorbeelden bindingen Hierna worden diverse bindingstekeningen voor 2, 3 en 4 schachten weergegeven. Tabby I Linnenbinding Tabby (2 shafts) The tabby is the most simple plan. This has been explained on page 18 and 19. Extended tabby (2 shafts) You could make double threads in both your warp and weft. That is known as the extended tabby. In order to have the warp threads neatly beside each other you have to thread the warp threads each through their own opening in the reed. If you wish to also use separate heddles you will get a threading pattern of shaft repeat. Extended tabby I Panamabinding Linnenbinding (2 schachten) De linnenbinding is de eenvoudigste binding. Deze wordt op bladzijde 18 en 19 besproken. Panamabinding (2 schachten) Je kunt ook een linnenbinding met dubbele draden in de schering en/of inslag maken. Dat is de panamabinding en om de scheringdraden dan netjes naast elkaar te houden moeten de dubbele draden elk door een aparte opening in het riet geregen worden. In geval je ze ook apart door de hevels rijgt, krijg je een doorrijg van bv. schacht etc. 31

33 Log-cabin-patterns What is appearance, what is reality? You thread a line in your warp and you also weave a line; yet the fabric does not look like a checkered piece. Characteristics: - square setting - plain weave - colours in warp and weft - rhythm in colour Drawing log-cabin patterns in colour: - threading - fill in visible warp threads - fill in the pick Schijnpatronen Wat is schijn, wat is werkelijkheid? Je rijgt een streep in de ketting en je weeft ook een streep, toch lijkt het weefsel niet op een geruite lap. Kenmerken: - vierkante instelling - linnenbinding - kleuren in ketting en inslag - ritme in kleur Het in kleur tekenen van schijnpatronen: - inrijg - zichtbare kettingdraden invullen - inslag invullen 32


34 Twill (3 shafts) Drawdown and cloth of a warp and weft-faced twill. This example is from the book Weaving on 3 shafts from Erica de Ruiter. Keperbinding (3 schachten) Bindingstekening en weefsel van een ketting- en inslagkeper voor drie schachten weergegeven. Dit voorbeeld komt uit het boek Weven op 3 schachten door Erica de Ruiter. 33

35 2/2 twill Köperbindung keperbinding 1/3 twill Köperbindung keperbinding 3/1 twill Köperbindung keperbinding Twill (4 shafts) The main feature of a twill is a slanting line. The binding points are located one angled above the other; they connect in a slanting line. A twill weave must always be threaded slightly closer than a plain weave. Warping density of a plain weave is 60 to 70%, with a twill this is 70 to 75%. Keperbinding (4 schachten) Kenmerk van een keper is een schuine lijn, deze lijn noemen we een graat. De bindpunten liggen schuin boven elkaar, ze sluiten in een schuine lijn aan. Een keperweefsel moet altijd iets dichter ingeregen worden dan een linnenbinding. Scheringsdichtheid van een linnenbinding is 60 tot 70%, bij een keper is dit 70 tot 75%. 34
 Veel gebruikte binding, afgeleid van de inslagkeper met gebruik van tegeninslag en/of tussenslagen van linnenbinding. De rozengang biedt vele variaties en mogelijkheden.")
36 Rosepath (4 shafts) Commonly used pattern, derived from the weft-faced twill using counter threading and / or intermediate picks of plain weave. The rosepath offers many variations and possibilities. Rozengang (4 schachten) Veel gebruikte binding, afgeleid van de inslagkeper met gebruik van tegeninslag en/of tussenslagen van linnenbinding. De rozengang biedt vele variaties en mogelijkheden. 35 Louët BV printed in Holland
weaving on a frame loom materials
 weaving on a frame loom materials First you assemble the frame loom (A). Fasten the 2 sides of each beam together loosely with the bolts and wingnuts. Next you slide the rods into the holes in the beams.
Jane. Montage instructie. Montage instructie... 1 Het inklappen van Jane Tips en aandachtspunten Wat er mis kan gaan...
 Jane Montage instructie Montage instructie... 1 Het inklappen van Jane... 12 Tips en aandachtspunten... 13 Wat er mis kan gaan... 14 Version: Jane-V6-NL Montage instructie - 6 Texsolv aanbindkoorden voor
WP0159. Frame loom Weefraam Webrahmen. lisa. XL 60x90 cm. made in holland
 WP0159 lisa XL 60x90 cm Frame loom Weefraam Webrahmen made in holland assembly First you assemble the frame loom. Screw the buffers in the bars for the stand (D). Insert the bolts from the top into the
!!!! Wild!Peacock!Omslagdoek!! Vertaling!door!Eerlijke!Wol.!! Het!garen!voor!dit!patroon!is!te!verkrijgen!op! Benodigdheden:!!
 WildPeacockOmslagdoek VertalingdoorEerlijkeWol. Hetgarenvoorditpatroonisteverkrijgenopwww.eerlijkewol.nl Benodigdheden: 4strengenWildPeacockRecycledSilkYarn rondbreinaaldnr8(jekuntnatuurlijkookgewonebreinaaldengebruiken,maar
SAMPLE 11 = + 11 = + + Exploring Combinations of Ten + + = = + + = + = = + = = 11. Step Up. Step Ahead
 7.1 Exploring Combinations of Ten Look at these cubes. 2. Color some of the cubes to make three parts. Then write a matching sentence. 10 What addition sentence matches the picture? How else could you
Brei een Sinterklaas / Knit a Sinterklaas
 Vandaag breien we een Sinterklaasje van synthetische wol, want dan kan Sinterklaas gewoon gewassen worden. Als je een beetje achter elkaar door kan breien is al het breiwerk in een uurtje of 2 klaar. Wat
Preschool Kindergarten
 Preschool Kindergarten Objectives Students will recognize the values of numerals 1 to 10. Students will use objects to solve addition problems with sums from 1 to 10. Materials Needed Large number cards
(1) De hoofdfunctie van ons gezelschap is het aanbieden van onderwijs. (2) Ons gezelschap is er om kunsteducatie te verbeteren
 De hoofdfunctie van ons gezelschap is het aanbieden van onderwijs. (2) Ons gezelschap is er om kunsteducatie te verbeteren") (1) De hoofdfunctie van ons gezelschap is het aanbieden van onderwijs (2) Ons gezelschap is er om kunsteducatie te verbeteren (3) Ons gezelschap helpt gemeenschappen te vormen en te binden (4) De producties
(1) De hoofdfunctie van ons gezelschap is het aanbieden van onderwijs (2) Ons gezelschap is er om kunsteducatie te verbeteren (3) Ons gezelschap helpt gemeenschappen te vormen en te binden (4) De producties
Rhythm of Light. Susanne de Graef, Montagehandleiding / Instruction manual
 Rhythm of Light Susanne de Graef, 2016 Montagehandleiding / Instruction manual GELEVERD MATERIAAL / SUPPLIED MATERIAL B. C. D. A. E. F. A. B. C. D. E. F. armatuur / fixture fitting lange staalkabels (3)
Quality requirements concerning the packaging of oak lumber of Houthandel Wijers vof (09.09.14)
") Quality requirements concerning the packaging of oak lumber of (09.09.14) Content: 1. Requirements on sticks 2. Requirements on placing sticks 3. Requirements on construction pallets 4. Stick length and
Quality requirements concerning the packaging of oak lumber of (09.09.14) Content: 1. Requirements on sticks 2. Requirements on placing sticks 3. Requirements on construction pallets 4. Stick length and
The upside down Louisa tutorial by Dorothée: Noortjeprullemie.blogspot.be Written for Compagnie M.: m.com
 The upside down Louisa tutorial by Dorothée: Noortjeprullemie.blogspot.be Written for Compagnie M.: www.compagnie- m.com Dorothée heeft een unieke Compagnie M. hack gemaakt: de Louisa op zijn kop. Als
MyDHL+ Van Non-Corporate naar Corporate
 MyDHL+ Van Non-Corporate naar Corporate Van Non-Corporate naar Corporate In MyDHL+ is het mogelijk om meerdere gebruikers aan uw set-up toe te voegen. Wanneer er bijvoorbeeld meerdere collega s van dezelfde
My Inspiration I got my inspiration from a lamp that I already had made 2 years ago. The lamp is the you can see on the right.
 Mijn Inspiratie Ik kreeg het idee om een variant te maken van een lamp die ik al eerder had gemaakt. Bij de lamp die in de onderstaande foto s is afgebeeld kun je het licht dimmen door de lamellen open
Flybye. Ernst Koning, Montagehandleiding / Instruction manual
 Flybye Ernst Koning, 2018 Montagehandleiding / Instruction manual GELEVERD MATERIAAL / MATERIALS SUPPLIED A. B. C. D. E. F. G. A. B. C. D. E. F. G. H. H. lichtbuis / lighting tube plafondkap / ceiling
256 kb Memory in NMS 8250, 8255 and 8280
 256 kb Memory in NMS 8250, 8255 and 8280 Supplied by Bastiaan Huber, 2001 Converted to PDF by HansO, 2001 Dutch text follows the english text! MEMORY-UPGRADE to 256Kb This description is only for people
Group work to study a new subject.
 CONTEXT SUBJECT AGE LEVEL AND COUNTRY FEATURE OF GROUP STUDENTS NUMBER MATERIALS AND TOOLS KIND OF GAME DURATION Order of operations 12 13 years 1 ste year of secundary school (technical class) Belgium
B1 Woordkennis: Spelling
 B1 Woordkennis: Spelling Bestuderen Inleiding Op B1 niveau gaan we wat meer aandacht schenken aan spelling. Je mag niet meer zoveel fouten maken als op A1 en A2 niveau. We bespreken een aantal belangrijke
Esoscheletro Veruska, 2015 NL/ENG
 Esoscheletro Veruska, 2015 NL/ENG Maat Eén maat. Circa 110 cm omtrek, 35 cm breed Moeilijkheidsgraad: Makkelijk Garen Borgo de'pazzi, Kuki, 50gr/110m, 65% wol, 20% ramee, 15% hennep, 3 bollen Haaknaald
OUTDOOR HD BULLET IP CAMERA PRODUCT MANUAL
 OUTDOOR HD BULLET IP CAMERA PRODUCT MANUAL GB - NL GB PARTS & FUNCTIONS 1. 7. ---- 3. ---- 4. ---------- 6. 5. 2. ---- 1. Outdoor IP camera unit 2. Antenna 3. Mounting bracket 4. Network connection 5.
Dagelijkse checklist Daily checklist
 Dagelijkse checklist Daily checklist Sluiting met snelspanner Verstelbare hoofdsteun Verstelbare en aanpasbare riem Verstelbare voetsteunen Verstelbare riemen van de voetsteun Quick release locked Head
ANGSTSTOORNISSEN EN HYPOCHONDRIE: DIAGNOSTIEK EN BEHANDELING (DUTCH EDITION) FROM BOHN STAFLEU VAN LOGHUM
 FROM BOHN STAFLEU VAN LOGHUM") Read Online and Download Ebook ANGSTSTOORNISSEN EN HYPOCHONDRIE: DIAGNOSTIEK EN BEHANDELING (DUTCH EDITION) FROM BOHN STAFLEU VAN LOGHUM DOWNLOAD EBOOK : ANGSTSTOORNISSEN EN HYPOCHONDRIE: DIAGNOSTIEK STAFLEU
Read Online and Download Ebook ANGSTSTOORNISSEN EN HYPOCHONDRIE: DIAGNOSTIEK EN BEHANDELING (DUTCH EDITION) FROM BOHN STAFLEU VAN LOGHUM DOWNLOAD EBOOK : ANGSTSTOORNISSEN EN HYPOCHONDRIE: DIAGNOSTIEK STAFLEU
Engels op Niveau A2 Workshops Woordkennis 1
 A2 Workshops Woordkennis 1 A2 Workshops Woordkennis 1 A2 Woordkennis 1 Bestuderen Hoe leer je 2000 woorden? Als je een nieuwe taal wilt spreken en schrijven, heb je vooral veel nieuwe woorden nodig. Je
Add the standing fingers to get the tens and multiply the closed fingers to get the units.
 Digit work Here's a useful system of finger reckoning from the Middle Ages. To multiply $6 \times 9$, hold up one finger to represent the difference between the five fingers on that hand and the first
L.Net s88sd16-n aansluitingen en programmering.
 De L.Net s88sd16-n wordt via één van de L.Net aansluitingen aangesloten op de LocoNet aansluiting van de centrale, bij een Intellibox of Twin-Center is dat de LocoNet-T aansluiting. L.Net s88sd16-n aansluitingen
OUTDOOR HD DOME IP CAMERA PRODUCT MANUAL GB - NL
 OUTDOOR HD DOME IP CAMERA PRODUCT MANUAL GB - NL GB PARTS & FUNCTIONS 2. ---- 1. ---- 3. ---- 7. ---------- 5. 4. 6. 1. Outdoor IP camera unit 2. Antenna 3. Mounting bracket 4. Network connection 5. Power
FOR DUTCH STUDENTS! ENGLISH VERSION NEXT PAGE. Toets Inleiding Kansrekening 1 8 februari 2010
 FOR DUTCH STUDENTS! ENGLISH VERSION NEXT PAGE Toets Inleiding Kansrekening 1 8 februari 2010 Voeg aan het antwoord van een opgave altijd het bewijs, de berekening of de argumentatie toe. Als je een onderdeel
LOAD SECURING PROCEDURE IN 15 FT/20 FT HOT CONTAINER
 Page: 1 of 5 Page: 2 of 5 Load securing SNS Pool procedure Den Helder in the Procedure 15 ft/20 ft vastzetten hot containers lading according in de 15 ft/20 ft to the NOGEPA guidelines hot containers volgens
Ontpopping. ORGACOM Thuis in het Museum
 Ontpopping Veel deelnemende bezoekers zijn dit jaar nog maar één keer in het Van Abbemuseum geweest. De vragenlijst van deze mensen hangt Orgacom in een honingraatpatroon. Bezoekers die vaker komen worden
ANT S KINGDOM Here is some advice for setting up your Master Ant Farm!
 ANT S KINGDOM Master NL EN Instructies Mierenboerderij Master Bedankt voor je bestelling van de Mierenboerderij Master. De beste keus! Installatie NL Naast de informatie die te lezen is in ons boekje
Introductie in flowcharts
 Introductie in flowcharts Flow Charts Een flow chart kan gebruikt worden om: Processen definieren en analyseren. Een beeld vormen van een proces voor analyse, discussie of communicatie. Het definieren,
Exercise P672 Lightweight Structures. A.P.H.W. Habraken. Report
 Exercise 2011-2012 7P672 Lightweight Structures A.P.H.W. Habraken Report Group 4: S.H.M. van Dijck J.C. Fritzsche J. Koeken T. Relker F.G.M. van Rooijen M. Slotboom M. Steenbeeke J.P.T. Theunissen Date:
Kies uit setje A of B voor deze bakfiets Choose between set A or B for this transportbike
 Kies uit setje A of B voor deze bakfiets Choose between set A or B for this transportbike A A Selecteer op bestelformulier: Houtenbak gat 5 punts bevestiging Set A: standaard setje voor bevestiging icm
MONTAGE INSTRUCTIE ASSEMBLY INSTRUCTION
 MONTAGE INSTRUCTIE ASSEMBLY INSTRUCTION - 1. Waterpas stellen. De groef aan de zijkant van de beschermdeksel moet gelijk staan met de deellijn van het inbouw box. 2. Zet de inbouw box vast in de muur.
L.Net s88sd16-n aansluitingen en programmering.
 De L.Net s88sd16-n wordt via één van de L.Net aansluitingen aangesloten op de LocoNet aansluiting van de centrale, bij een Intellibox of Twin-Center is dat de LocoNet-T aansluiting. L.Net s88sd16-n aansluitingen
FRAME [UPRIGHT MODEL] / [DEPTH] / [HEIGHT] / [FINISH] TYPE OF BASEPLATE P Base plate BP80 / E alternatives: ZINC finish in all cases
![FRAME [UPRIGHT MODEL] / [DEPTH] / [HEIGHT] / [FINISH] TYPE OF BASEPLATE P Base plate BP80 / E alternatives: ZINC finish in all cases](/thumbs/60/44127117.jpg "FRAME [UPRIGHT MODEL] / [DEPTH] / [HEIGHT] / [FINISH] TYPE OF BASEPLATE P Base plate BP80 / E alternatives: ZINC finish in all cases") FRAME XS UPRIGHT BASE PLATE UPRIGHT HORIZONTAL PROFILE DIAGONAL PROFILE DESCRIPTION A vertical structure consisting of 2 uprights, joined by a system of bracing profiles, and base plates intended to support
FRAME XS UPRIGHT BASE PLATE UPRIGHT HORIZONTAL PROFILE DIAGONAL PROFILE DESCRIPTION A vertical structure consisting of 2 uprights, joined by a system of bracing profiles, and base plates intended to support
REIN kast. eiken standaard iepen. gebakken iepen. gerookt. licht iepen. bijzonderheden. staanders/achterwand/deur. ontwerp: Gjalt Pilat, 2005
 REIN kast ontwerp: Gjalt Pilat, 2005 afwijkende standaard maten op aanvraag standaard staanders/achterwand/deur licht gerookt gebakken bijzonderheden Rein hoogte 79,5 cm kast wordt gedemonteerd geleverd
RECEPTEERKUNDE: PRODUCTZORG EN BEREIDING VAN GENEESMIDDELEN (DUTCH EDITION) FROM BOHN STAFLEU VAN LOGHUM
 FROM BOHN STAFLEU VAN LOGHUM") Read Online and Download Ebook RECEPTEERKUNDE: PRODUCTZORG EN BEREIDING VAN GENEESMIDDELEN (DUTCH EDITION) FROM BOHN STAFLEU VAN LOGHUM DOWNLOAD EBOOK : RECEPTEERKUNDE: PRODUCTZORG EN BEREIDING VAN STAFLEU
Read Online and Download Ebook RECEPTEERKUNDE: PRODUCTZORG EN BEREIDING VAN GENEESMIDDELEN (DUTCH EDITION) FROM BOHN STAFLEU VAN LOGHUM DOWNLOAD EBOOK : RECEPTEERKUNDE: PRODUCTZORG EN BEREIDING VAN STAFLEU
2000 Volkswagen Passat GLS
 REAR DOOR WINDOW Rear door window, assembly overview Fig. 304: Exploded View Of Rear Door Window 1 - Door Removing and installing: --> Rear door, removing and installing 2 - Spring nut Qty 2 3 - Screw
01/ M-Way. cables
 01/ 2015 M-Way cables M-WaY Cables There are many ways to connect devices and speakers together but only few will connect you to the music. My Way of connecting is just one of many but proved it self over
2006 Volkswagen Jetta TDI
 Door handle and door lock, assembly overview The illustration shows the left side. The right side is derived accordingly from this. Fig. 99: Door Handle And Door Lock, Assembly Overview 1 - Cable For disengaging
The first line of the input contains an integer $t \in \mathbb{n}$. This is followed by $t$ lines of text. This text consists of:
 Document properties Most word processors show some properties of the text in a document, such as the number of words or the number of letters in that document. Write a program that can determine some of
Tutorial GEVILTE HART MET GAT ERIN/FELTED HEART WITH HOLE IN IT
 Tutorial GEVILTE HART MET GAT ERIN/FELTED HEART WITH HOLE IN IT Stap 1/step 1: Neem een het plastic binneneitje van een verrassingsei en vilt daar met wol omheen, niet door en door, maar wel zover dat
MyDHL+ ProView activeren in MyDHL+
 MyDHL+ ProView activeren in MyDHL+ ProView activeren in MyDHL+ In MyDHL+ is het mogelijk om van uw zendingen, die op uw accountnummer zijn aangemaakt, de status te zien. Daarnaast is het ook mogelijk om
Travel Survey Questionnaires
 Travel Survey Questionnaires Prot of Rotterdam and TU Delft, 16 June, 2009 Introduction To improve the accessibility to the Rotterdam Port and the efficiency of the public transport systems at the Rotterdam
S40 LE. Instructions Instructie. English... 1 Nederlands... 6 S40 LE
 S40 LE Instructions Instructie English... 1 Nederlands... 6 S40 LE Introduction The original S40 hatbox spinning wheel was made from 1977 tot 1985. To celebrate our 40th anniversary we produced a new
Illustrator Tutorial - How to Create a Watch
 Illustrator Tutorial - How to Create a Watch «Andrew Bannecker - Simple, True and Tender Vector Movie Posters by GABZ» Categories: Tutorials Have you ever seen print advertising of some watch brand before?
Benodigdheden: stukje zeil, vilt, stukjes lint om labeltjes van te maken, dubbelzijdig tape, naaigaren, schaar of rolmes.
 Daar is ie dan: de tutorial om zelf een iphone labelhoesje te maken van zeil en vilt. Ik heb ze jaren gemaakt voor de Jipshop en nu kun je ze zelf ook maken. Met het zeil dat je zelf leuk vindt, in de
DALISOFT. 33. Configuring DALI ballasts with the TDS20620V2 DALI Tool. Connect the TDS20620V2. Start DALISOFT
 TELETASK Handbook Multiple DoIP Central units DALISOFT 33. Configuring DALI ballasts with the TDS20620V2 DALI Tool Connect the TDS20620V2 If there is a TDS13620 connected to the DALI-bus, remove it first.
2019 SUNEXCHANGE USER GUIDE LAST UPDATED
 2019 SUNEXCHANGE USER GUIDE LAST UPDATED 0 - -19 1 WELCOME TO SUNEX DISTRIBUTOR PORTAL This user manual will cover all the screens and functions of our site. MAIN SCREEN: Welcome message. 2 LOGIN SCREEN:
FOR DUTCH STUDENTS! ENGLISH VERSION NEXT PAGE
 FOR DUTCH STUDENTS! ENGLISH VERSION NEXT PAGE Tentamen Bewijzen en Technieken 1 7 januari 211, duur 3 uur. Voeg aan het antwoord van een opgave altijd het bewijs, de berekening of de argumentatie toe.
INSTALATIEGIDS VIDEOWALL
 INSTALATIEGIDS VIDEO 1. Bereken de hoogte van de rails door te meten hoeveel lager het onderste scherm zal uitkomen. Je kan dit meten aan de achterkant van de display, waar de beugels op gemonteerd zijn.
Omwinden/omwikkelen. 2 Winding. 3a dried vines gedroogde ranken. 3b piece of wood (poplar) stukje hout (populier)
 stukje hout (populier)") 2 Winding Omwinden/omwikkelen 3a dried vines gedroogde ranken 90 3b piece of wood (poplar) stukje hout (populier) Affix the strip of veneer to the dried stem with a drop of hot adhesive. Make windings
2 Winding Omwinden/omwikkelen 3a dried vines gedroogde ranken 90 3b piece of wood (poplar) stukje hout (populier) Affix the strip of veneer to the dried stem with a drop of hot adhesive. Make windings
S e v e n P h o t o s f o r O A S E. K r i j n d e K o n i n g
 S e v e n P h o t o s f o r O A S E K r i j n d e K o n i n g Even with the most fundamental of truths, we can have big questions. And especially truths that at first sight are concrete, tangible and proven
Free time! Better skills. Free time with Brenda and Brian. Worksheet
 1 Free time! read a Stel je hebt een dag vrij van school. Schrijf op wat je dan gaat doen. b Lees de tekst en schrijf op welke dingen Brian en Brenda voorstellen om te doen op een vrije dag. Free time
Stoplap ontwerp/sampler design Evelien Verkerk. Gemaakt met/made with stitchfiddle.com
 Breistoplap Ontwerp Evelien Verkerk Een deel van de patroontjes die zijn gebruikt komen van Nederlandse stoplappen uit de 18e en 19e eeuw. Een aantal motieven heb ik zelf ontworpen of aangepast. Decorative
Main language Dit is de basiswoordenschat. Deze woorden moeten de leerlingen zowel passief als actief kennen.
 Lesbrief Les 2.1: My family Main language Dit is de basiswoordenschat. Deze woorden moeten de leerlingen zowel passief als actief kennen. Nouns: brother, sister, cousin, mother, father, aunt, uncle, grandmother,
It s all about the money Group work
 It s all about the money Group work Tijdsduur: 45 minuten Kernwoorden: money (geld) coin (munt), banknote (bankbiljet), currency (munteenheid) Herhalings-/uitbreidingswoorden: debate (debat), proposal
Luister alsjeblieft naar een opname als je de vragen beantwoordt of speel de stukken zelf!
 Martijn Hooning COLLEGE ANALYSE OPDRACHT 1 9 september 2009 Hierbij een paar vragen over twee stukken die we deze week en vorige week hebben besproken: Mondnacht van Schumann, en het eerste deel van het
Procedure Reset tv-toestellen:
 Procedure Reset tv-toestellen: Volgende procedure is te volgen wanneer er een tv-toestel, op een van de kamers niet meer werkt. TV Re-installation Factory Default Her-installeren van de TV Fabrieksinstellingen
Het handboek van KDE Screen Ruler. Lauri Watts Vertaling van het handboek: Niels Reedijk Vertaler/Nalezer: Alexander S. Koning
 Lauri Watts Vertaling van het handboek: Niels Reedijk Vertaler/Nalezer: Alexander S. Koning 2 Inhoudsopgave 1 Inleiding 5 2 Menubeschrijvingen 6 3 Dankbetuigingen en licentie 8 Samenvatting KDE Screen
Settings for the C100BRS4 MAC Address Spoofing with cable Internet.
 Settings for the C100BRS4 MAC Address Spoofing with cable Internet. General: Please use the latest firmware for the router. The firmware is available on http://www.conceptronic.net! Use Firmware version
NEDERLANDS. Display Instructies. Knoppen. Geeft afwisselend Tijd, Datum en Temperatuur weer, kan ook ingesteld worden op enkel tijd
 NEDERLANDS Het ziet eruit als een simpel blokje hout, maar maak een geluid (knip met je vingers, kuch, klap in je handen, of tip op de bovenkant) en het geeft onmiddelijk en afwisselend tijd, datum en
Firewall van de Speedtouch 789wl volledig uitschakelen?
 Firewall van de Speedtouch 789wl volledig uitschakelen? De firewall van de Speedtouch 789 (wl) kan niet volledig uitgeschakeld worden via de Web interface: De firewall blijft namelijk op stateful staan
After that, the digits are written after each other: first the row numbers, followed by the column numbers.
 Bifid cipher The bifid cipher is one of the classical cipher techniques that can also easily be executed by hand. The technique was invented around 1901 by amateur cryptographer Felix Delastelle. The cipher
ALGORITMIEK: answers exercise class 7
 Problem 1. See slides 2 4 of lecture 8. Problem 2. See slides 4 6 of lecture 8. ALGORITMIEK: answers exercise class 7 Problem 5. a. Als we twee negatieve (< 0) getallen bij elkaar optellen is het antwoord
Opgave 2 Geef een korte uitleg van elk van de volgende concepten: De Yield-to-Maturity of a coupon bond.
 Opgaven in Nederlands. Alle opgaven hebben gelijk gewicht. Opgave 1 Gegeven is een kasstroom x = (x 0, x 1,, x n ). Veronderstel dat de contante waarde van deze kasstroom gegeven wordt door P. De bijbehorende
150 ECG-problemen (Dutch Edition)
") 150 ECG-problemen (Dutch Edition) John R. Hampton, Piet Machielse Click here if your download doesn"t start automatically 150 ECG-problemen (Dutch Edition) John R. Hampton, Piet Machielse 150 ECG-problemen
150 ECG-problemen (Dutch Edition) John R. Hampton, Piet Machielse Click here if your download doesn"t start automatically 150 ECG-problemen (Dutch Edition) John R. Hampton, Piet Machielse 150 ECG-problemen
Vertaling Engels Gedicht / songteksten
 Vertaling Engels Gedicht / songteksten Vertaling door een scholier 1460 woorden 23 januari 2002 5,4 399 keer beoordeeld Vak Engels Songtekst 1 Another day in paradise Artiest: Brandy & Ray J She calls
Lists of words from the books, and feedback from the sessions, are on
 Vocabulairetrainer www.quizlet.com - handleiding 1. Woordenlijsten van de boeken en de feedback van de les staan op http://www.quizlet.com. Lists of words from the books, and feedback from the sessions,
Meetkunde en Lineaire Algebra
 Hoofdstuk 1 Meetkunde en Lineaire Algebra Vraag 1.1 De samenstelling van rotaties in het vlak is commutatief. Vraag 1.2 De samenstelling van de orthogonale spiegelingen t.o.v. twee gegeven vlakken in de
3. HET STAAND WEEFGETOUW Ik ga er van uit dat je al een weefgetouw hebt gebouwd. Hieronder wat termen, die regelmatig voorkomen.
 WEVEN op een VERTICAAL WEEFGETOUW Inhoud: 1. Geschiedenis in een notendop blz. 1 2. Soorten weefgetouwen blz. 1 3. Het staand weefgetouw blz. 1 4. Principe en techniek van weven op een staand getouw: blz.
FOR DUTCH STUDENTS! ENGLISH VERSION NEXT PAGE. Toets Inleiding Kansrekening 1 7 februari 2011
 FOR DUTCH STUDENTS! ENGLISH VERSION NEXT PAGE Toets Inleiding Kansrekening 1 7 februari 2011 Voeg aan het antwoord van een opgave altijd het bewijs, de berekening of de argumentatie toe. Als je een onderdeel
20 twenty. test. This is a list of things that you can find in a house. Circle the things that you can find in the tree house in the text.
 9006625806_boek.indd 1 31/08/16 15:26 1 6 test This is a list of things that you can find in a house. Circle the things that you can find in the tree house in the text. living room kitchen bedroom toilet
Comics FILE 4 COMICS BK 2
 Comics FILE 4 COMICS BK 2 The funny characters in comic books or animation films can put smiles on people s faces all over the world. Wouldn t it be great to create your own funny character that will give
De grondbeginselen der Nederlandsche spelling / Regeling der spelling voor het woordenboek der Nederlandsche taal (Dutch Edition)
") De grondbeginselen der Nederlandsche spelling / Regeling der spelling voor het woordenboek der Nederlandsche taal (Dutch Edition) L. A. te Winkel Click here if your download doesn"t start automatically
De grondbeginselen der Nederlandsche spelling / Regeling der spelling voor het woordenboek der Nederlandsche taal (Dutch Edition) L. A. te Winkel Click here if your download doesn"t start automatically
HANDLEIDING Te chno Life Pla tinum
 HANDLEIDING Te chno Life Pla tinum 1 Onde rde le n ove rzicht. 3 Onde rde le nlijs t. NR. Naam e n Spe cificatie Aantal. NR. Naam e n Spe cificatie Aantal. 1 Hoofdframe 1 39 Plastic bus 6 2 Gewichtsgeleiders
Het beheren van mijn Tungsten Network Portal account NL 1 Manage my Tungsten Network Portal account EN 14
 QUICK GUIDE C Het beheren van mijn Tungsten Network Portal account NL 1 Manage my Tungsten Network Portal account EN 14 Version 0.9 (June 2014) Per May 2014 OB10 has changed its name to Tungsten Network
SnowStorm Blok 4. : 9x6 inch.
 DMC Geweven katoen Slate grey 930 Royal Blue vy dk 820 Venus 2463 2464 Stiksteken in: Backstitches in: Metallic Thread Treasure Braid PB32 Mill Hill Magnifica Bead Silver Fox 10061 SnowStorm Blok 4 Afmeting
Win a meet and greet with Adam Young from the band Owl City!
 1 Meet and greet read Lees de tekst. Wat is de prijs die je kunt winnen? early too late on time vroeg te laat op tijd Win a meet and greet with Adam Young from the band Owl City! Do you have a special
Calculator spelling. Assignment
 Calculator spelling A 7-segmentdisplay is used to represent digits (and sometimes also letters). If a screen is held upside down by coincide, the digits may look like letters from the alphabet. This finding
Quick start guide. Powerbank MI Mah. Follow Fast All rights reserved. Page 1
 Quick start guide Powerbank MI 16.000 Mah Follow Fast 2016 - All rights reserved. Page 1 ENGLISH The Mi 16000 Power Bank is a very good backup option for those on the move. It can keep you going for days
AE1103 Statics. 25 January h h. Answer sheets. Last name and initials:
 Space above not to be filled in by the student AE1103 Statics 09.00h - 12.00h Answer sheets Last name and initials: Student no.: Only hand in the answer sheets! Other sheets will not be accepted Write
Limpid Light. design Esther Jongsma & Sam van Gurp, Montagehandleiding / Assembly Instructions
 Limpid Light design Esther Jongsma & Sam van Gurp, 05 Montagehandleiding / Assembly Instructions GELEVERD MATERIAAL / SUPPLIED MATERIAL A. A. B. B. C. D. E. F. G. G. H. I. J. K. / / ophanging / suspension:
Shipment Centre EU Quick Print Client handleiding [NL]
![Shipment Centre EU Quick Print Client handleiding [NL]](/thumbs/78/76906513.jpg "Shipment Centre EU Quick Print Client handleiding [NL]") Shipment Centre EU Quick Print Client handleiding [NL] Please scroll down for English. Met de Quick Print Client kunt u printers in Shipment Centre EU configureren. De Quick Print Client kan alleen op
Shipment Centre EU Quick Print Client handleiding [NL] Please scroll down for English. Met de Quick Print Client kunt u printers in Shipment Centre EU configureren. De Quick Print Client kan alleen op
Chromosomal crossover
 Chromosomal crossover As one of the last steps of genetic recombination two homologous chromosomes can exchange genetic material during meiosis in a process that is referred to as synapsis. Because of
EM7680 Firmware Update by OTA
 EM7680 Firmware Update by OTA 2 NEDERLANDS/ENGLISH EM7680 Firmware update by OTA Table of contents 1.0 (NL) Introductie... 3 2.0 (NL) Firmware installeren... 3 3.0 (NL) Release notes:... 3 4.0 (NL) Overige
CHROMA STANDAARDREEKS
 CHROMA STANDAARDREEKS Chroma-onderzoeken Een chroma geeft een beeld over de kwaliteit van bijvoorbeeld een bodem of compost. Een chroma bestaat uit 4 zones. Uit elke zone is een bepaald kwaliteitsaspect
Meetkunde en Lineaire Algebra
 Hoofdstuk 1 Meetkunde en Lineaire Algebra Vraag 1.1 Het trapoppervlak is een afwikkelbaar oppervlak met oneindig veel singuliere punten. Vraag 1.2 Het schroefoppervlak is een afwikkelbaar oppervlak met
How to install and use dictionaries on the ICARUS Illumina HD (E652BK)
") (for Dutch go to page 4) How to install and use dictionaries on the ICARUS Illumina HD (E652BK) The Illumina HD offers dictionary support for StarDict dictionaries.this is a (free) open source dictionary
(for Dutch go to page 4) How to install and use dictionaries on the ICARUS Illumina HD (E652BK) The Illumina HD offers dictionary support for StarDict dictionaries.this is a (free) open source dictionary
Online Resource 1. Title: Implementing the flipped classroom: An exploration of study behaviour and student performance
 Online Resource 1 Title: Implementing the flipped classroom: An exploration of study behaviour and student performance Journal: Higher Education Authors: Anja J. Boevé, Rob R. Meijer, Roel J. Bosker, Jorien
Classification of triangles
 Classification of triangles A triangle is a geometrical shape that is formed when 3 non-collinear points are joined. The joining line segments are the sides of the triangle. The angles in between the sides
The genesis of the game is unclear. Possibly, dominoes originates from China and the stones were brought here by Marco Polo, but this is uncertain.
 Domino tiles Dominoes is a game played with rectangular domino 'tiles'. Today the tiles are often made of plastic or wood, but in the past, they were made of real stone or ivory. They have a rectangle
ATOS Viewer for Dental Frameworks User Manual
 ATOS Viewer for Dental Frameworks User Manual www.dentwise.eu Inhoud Content NEDERLANDS... 2 1. Installatie... 2 2. Algemene Functies... 2 3. Afstanden Meten... 3 4. Doorsneden Maken... 4 5. Weergave Aanpassen...
Borstkanker: Stichting tegen Kanker (Dutch Edition)
") Borstkanker: Stichting tegen Kanker (Dutch Edition) Stichting tegen Kanker Click here if your download doesn"t start automatically Borstkanker: Stichting tegen Kanker (Dutch Edition) Stichting tegen Kanker
Borstkanker: Stichting tegen Kanker (Dutch Edition) Stichting tegen Kanker Click here if your download doesn"t start automatically Borstkanker: Stichting tegen Kanker (Dutch Edition) Stichting tegen Kanker
9 daagse Mindful-leSs 3 stappen plan training
 9 daagse Mindful-leSs 3 stappen plan training In 9 dagen jezelf volledig op de kaart zetten Je energie aangevuld en in staat om die batterij op peil te houden. Aan het eind heb jij Een goed gevoel in je
EU Declaration of Conformity and safety instructions EU Conformiteitsverklaring en veiligheidsinstructies
 EU Declaration of Conformity and safety instructions EU Conformiteitsverklaring en veiligheidsinstructies Battery operated UNICOM 300 N51 UNICOM 300 met batterijvoeding N51 Explosion safety instructions
VOORZETSELS. EXERCISE 1 Bestudeer de bovenstaande voorzetsels en zinnen goed!
 ENGLISH, WE WILL DO BETTER! LESSON EIGHT VOORZETSELS at three o'clock = om drie uur around three o'clock = rond drie uur by three o'clock = tegen drie uur before Saturday = voor zaterdag for a week = voor