GEBRUIKERSHANDLEIDING CDC300
|
|
|
- Rosalia van der Velde
- 6 jaren geleden
- Aantal bezoeken:
Transcriptie
1 GEBRUIKERSHANDLEIDING CDC300
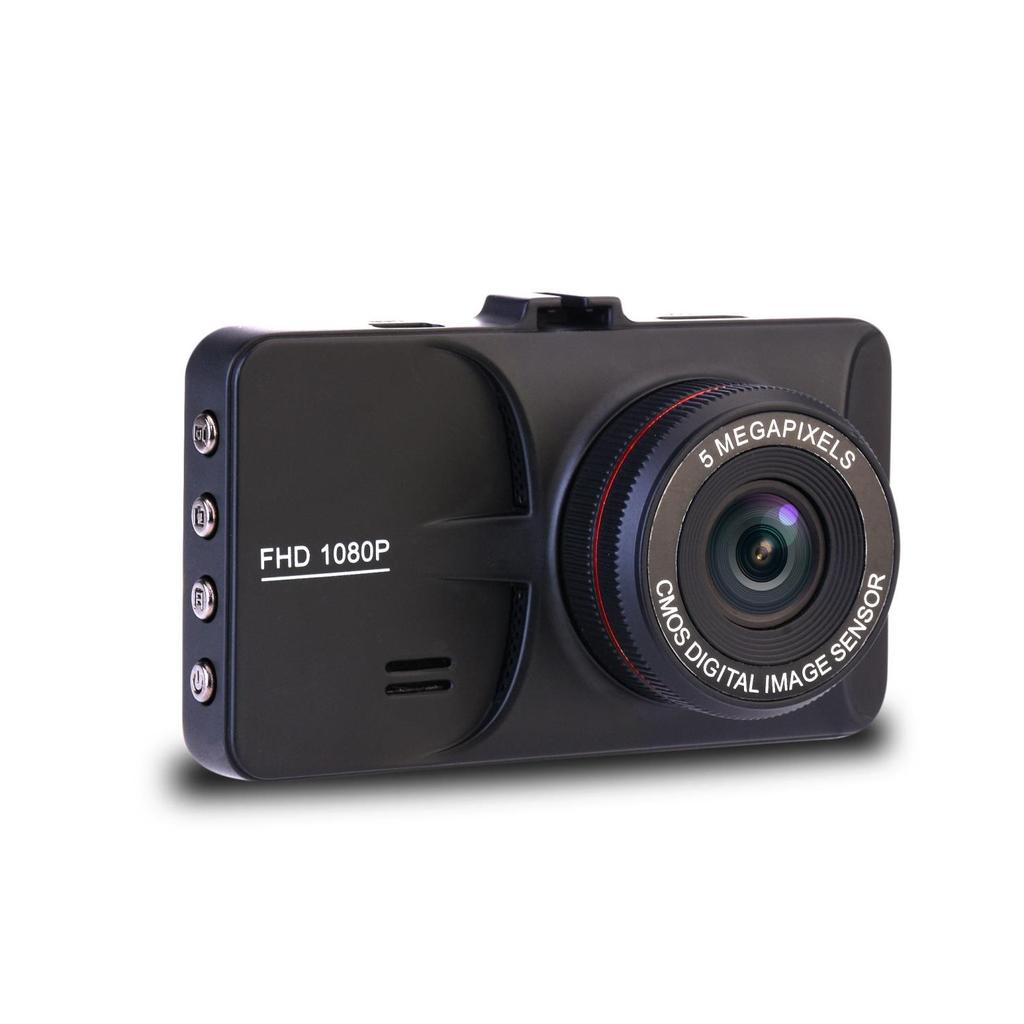
2 Product overzicht 1. TF kaart sleuf 7. HDMI out poort 12. RESET 2. Omhoog knop 8. OK knop 13. Microfoon 3. Menu knop 9. Modus knop 14. Luidspreker 4. Omlaag knop 10. Vergrendeling opname knop 15. Lens 5. USB poort 11. Aan/Uit knop 16. Scherm 6. Montage houder Uitleg functie knoppen: 1. TF kaart sleuf U kunt hier uw geheugenkaart installeren of eruit halen. 2. Omhoog knop In het Optie menu: kunt u een keuze selecteren door omhoog te gaan. In Foto modus: kunt u met deze knop inzoomen. In Afspeel modus: kunt u hiermee het volume verhogen of snel vooruit afspelen. 3. Menu knop Druk kort op deze knop om het menu van uw keuze te selecteren. 4. Omlaag knop In Optie menu: kunt u hiermee en keuze selecteren door omlaag te gaan. In Afspeel modus: In Foto modus: kunt u met deze knop uitzoomen. In Afspeel modus: kunt u hiermee het volume verlagen en terug spoelen. 5. USB poort 1 Voor aansluiting op een PC om bestanden over te zetten. 2 voor aansluiting op een externe voeding voor het opladen van de batterij of voor bediening van het apparaat. 3 voor gebruik als PC CAM. 6. Montage houder
3 Voor het monteren van de camera op een zuignap houder op een autoruit. 7. HDMI output poort Voor het aansluiten van een FHD apparaat. 8. OK knop In Optie modus: druk om uw keuze te bevestigen. In Video modus: druk kort om de opname te starten, druk nogmaals om de opname te stoppen. In Foto modus: druk kort om een foto te nemen. In Menu modus: druk om uw instellingen te bevestigen. 9. Modus knop Druk kort om te wisselen tussen de verschillende modi: Video, Foto en Afspelen. 10. Vergrendeling Opname knop Druk op deze knop om uw opname te vergrendelen. De opname is nu geblokkeerd en kan niet worden gewist. Indien u de opname toch wilt wissen, dient u deze eerst te ontgrendelen. 11. Aan/Uit knop Houd de knop ingedrukt om de camera uit te zetten, druk kort om deze weer aan te zetten. 12. Reset Druk, door middel van een dun voorwerp (een verbogen paperclip of naald) in het gaatje. De camera zal nu worden hersteld naar de fabrieksinstellingen. 13. Microfoon Voor de ontvangst van geluidsopnamen. 14. Luidspreker Voor de weergave van een geluidsignaal bij het indrukken van de functie toetsen en voor weergave van geluidsopnamen. 15. Lens Voor het maken van foto of video opnamen. 16. Scherm 3.0 inch scherm, voor weergave van beelden en menu s Speciale functies: 1. Vergrendeling opname functie Druk op deze knop tijden het maken van een video opname, zodat deze wordt vergrendeld en niet kan worden gewist. 2. Energiestand U kunt in het systeem een tijd instellen waarna de camera bij inactiviteit, automatisch zal worden uitgeschakeld. Basisbediening Video/Foto functie Aan- en Uitzetten van de camera Druk kort op de knop om de camera aan te zetten, de blauwe indicator zal nu aan gaan. Houd de knop ingedrukt en de camera en de blauwe indicator gaan uit. Note: nadat de camera de waarschuwing: low battery aangeeft, zal deze automatisch uitgaan.
4 Video modus Druk kort op de knop om naar de Video modus te gaan, het icoontje van de Video modus verschijnt links bovenin het scherm. Druk kort op de knop om de video opname te starten, de indicator zal rood gaan knipperen om aan te geven dat de opname is gestart. Resolutie 1080FD 1920x1080, 720P 1280x720, WVGA 848x480, VGA 640x480 Loop opname Uit, 1min, 3min, 5min Belichting +2/3, +1/3, +0.0, -1/3, -2/3, -1.0, -4/3, -5/3, -2.0 Beweging detectie modus Uit, Aan Geluid opname Uit, Aan Datumstempel Uit, Aan Foto modus Druk kort op de knop om naar de Foto modus te gaan, het icoontje van de Foto modus verschijnt links bovenin het scherm. Druk kort op de knop om de foto te maken, de indicator flitst één keer om aan te geven dat de foto is gemaakt. Opname modus Één, 1sec, 5sec, 10sec Resolutie 12M 4000x3000, 10M 3648x2736, 8M 3264x2448, 5M 2592x1944, 3M 2048x1536, 2MHD 1920x1080, VGA 640x480, 1.3M 1280x960 Serie Uit, Aan Kwaliteit Fijn, Normaal, Economisch Scherpte Sterk, Normaal, Zacht Witbalans Auto, Daglicht, Bewolkt, Kunstlicht, Fluorescerend Kleur Kleur, Zwart/Wit, Sepia ISO Auto, 100, 200, 400 Belichting +2/3, +1/3, +0.0, -1/3, -2/3, -1.0, -4/3, -5/3, -2.0 Stabilisator Anti-trillen Uit, Aan Snel bekijken Uit, 2sec, 5sec Datumstempel Uit, Datum, Datum &Tijd Afspelen Video/Foto Druk kort op de knop om naar de Afspeel modus te gaan, het icoontje van de Afspeel modus verschijnt links bovenin het scherm. Druk kort op de knop om te zoeken naar het video of foto bestand dat u wilt weergeven. Druk kort op de knop om de pagina van het foto of videobestand te openen, druk daarna op de Omlaag knop om uw keuze te selecteren.
5 Druk kort op de knop om uw selectie weer te geven. In het Afspeel menu kunt u bestanden wissen en opslaan. U kunt tevens de bestanden in een dia-show ergave bekijken (2sec, 5sec, 8sec) Menu instellingen Druk kort op de Mode knop om de Video, Foto of Afspeel instellingen te openen, Druk op de knop om het Instellingen menu te openen, druk nogmaals om de algemene Systeem Instellingen te openen, het icoontje zal nu oplichten. Door op de en knoppen te drukken kunt u het item dat u wilt aanpassen selecteren. Druk op de knop om te bevestigen en pas het aan. Druk op om te bevestigen en het submenu te verlaten. Om de Video, Foto of Afspeelmodus te verlaten, drukt u op. Datum en Tijd JJ/MM/DD, MM/DD/JJ, DD/MM/JJ Automatische uitschakeling Uit, 1min, 3min Geluidsignaal Uit, Aan Auto video weergave Uit, Aan Taal Engels, Traditioneel Chinees, Gesimplificeerd Chinees TV modus PAL, NTSC HDMI Uit, Aan Frequentie 50Hz, 60Hz G-sensor Uit, Hoog, medium, Laag Energiebesparende modus Uit, 3min, 5min, 10min Formatteren Annuleer, OK Fabrieksinstellingen Annuleer, OK Versie 866TSW001.V1.0 Kentekenplaat nummer eigenaar Voer uw kentekenplaat nummer in Instellen datum en tijd Druk kort op de knop om de systeem instellingen te openen. Ga door middel van de en knoppen naar de Datum en druk op de knop om de instellingen te openen. Begin met het instellen van het jaar, door middel van de en knoppen en druk op de knop om te bevestigen. De maand, dag, uur, minuten en seconden doet hetzelfde als hiervoor aangegeven bij het instellen van het jaar. USB modus Verbind de camera met uw PC door middel van een USB kabel, de dascam zal nu het USB menu weergeven, zoals hieronder beschreven: 1. USB-Disk In deze modus kunt u de video en foto opnamen opslaan op uw compter
6 2. PC-Camera Hiermee kunt u de camera gebruiken als webcam. Opladen van de batterij U kunt op drie verschillende manieren de batterij opladen. Bij het opladen van de batterij zal de indicator rood branden, zodra het opladen is voltooid zal de indicator uit gaan. 1. Gebruik de adpater 2. Gebruik de PC-USB 3. Gebruik de auto stroomvoorziening Note: Indien de camera niet meer functioneert door onjuist gebruik, dient u de camera te restten door middel van het Reset gaatje. Daarna zal de camera het weer doen. Product specificaties Product naam Dashcam Model nummer CDC300 Kenmerken HD camera, HD Video Kleur Zwart Solutie Scherm afmting 3.0 inch Lens AR0330 Taal Engels, Traditoneel Chinees. Gesimplificeerd Chinees, Japans, Frans, Duits, Koreaans, Italiaans, Portugees, Russisch, Nederlands Bestand formaat MOV Video formaat Tot 10180FHD Kleureffect Standaard Naadloos opnemen Zonder ruimte tussen de opnamen Dashcam montage Camera opname start zodra de auto is gestart en zal stoppen nadat de motor is uitgezet. Datum stempel Ondersteund Foto modus 12MP Foto formaat JPG Geheugen kaart TF (ondersteund tot 32GB) Microfoon Ondersteund Ingebouwde speaker Ondersteund Stroomvoorziening 50Hz/60Hz USB functie 1: USB-Disk 2: PC-Camera Stroom interface 5V 1A Batterij Ingebouwde 250mAh
7 MANUEL D UTILISATION CDC300
8 Présentation du produit 1. Fente carte TF 7. Port HDMI sortie 12. Réinitialisation 2. Touche Haut 8. Touche OK 13. Microphone 3. Touche Menu 9. Touche Mode 14. Haut-Parleur 4. Touche Bas 10. Touche Verrouillage Enregistrement 15. Lentille 5. Port USB 11. Marche/Arrêt 16. Écran 6. Support montage Explication fonctions: 1. Fente carte TF Vous pouvez insérer ou enlever la carte mémoire. 2. Touche Haut En mode Menu : Aller en haut. En mode Photo : Appuyer pour agrandir l image. En mode Lecture : Appuyer pour augmenter le volume ou lecture rapide. 3. Touche Menu En appuyant brièvement vous pouvez sélectionner le menu de votre choix. 4. Touche Bas En mode Menu : Aller en Bas En Mode Enregistrement : En mode Photo : Appuyer pour diminuer l image. En mode Lecture : Appuyer pour diminuer le volume ou lecture en arrière. 5. Port USB 1 Pour la connexion avec l ordinateur pour transmission de données. 2 Pour connecter le chargeur de batterie avec un dispositif externe ou alimentation pendant l opération. 3 Utilisation comme une Webcam.
9 6. Support montage Pour monter la caméra avec la ventouse sur la fenêtre. 7. Sortie HDMI port Pour connecter un dispositif FHD pour l affichage. 8. Touche OK En mode Menu : Pour confirmer le réglage. En mode Enregistrement : Appuyer brièvement sur la touche pour commencer l enregistrement, appuyer une autre fois pour l arrêter. En mode Photo : Appuyer brièvement pour prendre une photo. 9. Touche Mode Appuyer brièvement pour basculer entre les divers modes : Photo, Vidéo et Lecture. 10. Touche Verrouillage enregistrement Vous pouvez verrouiller une vidéo enregistré, il n est pas possible de l effacer. Si vous voulez effacer l enregistrement, d abord il faut le déverrouiller. 11. Mettre en Marche/Arrêter Appuyer en tenir enfoncé pour éteindre la caméra, appuyer brièvement pour la mettre en marche. 12. Réinitialisation Insérez un objet étroit et de petite taille, tel qu'une épingle ou un trombone, dans le trou pour une réinitialisation. 13. Microphone Pour l enregistrement d audio. 14. Haut-parleur Pour émettre un signal sonore en appuyant les touches et l émission de son d une vidéo enregistrée. 15. Obturateur Pour prendre une photo ou enregistrer une vidéo. 16. Écran 3.0 pouces, pour l affichage des images et menus. Fonctions spéciales : Verrouillage enregistrement Appuyer sur la touche pendant l enregistrement, la vidéo sera verrouillée en ne pourra pas être effacée. Si vous la voulez effacer, d abord il faut la déverrouiller. Économie d énergie Vous pouvez activer le mode économie d énergie dans le système, la caméra s éteindra après un certain temps d inutilisation. Opération de base Enregistrement Vidéo/Photo Appuyer brièvement sur la touche pour mettre en marche la caméra, le témoin s allume en bleu, tenir enfoncé la touche la caméra et le témoin s éteindent. Notification : Après le signal «low Battery» la caméra s éteint automatiquement. Mode Enregistrement Vidéo Appuyer brièvement la touche pour sélectionner le mode Vidéo, l icône du mode Vidéo s affiche dans le coin supérieur gauche.
10 Appuyer brièvement la touche pour commencer l enregistrement, le témoin rouge clignote, indiquant que l enregistrement est en cours. Résolution 1080FD 1920x1080, 720P 1280x720, WVGA 848x480, VGA 640x480 Enregistrement en boucle Désactivér, 1min, 3min, 5min. Valeurs d exposition +2/3, +1/3, +0.0, -1/3, -2/3, -1.0, -4/3, -5/3, -2.0 Mode détection de mouvement Désactivér, Activer Enregistrement de son Désactivér, Activer Horodateur Désactivér, Activer Mode Photo Appuyer brièvement la touche pour sélectionner le mode Photo, l icône du mode Photo s affiche dans le coin supérieur gauche. Appuyer brièvement la touche pour prendre une photo, le témoin clignote une fois. Mode Capture Seule, 1sec, 5sec, 10sec. Résolution 12M 4000x3000, 10M 3648x2736, 8M 3264x2448, 5M 2592x1944, 3M 2048x1536, 2MHD 1920x1080, VGA 640x480, 1.3M 1280x960 Séquence Désactivér, Activer Qualité Fin, Normal, Économie Nettété Fort, Normal, Faible Balance des Blancs Auto, Lumière du Jour, Nuageux, Incandescente, Fluorescent Couleur Couleur, Blanc/Noir, Sépia ISO Auto, 100, 200, 400 Valeurs d exposition +2/3, +1/3, +0.0, -1/3, -2/3, -1.0, -4/3, -5/3, -2.0 Anti secousses Désactivér, Activer Lecture rapide Désactivér, 2sec, 5sec Horodateur Désactivér, Date, Date & heure Mode Lecture Vidéo/Photo Appuyer brièvement la touche pour sélectionner le mode Lecture, l icône du mode Lecture s affiche dans le coin supérieur gauche. Appuyer brièvement la touche pour basculer entre les fichiers des vidéos et photos. Appuyer brièvement la touche pour ouvrir la page de l enregistrement ou photo, appuyer une autre la touche Bas fois pour sélectionner le fichier que vous voulez lire. Appuyer brièvement la touche pour confirmer la lecture du fichier sélectionné. En mode Lecture vous pouvez effacer ou sauvegarder votre fichiers. En plus vous les pouvez lire dans un diaporama (2sec, 5sec, 8sec) Réglage Menu
11 Appuyer sur la touche Mode pour passer en mode Vidéo, Photo ou Lecture, appuyer sur la touche pour entrer dans le menu Réglage Système, appuyez une autre fois pour entrez dans le menu Réglage Général, l icône est mis en surbrillance. En utilisant les touches et vous pouvez aller en haut et en bas pour sélectionner l option que vous voulez régler, appuyer sur la touche pour sélectionner l option. Appuyer sur la touche pour confirmer. Appuyer sur la touche Date et Heure Extinction Automatique Signal sonore Contrôle Vidéo Langue Mode TV HDMI Fréquence Capteur Gravité Mode Économie d énergie Formatage Réglage par défaut Version Numéro de plaque d immatriculation pour quitter le menu Réglage. AA/MM/JJ, MM/JJ/AA, JJ/MM/AA Désactivér, 1min, 3min Désactivér, Activer Désactivér, Activer Anglais, Chinois Traditionnelle, Chinois Simplifié PAL, NTSC Désactivér, Activer 50Hz, 60Hz Désactivér, Haut, Medium, Bas Désactivér, 3min, 5min, 10min Supprimer, OK Supprimer, OK 866TSW001.V1.0 Insérez votre numéro de la plaque d immatriculation Réglage Date et heure Appuyer brièvement la touche pour entrer dans le menu Réglage Système, en utilisant les touches et vous pouvez sélectionner le réglage de la date, appuyez sur la touche pour entrer dans le menu Date et heure. En appuyant sur les touches et vous pouvez régler l ans. Appuyer sur la touche pour confirmer. Pour régler le mois, date, heures, minutes et secondes veuillez suivre la procédure précédente. Mode USB Connecter la caméra avec l ordinateur par un câble USB, la dashcam affichera le menu USB comme ci-dessous : 1. Disque USB En mode disque-usb vous pouvez sauvegarder un fichier vidéo ou photo sur votre ordinateur. 2. Caméra PC Utiliser cette caméra comme caméra PC. Chargement de la Batterie Il y trois manières de charger la batterie de cette caméra. Le témoin s allume lorsque la batterie st en cours de se charger. Le témoin s éteint lorsque le chargement est terminé.
12 Notification : Lorsque la caméra ne fonctionne plus par une utilisation incorrecte, il faut réinitialiser la caméra. Appuyer un objet de petite taille dans le trou. Spécification du produit Nom produit Dashcam Numéro produit DVR866 Caractéristique Caméra HD, Vidéo HD Couleur Noir Solution Taille d écran 3.0 pouces Lentille AR0330 Langues Anglais, Chinois Traditionnel, Chinois Simplifié, Japonnais, Français, Allemand, Coréain, Italien, Portoguès, Russien, Neerlandais Format Fichier MOV Taille Vidéo Jusqu à 1080FHD Effet couleur Standard Enregistrement en continu Pas d espace entre les enregsitrements Montage dans la voiture Prise en charge : La caméra se met en marche lorsque la voiture départ et s éteint lorsque la voiture s arrêt Horodateur Prise en charge Mode Photo 12MP Taille Photo JPG Carte Mémoire Carte TF (jusqu à 32GB) Microphone Prise en charge Haut-parleur intégré Prise en charge Alimentation 50Hz/60Hz Fonction USB 1 : Disque USB 2 : Caméra PC Interface alimentation 5V 1A Batterie Intégrée 250mAh
13 USER MANUAL CDC300
14 Product diagram 1. TF Card Slot 7. HDMI output socket 12. RESET 2. Up button 8. OK button 13. MIC 3. Menu button 9. Mode button 14. Speaker 4. Down button 10. Recording lock button 15. Lens 5. USB socket 11. Power on/off 16 Screen 6. Mount holder Functions of the camera: 1. TF card slot Here you can insert or remove your memory card. 2. Up button In Option menu: you can select an option by going up. In Photo mode: you can zoom in. In Playback mode: you can increase the volume or fast forward playback. 3. Menu button By pressing briefly you can choose the desired menu. 4. Down button In Option mode: you can select an option by going down. In Recording mode: press briefly In Photo mode: you can zoom out.
15 In Playback mode: you can decrease the volume or rewind playback. 5. USB socket 1 For connecting with a computer for data transmission. 2 For connecting the battery charger to an external device or power supply whilst in operation. 3 For using the camera as a PC CAM. 6. Mount holder This can be used to attach the camera with a suction cup mount to the car window. 7. HDMI output socket To connect an FHD device with the camera. 8. OK button In Option mode: press to confirm. In Video Recording mode: press briefly to start the recording, press again to stop the recording. In Photo mode: press briefly to take a picture. In Menu mode: press to confirm settings. 9. Mode button Press briefly to switch between: Video, Photo and Playback. 10. Recording lock button After you have made a recording, you can press this button and the recording will be locked, it cannot be deleted. If you would like to delete the recording, you will have to unlock it first. 11. Power on/off Hold the power button to power on and press briefly again to power off. 12. RESET To restore the camera back to factory default settings, push a small, thin pin into the little hole. 13. MIC Microphone to record sound. 14. Speaker To transmit a beep sound, using the function buttons and to transmit the recorded sound in Playback mode. 15. Lens To capture the image by taking a picture and make a recording. 16. Screen 3.0 inch screen to display the images and menu s. Special functions; Video recording lock function: After you have made a recording, with this function, the recording will be locked, it cannot be deleted. If you would like to delete the recording, you will have to unlock it first. Power Save function With this function, after a set period of time, the camera will turn off automatically when not in use. You can set this period in the menu Settings.
16 Basic operation Video recording/ Photo Turn on and turn off Press briefly the button, the indicator will turn blue to indicate that the camera has been turned on; Press and hold the button to turn off the camera, the blue indicator will turn off. Note: The camera will automatically turn of as soon as the low battery icon appears. Video mode Press briefly the top corner; button, to switch to Video mode, the video icon will appear in the left Press briefly the button to start the recording, the red indicator will flash, meaning the recording is in progress; Resolution 1080FD 1920x1080, 720P 1280x720, WVGA 848x480, VGA 640x480 Loop recording Off, 1min, 3min, 5min. Exposure +2/3, +1/3, +0.0, -1/3, -2/3, -1.0, -4/3, -5/3, -2.0 Motion detection mode Off, On Sound recording Off, On Date stamp Off, On Photo mode Press briefly the left top corner; button, to switch to Photo mode, the camera icon will appear in the Press briefly the button to take a picture, the indicator will flash once, to indicate that the picture has been taken. Capture Mode Single, 1sec, 5sec, 10sec. Resolution 12M 4000x3000, 10M 3648x2736, 8M 3264x2448, 5M 2592x1944, 3M 2048x1536, 2MHD 1920x1080, VGA 640x480, 1.3M 1280x960 Sequence Off, On Quality Fine, Normal, Economy Sharpness Strong, Normal, Soft White Balance Auto, Daylight, Cloudy, Tungsten, Fluorescent Color Color, Black/White, Sepia ISO Auto, 100, 200, 400 Exposure +2/3, +1/3, +0.0, -1/3, -2/3, -1.0, -4/3, -5/3, -2.0 Anti shake Off, On Quick Review Off, 2sec, 5sec. Date stamp Off, Date, Date &Time
17 Video/Photo Playback Press briefly the the left top corner; Press briefly the button, to switch to Playback mode, the playback icon will appear in button, to browse through the video and photo files; Press briefly the button to open the page of the recording or photograph, then press the Down button again to select the file you would like to playback; Press brief the button to start the playback of the selected file. In the Playback menu, you can delete or protect your files. Also you can view them in a slide show (2sec, 5sec, 8sec) General Setting Menu Press the Mode button to enter the Video, Photo or Playback mode, press the button to enter the System settings, press again to enter the General Setting Menu, the icon will be highlighted. By using the and buttons, you can scroll up and down the items you wish to adjust, press the button to confirm and adjust. Press to confirm and exit the submenu. To exit the Video, Photo or Playback mode, press the button. Date and Time Auto Power Off Beep sound Auto Video Monitoring Language TV mode HDMI Frequency G-sensor Power Saving mode Format Manufacturing Settings Version Car owner s plate YY/MM/DD, MM/DD/YY, DD/MM/YY Off, 1min, 3min. Off, On Off, On English, Traditional Chinese, Simplified Chinese PAL, NTSC Off, On 50Hz, 60Hz Off, High, Medium, Low Off, 3min, 5min, 10min. Cancel, OK Cancel, OK 866TSW001.V1.0 Enter your registration number Time settings Press briefly the button to enter the system setting menu, by using the and buttons you select the date settings, press the button to enter the settings. By using the
18 and buttons you adjust the year, press the button to confirm. The settings of the month, date, hours, minutes and seconds can be adjusted I the same way as the year. USB mode Connect the camera with the computer using a USB cable, the car camera will now display a USB menu as shown here below: 1. USB-disk Here you can save your photo and video files onto your computer. 2. PC-Camera Here you can use the camera as a PC camera. Charging the battery There are three different ways in which you can charge the built-in battery. When the battery is charging, the indicator light will be red, when the charging has been completed, the indicator light will be turned off. You can charge the battery: 1. Using the power adapter 2. Using the PC-USB 3. Using the car power supply Note: When the camera does not function properly by cause of incorrect use, you can press the reset button. All settings will be restored to factory default settings. Product name Car camera Product number CDC100 Feature HD camera, HD video Color Black Solution Screen size 3.0 inch Lens AR0330 Language English, Traditional Chinese, Simplified Chinese, Japanese, French, German, Korean, Portuguese, Russian, Dutch File format MOV Video Size Up to 1080FHD Color effect Standard Seamless Recording No gaps between recorded files Car mounted dashcam Supports camera to turn on when the car starts the engine, turns of when the engine is turned off. Time stamp Supported Photo mode 12MP Photo format JPG Memory card TF (supports up to 32GB) Microphone Supported Built-in speaker Supported Power requirements 50Hz/60Hz USB function 1. USB-disk 2. PC-Camera
19 Power Interface Battery 5V 1A Built-in 250mAh
GEBRUIKERSHANDLEIDING CDC300
 GEBRUIKERSHANDLEIDING CDC300 Product overzicht 1. TF kaart sleuf 7. HDMI out poort 12. RESET 2. Omhoog knop 8. OK knop 13. Microfoon 3. Menu knop 9. Modus knop 14. Luidspreker 4. Omlaag knop 10. Vergrendeling
Aan/Uit, Auto type, Gevoeligheid, Zone keuze, Start Snelheid, Aan/Uit Geluid
 SALORA CDC100 1. Aan/Uit knop (4) Om de camera aan of uit te zetten, druk op deze knop om de camera Stand-by te zetten. Houd de knop ingedrukt, de opname of instelling zal worden opgeslagen voordat de
HD VIDEO CAMCORDER CDC1350FD. Gebruikershandleiding
 HD VIDEO CAMCORDER CDC1350FD Gebruikershandleiding Afbeelding Apparaat 1 1.Indicator Opstarten 2.Indicator Status 3.Indicator Aan/Uit 4.camera 5.luidspreker 6.OK toets 7.Omhoog toets 8.Omlaag toets 9.Menu
Product Garantie Dit product is goedgekeurd door ISO9001: 2000 International Quality Standard en gecertificeerd aan de FCC, CE en SGS.
 Handleiding EP-HD001 Instructies voor gebruik In deze handleiding wordt het gebruik van dit product beschreven, inclusief het gebruik, de werking, installatie-instructies en specificatie, enz. Gelieve
DASHBOARD CAMERA INSTRUCTIES
 DVRCAR25 DASHBOARD CAMERA INSTRUCTIES Inclusief Dashboard Camera (voor in de auto) Auto oplader USB kabel Zuignap voor bevestiging 14 15 1 7 2 8 3 9 10 11 4 6 5 12 5 1) Opladen A) Gebruik de ingebouwde
Gembird DCAM-005. Nederlands
 Gembird DCAM-005 Nederlands 1: Productbeschrijving 1.1 Knoppen en functies 1) Pijltje omhoog 2) menuknop 3) Pijltje omlaag 4) USB ingang 5) Bevestiging zuignap 6) HDMI uitgang 7) aan/uit knop 8) microsd
HANDLEIDING KA5653BK - KA5653DW - KA5654BK - KA5654DW - KA5655BK - KA5655DW. Algemene Functies. Instructies voor gebruik:
 NL HANDLEIDING KA5653BK - KA5653DW - KA5654BK - KA5654DW - KA5655BK - KA5655DW Algemene Functies 1. Weergave van tijd: 12 of 24 uur tijd weergave 2. Kalender Modus: Maand en datum weergave 3. Alarm Modus:
Roadcam Duo. Gebruikershandleiding Mode d emploi. www.syco.be. FrOnt2baCK mirror dvr-cam
 FrOnt2baCK mirror dvr-cam Roadcam Duo Gebruikershandleiding Mode d emploi www.syco.be 1 nederlands 1. Springveren 2. USb 3. DC5V 4. Reset 5. 3.5-inch tft LCD 6. LED (laden) 7. LED (aan/uit) 8. Up/REC 9.
NEDERLANDS. Display Instructies. Knoppen. Geeft afwisselend Tijd, Datum en Temperatuur weer, kan ook ingesteld worden op enkel tijd
 NEDERLANDS Het ziet eruit als een simpel blokje hout, maar maak een geluid (knip met je vingers, kuch, klap in je handen, of tip op de bovenkant) en het geeft onmiddelijk en afwisselend tijd, datum en
EM7680 Firmware Update by Micro SD card
 EM7680 Firmware Update by Micro SD card 2 NEDERLANDS/ENGLISH EM7680 Firmware update by Micro SD card Table of contents 1.0 (NL) Introductie... 2 2.0 (NL) Firmware installeren... 2 3.0 (NL) Opmerking...
Onboard auto camera Caméra embarquée
 Onboard auto camera Caméra embarquée ONBOARD CAR CAMERA ONBOARD-KFZ-KAMERA up to 32GB Video format Movie 2.0 LCD Screen Low illumination for night operation High speed recording quick response for light
DASH CAM, HD Handleiding
 DASH CAM, HD Handleiding 87231 Lees deze handleiding vóór ingebruikname a.u.b. zorgvuldig door, zodat u alle functies van deze Auto-DVR optimaal weet te gebruiken. Opgelet 1. Steek de geheugenkaart a.u.b.
Gebruikershandleiding
 Full HD Auto DVR Gebruikershandleiding *1080P Full HD * WDR Functie (Breed Dynamisch Bereik) * Toetsenbord dat oplicht * CPL&UV Lens beschikbaar Afbeelding apparaat en Functies a. Introductie van het
Gebruiksaanwijzing GPS car cam
 Gebruiksaanwijzing GPS car cam productomschrijving Dit product is ontwikkeld met de nieuwste wetenschap en technologie om een high- definition camcorder te ontwerpen. Het wordt niet alleen gebruikt als
Gebruiksaanwijzing DCAM GPS 01
 Gebruiksaanwijzing DCAM GPS 01 LEES VOOR HET GEBRUIK VAN DIT PRODUCT DEZE HANDLEIDING EERST GOED DOOR. INTRODUCTIE Bedankt voor uw keuzevoor deze Gembird dashboard camera met GPS tracker. Deze handleiding
Nederlandse versie. Inleiding. Software installatie. MP502FM / MP504FM Sweex Black Onyx MP4 Player
 MP502FM / MP504FM Sweex Black Onyx MP4 Player Inleiding Stel de Sweex Black Onyx MP4 Player niet bloot aan extreme temperaturen. Plaats het apparaat niet in direct zonlicht of in de dichte nabijheid van
Procedure Reset tv-toestellen:
 Procedure Reset tv-toestellen: Volgende procedure is te volgen wanneer er een tv-toestel, op een van de kamers niet meer werkt. TV Re-installation Factory Default Her-installeren van de TV Fabrieksinstellingen
Handleiding Blackview Dual Dashcam GPS dashcam
 Handleiding Blackview Dual Dashcam GPS dashcam Gefeliciteerd met de aankoop van uw dashcam! U heeft hiermee een kwaliteitsproduct aangeschaft waar u, mits u de dashcam verantwoord gebruikt, nog vele jaren
Gebruikershandleiding
 HD Auto Video Recorder Gebruikershandleiding Krijg de beste functies uit uw camcorder Lees de handleiding vóór het gebruik 2.7- inch LTPS TFT LCD HD 720P 120 graden Super Groothoeklens Beste gebruikers:
XEMIO-654/664 Gebruikershandleiding. Voor informatie en ondersteuning, www.lenco.eu
 XEMIO-654/664 Gebruikershandleiding Voor informatie en ondersteuning, www.lenco.eu Wat zit er in de doos: Het apparaat Gebruikershandleiding USB Kabel Hoofdtelefoon Installatie CD 2 Locatie en gebruik
Distributed in Canada by Gentec International gentec-intl.com
 Distributed in Canada by Gentec International gentec-intl.com WARNING 1. This is a sensitive piece of electronic equipment, please take care of your camera and do not let it fall. 2. Avoid having your
EM7680 Firmware Update by Micro SD card or USB stick
 EM7680 Firmware Update by Micro SD card or USB stick 2 NEDERLANDS/ENGLISH EM7680 Firmware update by Micro SD card or USB stick Table of contents 1.0 (NL) Introductie... 3 2.0 (NL) Firmware installeren...
Digitale Video. Gebruikershandleiding
 Digitale Video Gebruikershandleiding Nl 2 Inhoud Aan de slag Kennismaken met uw digitale video... 3 Het paneel gebruiken... 4 Aan-/uitzetten... 5 Modi... 6 Modusschakelaar... 7 Modus Movie Films opnemen...
EM7580 Firmware Update by Micro SD card
 EM7580 Firmware Update by Micro SD card 2 NEDERLANDS/ENGLISH EM7580 Firmware update by Micro SD card Table of contents 1.0 (NL) Introductie... 3 2.0 (NL) Firmware installeren... 3 3.0 (NL) Opmerking...
EM7680 Firmware Update by Micro SD card or USB
 EM7680 Firmware Update by Micro SD card or USB 2 NEDERLANDS/ENGLISH EM7680 Firmware update by Micro SD card or USB Table of contents 1.0 (NL) Introductie... 3 2.0 (NL) Firmware installeren... 3 3.0 (NL)
Quick start guide. Powerbank MI Mah. Follow Fast All rights reserved. Page 1
 Quick start guide Powerbank MI 16.000 Mah Follow Fast 2016 - All rights reserved. Page 1 ENGLISH The Mi 16000 Power Bank is a very good backup option for those on the move. It can keep you going for days
Gebruikshandleiding. EP-HD003 High Definition Dashcam A7LA50D Chipset
 Gebruikshandleiding EP-HD003 High Definition Dashcam A7LA50D Chipset Instructies voor het gebruik Deze gebruikshandleiding bevat gedetailleerde informatie over het gebruik van het product en uitgebreide
Shipment Centre EU Quick Print Client handleiding [NL]
![Shipment Centre EU Quick Print Client handleiding [NL]](/thumbs/78/76906513.jpg "Shipment Centre EU Quick Print Client handleiding [NL]") Shipment Centre EU Quick Print Client handleiding [NL] Please scroll down for English. Met de Quick Print Client kunt u printers in Shipment Centre EU configureren. De Quick Print Client kan alleen op
Shipment Centre EU Quick Print Client handleiding [NL] Please scroll down for English. Met de Quick Print Client kunt u printers in Shipment Centre EU configureren. De Quick Print Client kan alleen op
Gebruiksaanwijzing Samsung PV 210 Tablet PC. Inhoudsopgave
 Gebruiksaanwijzing Samsung PV 210 Tablet PC Inhoudsopgave 1 Introductie van uw TABLET...2 2 Accu...2 4 Interface en applicaties...4 5 HDMI & Host...5 6 Taal & keyboard...6 7 Beheren van Applicaties...7
Downloaded from
 GARMIN DASH CAM 10 & 20 Aan de Slag WAARSCHUWING Bekijk ook de Veiligheids en Productinformatie Gids in de verpakking voor belangrijke bijkomende info. Een geheugenkaart plaatsen Het toestel ondersteunt
Handleiding Digipass DP310
 Handleiding Digipass DP310 Deze handleiding geeft u uitleg over het activeren en gebruik maken van uw Digipass. Toetsen van de Digipass OK: voor het aan- of uitschakelen van het apparaat of om een handeling
Handleiding. SOLUS PA (Traditioneel rolluik) met Inus Keo schakelaar
 met Inus Keo schakelaar") Handleiding SOLUS PA (Traditioneel rolluik) met Inus Keo schakelaar A. Aansluiting Indien foute draadrichting: wissel de bruine en zwarte motordraad om. B. Afstelling 1. De draairichting van de oprolbuis
Handleiding SOLUS PA (Traditioneel rolluik) met Inus Keo schakelaar A. Aansluiting Indien foute draadrichting: wissel de bruine en zwarte motordraad om. B. Afstelling 1. De draairichting van de oprolbuis
Gebruikershandleiding. Waarschuwing voor gebruik
 Gebruikershandleiding Waarschuwing voor gebruik 1. Dit is een gevoelig product, laat het niet vallen of beschadigen. 2. Houd dit apparaat uit de buurt van objecten die een sterk magnetische veld hebben,
Mobile Watch Snelle Handleiding. Bezoek voor meer informatie
 Mobile Watch Snelle Handleiding Ⅰ. Software installatie - Software download: Zoek voor "360Eye"in de Iphone App Store en installeer de applicatie. Of scan de QR Code aan de rechterzeide. Voor meer details
40 FHD LED TV MODEL NR.:40LED1600
 40 FHD LED TV MODEL NR.:40LED1600 1 2 3 VOL+ VOL - MENU SOURCE 4 1 2 CH+ CH - 3 4 5 TV Buttons INPUT VIDEO R L OUTPUT VIDEO R L INPUT Y Pb Pr HDMI COAXIAL COAXIAL In verband met de spdif ontvangen 6 DVD
1. Grafische weergave
 Bedank voor uw aankoop van deze G98C FullHD dashcam. Deze dashcam is speciaal ontworpen om alles te registreren wat u in het verkeer meemaakt. De beelden die u opneemt met deze camera kunnen worden gebruikt
Settings for the C100BRS4 MAC Address Spoofing with cable Internet.
 Settings for the C100BRS4 MAC Address Spoofing with cable Internet. General: Please use the latest firmware for the router. The firmware is available on http://www.conceptronic.net! Use Firmware version
GEBRUIKSAANWIJZING PRODUCT SPECIFICATIES
 GEBRUIKSAANWIJZING PRODUCT SPECIFICATIES Stilstaand beeldresolutie: [12M] 4000x3000/ [8M] 3264x2448/[5M] 2592x1944/[2M] 1600x1200 Resolutie van de videoclip: [HD] 1280x720/ [640] 640x480 Bestandsindelingen:
e-dr DISPLAY GEBRUIKERS HANDLEIDING Makes you want to /crystalyteeu drive electric www.crystalyte-europe.com you electric Makes want to drive
 e-dr DISPLAY GEBRUIKERS HANDLEIDING www.crystalyte-europe.com to /crystalyteeu drive @crystalyteeu Om de elektrische fiets op de juiste manier te gebruiken wordt u verzocht de handleiding aandachtig te
2. Monitor schermweergave
 Gebruikshandleiding 1. Productoverzicht 1 1 DISPLAY-knop 2 Led Aan/Uit-knop 3 MODUS-knop 4 VOEDING-knop 5 MENU-knop 6 OMHOOG-knop 7 SD-kaartsleuf 8 Voeding-LED 9 SLUITER-knop 10 USB-bus 11 AV-bus 12 RECHTS/ZELFONTSP
Porte-clé avec cadre photo numérique. Dragen-Sleutel met numeriek fotokader
 Réf / Item code : 475520 Porte-clé avec cadre photo numérique Dragen-Sleutel met numeriek fotokader FR NL MET840 SOMMAIRE FR 1 Généralités 2 Contenu de l emballage 3 Description du produit 4 Charger la
28 HD LED TV MODEL NR.:28LED1600
 28 HD LED TV MODEL NR.:28LED1600 1 2 3 VOL+ VOL - MENU SOURCE 4 1 2 CH+ CH - 3 4 5 TV Buttons INPUT VIDEO R L OUTPUT VIDEO R L INPUT Y Pb Pr HDMI 6 DVD Set top boxen HDMI HDMI ingang aansluiting HDMI INPUT
Gebruikshandleiding. Dash Cam
 Gebruikshandleiding Dash Cam 87230 1. Leveringsomvang NL Ednet auto-dvr 1,2 m voedingskabel Zuignap Gebruikshandleiding Autolader 2. Productoverzicht 1 2 3 4 5 6 7 Knop voor lensinstelling HDMI-Poort USB-poort
Nederlands. Inhoud verpakking. Uw Camera. G-Shot D610. Voorzijde. Achterzijde -1-
 Nederlands G-Shot D610 Inhoud verpakking Controleer de verpakking op de volgende inhoud: CD-ROM (incl. Camera Driver) Camera hoes Pols band 2 x AA Alkaline Batterijen USB kabel TV OUT kabel Handleiding
GEBRUIKERSHANDLEIDING ACE700
 GEBRUIKERSHANDLEIDING ACE700 1. Voorwoord Hartelijk voor uw aankoop van deze camera. Leest u, voor gebruik, deze gebruikershandleiding zorgvuldig door voor een optimale prestatie en een langere levensduur.
AUTO DVR IN FULL HD CDC1300FD. Gebruikershandleiding
 AUTO DVR IN FULL HD CDC1300FD Gebruikershandleiding Voorwoord Wij danken u hartelijk voor het aankopen van één van onze producten, dit product is speciaal ontwikkeld om te dienen als hard bewijs voor ongelukken;
Gebruikshandleiding 1
 Gebruikshandleiding 1 Dank u voor de aanschaf van de GoXtreme WiFi View actiecamera. Lees alvorens dit product in gebruik te nemen deze gebruikshandleiding zorgvuldig door om het gebruik te optimaliseren
Gebruikshandleiding 1
 Gebruikshandleiding 1 Dank u voor de aanschaf van de GoXtreme WiFi actiecamera. Lees alvorens dit product in gebruik te nemen deze gebruikshandleiding zorgvuldig door om het gebruik te optimaliseren en
Dash Cam, Volledig HD 1080 p
 Dash Cam, Volledig HD 1080 p Gebruikshandleiding 87234 1. Leveringsomvang NL Auto-DVR 1,2 m voedingskabel Zuignap Gebruikshandleiding Autolader 2. Productoverzicht Aan de slag 3. Inschakelen/Uitschakelen
Multifunctionele Digitale camera
 Nederlands Multifunctionele Digitale camera Gebruikershandleiding ii Nederlands Gebruikershandleiding voor digitale camera Inhoud DE ONDERDELEN IDENTIFICEREN... 1 PICTOGRAMMEN OP HET LCD-SCHERM... 2 VOORBEREIDING...
MPOC Push to Talk via Two-way mobiele zender Handleiding
 MPOC-4810 Push to Talk via Two-way mobiele zender Handleiding BEDANKT Bedankt om te kiezen voor de Syco poc zender. Wij zijn ervan overtuigd dat u een verstandige keuze heeft gemaakt De zenders van Syco
GEBRUIKERSHANDLEIDING
 GEBRUIKERSHANDLEIDING PSC4K 1. Voorwoord Hartelijk voor uw aankoop van deze camera. Leest u, voor gebruik, deze gebruikershandleiding zorgvuldig door voor een optimale prestatie en een langere levensduur.
DB-2180 Binocular LCD DigiCam Product informatie D E B C
 DB-2180 Binocular LCD DigiCam Product informatie F D E L K J A B C G I NL H A: Verrekijker lens (8 x vaste vergroting) B: Digitale camera lens (8 x vaste vergroting) C: Digitale camera focus draaiknop
Gebruiksaanwijzing DVX Player F150-III
 Gebruiksaanwijzing DVX Player F150-III SET-UP In de SETUP vindt u diverse instellingen voor beeld, geluid, display en kalender. Druk op en kies uw taal. met UP/DOWN de functie Selecteer
1 Aansluiten op uw TV. Sluit de HDMI poort van de SmarTVstick aan op een HDMI poort van uw TV
 Stenmark SmarTVstick Handleiding: Inhoudsopgave 1 SmarTVstick aansluiten op een TV 2 Voeding aansluiten Externe apparaten 3 Verbinding met de muis Gebruik 4 Verbinding met het netwerk 5 Schermresolutie
Bedieningspaneel buiten Bedieningspaneel binnen
 - 1-1211 Bedieningspaneel buiten Panneau extérieur Bedieningspaneel binnen Panneau intérieur - 2-2222 1. 1.ON/OFF: 1. ON/OFF : 2. Tijd toetsen (time): om de tijd inclusief verwarmingstijd bediening in
EM6250 Firmware update V030507
 EM6250 Firmware update V030507 EM6250 Firmware update 2 NEDERLANDS/ENGLISH Table of contents 1.0 (NL) Introductie... 3 2.0 (NL) Firmware installeren... 3 3.0 (NL) Release notes:... 5 1.0 (UK) Introduction...
ICARUS Illumina E653BK on Windows 8 (upgraded) how to install USB drivers
 how to install USB drivers") ICARUS Illumina E653BK on Windows 8 (upgraded) how to install USB drivers English Instructions Windows 8 out-of-the-box supports the ICARUS Illumina (E653) e-reader. However, when users upgrade their Windows
ICARUS Illumina E653BK on Windows 8 (upgraded) how to install USB drivers English Instructions Windows 8 out-of-the-box supports the ICARUS Illumina (E653) e-reader. However, when users upgrade their Windows
Handleiding GuardCam-LED
 Handleiding GuardCam-LED Stap 1. Plaatsen / verwijderen SD kaart Stap 2. Installeren GuardCam LED Stap 3. Monteren GuardCam LED Stap 4. Aanpassen instellingen Stap 5. Instellen datum, tijd en video mode
2015 Multizijn V.O.F 1
 Dank u voor de aanschaf van de gloednieuwe SJ5000 Camera. Lees deze handleiding aandachtig door voordat u de camera gaat gebruiken en wij hopen dat u snel vertrouwd zal zijn met de camera en u veel spannende
Handleiding. DDPai. Retail en Distributie: Pitstar Retail BV Postbus AA Oosterbeek The Netherlands
 Handleiding DDPai Retail en Distributie: Pitstar Retail BV Postbus 80 AA Oosterbeek The Netherlands info@pitstar.com versie Juli 08 Inhoud verpakking De camera mini camera M sticker USB voedingskabel Micro
Gebruikershandleiding. Sports DV PSC1331HD
 Gebruikershandleiding Sports DV PSC1331HD INFORMATIE Wij willen u hartelijk danken voor de aankoop van deze camera. Dankzij de ingebouwde hoogwaardige chip, levert deze camera high definition video met
2015 Multizijn V.O.F 1
 Dank u voor de aanschaf van de gloednieuwe SJ5000 Camera. Lees deze handleiding aandachtig door voordat u de camera gaat gebruiken en wij hopen dat u snel vertrouwd zal zijn met de camera en u veel spannende
Hoe te verbinden met NDI Remote Office (NDIRO): Apple OS X How to connect to NDI Remote Office (NDIRO): Apple OS X
: Apple OS X How to connect to NDI Remote Office (NDIRO): Apple OS X") Handleiding/Manual Hoe te verbinden met (NDIRO): Apple OS X How to connect to (NDIRO): Apple OS X Inhoudsopgave / Table of Contents 1 Verbinden met het gebruik van Apple OS X (Nederlands)... 3 2 Connect
Handleiding/Manual Hoe te verbinden met (NDIRO): Apple OS X How to connect to (NDIRO): Apple OS X Inhoudsopgave / Table of Contents 1 Verbinden met het gebruik van Apple OS X (Nederlands)... 3 2 Connect
PLUS & PRO. Addendum installatie aanvullende MID 65A kwh-meter - Addendum installation additional MID 65A kwh-meter SET
 PLUS & PRO Addendum installatie aanvullende MID 65A kwh-meter - Addendum installation additional MID 65A kwh-meter 1 Aansluiten MID 65A kwh-meter Adres instellen MID 65A kwh-meter Maxem kan verschillende
EM7680 Firmware Update by OTA
 EM7680 Firmware Update by OTA 2 NEDERLANDS/ENGLISH EM7680 Firmware update by OTA Table of contents 1.0 (NL) Introductie... 3 2.0 (NL) Firmware installeren... 3 3.0 (NL) Release notes:... 3 4.0 (NL) Overige
IDPF-700 HANDLEIDING
 IDPF-700 HANDLEIDING Kenmerken product: Resolutie: 480x234 pixels Ondersteunde media: SD/ MMC en USB-sticks Fotoformaat: JPEG Foto-effecten: kleur, mono, en sepia Zoomen en draaien van afbeeldingen Meerdere
GEBRUIKERSHANDLEIDING
 GEBRUIKERSHANDLEIDING 1. Onderdelen van de camcorder 1: Preview-knop 2: Menuknop 3: LCD-scherm 4: HDMI-aansluiting 5: Moduswiel 6: Vermogen LED 7: Sluiterknop 8: Opladen LED 9: Omhoog/Belichtingsknop 10:
Nederlands. Multifunctionele. Digitale camera. Gebruikershandleiding
 Nederlands Multifunctionele Digitale camera Gebruikershandleiding ii INHOUD DE ONDERDELEN IDENTIFICEREN... 1 PICTOGRAMMEN OP HET LCD-SCHERM... 2 VOORBEREIDING... 2 Batterijen laden... 2 De SD/MMC-kaart
GEBRUIKERSHANDLEIDING
 GEBRUIKERSHANDLEIDING Informatie voor de gebruiker: HD (High Definition) en HFR (High Frame Rate) video-opname apparaten, zijn een zware belasting voor geheugenkaarten. Afhankelijk van de gebruikersinstellingen,
MultiSport DV609 Nederlands
 MultiSport DV609 Nederlands! Kennisgeving: High-definition video-opnameapparatuur met hoge beeldfrequentie vormt een zware belasting voor geheugenkaarten. Afhankelijk van uw instellingen wordt aanbevolen
Installatie van versie 2.2 van Atoum
 Version française en seconde partie du document. Installatie van versie 2.2 van Atoum U moet in uw databases een nieuwe tabel aanmaken na de installatie van versie 2.2 van de toepassing Atoum. Hiervoor
VIDEO / FOTO zonnebril met afstandsbediening. GEBRUIKSAANWIJZING
 0 Gebruiksaanwijzing Video/ foto zonnebril H211012 VIDEO / FOTO zonnebril met afstandsbediening. GEBRUIKSAANWIJZING 1 Gebruiksaanwijzing Video/ foto zonnebril H211012 VIDEO / FOTO zonnebril met afstandsbediening.
Xemio-760 BT Snelgids Voor informatie en ondersteuning,
 Xemio-760 BT Snelgids Voor informatie en ondersteuning, www.lenco.com 1. Bedieningselementen en aansluitingen (1) TFT LCD-display (2 inch; R,G,B) (2) M (Menu oproepen/ Submenu) (3) (Vorige / Terugspoelen,
MyDHL+ ProView activeren in MyDHL+
 MyDHL+ ProView activeren in MyDHL+ ProView activeren in MyDHL+ In MyDHL+ is het mogelijk om van uw zendingen, die op uw accountnummer zijn aangemaakt, de status te zien. Daarnaast is het ook mogelijk om
Uiterlijk. 1.Lens 2.Opnametoets 3.Fotografeertoets _ NED 01
 Uiterlijk 3 2 1 1.Lens 2.Opnametoets 3.Fotografeertoets NED 01 13 4.MicroUSB-poort 10 12 11 6 7 8 9 4 5 5.Schakelaar voor batterijvoeding 6.Toets pagina omhoog 7.Inschakeltoets 8.OK-toets 9.Toets pagina
Hoe met Windows 8 te verbinden met NDI Remote Office (NDIRO) How to connect With Windows 8 to NDI Remote Office (NDIRO
 How to connect With Windows 8 to NDI Remote Office (NDIRO") Handleiding/Manual Hoe met Windows 8 te verbinden met NDI Remote Office (NDIRO) How to connect With Windows 8 to NDI Remote Office (NDIRO Inhoudsopgave / Table of Contents 1 Verbinden met het gebruik van
Handleiding/Manual Hoe met Windows 8 te verbinden met NDI Remote Office (NDIRO) How to connect With Windows 8 to NDI Remote Office (NDIRO Inhoudsopgave / Table of Contents 1 Verbinden met het gebruik van
Full HD Action Video Camera
 ENVIVO Full HD Action Video Camera USER MANUAL ENVIVO Full HD Action Video Camera MODE D EMPLOI SOMMAIRE BIENVENUE... 6 DANS LA BOITE... 7 ACCESSOIRES DE MONTAGE... 8 Montage sur le vélo... 8 Montage
Automatische opname inrichting Collegezaal
 Automatische opname inrichting Collegezaal Onderstaande beschrijving legt uit hoe de automatische opname inrichting in de Collegezaal voor media recording is ingericht bij de School of Business and Economics
Uw gebruiksaanwijzing. MPMAN MPUB 330
 U kunt de aanbevelingen in de handleiding, de technische gids of de installatie gids voor MPMAN MPUB 330. U vindt de antwoorden op al uw vragen over de MPMAN MPUB 330 in de gebruikershandleiding (informatie,
MP300011/MP Sweex MP3 Player 128 MB/256 MB
 MP300011/MP300021 Sweex MP3 Player 128 MB/256 MB Voordelen FM Radio FM opname Flash Geheugen Spraakopname - Luister naar uw favoriete radiostation. - Neem tijdens het luisteren uw favoriete song op in
Alistair LED stairwell luminaire Handleiding Alistair (Emergency UC03 sensor)
") Alistair LED stairwell luminaire Handleiding Alistair (Emergency UC03 sensor) Let op: Als het flexibele draad van dit licht beschadigd is, dient het te worden vervangen door iemand van de technische service,
Alistair LED stairwell luminaire Handleiding Alistair (Emergency UC03 sensor) Let op: Als het flexibele draad van dit licht beschadigd is, dient het te worden vervangen door iemand van de technische service,
IOS and Android APP instruction
 IOS and Android APP instruction - Open de APP Store of Google Play op uw toestel - Open the APP Store or Google Play on your device IOS Android - Download de Eurom Heating APP: - Download the Eurom Heating
HET MODELNUMMER FIESTA2. Mp3 speler met luidspreker. Instructiehandleiding
 Mp3 speler met luidspreker HET MODELNUMMER FIESTA2 Instructiehandleiding Lees deze instructies svp goed door alvorens dit apparaat in gebruik te nemen. NL Gebruiksaanwijzing TOETS AANDUIDINGEN 9 1 3 2
CCT-1301 GEBRUIKSHANDLEIDING
 CCT-1301 GEBRUIKSHANDLEIDING www.facebook.com/denverelectronics DUT-1 1.Sluiter 2.Luidspreker 3.AAN/UIT 4.USB-poort 5.Micro SD-kaartsleuf 6.Lens 7.Indicatielampje Opladen 8.Indicatielampje Bezig 9.Cover
Vr.Model-nr MPFOL15. Gebruikershandleiding
 Vr.Model-nr MPFOL15 Gebruikershandleiding NL 1. Toetsen 1. M : Menu 2. : Afspelen/Pauzeren 3. < : Vorige track / Terugspoelen 4. > : Volgende track/ Vooruitspoelen 5. - : Volume verlagen 6. + : Volume
STAS partout. 12V - systeem
 STAS partout 12V - systeem Montage instructies STAS partout Lees eerst altijd zorgvuldig de montage instructies! - Indien er een STAS multirail aanwezig is waar men de STAS partout aan wil monteren, controleer
PIR DC-SWITCH. DC Passive infra-red Detector. Model No. PDS-10 GEBRUIKSAANWIJZING/INSTRUCTION MANUAL
 PIR DC-SWITCH DC Passive infra-red Detector Model No. PDS-10 GEBRUIKSAANWIJZING/INSTRUCTION MANUAL Please read this manual before operating your DETECTOR PIR DC-Switch (PDS-10) De PDS-10 is een beweging
VCA-DRR2014. Digitale Rit recorder Gebruikers Handleiding. Versluis Automotive / VCA-DRR2014 1
 VCA-DRR2014 Digitale Rit recorder Gebruikers Handleiding Versluis Automotive / VCA-DRR2014 1 Bedankt voor het kiezen van ons kwaliteitproduct, de VCA-DRR2014. Omschreven als: Digitale Rit Recorder of ook
Videokwaliteit HD: MPEG-4 H.264 8bit 480p / 720p / 960p / 1080p / 1440p / 2.7K / 2.7K 4:3 / 4K. 2.7K: 24fps / 25fps / 30fps / 48fps / 50fps / 60fps
 QUICK GUIDE MODEL: GoPro Hero5 Black SPECIFICATIES: Videokwaliteit HD: MPEG-4 H.264 8bit 480p / 720p / 960p / 1080p / 1440p / 2.7K / 2.7K 4:3 / 4K Frame rate 4K: 24fps / 25fps / 30fps 2.7K: 24fps / 25fps
Inleiding. Inhoud van de verpakking. Nederlandse versie. JB000160 Sweex 4.2 Megapixel Digitale Camera
 JB000160 Sweex 4.2 Megapixel Digitale Camera Inleiding Allereerst hartelijk bedankt voor de aanschaf van deze Sweex 4.2 Megapixel Digitale Camera Voor een juiste werking van deze Sweex 4.2 Megapixel Digitale
Multifunctionele Digitale camera
 Nederlands Multifunctionele Digitale camera Gebruikershandleiding INHOUD DE ONDERDELEN IDENTIFICEREN... 1 PICTOGRAMMEN OP HET LCD-SCHERM... 2 VOORBEREIDING... 2 Batterijen laden... 2 De SD/MMC-kaart plaatsen...
Haut-Parleur Led Compact
 ENVIVO Haut-Parleur Led Compact GUIDE RAPIDE HAUT-PALEUR LED COMPACT Totalement sans fil - le haut-parleur EnVivo Bluetooth LED vous permet de diffuser votre musique préférée de n importe quel appareil.
How to install and use dictionaries on the ICARUS Illumina HD (E652BK)
") (for Dutch go to page 4) How to install and use dictionaries on the ICARUS Illumina HD (E652BK) The Illumina HD offers dictionary support for StarDict dictionaries.this is a (free) open source dictionary
(for Dutch go to page 4) How to install and use dictionaries on the ICARUS Illumina HD (E652BK) The Illumina HD offers dictionary support for StarDict dictionaries.this is a (free) open source dictionary
Digital Video. Gebruikershandleiding
 Digital Video Gebruikershandleiding Inhoud Aan de slag Kennismaken met uw Digital Video... 3 Het paneel gebruiken... 5 Voeding... 6 Modi... 7 DV-modus Films opnemen... 11 Video Out... 12 DSC-modus Foto
MyDHL+ Van Non-Corporate naar Corporate
 MyDHL+ Van Non-Corporate naar Corporate Van Non-Corporate naar Corporate In MyDHL+ is het mogelijk om meerdere gebruikers aan uw set-up toe te voegen. Wanneer er bijvoorbeeld meerdere collega s van dezelfde
HANDLEIDING GPS01 DASHCAM
 ! PIXIO GPS01 DASHCAM HANDLEIDING HANDLEIDING GPS01 DASHCAM Model 2013 Oranje menu GPS Locatie GPS Snelheid FULL HD 1080p G-sensor Loop recording pixio-electronics.com Versie 2.0 Gefeliciteerd met uw aankoop.
Handleiding Zuludesk Parent
 Handleiding Zuludesk Parent Handleiding Zuludesk Parent Met Zuludesk Parent kunt u buiten schooltijden de ipad van uw kind beheren. Hieronder vind u een korte handleiding met de mogelijkheden. Gebruik
2015 Multizijn V.O.F 1
 Dank u voor de aanschaf van de SJ4000 WIFI Camera. Lees deze handleiding aandachtig door voordat u de camera gaat gebruiken en wij hopen dat u snel vertrouwd zal zijn met de camera en u veel spannende