USER MANUAL GEBRUIKERSHANDLEIDING MODE D'EMPLOI
|
|
|
- Bernard Kuipersё
- 8 jaren geleden
- Aantal bezoeken:
Transcriptie
1 TAB07 7" Tablet PC USER MANUAL GEBRUIKERSHANDLEIDING MODE D'EMPLOI
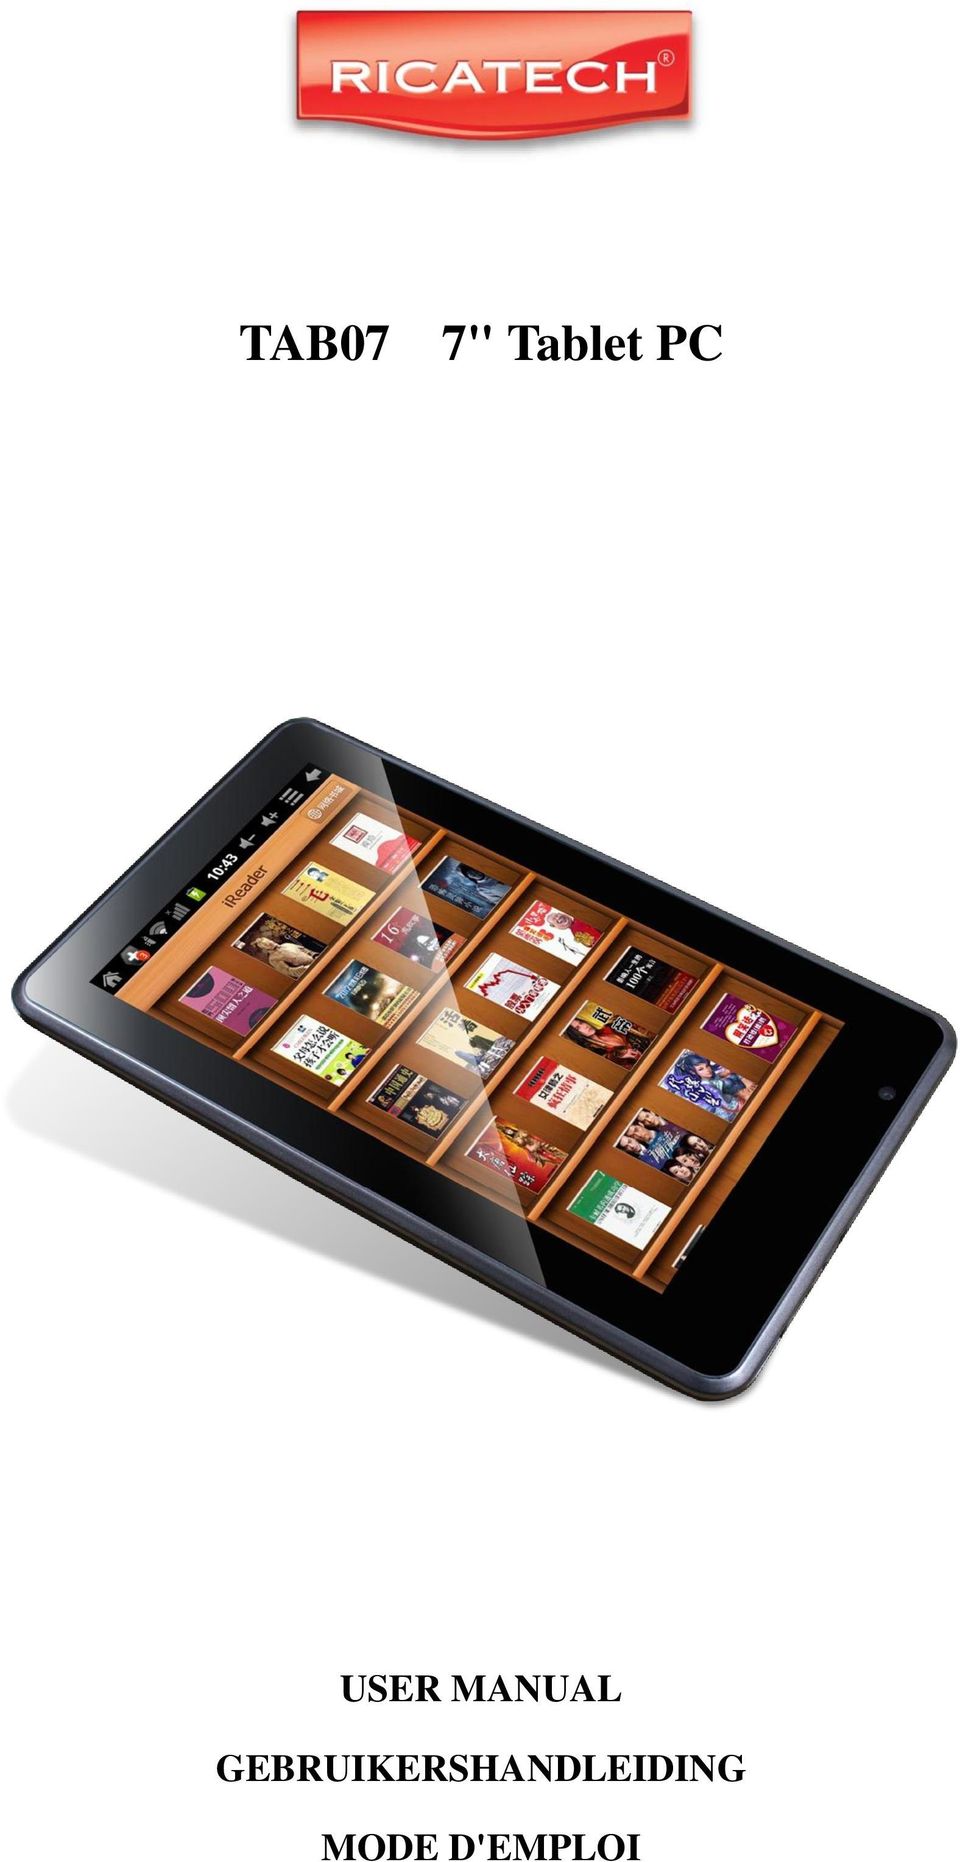
2 1. Desktop 2. Power button 3. Menu button 4. Back button 5. Camera 6. TF Card 7. HDMI 8. Earpieces Jack 9. DC Socket 10. USB 11. USB Host Port

3 Content 1. Announcements 2. Introduction 2.1 Packing Details Instructions on Keys Features Overview Technical Specifications 3. Quick Guidance 3.1 About Touch Panel Switch On/Off Power Save Modes and lock screen 3.4 Battery management and charging. 3.5 Definition for the icons of the Functions 3.6 USB HOST Function TF Card Storage Network Access 4.1 Network Access by Wi-Fi Network Access by 3G Storage File Copy & Delete from PC 6. Main Functions Introduction 6.1 Audio Function 6.2 Video Function. 6.3 Picture Function 6.4 Record Function 6.5 File Manager E-book Function 6.7 Internet Browser 6.8 Function 6.9 Calendar Calculator Alarm Clock APK Installer. 7. System Settings 8. FAQ

4 1. Announcements 1. Please keep the device away from moist and dust. 2. Do not put the device in high-temperature environment, especially closed car in hot weather. 3. Do not drop or strike the device. 4. Do not shake the device violently, especially the LCD Screen part. Or, it will cause abnormal display on the screen. 5. Please choose proper volume when using the earphone which will be good for your ear. 6. Please charge the device when (1) The power icon shows lowest power. (2) The device is turned off automatically, and when you turn on it, it is turned off automatically again. (3) No response when operating the buttons. Attention: Please use the charger offered by manufacturer to charge, other charges may causes damage to the device. Input: V ~ 50/60 Hz Output: 5V 1500 ma 7. Do not disconnect the device from PC when downloading, uploading or formatting, or it will cause programming errors of the device. 8. Do not dismounting the device privately without professional guidance. 9. Do not use alcohol, thinner or benzene-chemical to clean the surface of the device. 10. Do not use the device in forbidden place, like airplane. 11. Please always back-up your files in device s memory. The manufacturer is not responsible for clearing the files after damage or repairs of the device. 12. The manufacturer reserves all right of device s technology and design, and will have no obligation to inform the user if there are new versions or designs been developed. 13. The device is NOT water-proof; please keep it away from water. The turn on time of this device is about 20 seconds; please don t operate the device for 20 seconds when it is turned on.
 The device is turned off automatically, and when you turn on it, it is turned off automatically again. (3) No response when operating the buttons.")
5 2. Introduction 2.1 Packing Details. Each unit of Tablet PC has the following items: Tablet PC device*1, charger*1, earphone*1, USB cable*1, and user manual*1. All items are packed in gift box. 2.2 Instructions on Keys. Name POWER MENU ESC TF Card Slot Stereo Earpieces Jack Description Press this button shortly to enter sleeping/wake up mode, long press to switch ON/OFF Press this button shortly to enter the submenu Press shortly to return, long press to the touch screen calibration For external TF card, 1GB to 16GB Stereo earpieces jack for earphone DC Socket MINI USB Port USB Host Port Connect with 5V DC charger MINI_5 PIN USB Port Display HD Display area Long Press: Press the item for more than 1.2 seconds. Port for external USB Driver, 3G Dongle, Mouse, keyboard, etc 2.3 Features Overview CPU: ALLWINNER, Cortext A8, 1.2GHz. With ANDROID 2.3 operation system. 7" TFT touch panel LCD display, 800 x 480 pixel resolution. Support 4~16GB built-in Flash Memory, support 128MB-16GB external TF card. Support Media playing: Video, audio, pictures, Ebooks, etc. Built-in Wi-Fi. Support external 3G USB-DONGLE wireless network card (3G card or USB-Dongle are not provided by the Tablet PC manufacturer). Various applications are available in the ANDROID 2.3 OS (APK applications only). Support built-in microphone record function (optional). Support USB-HOST and external U-disk, MP3, MP4, Mouse, keyboard, etc. Support G-sensor screen rotation function. Support Stereo Earpieces and speaker. Supports multiple languages. The device can be used as USB portable hard disk, driver not needed for WIN2000 or above.

6 2.4 Technical Specifications Screen 7 inch Capacitive Touch Screen. Five Points Multi-touch Resolution: 800 x 480. Aspect Ratio: 16 : 9 CPU Chipset: ALLWINNER; Processor: Cortex A8; Frequency: 1.2GHz RAM DDR3 512 MB Storage 4GB-16GB optional External inserted TF card be extendable from 1GB to 16 GB System Android 2.3 Network Wifi: Built-in Wifi Module. IEEE b/g/n. 11Mbps to 54Mbps 3G: External 3G by USB Dongle. Applications APK format applications Video RM, RMVB, AVI, MOV, WMV, MP4, ASF, 3GP, TS, MKV, MPEG, etc. All videos support HD 2160P. Music MP3, WMA, WAV, APE, FLAC, AAC, OGG, etc. Pictures Ebooks Office Files JPG, BMP, PNG, TIFF, etc. TXT, PDF, CHM, HTML, PDB, UMD, FB2, LRC, EPUB. Supported files: Word, Excel, PDF, etc. PC Connection MINI USB 2.0 x 1 Battery Built-in Lithium Battery: 3200 mah. 3. Quick Guides 3.1 About Touch Panel The touch screen is capacitive touch screen; you can use five fingers to touch the screen at the same time. 3.2 Switch On/Off Switch On and Unlock: When the device is in the OFF mode, press and hold Power key for 3 seconds to enter the Android startup progress bar, it need about 20 seconds enter to the system desktop, when the LCD is under locked mode, please press and pull the point, then the LCD will unlocked automatically, see the figures below. icon to the green

7 3.3 Power Saving Modes and lock screen Press the POWER key shortly after starting up, system enter to power save and lock mode. Press the POWER key or tap the touch screen, system will return to bright in 1 second. The primary operation of the device will not stop under the power save mode, just the LCD is shut and with black screen. For example: playing music, movie, etc. Switch OFF: When the device is in the OFF mode, press and hold the POWER key for 3 seconds, the screen will display the power off interface, choose the power off item to confirm, the system will shut automatically. Note When the device with low battery it will alarm continuous and shut automatically without charging. If the device can not start up please check if the battery is low, and try it again after the battery is charged. 3.4 Battery management and charging Charge the battery for 8-12 hours to make sure the battery is fully charged when firstly use Insert the micro port of the battery adaptor into DC slot on the device, and connect the other side with the power socket. Then the desktop icon of the battery keep rolling which shows it is charging, please wait until the battery is fully charged, don t disconnect the power when charging. Once the battery is fully charged, the Icon on the desktop will stop rolling. Note In order to keep the battery working in the best condition, please pay attention as below: Please don t charge the power in high temperature. No need to release the power for this Li- battery, you can charge the power even there is still some power in the battery, no need to wait it runs out. In order to keep the battery in good condition, please make sure to charge the power once per two weeks if you don t use this device for a long time. 3.5 Definition for the icons of the Functions

8 Icon Function instruction Back to main menu Show current power status The current system time Icon Function instruction Note when the system finds new devices Set the alert time Reduce the volume Back Louder the volume Menu Menu for Function Block Google search Switch the interface System clock WIFI on/off New mail USB Connection Status Bar 3.6 USB HOST Function USB- HOST Definition The Mini USB on the device can be used as USB Host Read U-disk: Insert the U-disk into the HOST port, press the Resource manager in the desktop, press USB enter into u-disk External 3G USB Dongle. (See network access guidance in item 4) 3.7 TF Card Storage There is a TF card slot in this device, it support reading the files in TF card. Insert the TF card into the card slot in right way, when take it out, just push the TF toward to the inside, then the slot will release the TF card, the TF card will pop out automatically, take it then Please insert the TF into the card slot in the right side of the device Don t pull out the card when operating ( reading, copying), or it may cause date error Don t use the TF card under high temperature condition Keep the TF card far from the liquid and erosive materials. 4. Network Access The device support Wi-Fi network and external 3G network.
 3.7 TF Card Storage There is a TF card slot in this device, it support reading the files in TF card.")
9 4.1 Network Access by Wi-Fi Turn on Wi-Fi, and Press Wi-Fi settings. The device will scans automatically for available Wi-Fi networks Choose the Wi-Fi network that you want to connect to Press Connect. Some network may need you input the password On the Wi-Fi settings screen, press the Menu key, touch Advanced, you will get more settings for Wi-Fi. 4.2 Network Access by 3G Turn OFF Wi-Fi if it is working Access Wireless & Networks, and choose Mobile network setting, make sure Data enabled was chosen. Then go back to Wireless & Networks Insert External 3G by USB host Choose Mobile network, then wait for the 3G network connection, soon you can access network via 3G.. 5. Storage File Copy & Delete from PC A) Connect the device to computer by USB Cable, there will be notification in the status bar that USB connected. B) Hold Pressing the top of device, and move your fingers down, the status bar will be dragged down. C) Choose USB Connected. Then, Turn on USB storage.


10 The left picture shows that device storage content could be viewed and modified from computer. The right picture means that device storage content could NOT be viewed or modified from computer. If there is no notification as above when you turn on the device, please operate as follows: Enter System Settings Enter Applications settings ---- Enter Development Choose USB debugging, turn it on. Then, there will be notification again that if you Allow USB debugging, choose OK and then turn on USB storage, now you can copy or delete the device s files from PC. 6. Main Functions Introduction 6.1 Audio Function Enter the music player: In music player mode, double-click the favorite in the list to play music as shown in the following picture. Drag the playing progress bar, to adjust the playing process. Instructions of the buttons in the Music player

11 Button Instruction button Instruction Artist Album Song Random Play Play the last song Pause Playing Music list Loop playback Play the next song Play When no music files in the audio player playlist, the system will automatically load the music files from the card to the audio player playlist after turning on the audio player (the device supported audio file format: mp3, wav, midi, wma). The playlist as shown in the above figure. If two more songs in the Music playlist area, slide up/down the touch screen to page up/down Double-click the favorite in the list to play music. In the music playing interface, click Drag the playback progress bar enter the audio playing list. to adjust audio playback progress. 6.2 Video Function Click the Video player icon to enter the video player interface, open the video files. The device supported audio file format: MKV, AVI, RM, RMVB, MP4, MOV, VOB, DAT, FLV, 3GP etc. When there are no video files in the video player playlist, the system will automatically load the video files from the card to the video player playlist after turning on video player. Drag the playback progress bar to adjust video playback progress. 6.3 Picture Function Click the HD Video Player to enter the viewing interface Add image(supports the format of picture: BMP, JPG, JPEG, PNG, GIF) When there is no file in the photo list, the system will automatically load the image files from the card to the photo browsing list after opening the photo browser. Open the corresponding folder, find the image file and add the picture you want. Click menu button, the photo can be set as wallpaper.

12 6.4 Record Function Click the record icon to enter the record interface, click record button to start recording, click this button recording or give up, please select manually. to stop recording, the system will remind you to use this Recording playing: please select audio player to play the recording, select first the record files from the explorer, then click it and playing, further details please refer to Audio Function. 6.5 File Manager In file manager, you can check all files in the device, including files in built-in Memory and external card. Also there is a quick view for pictures and videos. 6.6 E-book Function. Support formats of E-Book: TXT, LRC, PDF, HTML, HTM, EPUB etc. 6.7 Internet Browser Before you use internet browse function, please make sure your network is connected. See network access guidance in former part. Click IE Browser icon to enter to the IE interface, click the address bar and input website and click Go to enter a corresponding web page, you can view the corresponding website information.

13 Click icon to view bookmark and history record. Click menu icon to access settings. The device also supports other internet browsers, detail functions of those internet browsers refer to their own instructions Function Before you use function, please make sure your network is connected. See network access guidance in former part. When you firstly use this function, you need to add an account to the device. The device supports several accounts working together. Portal sites accounts and enterprise account adding methods are different Add portal sites accounts. (Example: Gmail, MSN, Yahoo, etc.) Take Google account for an example here.

14 Account: Password: ********* For portal sites accounts, directly input your address and password, then click next. After successful connection, input Account Name and Your Name. Account Name means the name of this account in the device, Your Name means the displayed name of your in receivers account. Then you will access the account. Click titles to read s, long press titles to access options. Click menu icon to access settings Refresh: Checking new s. Compose: Write new s. Folders: Manage s to different folders. Accounts: View accounts in the device, add new accounts, delete accounts, set main account. Accounts settings: More options for account Add enterprise account. ( Example: ) Take PLOYER enterprise account for an example here. Account: info@ployer.com.cn Password: ********* For enterprise account, first input your address and password, then click manual setup for more options. Inquire the sever of enterprise account from your webmaster, and follow his guidance to fill in items in manual setup, then click next. The following steps are the same as 6.8.1, see instructions above. 6.9 Calendar Click Calendar icon to enter calendar interface. In calendar mode, press and pull up/down the screen to reduce/increase the Months; or to turn the pages. Auto adjusts Years when the month exceeds December or January. Enter interface, the number in the orange form is the intraday date, you can change the date in setting function; details as the setting section. Click to return to main menu.

15 6.10 Calculator Click Calculator icon to enter calculator interface Alarm Clock Click Clock icon to enter time interface, then click the clock to access alarm interface, and you can add new alarms or edit former alarms now. Long press former alarms to choose turn alarm on/off, edit alarm, and delete alarm. Click alarms to edit alarm. You can edit alarms time, repeat mode, ringtone and label. In alarm interface, click menu icon to access settings. The following items could be set. Alarm in silent mode Alarm volume Snooze duration Volume and camera 6.12 APK Installer This device supports the third party s Application Package (APK format) based on Android OS. Many Application Package can be downloaded from internet, or copied from other devices into the storage. If the Application Package is not downloaded from Google Android Market, you should operate the following steps before installation. Please check Settings Applications, make sure Unknown sources is chosen. Click the APK installer icon Manage, and Exit. and the APK installer interfaces will pop up: Install,

16 Install: Click Install, enter into the APK installer interface. Internal Memory means built-in Flash memory, SD card means inserted T-Flash. After entering, select the APK format setting program in the right side, click the application to install, back to the main interface when complete this operation, then it finished the installing, and there will be a relevant icon in application list Manage: Click manage and enter into the third part software interface. Startup: run the software. Export: export the software to the TF card. Uninstall: uninstall the software. Search: search the software in the software shops. Cancel: cancel the operation Exit: Go back to the main interface. Note: All installed applications will be shown in application list menu. The applications include games, chatting TM, internet browser, media player, system tool, etc. 7. System Settings Click setting icon to enter system settings, then you can change wireless & networks, sound, display, HDMI setting, location & security, Applications, accounts & sync, Privacy, Storage, language & keyboard, voice input & output, and date & time. 7.1 Wireless & Networks Setting - See item Sound Setting - You can adjust Silent mode, Volume, Notification ringtone, Audible selection, Screen lock sounds, and Haptic feedback. 7.3 Display Setting - You can adjust Brightness, Auto-rotate screen, Animation, Screen timeout. 7.4 Location & Security Setting - In this Setting, you can set up screen lock and device administrators, as well as TF card password. 7.5 Applications Setting - You can manage applications here, and check storage & battery usage. Note: If you want to install applications which are not downloaded from Google Android Market, you should turn on Unknown sources in advance. 7.6 Accounts & sync Setting - In this setting, you can manage accounts in the device. 7.7 Privacy Setting - In this setting, you can back up data, and reset factory default. 7.8 Storage Setting. - In this setting, you can check storage use and Mount & Erase TF cards. Note: Before you fetch out TF Card (if you have inserted TF card), please Unmount TF card first,

17 in case that some applications will arise problems. 7.9 Language & Keyboard Setting - In this setting, you can change the language of system, and choose keyboard inputs. Note: If you have installed an input and you want to use it, please remember to turn on it in this setting (All inputs could be turned on here). Long Press the blank where you want to type, there will be popup to choose inputs Date & time Setting - In this setting, you can adjust date and time About device - Check device information. 8. FAQ 1) How can I change languages if I mistakenly choose an unknown language? Find setting icon in Menu Page to enter Settings. Then, choose icon to enter language & keyboard setting, the first option is language setting. 2) How can I change input when I am typing? Long Press the blank where you are typing, there will be popup to choose inputs. 3) I already installed some applications, but I can not find them now, why? By default, some applications are installed in external TF card, so if you fetched out the TF card from the device, you will not see these applications. 4) The machine can not be turned on. Check the battery and charge it if there is no power. Connect the machine to AC Adapter. Contact the seller if the machine still can not be turned on after charged. 5) There is no voice in the earphone. Check if the device is in Mute mode. Check the volume setting in case it is 0. Check the connection of earphone. 6) Why I can not install applications? Please check Settings Applications, make sure Unknown sources is chosen. 7) There is Error Codes on the screen. System error, restart the device. The language you are browsing is not supported by built-in languages, please contact the original manufacturer to debug. 8) There are problems of system, many popup of error.
 How can I change languages if I mistakenly choose an unknown language? Find setting icon in Menu Page to enter Settings.")
18 Restart the device by POWER button for 10 seconds, the device will restart. If you have restarted the device and error popup still exist, you can check active applications to see if there is any unknown application, uninstall it if any. There may be virus in the device, please install security applications and protect your device. If you have problems after above operations, the device s firmware needs rebuilt (the operation is named flash ). Note: Before you flash the device, please back up your storage, the flashing will make all settings and files turn to factory default. Flashing operation need flashing tool and firmware, please contact original manufacturer for flashing operation.
.")
19 CUSTOMER SUPPORT You can contact the Ricatech customer service when you have a question or a problem with your Ricatech product.you can contact us by telephone and . For customer support by ,please sent a to support@ricatech.com. Please make sure that you mention the model number and serial number of the product,mention your name & address and describe your question or problem clearly. Telephone For customer support by telephone,please dial Our service staff will be ready to help you. For full procedure please visit the website of Ricatech at: Hereby, Richtech B.V declares that this Android Tablet PC is in compliance with essential requirements and other relevant provisions of Directive 1999/5/EC.

20 GEBRUIKERSHANDLEIDING 1. Desktop 2. Powerknop 3. Menuknop 4. Terugknop 5. Camera 6. TF-kaart 7. HDMI 8. Koptelefoonaansluiting 9. DC-aansluiting 10. USB 11. USB-hostpoort

21 Inhoud 1. Mededelingen Inleiding Verpakkingsdetails Instructies voor de Toetsen. 2.3 Overzicht van de functies Technische specificaties.. 3. Snelle uitleg Over het aanraakpaneel In-/uitschakelen 3.3 Energiebesparende standen en schermvergrendeling Batterijbeheer en opladen Omschrijving van de functiepictogrammen 3.6 Functie USB HOST TF-kaartopslag Netwerktoegang Netwerktoegang met behulp van Wi-Fi Netwerktoegang met behulp van 3G Opslag bestandskopie & Van PC wissen Inleiding hoofdfuncties Audiofunctie Videofunctie Fotofunctie Opnamefunctie Bestandsmanager E-bookfunctie Internetbrowser functie Kalender Rekenmachine Alarmklok APK Installer Systeeminstellingen Veelgestelde vragen
22 1. Mededelingen 14. Gelieve het apparaat uit de buurt van vocht en stof te houden. 15. Leg het apparaat niet in een omgeving met hoge temperaturen, in het bijzonder in een afgesloten auto tijdens warme weersomstandigheden. 16. Sla niet op het apparaat of laat het apparaat niet vallen. 17. Schud het apparaat niet heftig door elkaar, in het bijzonder het lcd-schermgedeelte. Of dit leidt tot afwijkende weergave op het scherm. 18. Kies bij het gebruik van de oordopjes het juiste volume dat goed is voor uw oren. 19. Laad het apparaat op wanneer (1) Het powerpictogram het laagste vermogen aanduidt. (2) Het apparaat wordt automatisch uitgeschakeld en wanneer u het inschakelt wordt het opnieuw automatisch uitgeschakeld. (3) Geen reactie bij het bedienen van de knoppen. Opgelet: Gebruik voor het opladen de oplader van de fabrikant, andere laders kunnen schade aan het apparaat veroorzaken. Invoer: V ~ 50/60 Hz Uitvoer: 5V 1500 ma 20. Koppel het apparaat niet los van de PC bij het downloaden, uploaden of formatteren, want dit zal programmeerfouten in het apparaat veroorzaken. 21. Demonteer het apparaat niet zonder professionele begeleiding. 22. Gebruik geen chemische producten met alcohol, verdunner of benzeen om het oppervlak van het apparaat te reinigen. 23. Gebruik het apparaat niet op verboden plaatsen, zoals vliegtuigen. 24. Maak altijd een back-up van uw bestanden in het toestelgeheugen. De fabrikant is niet verantwoordelijk voor het wissen van bestanden na beschadiging of reparaties van het apparaat. 25. De fabrikant behoudt zich alle rechten van de technologie en het ontwerp van het apparaat voor en is niet verplicht de gebruiker te informeren als er nieuwe versies of ontwerpen zijn ontwikkeld. 26. Het apparaat is NIET waterdicht; houd het apparaat uit de buurt van water. De inschakeltijd van dit apparaat is ongeveer 20 seconden; zodra ingeschakeld, mag het apparaat gedurende 20 seconden niet worden bediend.
23 2. Inleiding 2.5 Verpakkingsdetails. Elke Tablet PC beschikt over de volgende items: Tablet PC-apparaat*1, lader*1, oordopjes*1, USB-kabel*1 en gebruikershandleiding*1. Alle items zijn in een geschenkdoos verpakt. 2.6 Instructies voor de toetsen. Naam POWER MENU ESC TF-kaartsleuf Beschrijving Houd deze knop kort ingedrukt om naar de stand slapen/wekken te gaan en houd lang ingedrukt om AAN/UIT te zetten Houd deze knop kort ingedrukt om naar het submenu te gaan Houd kort ingedrukt om terug te gaan, lang ingedrukt om het aanraakscherm te kalibreren Voor externe TF-kaart, 1 GB tot 16 GB Stereo-oortelefoonaansluiting Stereo-oortelefoonaansluiting voor oordopjes DC-aansluiting MINI USB-poort USB-hostpoort Verbind met 5V DC-lader MINI_5 PIN USB-poort Weergave HD-weergavegebied Lang indrukken: Druk langer dan 1,2 seconde op het item. Poort voor externe USB-driver, 3G-dongel, muis, toetsenbord, enz. 2.7 Overzicht van de functies CPU: ALLWINNER, Cortext A8, 1,2 GHz. Met ANDROID 2.3 besturingssysteem. 7" TFT-aanraakpaneel LCD-weergave, 800 x 480 pixelresolutie. Ondersteunt 4~16 GB ingebouwd Flash-geheugen, ondersteunt 128 MB-16 GB externe TF-kaart. Ondersteunt afspelen van Media: Video, audio, foto s, E-books, enz. Ingebouwde Wi-Fi. Ondersteunt externe draadloze netwerkwerkkaart voor 3G USB-DONGEL (3G-kaart of USB-dongel worden niet door de fabrikant van de Tablet PC meegeleverd). Er zijn verschillende applicaties beschikbaar in de ANDROID 2.3 OS (alleen APK-applicaties). Ondersteunt ingebouwde microfoonopnamefunctie (optioneel). Ondersteunt USB-HOST en externe U-disc, MP3, MP4, muis, toetsenbord, enz. Ondersteunt de G-sensor schermrotatiefunctie. Ondersteunt stereo-oortelefoon en -luidspreker. Ondersteunt meerdere talen. Het apparaat kan als USB draagbare harde schijf worden gebruikt, voor WIN2000 of hoger is geen stuurprogramma nodig.
24 2.8 Technische specificaties Scherm 7 inch Capacitief Aanraakscherm. Vijf punten multi-aanraking Resolutie: 800 x 480. Beeldverhouding: 16 : 9 CPU Chipset: ALLWINNER; Processor: Cortex A8; Frequentie: 1,2 GHz RAM DDR3 512 MB Opslag 4 GB-16 GB optioneel Extern geplaatste TF-kaart kan worden uitgebreid van 1 GB tot 16 GB Systeem Android 2.3 Netwerk Wi-Fi: Ingebouwde Wi-Fi-module. IEEE b/g/n. 11 Mbps tot 54 Mbps 3G: Externe 3G met behulp van USB-dongel. Applicaties APK-formaat applicaties Video RM, RMVB, AVI, MOV, WMV, MP4, ASF, 3GP, TS, MKV, MPEG, enz. Alle video s ondersteunen HD 2160P. Muziek MP3, WMA, WAV, APE, FLAC, AAC, OGG, enz. Afbeeldingen E-books Office-bestanden JPG, BMP, PNG, TIFF, enz. TXT, PDF, CHM, HTML, PDB, UMD, FB2, LRC, EPUB. Ondersteunde bestanden: Word, Excel, PDF, enz. PC-verbinding MINI USB 2.0 x 1 Batterij Ingebouwde lithiumbatterij: 3200 mah. 3. Snelgidsen 3.1 Over het aanraakpaneel Het aanraakscherm is een capacitief aanraakscherm: u kunt vijf vingers gebruiken om gelijktijdig het scherm aan te raken. 3.2 In-/uitschakelen Inschakelen en ontgrendelen: Houd de Power -toets gedurende 3 seconden ingedrukt wanneer het apparaat zich in de OFF-stand bevindt om naar de taakbalk voor het opstarten van Android te gaan en duurt het ongeveer 20 seconden om naar het systeem van de desktop te gaan. Druk en sleep het pictogram naar het groene punt wanneer de LCD zich in de vergrendelde stand bevindt. Vervolgens wordt de LCD automatisch ontgrendeld, zie de onderstaande afbeeldingen.
25 3.3 Energiebesparende standen en schermvergrendeling Houd de POWER -toets na het opstarten kort ingedrukt; systeem gaat naar de energiebesparende stand en vergrendelstand. Druk op de POWER -toets of tik op het aanraakscherm en het systeem gaat binnen 1 seconde terug naar de heldere weergave. De primaire werking van het apparaat stopt niet in de energiebesparende stand. Alleen de LCD wordt uitgeschakeld en is een zwart scherm te zien. Bijvoorbeeld: muziek, film, enz. afspelen UITSCHAKELEN: Houd de POWER -toets gedurende 3 seconden ingedrukt wanneer het apparaat zich in de stand UIT bevindt. Het scherm geeft de uitgeschakelde interface weer. Kies ter controle het uitgeschakelde item, waarna het systeem automatisch uitschakelt. Opmerking Wanneer de batterij van het apparaat bijna leeg is, klinkt er een ononderbroken alarm en wordt het apparaat zonder laden automatisch uitgeschakeld. Als het apparaat niet kan opstarten moet u controleren of de batterij bijna leeg is en probeer het opnieuw nadat de batterij is opgeladen. 3.4 Batterijbeheer en opladen Laad de batterij gedurende 8-12 uur op om er zeker van te zijn dat de batterij volledig is opgeladen bij eerste gebruik Plaats de micropoort van de batterijadapter in de DC-sleuf op het apparaat en sluit de andere zijde op het stopcontact aan. Vervolgens blijft het pictogram van de batterij op het bureaublad draaien, wat aanduidt dat het laden aan de gang is. Wacht totdat de batterij volledig is opgeladen en koppel de voeding niet los tijdens het laden. Zodra de batterij volledig is opgeladen, stopt het pictogram op het bureaublad met draaien. Opmerking Houd rekening met het volgende om de batterij onder de beste omstandigheden te laten werken: Laad de batterij niet op bij hoge temperaturen. Deze Li-batterij hoeft u niet te ontladen. U kunt de batterij laden terwijl de batterij nog over vermogen beschikt en hoeft u niet te wachten tot de batterij helemaal leeg is. Om de batterij in goede conditie te houden moet de batterij één keer per twee weken worden opgeladen als u voor langere tijd geen gebruik maakt van dit apparaat. 3.5 Omschrijving van de functiepictogrammen
26 Pictogram Functie-instructie Pictogram Functie-instructie Terug naar hoofdmenu Toon huidige batterijstatus De huidige systeemtijd Melding wanneer het systeem nieuwe apparaten vindt Stel de alarmtijd in Verlaag het volume Terug Menu Google zoeken Systeemklok Nieuwe Verhoog het volume Menu voor Functieblok Wijzig de interface WI-FI aan/uit USB-verbinding Statusbalk 3.6 USB HOST-functie USB- HOST-beschrijving De MINI USB op het apparaat kan als USB-host worden gebruikt U-disc lezen: Plaats de U-disc in de HOST-poort, druk op de Bronmanager op de desktop en druk op USB om naar een U-disk te gaan.
27 3.6.3 Externe 3G USB-dongel. (Zie de uitleg voor netwerktoegang in item 4) 3.7 TF-kaartopslag Er bevindt zich een TF-kaartsleuf in dit apparaat en ondersteunt het lezen van bestanden op de TF-kaart. Plaats de TF-kaart op juiste wijze in de kaartsleuf. Druk de TF-kaart naar binnen om de kaart te verwijderen, vervolgens geeft de sleuf de TF-kaart vrij. De TF-kaart komt automatisch naar buiten en kan worden uitgenomen Plaats de TF in de juiste zijde van het apparaat in de kaartsleuf Trek de kaart er niet uit tijdens werking (lezen, kopiëren), want dit kan een gegevensfout veroorzaken Gebruik de TF-kaart niet bij hoge temperaturen Houd de TF-kaart ver uit de buurt van vloeistoffen en eroderende materialen. 4. Netwerktoegang Het apparaat ondersteunt het Wi-Fi-netwerk en het externe 3G-netwerk. 4.1 Netwerktoegang met behulp van Wi-Fi Schakel Wi-Fi in en druk op Wi-Fi-instellingen. Het apparaat scant automatisch op beschikbare Wi-Fi-netwerken Kies het Wi-Fi-netwerk waarmee u verbinding wilt maken Druk op Verbinden. In bepaalde netwerken moet u mogelijk het wachtwoord invoeren Druk op het Wi-Fi-instellingenscherm op de Menu-toets, raak Geavanceerd aan en u krijgt meer instellingen voor Wi-Fi. 4.2 Netwerktoegang door 3G Schakel Wi-Fi UIT als het in werking is Toegang Draadloos & netwerken, en kies Mobiele netwerkinstelling en zorg dat Gegevens ingeschakeld werd gekozen. Ga vervolgens terug naar Draadloos & netwerken Plaats externe 3G met behulp van USB-host Kies Mobiel netwerk en wacht vervolgens op de 3G-netwerkverbinding. Snel daarna heeft u toegang tot het netwerk via 3G.
28 5. Opslag bestandskopie & Van PC wissen A) Sluit het apparaat met behulp van een USB-kabel op een computer aan. Er wordt geen mededeling in de statusbalk getoond dat USB is verbonden. B) Houd de bovenzijde van het apparaat ingedrukt, beweeg uw vingers naar beneden en de statusbalk zal naar beneden worden gesleept. C) Kies USB verbonden. Schakel vervolgens USB-opslag in. De linkse afbeelding duidt aan dat de opgeslagen inhoud van het apparaat vanaf de computer kan worden bekeken en gewijzigd. De rechtse afbeelding betekent dat de opgeslagen inhoud op het apparaat NIET vanaf de computer kan worden bekeken of gewijzigd. Ga als volgt te werk als er geen bovenstaande mededeling wordt weergegeven bij het inschakelen van het apparaat: Ga naar Systeeminstellingen Ga naar Applicatie-instellingen ---- Ga naar Ontwikkeling Kies USB-fouten opsporenen schakel het in. Vervolgens krijgt u opnieuw een mededeling bij het selecteren van USB-fouten opsporen toestaan. Kies OK en schakel vervolgens USB-opslag in. U kunt nu de bestanden van het apparaat vanaf een PC kopiëren of verwijderen.
29 6. Inleiding Hoofdfuncties 6.1 Audiofunctie Ga naar de muziekspeler: Dubbelklik in de muziekspelerstand op de favoriet in de lijst om muziek af te spelen zoals in de volgende afbeelding aangeduid. Sleep de voortgangsbalk voor het afspelen te passen. om het afspeelproces aan Knopinstructies van de muziekspeler Knop Instructie knop Instructie Artiest Album Muzieknummer Willekeurig afspelen Het vorige muzieknummer afspelen Pauze Muzieklijst afspelen Herhaald afspelen Het volgende muzieknummer afspelen Afspelen Wanneer er zich geen muziekbestanden in de afspeellijst van de audiospeler bevinden, laadt het systeem na het inschakelen van de audiospeler automatisch de muziekbestanden van de kaart naar de afspeellijst van de audiospeler (het apparaat ondersteunt de audiobestandsformaten: mp3, wav, midi, wma). De afspeellijst zoals aangeduid in de bovenstaande afbeelding. Schuif het aanraakscherm omhoog/omlaag om naar boven/beneden te bladeren als er zich twee
30 of meer muzieknummers in de muziekafspeellijst bevinden Dubbelklik op de favoriet in de lijst om muziek af te spelen. Klik in de interface voor het afspelen van muziek op gaan. Sleep de voortgangsbalk voor het afspelen afspelen van audio aan te passen. om naar de audio-afspeellijst te om de voortgang van het 6.2 Videofunctie Klik op het pictogram van de Videospeler om naar de interface van de videospeler te gaan en open de videobestanden. Het apparaat ondersteunt de volgende audiobestandsformaten: MKV, AVI, RM, RMVB, MP4, MOV, VOB, DAT, FLV, 3GP, enz. Wanneer er zich geen videobestanden in de afspeellijst van de videospeler bevinden, laadt het systeem na het inschakelen automatisch de videobestanden van de kaart naar de afspeellijst van de videospeler. Sleep de voortgangsbalk voor het afspelen afspelen van de video aan te passen. om de voortgang van het 6.3 Fotofunctie Klik op de HD-videospeler om naar de interface voor bekijken te gaan Afbeelding toevoegen (ondersteunt de volgende beeldformaten: BMP, JPG, JPEG, PNG, GIF) Wanneer er zich geen bestand in de fotolijst bevindt, laadt het systeem na het openen van de fotobrowser automatisch de beeldbestanden van de kaart naar de lijst van de fotobrowser. Open de bijbehorende map, zoek het beeldbestand en voeg de door u gewenste foto toe. Klik op de menu-knop. De foto kan als achtergrond worden ingesteld. 6.4 Opnamefunctie Klik op het opnamepictogram om naar de opname-interface te gaan. Klik op de opnameknop om de opname te starten. Klik op deze knop om de opname te stoppen. Het systeem vraagt of u deze opname wilt gebruiken of opgeven. Selecteer handmatig. Opname afspelen: selecteer audiospeler om de opname af te spelen. Selecteer eerst de opnamebestanden met de zoeker en klik vervolgens om af te spelen. Raadpleeg Audiofunctie voor meer informatie.
31 6.5 Bestandsmanager In bestandsmanager kunt u alle bestanden in het apparaat controleren, inclusief bestanden in het ingebouwde geheugen en op de externe kaart. Tevens is er snelle weergave voor foto s en video s. 6.6 E-bookfunctie. Ondersteunt de volgende E-bookformaten: TXT, LRC, PDF, HTML, HTM, EPUB, enz. 6.7 Internetbrowser Controleer eerst uw netwerkverbinding, voordat u de functie van de internetbrowser gebruikt. Zie de uitleg voor netwerktoegang in het vorige deel. Klik op het pictogram van de IE-browser om naar de IE-interface te gaan. Klik op de adresbalk en voer de website in en klik op Go om naar de bijbehorende webpagina te gaan. De overeenkomstige website-informatie kan worden bekeken. Klik op het pictogram om alle favorieten en de geschiedenis te bekijken.
32 Klik op het menupictogram om naar instellingen te gaan. Het apparaat ondersteunt tevens andere internetbrowsers. Raadpleeg voor gedetailleerde functies de instructies van deze internetbrowsers functie Controleer eerst uw netwerkverbinding, voordat u de functie gebruikt. Zie de uitleg voor netwerktoegang in het vorige deel. Wanneer u deze functie voor het eerst gebruikt, moet u eerst een account toevoegen aan het apparaat. Het apparaat ondersteunt verschillende accounts die met elkaar samenwerken. Methodes voor het toevoegen van accounts van portaalsites en een account van een bedrijf wijken af accounts van portaalsites toevoegen. (Voorbeeld: Gmail, MSN, Yahoo, enz.) Gebruik hier een Google account als voorbeeld. Account: ployermomo@gmail.com Wachtwoord: ********* Voer voor accounts van portaalsites rechtstreeks uw adres en wachtwoord in en klik vervolgens op volgende. Voer na een succesvolle verbinding Accountnaam en Uw naam in. Accountnaam betekent de naam van deze account in het apparaat, Uw naam betekent de weergegeven naam van uw in het account van de ontvanger. Vervolgens gaat u naar het account. Klik op de titels om de s te lezen en houd de titels lang ingedrukt om naar opties te gaan. Klik op het menupictogram om naar instellingen te gaan
33 Vernieuwen: Op nieuwe s controleren. Samenstellen: Nieuwe s opstellen. Mappen: s beheren in verschillende mappen. Accounts: Bekijk accounts in het apparaat, voeg nieuwe accounts toe, verwijder accounts, stel hoofdaccount in. Accountinstellingen: Meer opties voor een account account van een bedrijf toevoegen. ( Voorbeeld: ) Gebruik hier een account van het bedrijf PLOYER als voorbeeld. Account: info@ployer.com.cn Wachtwoord: ********* Voer voor een account van een bedrijf eerst uw adres en wachtwoord in en klik vervolgens op handmatige set-up voor meer opties. Informeer uw webmaster over de server van uw account van uw bedrijf en volg zijn uitleg voor het invullen van de items in handmatige set-up en klik vervolgens op volgende. De volgende stappen zijn hetzelfde als in 6.8.1; zie de bovenstaande instructies. 6.9 Kalender Klik op het pictogram Kalender om naar de kalenderinterface te gaan. In de kalenderstand, druk en trek het scherm omhoog/omlaag om de maanden te verlagen/verhogen; of om door de pagina s te bladeren. Past automatisch de jaren aan wanneer de maanden december of januari worden overschreden. Ga naar de interface, het oranje nummer is de werkdagdatum, u kunt nu de datum in de instellingsfunctie wijzigen; meer informatie hetzelfde als in het instellingendeel. Klik op om naar het hoofdmenu terug te gaan Rekenmachine Klik op het pictogram Rekenmachine om naar de rekenmachine-interface te gaan Alarmklok Klik op het pictogram Klok om naar de tijdinterface te gaan en klik vervolgens op de klok om naar de alarminterface te gaan en kunt u nu nieuwe alarmen invoeren of voorgaande alarmen bewerken. Lang indrukken van voorgaande alarmen om te kiezen uit alarm aan/uit, alarm bewerken en alarm verwijderen. Klik op alarmen om een alarm te bewerken. U kunt de tijd van het alarm, de herhaalstand, beltoon en het label bewerken. Klik in de alarminterface op het menupictogram om naar instellingen te gaan. De
34 volgende items kunnen worden ingesteld. Alarm in stille stand Alarmvolume Sluimerduur Volume en camera 6.12 APK Installer Dit apparaat ondersteunt het applicatiepakket van derden (APK-formaat) op basis van Android OS. Vele applicatiepakketten kunnen via het internet worden gedownload of vanaf andere apparaten naar het geheugen worden gekopieerd. Als het applicatiepakket niet via Google Android Market is gedownload, moet u voorafgaand aan het installeren de volgende stappen uitvoeren. Controleer Instellingen Applicaties en zorg dat Onbekende bronnen is gekozen. Klik op het pictogram APK Installer en de interfaces van de APK Installer komen tevoorschijn: Installeren, Beheren en Afsluiten Installeren: Klik op Installeren om naar de interface van APK Installer te gaan. Intern geheugen betekent ingebouwd Flash-geheugen, SD-kaart betekent geplaatste T-Flash. Selecteer vervolgens aan de rechterzijde het instellingenprogramma van het APK-formaat, klik op de te installeren applicatie, ga terug naar de hoofdinterface zodra deze bewerking is voltooid en vervolgens wordt het installeren beëindigd en is er een bijbehorend pictogram aan de applicatielijst toegevoegd Beheren: Klik op beheren en ga naar de interface voor software van derden. Opstarten: start de software. Exporteren: exporteer de software naar de TF-kaart. Verwijderen: verwijder de software.
35 Zoeken: zoek naar software in de softwareshops. Annuleren: annuleer de bewerking Afsluiten: Gaat terug naar de hoofdinterface. Opmerking: Alle geïnstalleerde applicaties zullen in het applicatielijstmenu worden getoond. Het betreft de applicaties spelletjes, chatten TM, internetbrowser, mediaspeler, systeemhulpprogramma s, enz. 7. Systeeminstellingen Klik op het instellingenpictogram om naar systeeminstellingen te gaan. Vervolgens kunt u draadloos & netwerken, geluid, weergave, HDMI-instelling, locatie & beveiliging, applicaties, accounts & synchronisatie, privacy, opslag, taal & toetsenbord, spraakinvoer & -uitvoer en datum & tijd wijzigen. 7.1 Instelling voor Draadloos & Netwerken - Zie item Instelling voor geluid - U kunt Stille stand, Volume, Melding beltoon, Geluidsselectie, Geluiden schermvergrendeling en Haptic feedback aanpassen. 7.3 Instelling voor weergave - U kunt Helderheid, Automatisch draaien scherm, Animatie en Time-out scherm aanpassen. 7.4 Instelling voor Locatie & Beveiliging - In deze instelling kunt u zowel schermvergrendeling en apparaatbeheerders als een wachtwoord voor de TF-kaart instellen. 7.5 Instelling voor Applicaties - Hier kunt u applicaties beheren en opslagcapaciteit en batterijverbruik controleren. Opmerking: Om applicaties te installeren die niet van Google Android Market zijn gedownload, moet u Onbekende bronnen van tevoren inschakelen. 7.6 Instelling voor Accounts & Sync - In deze instelling kunt u de accounts in het apparaat beheren. 7.7 Instelling voor Privacy - In deze instelling kunt u een back-up maken van gegevens en de standaard fabrieksinstellingen terugzetten. 7.8 Instelling voor Opslag. - In deze instelling kunt u het opslaggebruik controleren en TF-kaarten installeren en wissen. Opmerking: De-installeer eerst de TF-kaart voordat u de TF-kaart er uithaalt (indien u een TF-kaart hebt geplaatst), mochten bepaalde applicaties problemen veroorzaken. 7.9 Instelling voor Taal & Toetsenbord - In deze instelling kunt u de taal van het systeem wijzigen en de invoer van het toetsenbord kiezen.
36 Opmerking: Hebt u een invoer geïnstalleerd en wilt u het gebruiken, vergeet deze dan niet in deze instelling in te schakelen (alle invoeren kunnen hier worden ingeschakeld). Lang drukken op de lege ruimte waar u wilt typen toont een pop-up voor het kiezen van de invoer Instelling voor Datum & Tijd - In deze instelling kunt u datum en tijd aanpassen Over het apparaat - Controleer de toestelinformatie. 8. Veelgestelde vragen 9) Hoe kan ik van taal veranderen als ik per ongeluk een onbekende taal heb gekozen? Zoek het pictogram van de instelling in Menupagina om naar Instellingen te gaan. Kies vervolgens pictogram om naar de instelling voor taal & toetsenbord te gaan; de eerste optie is de taalinstelling. 10) Hoe kan ik de invoer veranderen als ik aan het typen ben?. Lang drukken daar waar u typt toont een pop-up voor het kiezen van de invoer. 11) Ik heb al een aantal applicaties geïnstalleerd, maar waarom kan ik ze nu niet terugvinden? Standaard worden een aantal applicaties op de externe TF-kaart geïnstalleerd, dus als u de TF-kaart uit het apparaat haalt, zijn deze applicaties niet zichtbaar. 12) Het apparaat kan niet worden ingeschakeld. Controleer de batterij en laad deze op als er geen vermogen is. Sluit het apparaat op de AC-adapter aan. Neem contact op met de verkoper als het apparaat nog steeds niet kan worden ingeschakeld na het opladen. 13) Er komt geen geluid uit de oordopjes. Controleer of het apparaat op Dempen staat ingesteld. Controleer de volume-instelling in geval het 0 is. Controleer de aansluiting van de oordopjes. 14) Waarom kan ik geen applicaties installeren?. Controleer Instellingen Applicaties en zorg dat Onbekende bronnen is gekozen. 15) Er verschijnen foutcodes op het scherm. Systeemfout, herstart het apparaat. De taal waar u naar op zoek bent, wordt niet ondersteund door de ingebouwde talen. Neem contact op met de oorspronkelijke fabrikant om te debuggen. 16) Er zijn systeemproblemen met veel foutmeldingen. Herstart het apparaat door de POWER-knop gedurende 10 seconde ingedrukt te houden;
37 het apparaat zal herstarten. Als u het apparaat hebt herstart en er verschijnen nog steeds foutmeldingen, dan kunt u actieve applicaties controleren om te zien of er een onbekende applicatie aanwezig is om deze vervolgens te verwijderen. Er kan een virus in het apparaat aanwezig zijn. Installeer beveiligingsapplicaties om uw apparaat te beschermen. Als u nog problemen ondervindt na bovenstaande handelingen, dan moet de firmware van het apparaat worden vernieuwd (de bewerking wordt flash genoemd). Opmerking: Voordat u het apparaat flasht, moet u eerst een back-up van uw gegevens maken. Het flashen zet al uw instellingen en bestanden terug naar de standaard fabrieksinstellingen. De flashbewerking heeft hulpprogramma s en firmware voor flashen nodig. Neem contact op met de oorspronkelijke fabrikant voor flashbewerkingen.
38 KLANTENONDERSTEUNING Voor vragen en problemen kunt u contact opnemen met de klantenservice van Ricatech. U kunt telefonisch en via contact opnemen. Voor klantenondersteuning per stuur een naar support@ricatech.com. Vergeet niet het modelnummer en serienummer van het product, uw naam & adres te vermelden en geef een duidelijke omschrijving van uw vraag of probleem. Telefoon Voor telefonische klantenondersteuning, bel naar Ons servicepersoneel staat klaar om u te helpen. Bezoek voor de volledige procedure de website van Ricatech: Hierbij verklaart Ricatech B.V. dat deze Android Tablet PC voldoet aan de essentiële vereisten en andere relevante voorwaarden van Richtlijn 1999/5/EC.
39 MODE D'EMPLOI 1. Bureau 2. Bouton marche/arrêt 3. Bouton Menu 4. Bouton Retour 5. Appareil photo 6. Carte mémoire 7. HDMI 8. Prise pour écouteurs 9. Prise CC 10. USB 11. Port hôte USB
40 Contenu 1. Annonces 2. Introduction Contenu de l emballage Instructions au sujet des touches 2.3 Vue d ensemble des caractéristiques Spécifications techniques 3. Conseils rapides 3.1 Au sujet de l écran tactile Bouton Marche/Arrêt Modes d économie d énergie et verrouillage de l écran Gestion de la batterie et mise en charge. 3.5 Définitions des icônes de Fonctions 3.6 Fonction HÔTE USB Stockage de données sur carte mémoire.. 4. Accès au réseau Accès au réseau par Wifi Accès au réseau par la 3G Copie des fichiers de stockage & Suppression du PC.. 6. Introduction aux fonctions principales. 6.1 Fonction audio 6.2 Fonction vidéo 6.3 Fonction images. 6.4 Fonction enregistrement 6.5 Gestionnaire de fichiers Fonction livres électroniques. 6.7 Navigateur internet 6.8 Fonction courriers électroniques 6.9 Calendrier Calculatrice Réveil Programme d installation APK 7. Paramètres système. 8. FAQ
41 1. Annonces 27. Tenez l appareil à l écart de l humidité et de la poussière. 28. Ne laissez en aucun cas l appareil dans un environnement soumis à de hautes températures, en particulier dans un véhicule fermé par forte chaleur. 29. Ne laissez pas tomber l appareil et ne le soumettez pas à des chocs. 30. Ne secouez pas l appareil violemment, en particulier l écran LCD. Cela pourrait causer un affichage anormal à l écran. 31. Réglez le volume sonore des écouteurs à un niveau correct, qui ne provoque pas de dommages à votre audition. 32. Chargez l appareil lorsque (1) L icône d alimentation indique que le niveau de charge est au plus bas. (2) L appareil s éteint automatiquement et si vous essayez de le rallumer, il s éteint à nouveau automatiquement. (3) Aucune réponse lorsque vous manipulez les touches. Attention : N utilisez que le chargeur mis à votre disposition par le fabricant ; tout autre chargeur peut entraîner des dommages au système. Entrée : 100 à 240V ~ 50/60 Hz Sortie : 5V 1500 ma 33. Ne déconnectez pas l appareil de votre ordinateur lorsqu un téléchargement ou un formatage est en cours. Cela provoquerait des erreurs programmes dans l appareil. 34. Ne démontez pas l appareil sans l assistance d un professionnel. 35. N utilisez pas d alcool, de diluants ou de produits à base de benzène pour nettoyer la surface de l appareil. 36. N utilisez pas l appareil dans un lieu où son utilisation est interdite, tel qu un avion. 37. Effectuez toujours une copie de sauvegarde dans la mémoire de l appareil. Le fabricant ne saurait être tenu responsable de la suppression des données par suite d un dommage ou de réparations de l appareil. 38. Le fabricant se réserve tout droit sur la conception et la technologie de l appareil et n est pas tenu d informer l utilisateur de l existence d éventuelles nouvelles versions ou conceptions. 39. L appareil N EST PAS étanche ; tenez-le à l écart de l eau. La durée de mise en marche de l appareil est d environ 20 secondes ; n utilisez pas l appareil
42 pendant 20 secondes lors du démarrage. 2. Introduction 2.9 Contenu de l emballage. Chaque Tablette PC est équipée des éléments suivants : Tablette PC*1, chargeur*1, écouteurs*1, câble USB*1 et mode d emploi*1. Tous les éléments sont emballés dans un emballage cadeau Instructions au sujet des touches. Nom MARCHE/ARRÊT MENU ESC Emplacement carte mémoire Prise pour écouteurs stéréo Prise CC Port MINI USB Port hôte USB Description Appuyez un instant sur ce bouton pour entrer dans le mode veille/ actif ; maintenez ce bouton enfoncé pour ALLUMER/ÉTEINDRE Appuyez un instant sur ce bouton pour entrer dans le sous-menu Appuyez un instant pour revenir en arrière, appuyez longtemps pour calibrer l écran tactile Pour carte mémoire externe, de 1 Go à 16 Go Prise d écouteurs stéréo pour écouteurs Connectez un chargeur 5V CC Port MINI USB 5 Broches Port de pilote USB externe, clé 3G, souris, clavier, etc. Affichage Zone d affichage HD Appui long : Appuyez sur l élément pendant plus de 1,2 secondes Aperçu des caractéristiques Processeur : ALLWINNER, Cortext A8, 1,2GHz. Avec système d exploitation ANDROID 2.3. Écran tactile LCD 7" TFT, résolution de 800 x 480 pixels. Mémoires flashs intégrées de 4 à 16 Go, supporte les cartes mémoires externes de 128 Mo à 16 Go. Lecture de médias supportés : Vidéo, audio, images, livres électroniques, etc. Wifi intégré. Carte réseau sans fil pour CLÉ USB 3G externe supportée (ni la carte 3G, ni la Clé USB ne sont fournis par le fabricant de la Tablette PC). Différentes application sont disponibles pour le système d exploitation ANDROID 2.3 (applications APK uniquement). Fonction d enregistrement par micro intégré supportée (en option). U-disk externe et HÔTE USB, MP3, MP4, souris, claviers, etc. supportés. Fonction de rotation d écran G-sensor supportée. Écouteurs stéréo et haut-parleurs supportés. Multilingue.
43 L appareil peut être utilisé comme un disque dur portable USB ; aucun pilote n est requis avec WIN2000 et supérieur Spécifications techniques Écran Écran tactile capacitif de 7 pouces. Multi-touch cinq points Résolution : 800 x 480. Rapport d aspect : 16 : 9 Processeur Chipset : ALLWINNER ; Processeur : Cortex A8; Fréquence: 1,2 GHz Mémoire RAM DDR3 512 Mo Espace de stockage de 4 Go à 16 Go en option Cartes mémoire externes insérées s étendent : de 1 Go à 16 Go Système Android 2.3 Réseau Wifi: Module Wifi intégré. IEEE b/g/n. 11 Mo/s à 54 Mo/s 3G : 3G externe par clé USB. Applications Applications au format APK Vidéo RM, RMVB, AVI, MOV, WMV, MP4, ASF, 3GP, TS, MKV, MPEG, etc. Toutes vidéos HD à 2160P supportées. Musique MP3, WMA, WAV, APE, FLAC, AAC, OGG, etc. Images Livres numériques Fichiers Office JPG, BMP, PNG, TIFF, etc. TXT, PDF, CHM, HTML, PDB, UMD, FB2, LRC, EPUB. Fichiers supportés : Word, Excel, PDF, etc. Connexion PC MINI USB 2.0 x 1 Batterie Batterie lithium intégrée : 3200 mah. 3. Guides de démarrage rapide 3.1 Au sujet de l écran tactile L écran tactile est un écran tactile capacitif ; vous pouvez utiliser cinq doigts simultanément pour toucher l écran. 3.2 Bouton Marche/Arrêt Allumer et déverrouiller : Lorsque l appareil est en position ARRÊT, appuyez pendant 3 secondes sur la touche «Power» pour passer à la barre de progression de démarrage Android ; il faut environ 20 secondes pour passer ensuite au bureau du système. Lorsque l écran LCD est verrouillé, appuyez sur l icône automatiquement, voir les figures ci-desous. et tirez-la jusqu au point vert : l écran se déverrouille alors
44 3.3 Modes d économie d énergie et verrouillage de l écran Appuyez peu de temps sur la touche «POWER» après le démarrage - le système entre alors en économie d énergie et dans le mode de verrouillage. Appuyez sur la touche «POWER» ou tapez du doigt sur l écran tactile : le système redevient actif au bout d une seconde. Le fonctionnement de l appareil n est pas suspendu dans le mode d économie d énergie, seul l écran LCD est éteint et devient noir. Par exemple : lecture de musique, de film, etc. Éteindre : Lorsque l appareil est éteint, appuyez sur la touche «POWER» pendant 3 secondes. L écran affiche l interface d arrêt, choisissez l icône d arrêt à confirmer ; le système s éteint alors automatiquement. Remarque Lorsque le niveau de charge de l appareil est insuffisant, si vous ne le remettez pas en charge, une alarme continue retentit, puis l appareil s éteint automatiquement. Si vous ne parvenez pas à démarrer l appareil, vérifiez si le niveau de charge de la batterie est faible, rechargez-la si nécessaire, puis réessayez. 3.4 Gestion de la batterie et mise en charge Chargez la batterie entre 8 et 12 heures pour vous assurer que la batterie est pleinement chargée lors de la première utilisation Insérez le port micro de l adaptateur batterie dans la prise secteur intégrée à l appareil, puis branchez l autre extrémité du cordon à la prise secteur. Si l animation de mise en charge de l icône de batterie continue, ce qui signifie que l appareil est en charge, attendez que la batterie soit entièrement chargée, ne débranchez pas le cordon pendant la charge. Lorsque la batterie est entièrement chargée, l animation de mise en charge sur le bureau cesse. Remarque Pour permettre à la batterie de continuer de fonctionner dans les meilleures conditions, veuillez lire attentivement ce qui suit : Ne chargez pas l appareil sous de hautes températures. Il n est pas utile de vider cette batterie au lithium ; vous pouvez la remettre en charge même si la batterie n est pas complètement déchargée, il n est pas utile de la vider totalement. Afin de garder la batterie en bon état, chargez-la une fois toutes les deux semaines si vous n utilisez pas cet appareil sur une période prolongée. 3.5 Définitions des icônes de Fonctions
45 Icône Instruction des fonctions Retour au menu principal Indique l état de charge actuel L heure du système Icône Instruction des fonctions Remarque quand le système trouve de nouveaux périphériques Définir l heure de l alarme Réduire le volume Retour Augmenter le volume Menu Menu du verrouillage de fonctions Recherche Google Changer l interface Horloge du système Marche/arrêt WIFI Nouveau courrier Connexion USB Barre d état 3.6 Fonction HÔTE USB Définition de l HÔTE USB Le mini-usb de l appareil peut être utilisé comme Hôte USB Lecture d U-disk : Insérez l U-disk dans le port HOST, appuyez sur le Gestionnaire de ressources sur le bureau,

46 appuyez sur USB entrer dans l u-disk Clé USB 3G externe. (Voir les conseils d accès au réseau dans l élément 4) 3.7 Stockage de données sur carte mémoire Cet appareil contient un emplacement pour carte SD ; il peut donc lire des fichiers contenus sur la carte SD. Insérez dans le bon sens la carte microsd dans l emplacement prévu pour les cartes. Pour la retirer, poussez-la vers l intérieur : lorsque l appareil libère la carte microsd, celle-ci est automatiquement éjectée, vous pouvez alors la sortir Insérez la carte mémoire dans l emplacement prévu à cet effet, sur le côté droit de l appareil Ne sortez pas la carte lorsqu elle est utilisée (pendant la lecture ou la copie). Ceci pourrait entraîner des erreurs de données N utilisez pas la carte mémoire dans des conditions de températures élevées Tenir la carte mémoire à l écart de tout liquide et matériaux érosifs. 4. Accès réseau L appareil supporte le réseau Wifi et le réseau 3G externe. 4.1 Accès au réseau par Wifi Allumez le Wifi et appuyez sur l icône des réglages Wifi. L appareil recherche automatiquement par balayage les réseaux Wifi disponibles Choisissez le réseau Wifi auquel vous souhaitez vous connecter Appuyez sur Se connecter. Certains réseaux peuvent nécessiter que vous entriez un mot de passe Dans l écran de paramétrage Wifi, appuyez sur la touche Menu, touchez Avancé : vous trouverez davantage de réglages pour le Wifi. 4.2 Accès au réseau par la 3G Éteignez le Wifi s il est en cours de fonctionnement Accès Sans fil & réseau, puis choisissez Paramètre réseau mobile, assurez-vous que Données actives a bien été choisi. Puis retournez à Sans fil & Réseaux Insérez la clé 3G externe via l hôte USB Choisissez Réseau mobile, puis patientez pour que la connexion 3G s établisse. Vous pourrez très prochainement accéder au réseau via la 3G..
 Maintenez enfoncé le sommet de l appareil et déplacez vos doigts vers le bas : la barre d état sera tirée vers le bas. C) Choisissez USB Connecté. Puis, Activez le stockage USB.")

47 5. Copie des fichiers de stockage & Suppression du PC A) Connectez l appareil à l ordinateur via le câble USB, dans la barre d état, une notification va apparaître, indiquant USB connecté. B) Maintenez enfoncé le sommet de l appareil et déplacez vos doigts vers le bas : la barre d état sera tirée vers le bas. C) Choisissez USB Connecté. Puis, Activez le stockage USB. L image de gauche montre que le contenu de la mémoire de stockage de l appareil peut être vu et modifié à partir de l ordinateur. L image de droite signifie que le contenu de la mémoire de stockage ne peut PAS être vu, ni modifié, depuis l ordinateur. Si aucune notification comme celles indiquées ci-dessus lorsque vous allumez l appareil, prenez les mesures correctives suivantes. Entrez dans Paramètres système Entrez dans Paramètres des applications ---- Entrez dans Développement Choisissez Débogage USB, activez-le. Puis, une autre notification apparaît qui vous informe que si vous Autorisez le débogage USB, choisissez OK puis activez la mémoire de stockage USB, vous pouvez à présent copier ou supprimer les fichiers contenus dans l appareil depuis le PC.
48 6. Introduction aux fonctions principales 6.1 Fonction audio Entrer dans le lecteur de musique : Dans le mode lecteur de musique, double-cliquez sur le favoris dans la liste pour jouer de la musique comme illustré dans l image suivante. Faites glisser la barre de progression de la lecture processus de lecture. pour régler le Utilisation des boutons dans le lecteur de musique Bouton Instruction bouton Instruction Artiste Album Chanson Lecture aléatoire Lire la dernière chanson Pause Lecture de la liste musicale Lecture en boucle Lire la chanson suivante Lecture En l'absence de fichiers musicaux dans la liste de lecture du lecteur audio, le système va automatiquement charger les fichiers musicaux à partir de la carte vers la liste de lecture du lecteur audio après avoir allumé le lecteur audio (le dispositif prend en charge ces formats de fichiers audio: mp3, wav, midi, wma). La liste de lecture comme montrée dans la figure ci-dessus. Si deux chansons de plus sont présentes dans la zone de listes de lecture de fichiers musicaux,
49 faites glisser l'écran tactile vers le haut / vers le bas pour passer à la page haute / basse Double-cliquez sur le favori dans la liste pour lire le fichier musical. Dans l'interface jouer de la musique, cliquez sur entrer dans la liste de lecture audio. Faites glisser la barre de progression de la lecture pour régler la progression de la lecture audio. 6.2 Fonction vidéo Cliquez sur l icône du lecteur vidéo pour entrer dans l interface du lecteur vidéo, ouvrez les fichiers vidéo. Formats de fichier audio supportés par l appareil : MKV, AVI, RM, RMVB, MP4, MOV, VOB, DAT, FLV, 3GP etc. Quand il n'y a pas de fichiers vidéo dans la liste de lecture du lecteur vidéo, après avoir lancé le lecteur vidéo, le système va automatiquement charger les fichiers vidéo à partir de la carte vers la liste de lecture du lecteur vidéo. Faites glisser la barre de progression de la lecture de la lecture vidéo. pour régler la progression 6.3 Fonction images Cliquez sur le lecteur vidéo HD pour entrer dans l interface de visionnage Ajouter une image (supporte les formats d images : BMP, JPG, JPEG, PNG, GIF) Quand il n'y a pas de fichiers photo dans la liste de lecture de photos, après avoir lancé le gestionnaire de photos, le système va automatiquement charger les fichiers image à partir de la carte vers la liste de lecture du gestionnaire de photos. Ouvrez le dossier correspondant, trouvez le fichier image et ajoutez l image souhaitée. Cliquez sur le bouton menu, la photo peut être définie comme papier-peint. 6.4 Fonction enregistrement Cliquez sur l icône d enregistrement pour entrer dans l interface d enregistrement, cliquez sur le bouton d enregistrement pour lancer l enregistrement, cliquez sur ce bouton pour arrêter l enregistrement. Le système vous demande si vous souhaitez utiliser l enregistrement ou si vous souhaitez abandonner ; entrez votre choix manuellement. Lecture d'un enregistrement: choisissez le lecteur audio pour lire l'enregistrement, sélectionnez d'abord les fichiers d'enregistrement dans l'explorateur, puis cliquez dessus pour les lancer - pour de plus amples détails, se référer à Fonction audio.
50 6.5 Gestionnaire de fichiers Dans le gestionnaire de fichiers, vous pouvez vérifier tous les fichiers présents dans l appareil, y compris les fichiers en mémoire intégrée et ceux sur carte externe. Il y a aussi un aperçu rapide des photos et des vidéos. 6.6 Fonction livres électroniques. Formats de livres électroniques supportés : TXT, LRC, PDF, HTML, HTM, EPUB, etc. 6.7 Navigateur internet Avant d'utiliser la fonction de navigation Internet, assurez-vous que votre réseau est connecté. Voir les conseils d accès au réseau dans l élément précédent. Cliquez sur l icône du navigateur IE pour entrer dans l'interface d Internet Explorer, cliquez sur la barre d'adresse et saisissez une adresse internet, puis cliquez sur OK pour entrer dans la page Internet correspondante, vous pouvez consulter les informations du site Internet correspondant.
51 Cliquez sur l icône pour consulter les marques-pages et l historique. Cliquez sur l icône de menu pour accéder aux réglages. Le dispositif prend également en charge d autres navigateurs Internet ; pour des informations sur les fonctions de ces navigateurs Internet, référez-vous à leurs propres instructions. 6.8 Fonction courriers électroniques Avant d'utiliser la fonction d , assurez-vous que votre réseau est connecté. Voir les conseils d accès au réseau dans l élément précédent. Lorsque vous utilisez cette fonction pour la première fois, vous devez ajouter un compte de messagerie à l'appareil. L appareil permet d utiliser plusieurs comptes ensemble. Les méthodes d'ajout des comptes de sites internet et de compte de messagerie d'entreprise diffèrent Ajout de compte de sites internet. (Exemple : Gmail, MSN, Yahoo, etc.) Pour notre exemple, nous allons utiliser un compte Google. Compte : ployermomo@gmail.com Mot de passe : ********* Pour les comptes de messagerie de sites internet, entrez directement l adresse de votre et votre mot de passe, puis cliquez sur Suivant. Lorsque la connexion est établie, entrez le Nom du compte et Votre nom. Nom de compte renvoie au nom de ce compte dans l appareil, Votre nom renvoie au nom affiché de l adresse de votre dans le compte des destinataires. Ensuite, vous accédez au compte. Cliquez sur les titres des s pour les lire, pour accéder aux options, appuyez de manière prolongée sur les titres d s. Cliquez sur l icône de menu pour accéder aux réglages
52 Rafraîchir : Vérification de nouveaux s. Composer : Rédiger de nouveaux s. Dossiers : Gestion des s dans différents dossiers. Comptes : Voir les comptes dans l appareil, ajouter de nouveaux comptes, supprimer des comptes, définir le compte principal. Paramètres de comptes : Plus d options pour le compte de messagerie électronique Ajout d un compte de messagerie électronique d entreprise. (Exemple : ) Pour notre exemple, nous allons utiliser un compte de l entreprise PLOYER. Compte : info@ployer.com.cn Mot de passe : ********* Pour un compte de messagerie électronique d entreprise, saisissez d abord l adresse de votre et le mot de passe, puis cliquez sur Installation manuelle pour davantage d options. Demandez au webmaster des informations sur le serveur du compte de messagerie électronique de l entreprise et suivez ses consignes pour saisir les éléments dans Installation manuelle, puis cliquez sur Suivant. Les étapes suivantes sont identiques à celles décrites dans 6.8.1, voir les instructions ci-dessus. 6.9 Calendrier Cliquez sur l icône de Calendrier pour entrer dans l interface du calendrier. Dans le mode calendrier, pressez et tirez l'écran vers le haut / vers le bas pour réduire / augmenter les mois, ou pour tourner les pages. Les années se règlent automatiquement lorsque le mois dépasse décembre ou janvier. Entrez dans l'interface, le nombre dans le formulaire orange est la date intrajournalière, vous pouvez modifier la date dans fonction de réglage ; détails en tant que section de réglage. Cliquez sur pour retourner au menu principal Calculatrice Cliquez sur l icône de Calculatrice pour entrer dans l interface de la calculatrice Réveil Cliquez sur l'icône de Réveil pour entrer dans l'interface de l'horloge, puis cliquez sur l'horloge pour accéder à l'interface d'alarme ; vous pouvez à présent ajouter de nouvelles alarmes ou modifier les alarmes précédentes.

53 Un appui long sur les anciennes alarmes pour choisir d activer / de désactiver l'alarme, de modifier l'alarme et de supprimer l'alarme. Cliquez sur l alarme pour la modifier. Vous pouvez modifier l heure de déclenchement de l alarme, modifier son mode de répétition, sa sonnerie et son label. Dans l interface d alarme, cliquez sur l icône de menu éléments suivants peuvent être réglés. pour accéder aux réglages. Les Alarme en mode silencieux Volume de l alarme Durée de répétition Volume et appareil photo 6.12 Programme d installation APK Cet appareil prend en charge les paquets d applications de parties tierces (au format APK) basés sur Android OS. De nombreux paquets d applications peuvent être téléchargés à partir d internet, ou copiés à partir d autres appareil dans la mémoire de stockage. Si vous ne téléchargez pas le paquet d application depuis l Android Market de Google, vous devriez suivre les étapes suivantes avant d installer l application. Vérifiez Réglages Applications, assurez-vous que la case Sources inconnues est cochée. Cliquez sur l icône du programme d installation APK d installation APK apparaît : Installer, Gérer et Sortir. et l interface du programme Installer: Cliquez sur Installer, entrez dans l'interface d'installation APK. Mémoire interne signifie mémoire Flash intégrée, carte SD correspond à la carte T-Flash. Après être entré, sélectionnez le programme de réglage du format APK sur le côté droit, cliquez sur l'application à installer, revenez à l'interface principale lorsque vous avez terminé cette opération, puis l'installation est terminée. L icône correspondante apparaîtra
Gebruiksaanwijzing Samsung PV 210 Tablet PC. Inhoudsopgave
 Gebruiksaanwijzing Samsung PV 210 Tablet PC Inhoudsopgave 1 Introductie van uw TABLET...2 2 Accu...2 4 Interface en applicaties...4 5 HDMI & Host...5 6 Taal & keyboard...6 7 Beheren van Applicaties...7
1 Aansluiten op uw TV. Sluit de HDMI poort van de SmarTVstick aan op een HDMI poort van uw TV
 Stenmark SmarTVstick Handleiding: Inhoudsopgave 1 SmarTVstick aansluiten op een TV 2 Voeding aansluiten Externe apparaten 3 Verbinding met de muis Gebruik 4 Verbinding met het netwerk 5 Schermresolutie
EM6250 Firmware update V030507
 EM6250 Firmware update V030507 EM6250 Firmware update 2 NEDERLANDS/ENGLISH Table of contents 1.0 (NL) Introductie... 3 2.0 (NL) Firmware installeren... 3 3.0 (NL) Release notes:... 5 1.0 (UK) Introduction...
EM7680 Firmware Update by Micro SD card
 EM7680 Firmware Update by Micro SD card 2 NEDERLANDS/ENGLISH EM7680 Firmware update by Micro SD card Table of contents 1.0 (NL) Introductie... 2 2.0 (NL) Firmware installeren... 2 3.0 (NL) Opmerking...
EM7680 Firmware Auto-Update for Kodi 17.2
 EM7680 Firmware Auto-Update for Kodi 17.2 2 NEDERLANDS/ENGLISH EM7680 Firmware Auto-update for Kodi 17.2 Table of contents 1.0 (NL) Introductie... 3 2.0 (NL) Firmware installeren... 3 3.0 (NL) Opmerking...
Handleiding. Systeem: Android 4.4 Processor: All Winner A31S Editie: V01
 Handleiding Basis inleiding... 1 Knoppen en aansluitingen... Fout! Bladwijzer niet gedefinieerd. Basis specificaties... 1 Starten... Fout! Bladwijzer niet gedefinieerd. Opstarten en afsluiten... Fout!
Nederlandse Gebruikershandleiding
 Nederlandse Gebruikershandleiding Hartelijk dank voor uw aankoop van deze tablet-pc. Deze handleiding maakt u wegwijs in de functies van uw apparaat en wijst u op belangrijke zaken. Lees deze handleiding
EM7580 Firmware Update by Micro SD card
 EM7580 Firmware Update by Micro SD card 2 NEDERLANDS/ENGLISH EM7580 Firmware update by Micro SD card Table of contents 1.0 (NL) Introductie... 3 2.0 (NL) Firmware installeren... 3 3.0 (NL) Opmerking...
EM7680 Firmware Update by Micro SD card or USB
 EM7680 Firmware Update by Micro SD card or USB 2 NEDERLANDS/ENGLISH EM7680 Firmware update by Micro SD card or USB Table of contents 1.0 (NL) Introductie... 3 2.0 (NL) Firmware installeren... 3 3.0 (NL)
Settings for the C100BRS4 MAC Address Spoofing with cable Internet.
 Settings for the C100BRS4 MAC Address Spoofing with cable Internet. General: Please use the latest firmware for the router. The firmware is available on http://www.conceptronic.net! Use Firmware version
ICARUS Illumina E653BK on Windows 8 (upgraded) how to install USB drivers
 how to install USB drivers") ICARUS Illumina E653BK on Windows 8 (upgraded) how to install USB drivers English Instructions Windows 8 out-of-the-box supports the ICARUS Illumina (E653) e-reader. However, when users upgrade their Windows
ICARUS Illumina E653BK on Windows 8 (upgraded) how to install USB drivers English Instructions Windows 8 out-of-the-box supports the ICARUS Illumina (E653) e-reader. However, when users upgrade their Windows
EM7680 Firmware Update by OTA
 EM7680 Firmware Update by OTA 2 NEDERLANDS/ENGLISH EM7680 Firmware update by OTA Table of contents 1.0 (NL) Introductie... 3 2.0 (NL) Firmware installeren... 3 3.0 (NL) Release notes:... 3 4.0 (NL) Overige
EM7680 Firmware Update by Micro SD card or USB stick
 EM7680 Firmware Update by Micro SD card or USB stick 2 NEDERLANDS/ENGLISH EM7680 Firmware update by Micro SD card or USB stick Table of contents 1.0 (NL) Introductie... 3 2.0 (NL) Firmware installeren...
Gebruikershandleiding DITK702201
 Gebruikershandleiding DITK7001 *ANY PROBLEM OR QUESTIONS, CALL SUPPORT DESK 0900-343763 (NL) *VRAGEN OF PROBLEMEN, BEL ONZE SUPPORT DESK 0900-343763 (NL) *BEI FRAGEN ODER PROBLEMEN WENDEN SIE SICH BITTE
Procedure Reset tv-toestellen:
 Procedure Reset tv-toestellen: Volgende procedure is te volgen wanneer er een tv-toestel, op een van de kamers niet meer werkt. TV Re-installation Factory Default Her-installeren van de TV Fabrieksinstellingen
Point of View Android 2.3 Tablet - User s Manual PlayTab Pro
 Inhoud 1. Note... 2 2. Inhoud van de verpakking... 2 3. Product aanzichten... 3 4. Opstarten en afsluiten... 4 5. Desktop... 4 6. Knoppen... 4 7. Systeem instellingen... 5 8. HDMI... 7 9. Installeren,
Gebruikershandleiding Inhoud
 Gebruikershandleiding Inhoud 1. Note 2. Inhoud van de verpakking 3. Product aanzichten 4. Opstarten en aflsuiten 5. Desktop 6. Knoppen 7. Systeem instellingen 7.1 WIFI draadloze connectie 8. HDMI 9. Installeren,
HANDLEIDING DIT702101
 HANDLEIDING DIT702101 *ANY PROBLEM OR QUESTIONS, CALL SUPPORT DESK 0900-3437623 (NL) *VRAGEN OF PROBLEMEN, BEL ONZE SUPPORT DESK 0900-3437623 (NL) *BEI FRAGEN ODER PROBLEMEN WENDEN SIE SICH BITTE AN UNSEREN
1. Prestigio MultiPad 2. Voedingsadapter 3. Draaghoes 4. USB-kabel 5. Snelstartgids 6. Garantiekaart 7. Wettelijke en veiligheidsinformatie
 1. Inhoud van de verpakking 1. 2. Voedingsadapter 3. Draaghoes 4. USB-kabel 5. 6. Garantiekaart 7. Wettelijke en veiligheidsinformatie 2. Overzicht van het apparaat 1 2 9 3 4 5 6 7 8 10 11 12 13 14 EN
Mobile Watch Snelle Handleiding. Bezoek voor meer informatie
 Mobile Watch Snelle Handleiding Ⅰ. Software installatie - Software download: Zoek voor "360Eye"in de Iphone App Store en installeer de applicatie. Of scan de QR Code aan de rechterzeide. Voor meer details
2019 SUNEXCHANGE USER GUIDE LAST UPDATED
 2019 SUNEXCHANGE USER GUIDE LAST UPDATED 0 - -19 1 WELCOME TO SUNEX DISTRIBUTOR PORTAL This user manual will cover all the screens and functions of our site. MAIN SCREEN: Welcome message. 2 LOGIN SCREEN:
EM4594 Firmware update
 EM4594 Firmware update EM4594 Firmware update 2 NEDERLANDS/ENGLISH Table of contents 1.0 (NL) Introductie... 3 2.0 (NL) Firmware installeren... 3 4.0 (NL) Overige informatie:... 7 1.0 (UK) Introduction...
Shipment Centre EU Quick Print Client handleiding [NL]
![Shipment Centre EU Quick Print Client handleiding [NL]](/thumbs/78/76906513.jpg "Shipment Centre EU Quick Print Client handleiding [NL]") Shipment Centre EU Quick Print Client handleiding [NL] Please scroll down for English. Met de Quick Print Client kunt u printers in Shipment Centre EU configureren. De Quick Print Client kan alleen op
Shipment Centre EU Quick Print Client handleiding [NL] Please scroll down for English. Met de Quick Print Client kunt u printers in Shipment Centre EU configureren. De Quick Print Client kan alleen op
Point of View Android 2.3 Tablet - User s Manual ProTab 2XXL
 Inhoud 1. Note... 2 2. Inhoud van de verpakking... 2 3. Product Aanzicht... 3 4. Opstarten en afsluiten... 4 5. Desktop... 5 6. Knoppen... 5 7. Het APK Scherm... 6 8. Systeem instellingen... 6 9. Installeren,
Handleiding DIT902101
 Handleiding DIT902101 Deze handleiding bevat belangrijke veiligheidsvoorschriften en informatie voor correct gebruik. Lees deze handleiding voor gebruik aandachtig door om ongelukken te voorkomen. Plaats
Hoe te verbinden met NDI Remote Office (NDIRO): Apple OS X How to connect to NDI Remote Office (NDIRO): Apple OS X
: Apple OS X How to connect to NDI Remote Office (NDIRO): Apple OS X") Handleiding/Manual Hoe te verbinden met (NDIRO): Apple OS X How to connect to (NDIRO): Apple OS X Inhoudsopgave / Table of Contents 1 Verbinden met het gebruik van Apple OS X (Nederlands)... 3 2 Connect
Handleiding/Manual Hoe te verbinden met (NDIRO): Apple OS X How to connect to (NDIRO): Apple OS X Inhoudsopgave / Table of Contents 1 Verbinden met het gebruik van Apple OS X (Nederlands)... 3 2 Connect
MyDHL+ Van Non-Corporate naar Corporate
 MyDHL+ Van Non-Corporate naar Corporate Van Non-Corporate naar Corporate In MyDHL+ is het mogelijk om meerdere gebruikers aan uw set-up toe te voegen. Wanneer er bijvoorbeeld meerdere collega s van dezelfde
Het beheren van mijn Tungsten Network Portal account NL 1 Manage my Tungsten Network Portal account EN 14
 QUICK GUIDE C Het beheren van mijn Tungsten Network Portal account NL 1 Manage my Tungsten Network Portal account EN 14 Version 0.9 (June 2014) Per May 2014 OB10 has changed its name to Tungsten Network
NEDERLANDS. Display Instructies. Knoppen. Geeft afwisselend Tijd, Datum en Temperatuur weer, kan ook ingesteld worden op enkel tijd
 NEDERLANDS Het ziet eruit als een simpel blokje hout, maar maak een geluid (knip met je vingers, kuch, klap in je handen, of tip op de bovenkant) en het geeft onmiddelijk en afwisselend tijd, datum en
Handleiding DIT102201
 Handleiding DIT102201 Deze handleiding bevat belangrijke veiligheidsvoorschriften en informatie voor correct gebruik. Lees deze handleiding voor gebruik aandachtig door om ongelukken te voorkomen. Plaats
HANDLEIDING DIT902104
 HANDLEIDING DIT902104 *ANY PROBLEM OR QUESTIONS, CALL SUPPORT DESK 0900-3437623 (NL) *VRAGEN OF PROBLEMEN, BEL ONZE SUPPORT DESK 0900-3437623 (NL) *BEI FRAGEN ODER PROBLEMEN WENDEN SIE SICH BITTE AN UNSEREN
Gebruiksaanwijzing OV-NewBase www.overmax.nl
 Gebruiksaanwijzing OV-NewBase www.overmax.nl Snel Start Batterij management en opladen Voordat u het toestel in gebruik neemt, dient u de accu eerst geheel op te laden. Stop de lader in het toestel en
Handleiding Zuludesk Parent
 Handleiding Zuludesk Parent Handleiding Zuludesk Parent Met Zuludesk Parent kunt u buiten schooltijden de ipad van uw kind beheren. Hieronder vind u een korte handleiding met de mogelijkheden. Gebruik
Quick start guide. Powerbank MI Mah. Follow Fast All rights reserved. Page 1
 Quick start guide Powerbank MI 16.000 Mah Follow Fast 2016 - All rights reserved. Page 1 ENGLISH The Mi 16000 Power Bank is a very good backup option for those on the move. It can keep you going for days
Voor Modelnr.. MPDC 705. Gebruikershandleiding
 Voor Modelnr.. MPDC 705 NL Gebruikershandleiding Deze handleiding bevat belangrijke veiligheidswaarschuwingen en informatie voor correct gebruik. Zorg dat u deze handleiding eerst goed doorleest, zodat
Edutab2+ Gebruikshandleiding. www.overmax.nl. Inleiding. Mors geen water of stop geen vreemde voorwerpen in het toestel.
 Edutab2+ Gebruikshandleiding Inleiding Dank u voor het kopen van de Edutab2+. Wij wensen u veel plezier met deze tablet. Lees en bewaar alle bedieningsinstructies voordat u het apparaat in gebruik neemt,
Gebruikershandleiding
 I785D8DCZ Gebruikershandleiding Hartelijk dank voor uw aankoop van deze EMPIRE Intel Tablet Model I785D8DCZ. Deze handleiding geeft een kort overzicht van alle functies van de tablet en is ervoor bedoeld
MyDHL+ ProView activeren in MyDHL+
 MyDHL+ ProView activeren in MyDHL+ ProView activeren in MyDHL+ In MyDHL+ is het mogelijk om van uw zendingen, die op uw accountnummer zijn aangemaakt, de status te zien. Daarnaast is het ook mogelijk om
Firewall van de Speedtouch 789wl volledig uitschakelen?
 Firewall van de Speedtouch 789wl volledig uitschakelen? De firewall van de Speedtouch 789 (wl) kan niet volledig uitgeschakeld worden via de Web interface: De firewall blijft namelijk op stateful staan
Specificaties. Software. Hardware 10.1 High Definition TN LCD Touchscreen (1024x600 pixels) Capacitief multi-touch (5 touch-punten)
 Capacitief multi-touch (5 touch-punten)") Deze handleiding bevat belangrijke voorzorgsmaatregelen en informatie voor correct gebruik. Zorg ervoor dat u de handleiding vóór gebruik zorgvuldig heeft doorgelezen om ongelukken te voorkomen. Plaats
Deze handleiding bevat belangrijke voorzorgsmaatregelen en informatie voor correct gebruik. Zorg ervoor dat u de handleiding vóór gebruik zorgvuldig heeft doorgelezen om ongelukken te voorkomen. Plaats
TAB-9701. Gebruikershandleiding. Voor informatie en ondersteuning, www.lenco.eu
 TAB-9701 Gebruikershandleiding Voor informatie en ondersteuning, www.lenco.eu Inhoud 1 Inleiding 2 Veiligheidsvoorschriften 3 Algemeen overzicht 3.1 Toetsen 3.2 Het toestel in- en uitschakelen 3.3 De batterij
FAAC DRIVER. Driver install procedure for FAAC boards. Installatieprocedure voor driver voor FAAC-kaarten.
 FAAC DRIVER Driver install procedure for FAAC boards Installatieprocedure voor driver voor FAAC-kaarten www.record-toegangstechniek.nl 1 When a FAAC board (E124 or E145) is connected to the USB port, it
Handleiding NL pagina 2. Manual UK page 6. Network Settings
 Handleiding NL pagina 2 Manual UK page 6 Network Settings 2 NEDERLANDS Netwerkinstellingen Inhoudsopgave Netwerkinstellingen voor Windows 98 en ME... 2 Netwerkinstellingen voor Windows 2000 en XP... 3
Nederlandse versie. Inleiding. Software installatie. MP502FM / MP504FM Sweex Black Onyx MP4 Player
 MP502FM / MP504FM Sweex Black Onyx MP4 Player Inleiding Stel de Sweex Black Onyx MP4 Player niet bloot aan extreme temperaturen. Plaats het apparaat niet in direct zonlicht of in de dichte nabijheid van
Hoe met Windows 8 te verbinden met NDI Remote Office (NDIRO) How to connect With Windows 8 to NDI Remote Office (NDIRO
 How to connect With Windows 8 to NDI Remote Office (NDIRO") Handleiding/Manual Hoe met Windows 8 te verbinden met NDI Remote Office (NDIRO) How to connect With Windows 8 to NDI Remote Office (NDIRO Inhoudsopgave / Table of Contents 1 Verbinden met het gebruik van
Handleiding/Manual Hoe met Windows 8 te verbinden met NDI Remote Office (NDIRO) How to connect With Windows 8 to NDI Remote Office (NDIRO Inhoudsopgave / Table of Contents 1 Verbinden met het gebruik van
DALISOFT. 33. Configuring DALI ballasts with the TDS20620V2 DALI Tool. Connect the TDS20620V2. Start DALISOFT
 TELETASK Handbook Multiple DoIP Central units DALISOFT 33. Configuring DALI ballasts with the TDS20620V2 DALI Tool Connect the TDS20620V2 If there is a TDS13620 connected to the DALI-bus, remove it first.
Index. 1. Apparaat beschrijving.
 Index 1. Apparaat beschrijving. 2. Getting Started Guide... 1 2.1 Batterij opladen... 1 2.2 Hoe de geheugenkaart te gebruiken... 2 2.3 in- en uithalen usb stick... 3 2.4 opslag ruimte... 3 2.5 Power On
QUICK START. IP cam viewer.
 QUICK START IP cam viewer www.profile.eu 1 Hardware Installation Verbind de camera met de stroom via de meegeleverde adaptor Verbind de camera met uw router via de meegeleverde netwerkkabel Verbind de
How to install and use dictionaries on the ICARUS Illumina HD (E652BK)
") (for Dutch go to page 4) How to install and use dictionaries on the ICARUS Illumina HD (E652BK) The Illumina HD offers dictionary support for StarDict dictionaries.this is a (free) open source dictionary
(for Dutch go to page 4) How to install and use dictionaries on the ICARUS Illumina HD (E652BK) The Illumina HD offers dictionary support for StarDict dictionaries.this is a (free) open source dictionary
IOS and Android APP instruction
 IOS and Android APP instruction - Open de APP Store of Google Play op uw toestel - Open the APP Store or Google Play on your device IOS Android - Download de Eurom Heating APP: - Download the Eurom Heating
Nederlandse Handleiding
 Nederlandse Handleiding OV-SteelCore8 (1). Introductie Deze handleiding bevat belangrijke veiligheids- en gebruikers informatie om mogelijke ongelukken te voorkomen. Lees eerst de handleiding grondig door
Veel gestelde vragen nieuwe webloginpagina
 Veel gestelde vragen nieuwe webloginpagina Op deze pagina treft u een aantal veel gestelde vragen aan over het opstarten van de nieuwe webloginpagina http://weblogin.tudelft.nl: 1. Ik krijg de melding
QUALCORE 1010. Handleiding. Nederlands. www.overmax.eu/nl voor service vragen: info@overmax.nl
 QUALCORE 1010 Handleiding Nederlands www.overmax.eu/nl voor service vragen: info@overmax.nl Voorwoord Dank u voor het kopen van de Overmax tablet. Wij wensen u veel plezier met de Qualcore 1010. Lees en
Gebruiksaanwijzing. User Manual. OV-BaseCore10
 Gebruiksaanwijzing User Manual OV-BaseCore10 NEDERLANDSE GEBRUIKSAANWIJZING Inleiding Dank u voor de aanschaf van de Overmax Basecore 10. Wij wensen u veel plezier met de tablet. Lees en bewaar alle bedieningsinstructies
 www.smartwatchbydexclusives.nl DexOne NEDERLANDS Veel plezier met de DexOne! Alle activiteiten worden weergegeven op de app nadat de gegevens van de polsband gesynchroniseerd zijn. Lees deze handleiding
MobiDM App Handleiding voor Windows Mobile Standard en Pro
 MobiDM App Handleiding voor Windows Mobile Standard en Pro Deze handleiding beschrijft de installatie en gebruik van de MobiDM App voor Windows Mobile Version: x.x Pagina 1 Index 1. WELKOM IN MOBIDM...
Gebruiksaanwijzing Tablet PC W10
 Gebruiksaanwijzing Tablet PC W10 Inhoud Welkom...2 Belangrijke mededelingen...2 Knoppen en functies...3 I. Aan de slag...4 1.1 Aan- of uitzetten 1.1.1 Aanzetten...4 1.1.2 Uitzetten...4 1.2 Het vergrendelen/ontgrendelen
Voor Modelnr.. MP888 NL Gebruikershandleiding
 Voor Modelnr.. MP888 NL Gebruikershandleiding Deze handleiding bevat belangrijke veiligheidswaarschuwingen en informatie voor correct gebruik. Zorg dat u deze handleiding eerst goed doorleest, zodat ongelukken
WWW.EMINENT-ONLINE.COM
 WWW.EMINENT-OINE.COM HNDLEIDING USERS MNUL EM1016 HNDLEIDING EM1016 USB NR SERIEEL CONVERTER INHOUDSOPGVE: PGIN 1.0 Introductie.... 2 1.1 Functies en kenmerken.... 2 1.2 Inhoud van de verpakking.... 2
Handleiding Digipass DP310
 Handleiding Digipass DP310 Deze handleiding geeft u uitleg over het activeren en gebruik maken van uw Digipass. Toetsen van de Digipass OK: voor het aan- of uitschakelen van het apparaat of om een handeling
CRESTA CTP810 7 MID. (Tablet PC)
") CRESTA CTP810 7 MID (Tablet PC) GEBRUIKSAANWIJZING Welkom... 3 Voorzorgsmaatregelen... 3 Toetsen en functies... 4 I. Beginnen... 5 1.1 AAN/UIT zetten... 5 1.1.1 Aanzetten... 5 1.1.2 Uitzetten... 5 1.2
CRESTA CTP810 7 MID (Tablet PC) GEBRUIKSAANWIJZING Welkom... 3 Voorzorgsmaatregelen... 3 Toetsen en functies... 4 I. Beginnen... 5 1.1 AAN/UIT zetten... 5 1.1.1 Aanzetten... 5 1.1.2 Uitzetten... 5 1.2
WiFi-verbinding ebook-functie (alle ebook-formaten worden ondersteund door applicaties) Afspelen van 1080P HD-bestanden
 Afspelen van 1080P HD-bestanden") Voor model MP11 OCTA NL Handleiding Deze handleiding bevat belangrijke voorzorgsmaatregelen en informatie voor correct gebruik. Zorg ervoor dat u de handleiding vóór gebruik zorgvuldig heeft doorgelezen
Voor model MP11 OCTA NL Handleiding Deze handleiding bevat belangrijke voorzorgsmaatregelen en informatie voor correct gebruik. Zorg ervoor dat u de handleiding vóór gebruik zorgvuldig heeft doorgelezen
HET MODELNUMMER FIESTA2. Mp3 speler met luidspreker. Instructiehandleiding
 Mp3 speler met luidspreker HET MODELNUMMER FIESTA2 Instructiehandleiding Lees deze instructies svp goed door alvorens dit apparaat in gebruik te nemen. NL Gebruiksaanwijzing TOETS AANDUIDINGEN 9 1 3 2
Voor Modelnr.. MPDC 905. Gebruikershandleiding
 Voor Modelnr.. MPDC 905 NL Gebruikershandleiding Deze handleiding bevat belangrijke veiligheidswaarschuwingen en informatie voor correct gebruik. Zorg dat u deze handleiding eerst goed doorleest, zodat
Ladibug Document Camera Image Software Gebruikershandleiding
 Ladibug Document Camera Image Software Gebruikershandleiding Inhoud 1. Introductie...2 2. Systeemvereisten...2 3. Ladibug installeren...3 4. Beginnen met de Ladibug te gebruiken...5 5. Bediening...6 5.1
DASH CAM, HD Handleiding
 DASH CAM, HD Handleiding 87231 Lees deze handleiding vóór ingebruikname a.u.b. zorgvuldig door, zodat u alle functies van deze Auto-DVR optimaal weet te gebruiken. Opgelet 1. Steek de geheugenkaart a.u.b.
Wi-Fi Range Extender Add-on Device Quickstart Guide
 Wi-Fi Range Extender Add-on Device Quickstart Guide Model No. WRP1220 What s inside: 1x Wi-Fi Range Extender 1x Power Adapter All Home8 add-on devices have to work with Home8 systems. Nederlands Stap 1:
Gebruikershandleiding 9,7" Tablet Android 4.0
 Gebruikershandleiding 9,7" Tablet Android 4.0 Model: DIT1010 1.1 Aan- of uitzetten 1.1.1 Aanzetten 1.1.2 Uitzetten 1.2 Het scherm vergrendelen/ontgrendelen (slaapstand) 1.3 Verbinding maken met computer
Gebruikershandleiding
 Gebruikershandleiding Inhoud 1. Note 2. Inhoud van de verpakking 3. Hardware specificaties 4. Opstarten en aflsuiten 5. Desktop 6. Knoppen 7. Systeem instellingen 7.1 WIFI draadloze connectie 8. HDMI 9.
Veelgestelde vragen voor Eee Pad TF201
 Veelgestelde vragen voor Eee Pad TF201 DU6915 Bestanden beheren... 2 Hoe krijg ik toegang tot mijn gegevens die opgeslagen zijn op microsd, SD-kaart en USB-apparaat?... 2 Hoe verplaats ik het geselecteerde
I. Specificaties. II Toetsen en bediening
 I. Specificaties Afmetingen Gewicht Scherm Audioformaat Accu Play time Geheugen 77 52 11mm (W*H*D) 79g 1,3inch OLED-scherm MP3: bitrate 8Kbps-320Kbps WMA: bitrate 5Kbps-384Kbps FLAC:samplingrate 8KHz-48KHz,16bit
LDAP Server on Yeastar MyPBX & tiptel 31xx/32xx series
 LDAP Server on Yeastar MyPBX & tiptel 31xx/32xx series Tiptel b.v. Camerastraat 2 1322 BC Almere tel.: +31-36-5366650 fax.: +31-36-5367881 info@tiptel.nl Versie 1.2.0 (09022016) Nederlands: De LDAP server
ednet Smart Memory Handleiding 31519
 ednet Smart Memory Handleiding 31519 Is het geheugen van uw iphone of ipad weer vol? Wij hebben de oplossing! Met ednet Smart Memory kunt u gemakkelijk het geheugen van uw iphone of ipad uitbreiden door
Downloaded from www.vandenborre.be
 WATCH ME Handleiding DIGITALE MEDIASPELER Overzicht functies Watch me is een Bluetooth-horloge en MP3-speler met capacitief touchscreen, u kunt uw vinger gebruiken om een icoontje aan te raken en een submenu
USER MANUAL. Contents:
 USER MANUAL POWERplus Toucan Solar MP4 player Congratulions with your new POWERplus Toucan Solar MP4 player. With this quality product from POWERplus you can enjoy a fantastic multi media experience. With
Cameramanager LSU Installation Guide
 Cameramanager LSU Installation Guide Network based video surveillance server Version 1.1 / August 2009 Copyright 2010 - Cameramanager.com Page 1 LSU installation guide index 1. Connecting the LSU to your
Activant Prophet 21. Prophet 21 Version 12.0 Upgrade Information
 Activant Prophet 21 Prophet 21 Version 12.0 Upgrade Information This class is designed for Customers interested in upgrading to version 12.0 IT staff responsible for the managing of the Prophet 21 system
General Mobile Discovery tab 8. Tablet Handleiding Quick Start
 General Mobile Discovery tab 8 Tablet Handleiding Quick Start Geachte klant, Hartelijk dank dat u heeft gekozen voor de General Mobile Discovery tab 8 Tablet. Deze quick start handleiding is bedoeld om
1. Prestigio MultiPad 2. Voedingsadapter 3. Draaghoes 4. USB-kabel 5. Snelstartgids 6. Garantiekaart 7. Wettelijke en veiligheidsinformatie
 1. Inhoud van de verpakking 1. 2. Voedingsadapter 3. Draaghoes 4. USB-kabel 5. 6. Garantiekaart 7. Wettelijke en veiligheidsinformatie 2. Overzicht van het apparaat 15 16 3 4 5 6 1 2 13 14 10 9 8 11 12
OUTDOOR HD DOME IP CAMERA PRODUCT MANUAL GB - NL
 OUTDOOR HD DOME IP CAMERA PRODUCT MANUAL GB - NL GB PARTS & FUNCTIONS 2. ---- 1. ---- 3. ---- 7. ---------- 5. 4. 6. 1. Outdoor IP camera unit 2. Antenna 3. Mounting bracket 4. Network connection 5. Power
Xemio-658 / Xemio-767BT / Xemio-777BT Snelgids Voor informatie en ondersteuning: 1. Bedieningselementen en aansluitingen
 Xemio-658 / Xemio-767BT / Xemio-777BT Snelgids Voor informatie en ondersteuning: www.lenco.com 1. Bedieningselementen en aansluitingen (1) TFT LCD-display (2 inch; R,G,B) (2) (AAN / UIT, Afspelen/ Pauzeren,
HANDLEIDING KA5653BK - KA5653DW - KA5654BK - KA5654DW - KA5655BK - KA5655DW. Algemene Functies. Instructies voor gebruik:
 NL HANDLEIDING KA5653BK - KA5653DW - KA5654BK - KA5654DW - KA5655BK - KA5655DW Algemene Functies 1. Weergave van tijd: 12 of 24 uur tijd weergave 2. Kalender Modus: Maand en datum weergave 3. Alarm Modus:
Cameramanager LSU Installation Guide
 Cameramanager LSU Installation Guide Network based video surveillance server Version 1.3 / November 2011 Copyright 2011 - Cameramanager.com Page 1 LSU installation guide index 1. Connecting the LSU to
Xemio-760 BT Snelgids Voor informatie en ondersteuning,
 Xemio-760 BT Snelgids Voor informatie en ondersteuning, www.lenco.com 1. Bedieningselementen en aansluitingen (1) TFT LCD-display (2 inch; R,G,B) (2) M (Menu oproepen/ Submenu) (3) (Vorige / Terugspoelen,
Inhoudsopgave: Whisper380-computerhulp
 Versie: 1.0 Gemaakt door: Whisper380 Eigenaar: Datum: 17-10-2010 Inhoudsopgave: Inhoudsopgave:... 2 Het programma downloaden.... 3 Het programma downloaden... 4 De installatie van het programma... 6 Het
Handleiding Archos 40 Titanium
 Handleiding Archos 40 Titanium Inhoud van de verpakking Controleer of de volgende onderdelen in de verpakking zitten: -- ARCHOS 40 Titanium -- Batterij -- Headset -- Micro SIM-adapter -- USB-kabel -- Lader
Tablet PC Gebruikershandleiding
 Tablet PC Gebruikershandleiding Voor optimale prestaties en veiligheid, dient u eerst de gebruikershandleiding goed door te lezen voordat u het product aansluit, bedient of aanpast. Bewaar de gebruikershandleiding
Automatic Medication Dispenser Add-on Device Quickstart Guide
 Automatic Medication Dispenser Add-on Device Quickstart Guide Model No. WMD1201 What s inside: 1x Automatic Medication Dispenser 6x Dosage Templates 1x Key 4x AA Battery All Home8 add-on devices have to
Xemio-767 BT Snelgids Voor informatie en ondersteuning:
 Xemio-767 BT Snelgids Voor informatie en ondersteuning: www.lenco.com 1. Bedieningselementen en aansluitingen (1) TFT LCD-display (2 inch; R,G,B) (2) (AAN / UIT, Afspelen/ Pauzeren, Select / Enter) (3)
Veelgestelde vragen voor Transformer TF201 DU7211
 Veelgestelde vragen voor Transformer TF201 DU7211 Bestanden beheren... 2 Hoe krijg ik toegang tot mijn gegevens die opgeslagen zijn op microsd, SD-kaart en USB-apparaat?... 2 Hoe verplaats ik het geselecteerde
Uw gebruiksaanwijzing. LENCO EB-1000
 U kunt de aanbevelingen in de handleiding, de technische gids of de installatie gids voor. U vindt de antwoorden op al uw vragen over de in de gebruikershandleiding (informatie, specificaties, veiligheidsaanbevelingen,
TAB07-210 XENTA 7c TAB07-211 XENTA 7c TAB07-212 XENTA 7c FIRMWARE UPGRADE INSTRUCTIES. Pagina 1 van 8
 TAB07-210 XENTA 7c TAB07-211 XENTA 7c TAB07-212 XENTA 7c FIRMWARE UPGRADE INSTRUCTIES Pagina 1 van 8 VOORDAT U BEGINT: BACKUP BELANGRIJKE GEGEVENS! Bij het upgraden van uw Yarvik tablet zullen alle gebruikersinstellingen,
Mp3 speler met luidspreker Instructiehandleiding. Lees deze instructies svp goed door alvorens dit apparaat in gebruik te nemen.
 Mp3 speler met luidspreker Instructiehandleiding Lees deze instructies svp goed door alvorens dit apparaat in gebruik te nemen. NL Gebruiksaanwijzing TOETS AANDUIDINGEN 9 1 3 2 5 6 4 8 7 1 Vermogen AAN/UIT
Datum 15 juni 2006 Versie 1.0.6. Exchange Online. Handleiding voor gebruiker Release 1.0
 Datum 1.0.6 Exchange Online Handleiding voor gebruiker Release 1.0 1.0.6 Inhoudsopgave 1 Instellingen e-mail clients 2 1.1 Gebruik via Outlook 2003 2 1.2 Gebruik via ActiveSync 15 1.3 Gebruik via andere
Fall Detector Add-on Device Quickstart Guide
 Fall Detector Add-on Device Quickstart Guide Model No. FDS1300 What s inside: 1x Fall Detector 1x Lanyard 1x Power Cable All Home8 add-on devices have to work with Home8 systems. Nederlands Stap 1: Apparaat
Handleiding DIGITALE MEDIASPELER
 Voormodel nr. BTC245 BTC245 Handleiding DIGITALE MEDIASPELER Overzicht functies BTC245 is een MP3-speler met touchscreen, de gebruiker kan op het scherm om de speler te bedienen 2,4 inch 320*240 TFT-scherm
Maillijsten voor medewerkers van de Universiteit van Amsterdam
 See page 11 for Instruction in English Maillijsten voor medewerkers van de Universiteit van Amsterdam Iedereen met een UvAnetID kan maillijsten aanmaken bij list.uva.nl. Het gebruik van de lijsten van