GB Demolition Hammer Instruction Manual Burineur Manuel d instructions Meißelhammer Betriebsanleitung
|
|
|
- Clara van Veen
- 8 jaren geleden
- Aantal bezoeken:
Transcriptie
1 GB Demolition Hammer Instruction Manual F Burineur Manuel d instructions D Meißelhammer Betriebsanleitung I Martello demolitore Istruzioni per l uso NL Breekhamer Gebruiksaanwijzing E Martillo demoledor Manual de instrucciones P Martelo demolidor Manual de instruções DK Opbrydningshammer Brugsanvisning S Mejselhammare Bruksanvisning N Meiselhammer Bruksanvisning SF Purkuvasara Käyttöohje GR Σφυρί Κατεδάφισης Οδηγίες χρήσεως HM1202 HM1202C

2

3

4
5 Symbols The following show the symbols used for the tool. Be sure that you understand their meaning before use. Symboles Nous donnons ci-dessous les symboles utilisés pour l outil. Assurez-vous que vous en avez bien compris la signification avant d utiliser l outil. Symbole Die folgenden Symbole werden für die Maschine verwendet. Machen Sie sich vor der Benutzung unbedingt mit ihrer Bedeutung vertraut. Simboli Per questo utensile vengono usati i simboli seguenti. Bisogna capire il loro significato prima di usare l utensile. Symbolen Voor dit gereedschap worden de volgende symbolen gebruikt. Zorg ervoor dat u de betekenis van deze symbolen begrijpt alvorens het gereedschap te gebruiken. Símbolos A continuación se muestran los símbolos utilizados con esta herramienta. Asegúrese de que entiende su significado antes de usarla. Símbolos O seguinte mostra os símbolos utilizados para a ferramenta. Certifique-se de que compreende o seu significado antes da utilização. Symboler Nedenstående symboler er anvendt i forbindelse med denne maskine. Vær sikker på, at De har forstået symbolernes betydning, før maskinen anvendes. Symboler Det följande visar de symboler som används för den här maskinen. Se noga till att du förstår deras innebörd innan maskinen används. Symbolene Følgende viser de symblene som brukes for maskinen. Det er viktig å forstå betydningen av disse før maskinen tas i bruk. Symbolit Alla on esitetty koneessa käytetyt symbolit. Opettele näiden merkitys, ennen kuin käytät konetta. Σύµβολα Τα ακόλουθα δείχνουν τα σύµβολα που χρησιµοποιούνται για το µηχάνηµα. Βεβαιωθείτε ότι καταλαβαίνετε τη σηµασία τους πριν από τη χρήση. Read instruction manual. Lire le mode d emploi. Bitte Betriebsanleitung lesen. Leggete il manuale di istruzioni. Lees de gebruiksaanwijzing. Lea el manual de instrucciones. DOUBLE INSULATION DOUBLE ISOLATION DOPPELT SCHUTZISOLIERT DOPPIO ISOLAMENTO DUBBELE ISOLATIE DOBLE AISLAMIENTO Leia o manual de instruções. Læs brugsanvisningen. Läs bruksanvisningen. Les bruksanvisingen. Katso käyttöohjeita. ιαβάστε τις οδηγίες χρήσης. DUPLO ISOLAMENTO DOBBELT ISOLATION DUBBEL ISOLERING DOBBEL ISOLERING KAKSINKERTAINEN ERISTYS ΙΠΛΗ ΜΟΝΩΣΗ 5

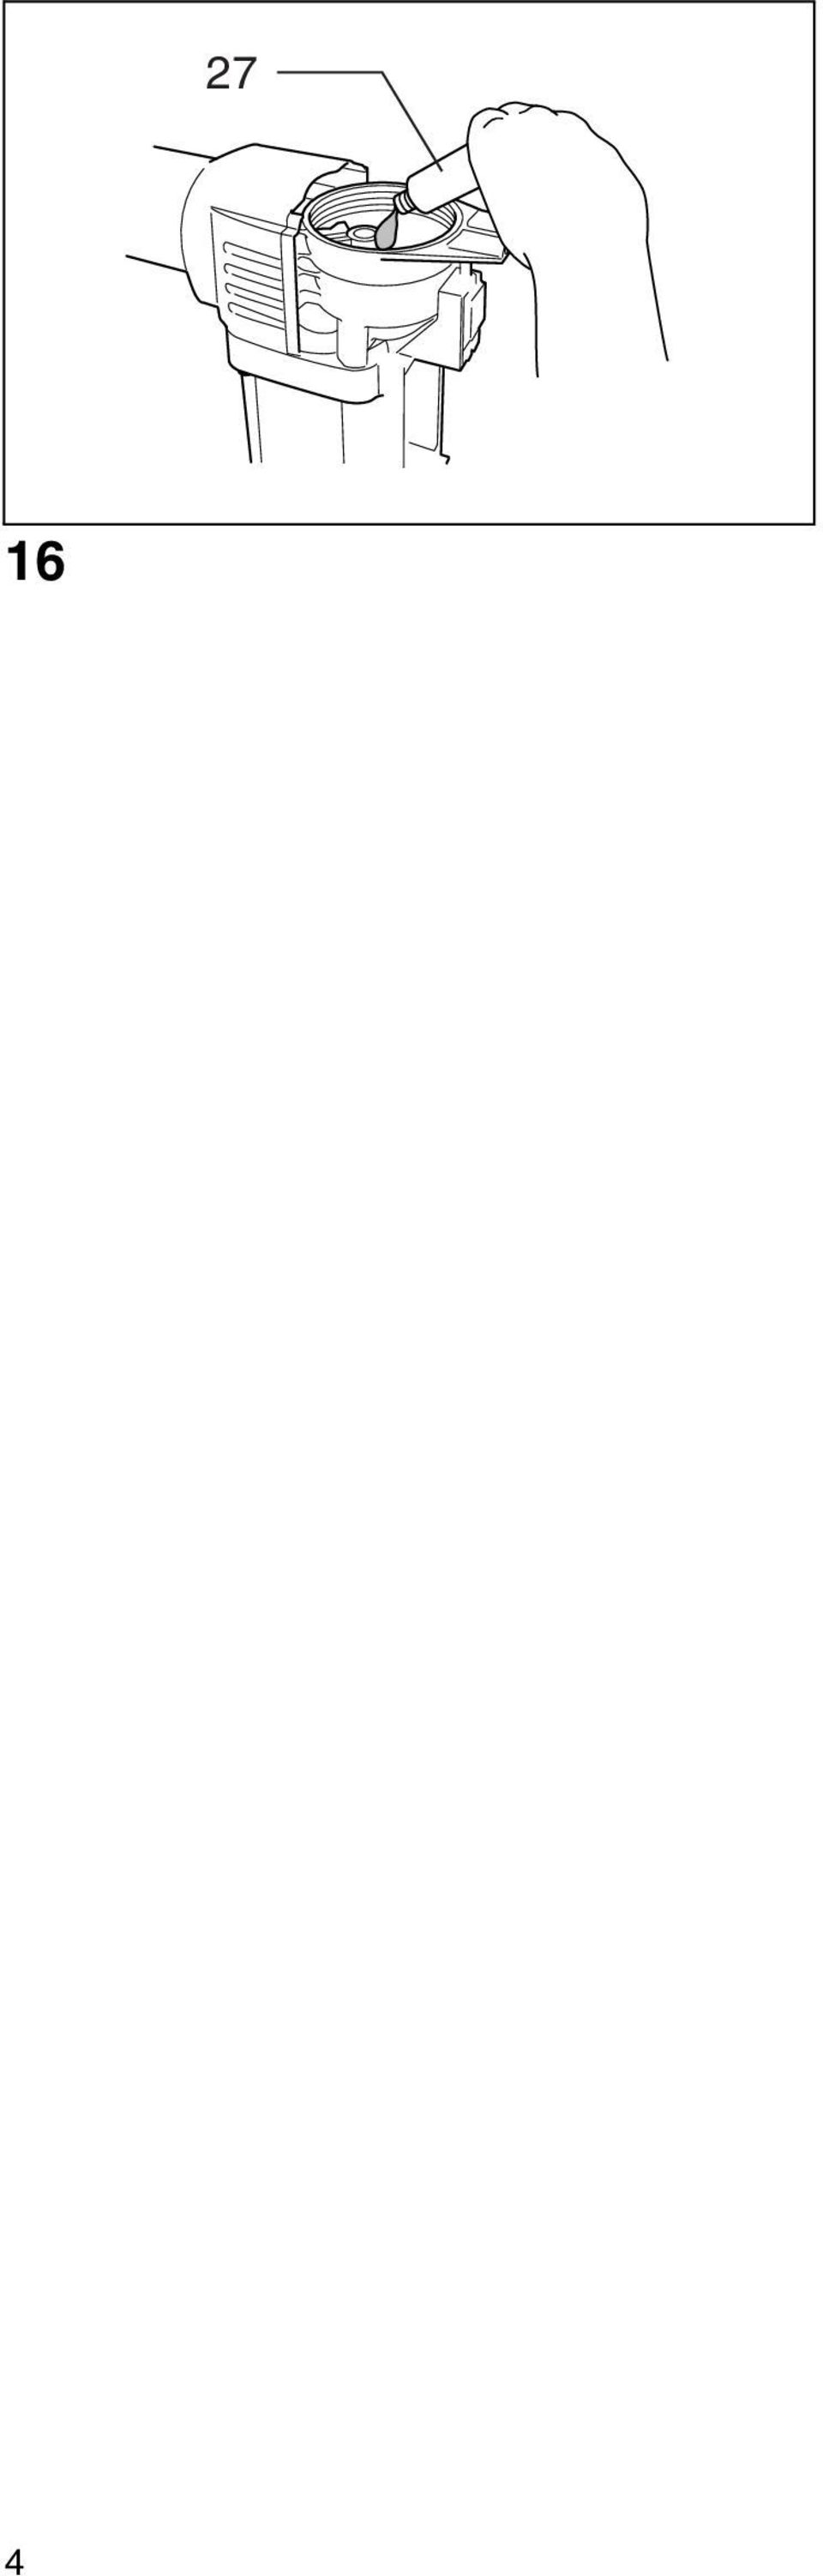
6 ENGLISH 1 Bit grease 2 Bit shank 3 Tool holder cover 4 Bit 5 Change ring 6 Side handle (auxiliary handle) 7 Can be swung 360 on the vertical and secured at any desired position 8 Secures at eight different positions back and forth on the horizontal Explanation of general view 9 Clamp nut 10 Loosen 11 Tighten 12 Side handle base 13 Switch lever 14 ON 15 OFF 16 Adjusting dial 17 Power-ON indicator lamp (green) 18 Service indicator lamp (red) 19 Screwdriver 20 Rear cover 21 Screws 22 Brush holder cap 23 Screws 24 Handle 25 Socket wrench 26 Crank cap 27 Hammer grease SPECIFICATIONS Model HM1202 HM1202C Blows per minute... 1, ,900 Overall length mm 578 mm Net weight kg 9.3 kg Due to our continuing program of research and development, the specifications herein are subject to change without notice. Note: Specifications may differ from country to country. Power supply The tool should be connected only to a power supply of the same voltage as indicated on the nameplate, and can only be operated on single-phase AC supply. They are double-insulated in accordance with European Standard and can, therefore, also be used from sockets without earth wire. For public low-voltage distribution systems of between 220 V and 250 V Switching operations of electric apparatus cause voltage fluctuations. The operation of this device under unfavorable mains conditions can have adverse effects to the operation of other equipment. With a mains impedance equal or less than 0.46 Ohms it can be presumed that there will be no negative effects. The mains socket used for this device must be protected with a fuse or protective circuit breaker having slow tripping characteristics. Safety hints For your own safety, please refer to the enclosed safety instructions. ADDITIONAL SAFETY RULES ENB Hold tool by insulated gripping surfaces when performing an operation where the cutting tool may contact hidden wiring or its own cord. Contact with a live wire will make exposed metal parts of the tool live and shock the operator. 2. Wear ear protectors when using the tool for extended periods. Prolonged exposure to high intensity noise can cause hearing loss. 3. Wear a hard hat (safety helmet), safety glasses and/or face shield. It is also highly recommended that you wear a dust mask and thickly padded gloves. 4. Be sure the bit is secured in place before operation. 5. Under normal operation, the tool is designed to produce vibration. The screws can come loose easily, causing a breakdown or accident. Check tightness of screws carefully before operation. 6. In cold weather or when the tool has not been used for a long time, let the tool warm up for a while by operating it under no load. This will loosen up the lubrication. Without proper warmup, hammering operation is difficult. 7. Always be sure you have a firm footing. Be sure no one is below when using the tool in high locations. 8. Hold the tool firmly with both hands. 9. Keep hands away from moving parts. 10. Do not leave the tool running. Operate the tool only when hand-held. 11. Do not point the tool at any one in the area when operating. The bit could fly out and injure someone seriously. 12. Do not touch the bit or parts close to the bit immediately after operation; they may be extremely hot and could burn your skin. SAVE THESE INSTRUCTIONS. OPERATING INSTRUCTIONS Installing or removing bit Important: Always be sure that the tool is switched off and unplugged before installing or removing the bit. Clean the bit shank and apply the bit grease provided to it before installing the bit. (Fig. 1) Pull the tool holder cover down all the way. (Fig. 2) Insert the bit into the tool. Turn the bit and push it in until it engages. (Fig. 3-1) Release the tool holder cover. It will return automatically to its original position to secure the bit. (Fig. 3-2) 6

7 After installing, always make sure that the bit is securely held in place by trying to pull it out. To remove the bit, pull the tool holder cover down all the way and pull the bit out. (Fig. 4) Bit angle (Fig. 5) The bit can be secured at 12 different angles. To change the bit angle, slide the change ring forward, then turn the change ring to change the bit angle. At the desired angle, slide the change ring back to the original position. The bit will be secured in place. NOTE: The change ring cannot turn when the bit is not installed on the tool. Side handle (auxiliary handle) The side handle can be swung 360 on the vertical and secured at any desired position. It also secures at eight different positions back and forth on the horizontal. Just loosen the clamp nut to swing the side handle to a desired position. Then tighten the clamp nut securely. (Fig. 6) The side handle also can be mounted in the rear groove as shown in Fig. 7. Loosen the clamp nut and widen the side handle base. Slide the side handle back to the rear groove and secure it with the clamp nut. (Fig. 7) Switch action (Fig. 8) CAUTION: Before plugging in the tool, always check to see that the tool is switched off. To start the tool, push the switch lever on the left side of the tool. To stop the tool, push the switch lever on the right side of the tool. Speed change (Fig. 9) For HM1202C only The blows per minute can be adjusted between 950 and 1,900 BPM just by turning the adjusting dial. This can be done even while the tool is running. The dial is marked 1 (lowest speed) to 6 (full speed). Refer to the table below for the relationship between the number settings on the adjusting dial and the blows per minute. Number on adjusting dial Blows per minute 6 1, , , , , Chipping / Scaling / Demolition (Fig. 10) Hold the tool firmly with both hands. Turn the tool on and apply slight pressure on the tool so that the tool will not bounce around, uncontrolled. Pressing very hard on the tool will not increase the efficiency. Indicator lamp (Fig. 11) For HM1202C only The green power-on indicator lamp lights up when the tool is switched ON. If the indicator lamp is lit but the tool does not start, the carbon brushes may be worn out, or the electric circuit or the motor may be defective. If the indicator lamp does not light up and the tool does not start, the ON/OFF switch or the mains cord may be defective. The red service indicator lamp lights up when the carbon brushes are nearly worn out to indicate that the tool needs servicing. After approx. 8 hours of use, the motor will automatically be shut off. MAINTENANCE CAUTION: Always be sure that the tool is switched off and unplugged before carrying out any work on the tool. Replacement of carbon brushes (Fig. 12 & 13) Whenever carbon brushes must be replaced, they cut out the tool automatically. When this occurs, loosen the screws which secure the rear cover. Pry up the rear cover with a screwdriver and remove it. Then replace both carbon brushes at the same time. Use only identical carbon brushes. Lubrication This tool requires no hourly or daily lubrication because it has a grease-packed lubrication system. Lubricate the tool every time the carbon brushes are replaced. Run the tool for several minutes to warm it up. Switch off and unplug the tool. Loosen the six screws and remove the handle. (Fig. 14) Remove the crank cap using a socket wrench. (Fig. 15) Rest the tool on the table with the bit end pointing upwards. This will allow the old grease to collect inside the crank housing. Wipe out the old grease inside and replace with a fresh grease (30 g). Use only Makita genuine hammer grease (optional accessory). Filling with more than the specified amount of grease (approx. 30 g) can cause faulty hammering action or tool failure. Fill only with the specified amount of grease. Reinstall the crank cap and tighten with the socket wrench. (Fig. 16) CAUTION: Be careful not to damage the terminals or lead wires especially when wiping out the old grease or installing the handle. Do not tighten the crank cap excessively. It is made of resin and is subject to breakage. To maintain product safety and reliability, repairs, maintenance or adjustment should be carried out by a Makita Authorized Service Center. 7
 The side handle can be swung 360 on the vertical and secured at any desired position. It also secures at eight different positions back and forth on the horizontal.")
8 ACCESSORIES CAUTION: These accessories or attachments are recommended for use with your Makita tool specified in this manual. The use of any other accessories or attachments might present a risk of injury to persons. Only use accessory or attachment for its stated purpose. If you need any assistance for more details regarding these accessories, ask your local Makita service center. SDS-MAX bull point SDS-MAX cold chisel SDS-MAX scaling chisel SDS-MAX tile chisel SDS-MAX clay spade Bit grease (100 g) Hammer grease (30 g) Plastic carrying case Safety goggles 8

9 NEDERLANDS 1 Boorvet 2 Beitelschacht 3 Kap van gereedschapshouder 4 Beitel 5 Verstelring 6 Zijhandgreep (hulphandgreep) 7 Kan 360 vertikaal worden versteld en in elke gewenste positie worden vastgezet 8 Kan in acht verschillende posities voorwaarts en achterwaarts in horizontale richting worden vastgezet Verklaring van algemene gegevens 9 Klemmoer 10 Losdraaien 11 Vastdraaien 12 Voet van zijhandgreep 13 Schakelhendel 14 AAN 15 UIT 16 Regelknop 17 Spanning-INGESCHAKELD controlelampje (groen) 18 Slijtage-contolelampje (rood) 19 Schroevendraaier 20 Achterdeksel 21 Schroeven 22 Koolborsteldop 23 Schroeven 24 Handgreep 25 Dopsleutel 26 Carterdeksel 27 Hamersmeervet TECHNISCHE GEGEVENS Model HM1202 HM1202C Slagen per minuut Totale lengte mm 578 mm Netto gewicht... 9,3 kg 9,3 kg In verband met ononderbroken research en ontwikkeling behouden wij ons het recht voor bovenstaande technische gegevens te wijzigen zonder voorafgaande kennisgeving. Opmerking: De technische gegevens kunnen van land tot land verschillen. Stroomvoorziening De machine mag alleen worden aangesloten op een stroombron van hetzelfde voltage als aangegeven op de naamplaat, en kan alleen op enkel-fase wisselstroom worden gebruikt. De machine is dubbel-geïsoleerd volgens de Europese standaard en kan derhalve ook op een niet-geaard stopkontakt worden aangesloten. Voor openbare laagspanningsverdeelsystemen van tussen 220 V en 250 V Schakelbedieningen van elektrische toestellen veroorzaken spanningsschommelingen. De bediening van dit gereedschap onder ongunstige lichtnetomstandigheden kan een nadelige invloed hebben op de bediening van andere apparatuur. Het kan worden aangenomen dat er geen negatieve effecten zullen zijn wanneer de netimpedantie gelijk is aan of minder is dan 0,46 Ohm. Het stopcontact dat voor dit gereedschap wordt gebruikt, moet beveiligd zijn door een zekering of een stroomonderbreker met trage afschakelkarakteristieken. Veiligheidswenken Voor uw veiligheid dient u de bijgevoegde Veiligheidsvoorschriften nauwkeurig op te volgen. AANVULLENDE VEILIGHEIDSVOORSCHRIFTEN 1. Houd het gereedschap bij de geïsoleerde greep vast wanneer u slijpt op plaatsen waar het gereedschap met verborgen elektrische bedrading of zijn eigen netsnoer in aanraking kan komen. Door contact met een onder spanning staande draad zullen ook de niet-geïsoleerde metalen delen van het gereedschap onder spanning komen te staan, zodat de gebruiker een elektrische schok kan krijgen. 2. Draag oorbeschermers wanneer u het gereedschap voor langere tijd doorlopend gebruikt. Langdurige blootstelling aan sterk lawaai kan gehoorverlies veroorzaken. 3. Draag een hard hoofddeksel (veiligheidshelm), een veiligheidsbril en/of gezichtsbescherming. Het is ook zeer aan te bevelen een stofmasker en dikke handschoenen te dragen. 4. Controleer of de boor goed vastgezet is alvorens met uw werk te beginnen. 5. Tijdens normale bediening brengt dit gereedschap trillingen voort. De schroeven kunnen daarom gemakkelijk loskomen, met een defect of ongeluk als mogelijk gevolg. 6. Laat het gereedschap enkele minuten onbelast warmdraaien wanneer het koud weer is of wanneer het gereedschap langere tijd niet werd gebruikt. Hierdoor zal het smeermiddel vloeibaar worden. Hameren is moeilijk indien het gereedschap niet goed warmgedraaid is. 7. Zorg ervoor dat u altijd stevige steun voor de voeten hebt. Controleer of er zich niemand beneden u bevindt wanneer u het gereedschap op een hoge plaats gaat gebruiken. 18

10 8. Houd het gereedschap stevig vast met beide handen. 9. Houd uw handen uit de buurt van draaiende onderdelen. 10. Laat het gereedschap niet achter terwijl het nog in bedrijf is. Bedien het gereedschap alleen wanneer u het met beide handen vasthoudt. 11. Richt het gereedschap tijdens het gebruik niet op personen die zich in de nabije omgeving bevinden. De boor zou kunnen losraken en ernstige verwondingen veroorzaken. 12. Raak de boor of onderdelen in de nabije omgeving van de boor niet aan onmiddellijk na het gebruik. Deze kunnen erg heet zijn en brandwonden veroorzaken. BEWAAR DEZE VOORSCHRIFTEN. BEDIENINGSVOORSCHRIFTEN Installeren of verwijderen van de beitel Belangrijk: Kontroleer altijd of het gereedschap is uitgeschakeld en de stekker uit het stopkontakt is getrokken, alvorens de beitel te installeren of te verwijderen. Reinig de beitelschacht en smeer het bijgeleverde boorvet erop alvorens de beitel te installeren. (Fig. 1) Trek de kap van de gereedschapshouder helemaal naar beneden. (Fig. 2) Steek de beitel in de gereedschapshouder. Draai de beitel en duw deze naar binnen tot hij vergrendelt. (Fig. 3-1) Laat de kap van de gereedschapshouder los. De kap zal automatisch naar haar oorspronkelijke positie terugkeren om de beitel vast te zetten. (Fig. 3-2) Nadat de beitel is geïnstalleerd, dient u te kontroleren of deze goed is vastgezet door te proberen hem eruit te trekken. Om de beitel te verwijderen, de kap van de gereedschapshouder helemaal naar beneden trekken en de beitel eruit trekken. (Fig. 4) Beitelhoek (Fig. 5) De beitel kan in 12 verschillende hoeken worden vastgezet. Om de beitelhoek te veranderen, schuift u de verstelring naar voren en dan draait u de verstelring om de beitelhoek te veranderen. Bij de gewenste hoek schuift u de verstelring naar zijn oorspronkelijke positie terug. De beitel zal op zijn plaats vergrendelen. OPMERKING: Wanneer de beitel niet op het gereedschap is gemonteerd, kan de verstelring niet worden verdraaid. Zijhandgreep (hulphandgreep) De zijhandgreep is 360 vertikaal verstelbaar en kan in elke gewenste positie worden vastgezet. U kunt deze ook in acht verschillende posities horizontaal voorwaarts of achterwaarts vastzetten. Draai gewoon de klemmoer los en zet de zijhandgreep in de gewenste positie. Draai daarna de klemmoer weer stevig vast. (Fig. 6) De zijhandgreep kan ook in de achtergroef worden gemonteerd zoals afgebeeld in Fig. 7. Draai de klemmoer los en verwijd de voet van de zijhandgreep. Schuif de zijhandgreep naar achteren in de achtergroef en zet deze vast met de klemmoer. (Fig. 7) Werking van de schakelaar (Fig. 8) LET OP: Alvorens de stekker van het gereedschap in het stopkontakt te steken, altijd kontroleren of het gereedschap is uitgeschakeld. Om het gereedschap in te schakelen, de schakelhendel op de linkerzijde van het gereedschap indrukken. Om het gereedschap uit te schakelen, de schakelhendel op de rechterzijde van het gereedschap indrukken. Snelheidsregeling (Fig. 9) Alleen voor HM1202C Het aantal slagen per minuut kan worden ingesteld tussen 950 en slagen/minuut door de regelknop te verdraaien. Dit is zelfs mogelijk terwijl het gereedschap is ingeschakeld. De regelknop is voorzien van de cijfers 1 (laagste snelheid) tot en met 6 (topsnelheid). Raadpleeg de onderstaande tabel voor de verhouding tussen de cijferindikaties op de regelknop en het aantal slagen per minuut. Cijfer op regelknop Slagen per minuut Afbikken / Beitelen / Slopen (Fig. 10) Houd het gereedschap met beide handen stevig vast. Schakel het gereedschap vervolgens in en oefen slechts zoveel druk uit dat het gereedschap op dezelfde plaats blijft. Door grote kracht op het gereedschap uit te oefenen, verloopt het werk niet sneller. Controlelampje (Fig. 11) Alleen voor HM1202C Het groene spanning-ingeschakeld controlelampje gaat aan wanneer het gereedschap wordt INGESCHA- KELD. Indien het controlelampje brandt maar het gereedschap niet start, zijn de koolborstels mogelijk versleten of is er een defekt in de elektrische keten of de motor. Indien het controlelampje niet aangaat en het gereedschap niet start, is de AAN/UIT schakelaar of het netsnoer mogelijk defekt. Het rode slijtage-controlelampje gaat aan wanneer de koolborstels bijna versleten zijn, om aan te geven dat het gereedschap een onderhoudsbeurt nodig heeft. Na ongeveer 8 gebruiksuren zal de motor automatisch afslaan. 19

11 ONDERHOUD LET OP: Zorg er altijd voor dat de machine is uitgeschakeld en de stekker uit het stopcontact is verwijderd alvorens onderhoud aan de machine uit te voeren. Vervangen van de koolborstels (Fig. 12 en 13) Wanneer de koolborstels aan vervanging toe zijn, zullen zij het gereedschap automatisch uitschakelen. Draai in zo n geval de borgschroeven van het achterdeksel los. Wrik daarna het achterdeksel met een schroevendraaier omhoog en verwrijder het. Vervang dan beide koolborstels tegelijkertijd. Gebruik uitsluitend identieke koolborstels. Smeren Dit gereedschap hoeft niet om het uur of dagelijks te worden gesmeerd, aangezien het voorzien is van een met vet gevuld smeersysteem. Ververs het smeervet telkens wanneer de koolborstels worden vervangen. Laat het gereedschap enkele minuten lang warm lopen. Schakel het gereedschap vervolgens uit en trek zijn stekker uit het stopcontact. Draai de zes schroeven los en verwijder de handgreep. (Fig. 14) Verwijder de dop van het carterdeksel met een dopsleutel. (Fig. 15) Plaats het gereedschap op een tafel met het beiteleinde naar boven, zodat het oude smeervet in het carter wordt verzameld. Verwijder het oude smeervet en vervang het door vers smeervet (30 g). Gebruik uitsluitend origineel hamersmeervet van Makita (los verkrijgbaar). Indien u meer dan de voorgeschreven hoeveelheid smeervet (ongeveer 30 g) bijvult, kunnen storingen optreden in het hameren of kan het gereedschap defect raken. Vul derhalve uitsluitend bij met de voorgeschreven hoeveelheid smeervet. Breng de carterdop opnieuw aan en draai deze met de dopsleutel vast. (Fig. 16) LET OP: Pas op dat u de aansluitklemmen of de leidingdraden niet beschadigt. Wees vooral voorzichtig tijdens het verwijderen van het oud smeervet en het aanbrengen van de handgreep. Draai de carterdeksel niet te vast aan. Deze is gemaakt van hars en is derhalve breekbaar. Opdat de machine veilig en betrouwbaar blijft, dienen alle reparaties, onderhoud of afstellingen te worden uitgevoerd bij een erkend Makita service centrum. ACCESSOIRES LET OP: Deze accessoires of hulpstukken worden aanbevolen voor gebruik met het Makita gereedschap dat in deze gebruiksaanwijzing wordt beschreven. Het gebruik van andere accessoires of hulpstukken kan gevaar voor persoonlijke verwonding opleveren. Gebruik de accessoires of hulpstukken uitsluitend voor het gespecificeerde doel. Wenst u meer informatie over deze accessoires, neem dan contact op met het dichtstbijzijnde Makita servicecentrum. SDS-MAX bull point SDS-MAX koudbeitel SDS-MAX bikbeitel SDS-MAX tegelbeitel SDS-MAX kleispade Boorvet (100 g) Hamersmeervet (30 g) Plastic draagtas Veiligheidsbril 20

ÛÙË ËÁ Â Ú Ûˆ HK1800 HK1810
 GB Power Scraper Instruction Manual F Burineur Manuel d Instructions D Kratzer Betriebsanleitung I Scalpellatore Istruzioni d Uso NL Bikhamer Gebruiksaanwijzing E Raspadora Manual de Instrucciones P Hartelo
GB Demolition Hammer Instruction Manual Burineur Manuel d instructions Meißelhammer Betriebsanleitung
 GB Demolition Hammer Instruction Manual F Burineur Manuel d instructions D Meißelhammer Betriebsanleitung I Martello demolitore Istruzioni per l uso NL Breekhamer Gebruiksaanwijzing E Martillo demoledor
BO4553 BO4554 BO4561 BO4563
 GB Finishing Sander Instruction Manual F Ponceuse orbitale Manuel d instructions D Schwingschleifer Betriebsanleitung I Levigatrice orbitale Istruzioni per l uso NL Vlakschuurmachine Gebruiksaanwijzing
HM1200 HM1200B HM1200K HM1200B
 GB Demolition Hammer Instruction Manual F Burineur Manuel d instructions D Meißilhammer Betriebsanleitung I Martello demolitore Istruzioni per l uso NL Breekhamer Gebruiksaanwijzing E Martillo demoledor
Rhythm of Light. Susanne de Graef, Montagehandleiding / Instruction manual
 Rhythm of Light Susanne de Graef, 2016 Montagehandleiding / Instruction manual GELEVERD MATERIAAL / SUPPLIED MATERIAL B. C. D. A. E. F. A. B. C. D. E. F. armatuur / fixture fitting lange staalkabels (3)
GB Electric Breaker Instruction Manual Marteau-piqueur Manuel d instructions Aufbruchhammer Betriebsanleitung
 GB Electric Breaker Instruction Manual F Marteau-piqueur Manuel d instructions D Aufbruchhammer Betriebsanleitung I Demolitore elettrico Istruzioni per l uso NL Electrisch breekhamer Gebruiksaanwijzing
GB Blower Instruction Manual Aspirateur Manuel d instructions Gebläse Betriebsanleitung
 GB Blower Instruction Manual F Aspirateur Manuel d instructions D Gebläse Betriebsanleitung I Soffiatrice-Aspiratore Istruzioni per l uso NL Blazer Gebruiksaanwijzing E Sopladora Aspiradora Manual de instrucciones
Flybye. Ernst Koning, Montagehandleiding / Instruction manual
 Flybye Ernst Koning, 2018 Montagehandleiding / Instruction manual GELEVERD MATERIAAL / MATERIALS SUPPLIED A. B. C. D. E. F. G. A. B. C. D. E. F. G. H. H. lichtbuis / lighting tube plafondkap / ceiling
PIR DC-SWITCH. DC Passive infra-red Detector. Model No. PDS-10 GEBRUIKSAANWIJZING/INSTRUCTION MANUAL
 PIR DC-SWITCH DC Passive infra-red Detector Model No. PDS-10 GEBRUIKSAANWIJZING/INSTRUCTION MANUAL Please read this manual before operating your DETECTOR PIR DC-Switch (PDS-10) De PDS-10 is een beweging
2000 Volkswagen Passat GLS
 REAR DOOR WINDOW Rear door window, assembly overview Fig. 304: Exploded View Of Rear Door Window 1 - Door Removing and installing: --> Rear door, removing and installing 2 - Spring nut Qty 2 3 - Screw
Ûˇ Ú ËÁ Â Ú Ûˆ HR5000 HR5000K
 GB Rotary Hammer Instruction Manual F Perforateur Manuel d instructions D Bohrhammer Betriebsanleitung I Martello rotativo Istruzioni per l uso NL Boor-en breekhamer Gebruiksaanwijzing E Martillo rotativo
GB Blower Instruction Manual Aspirateur Manuel d instructions Gebläse Betriebsanleitung
 GB Blower Instruction Manual F Aspirateur Manuel d instructions D Gebläse Betriebsanleitung I Soffiatrice-Aspiratore Istruzioni per l uso NL Blazer Gebruiksaanwijzing E Sopladora Aspiradora Manual de instrucciones
GB Impact Wrench Instruction Manual Boulonneuse à chocs Manuel d instructions Schlagschrauber Betriebsanleitung
 GB Impact Wrench Instruction Manual F Boulonneuse à chocs Manuel d instructions D Schlagschrauber Betriebsanleitung I Avvitatrici ad Impulso Istruzioni per l uso NL Slagmoersleutel Gebruiksaanwijzing E
OUTDOOR HD BULLET IP CAMERA PRODUCT MANUAL
 OUTDOOR HD BULLET IP CAMERA PRODUCT MANUAL GB - NL GB PARTS & FUNCTIONS 1. 7. ---- 3. ---- 4. ---------- 6. 5. 2. ---- 1. Outdoor IP camera unit 2. Antenna 3. Mounting bracket 4. Network connection 5.
35 mm HR mm HR3850 HR3850
 GB Rotary Hammer Instruction Manual F Perforateur Manuel d instructions D Bohrhammer Betriebsanleitung I Martello rotativo Istruzioni per l uso NL Boor-en breekhamer Gebruiksaanwijzing E Martillo rotativo
HP2050 HP2050F HP2051 HP2051F
 GB 2-Speed Hammer Drill Instruction Manual F Perceuse à percussion à 2 vitesses Manuel d instructions D 2-Gang Schlagbohrmaschine Betriebsanleitung I 2 velocità trapano a percussione Istruzioni per l uso
OUTDOOR HD DOME IP CAMERA PRODUCT MANUAL GB - NL
 OUTDOOR HD DOME IP CAMERA PRODUCT MANUAL GB - NL GB PARTS & FUNCTIONS 2. ---- 1. ---- 3. ---- 7. ---------- 5. 4. 6. 1. Outdoor IP camera unit 2. Antenna 3. Mounting bracket 4. Network connection 5. Power
EU Declaration of Conformity and safety instructions EU Conformiteitsverklaring en veiligheidsinstructies ISC 230B
 EU Declaration of Conformity and safety instructions EU Conformiteitsverklaring en veiligheidsinstructies ISC 230B Explosion safety instructions (Ex) (EN) ISC230B is approved for use outside the explosion-hazardous
Limpid Light. design Esther Jongsma & Sam van Gurp, Montagehandleiding / Assembly Instructions
 Limpid Light design Esther Jongsma & Sam van Gurp, 05 Montagehandleiding / Assembly Instructions GELEVERD MATERIAAL / SUPPLIED MATERIAL A. A. B. B. C. D. E. F. G. G. H. I. J. K. / / ophanging / suspension:
ÂÈ ÓÙ ËÁ Â Ú Ûˆ GD0800C GD0810C
 GB Die Grinder Instruction Manual F Meuleuse droite Manuel d instructions D Geradschleifer Betriebsanleitung I Smerigliatrice diritta Istruzioni per l uso NL Stempelslijpmachine Gebruiksaanwijzing E Amoladora
2006 Volkswagen Jetta TDI
 Door handle and door lock, assembly overview The illustration shows the left side. The right side is derived accordingly from this. Fig. 99: Door Handle And Door Lock, Assembly Overview 1 - Cable For disengaging
Montagehandleiding: doucheset
 Montagehandleiding: doucheset Installation manual: showerset 0 6 5 7 8 9 0 8 9 7 5 6 Controleer voor installatie of alle onderdelen aanwezig zijn. Check if all parts are present before installation. 5
GB Belt Sander Instruction Manual F Ponceuse à Bande Manuel d instructions D Bandschleifer Betriebsanleitung I Levigatrice a Nastro Istruzioni d uso
 GB Belt Sander Instruction Manual F Ponceuse à Bande Manuel d instructions D Bandschleifer Betriebsanleitung I Levigatrice a Nastro Istruzioni d uso NL Bandschuurmachine Gebruiksaanwijzing E Lijadora de
ATD Floor Fan Owner s Manual Features:
 ATD-30320 20 Floor Fan Owner s Manual Features: Made in China to ATD Tools, Inc. Specifications Visit us at www.atdtools.com General Safety Warnings: WARNING: The in and warnings ned in this manual d be
Quick start guide. Powerbank MI Mah. Follow Fast All rights reserved. Page 1
 Quick start guide Powerbank MI 16.000 Mah Follow Fast 2016 - All rights reserved. Page 1 ENGLISH The Mi 16000 Power Bank is a very good backup option for those on the move. It can keep you going for days
Mobile concrete base
 1 14 Mobile concrete base UMBASM8000000000 Mobile concrete base UMBASM8000000000 Congratula ons with your purchase! Please completely read and follow all the instruc ons. pg. 3 Proficiat met uw aankoop!
EU Declaration of Conformity and safety instructions EU Conformiteitsverklaring en veiligheidsinstructies
 EU Declaration of Conformity and safety instructions EU Conformiteitsverklaring en veiligheidsinstructies Battery operated UNICOM 300 N51 UNICOM 300 met batterijvoeding N51 Explosion safety instructions
Function checklist for the ML-350 or XL-350 with a print set. Missing loop.
 Function checklist for the ML-350 or XL-350 with a 260217 print set. Below mentioned check-point should resolve function problems of the lift systems. Missing loop. When a lift is connected to an external
GB Recipro Saw Instruction Manual Scie recipro Manuel d instructions Reciprosäge Betriebsanleitung
 GB Recipro Saw Instruction Manual F Scie recipro Manuel d instructions D Reciprosäge Betriebsanleitung I Seghetto diritto Istruzioni per l uso NL Reciprozaag Gebruiksaanwijzing E Sierra alternativa Manual
ÓÈ ËÁ Â Ú Ûˆ DA3000R DA3000V
 GB Angle drill Instruction Manual F Perceuse d angle Manuel d Instructions D Winkelbohrer Betriebsanleitung I Trapano ad angolo Istruzioni d Uso NL Haakse boormachine Gebruiksaanwijzing E Taladro en angulo
HR2020 HR2020X HR2021 HR2022
 GB Rotary Hammer Instruction Manual F Perforateur Manuel d instructions D Bohrhammer Betriebsanleitung I Martello rotativo Istruzioni per l uso NL Boorhamer Gebruiksaanwijzing E Martillo rotativo Manual
NEDERLANDS. Plaatselijke telefoonnummers voor de klantendienst kunt u vinden op: G-01 rev.
 For the latest User Installation Guide please visit: www.ergotron.com User's Guide - English Guía del usuario - Español Manuel de l utilisateur - Français Gebruikersgids - Deutsch Benutzerhandbuch - Nederlands
L.Net s88sd16-n aansluitingen en programmering.
 De L.Net s88sd16-n wordt via één van de L.Net aansluitingen aangesloten op de LocoNet aansluiting van de centrale, bij een Intellibox of Twin-Center is dat de LocoNet-T aansluiting. L.Net s88sd16-n aansluitingen
NEDERLANDS. Display Instructies. Knoppen. Geeft afwisselend Tijd, Datum en Temperatuur weer, kan ook ingesteld worden op enkel tijd
 NEDERLANDS Het ziet eruit als een simpel blokje hout, maar maak een geluid (knip met je vingers, kuch, klap in je handen, of tip op de bovenkant) en het geeft onmiddelijk en afwisselend tijd, datum en
ANT S KINGDOM Here is some advice for setting up your Master Ant Farm!
 ANT S KINGDOM Master NL EN Instructies Mierenboerderij Master Bedankt voor je bestelling van de Mierenboerderij Master. De beste keus! Installatie NL Naast de informatie die te lezen is in ons boekje
GB Cordless Recipro Saw Instruction Manual Scie recipro sans fil Manuel d instructions Akku-Reciprosäge Betriebsanleitung
 GB Cordless Recipro Saw Instruction Manual F Scie recipro sans fil Manuel d instructions D Akku-Reciprosäge Betriebsanleitung I Seghetto diritto a batteria Istruzioni per l uso NL Snoerloze reciprozaag
Dustless Cutter Instruction Manual Scie Diamanté Manuel d Instructions Diamantschneider Betriebsanleitung
 GB Dustless Cutter Instruction Manual F Scie Diamanté Manuel d Instructions D Diamantschneider Betriebsanleitung I Troncatrice con Aspirapolvere Istruzioni d Uso NL Diamant zaag droog Gebruiksaanwijzing
DA3010/DA3010F DA3011/DA3011F
 GB Angle Drill Instruction Manual F Perceuse d'angle Manuel d instructions D Winkelbohrmaschine Betriebsanleitung I Trapano angolare Istruzioni per l uso NL Haakse boor Gebruiksaanwijzing E Taladro angular
Group work to study a new subject.
 CONTEXT SUBJECT AGE LEVEL AND COUNTRY FEATURE OF GROUP STUDENTS NUMBER MATERIALS AND TOOLS KIND OF GAME DURATION Order of operations 12 13 years 1 ste year of secundary school (technical class) Belgium
DP3002 DP4000 DP4002 DP3003 DP4001 DP4003
 GB Drill Instruction Manual F Perceuse Manuel d instructions D Bohrmaschine Betriebsanleitung I Trapano Istruzioni per l uso NL Boormachine Gebruiksaanwijzing E Taladro Manual de instrucciones P Berbequim
GB Angle Grinder Instruction Manual Meuleuse d angle Manuel d instructions Winkelschleifer Betriebsanleitung
 GB Angle Grinder Instruction Manual F Meuleuse d angle Manuel d instructions D Winkelschleifer Betriebsanleitung I Smerigliatrice angolare Istruzioni per l uso NL Haakse slijpmachine Gebruiksaanwijzing
FSW-VW-2X2 FSW-VW. Handleiding / Manual
 FSW-VW-2X2 FSW-VW Handleiding / Manual Rev. 1.0 17-03-2014 I Pakketinhoud / Content Accessoires Benodigde gereedschappen / Required Tools Montage / Assembling Onderhoud / Maintenance Veel Gestelde Vragen
GB Blower Instruction Manual F Souffleur Manuel d instructions D Gebläse Betriebsanleitung
 GB Blower Instruction Manual F Souffleur Manuel d instructions D Gebläse Betriebsanleitung I Soffiatore Istruzioni per l uso NL Luchtblazer Gebruiksaanwijzing E Sopladora Manual de instrucciones P Soprador
EM7680 Firmware Update by Micro SD card
 EM7680 Firmware Update by Micro SD card 2 NEDERLANDS/ENGLISH EM7680 Firmware update by Micro SD card Table of contents 1.0 (NL) Introductie... 2 2.0 (NL) Firmware installeren... 2 3.0 (NL) Opmerking...
Alistair LED stairwell luminaire Handleiding Alistair (Emergency UC03 sensor)
") Alistair LED stairwell luminaire Handleiding Alistair (Emergency UC03 sensor) Let op: Als het flexibele draad van dit licht beschadigd is, dient het te worden vervangen door iemand van de technische service,
Alistair LED stairwell luminaire Handleiding Alistair (Emergency UC03 sensor) Let op: Als het flexibele draad van dit licht beschadigd is, dient het te worden vervangen door iemand van de technische service,
E Atornillador autoalimentado Manual de instrucciones
 GB Auto Feed Screwdriver Instruction Manual F Visseuse à recharge automatique Manuel d instructions D Magazin-Schnellbauschrauber Betriebsanleitung I Avvitatore ad auto-alimentazione Istruzioni per l uso
HANDLEIDING - ACTIEVE MOTORKRAAN
 M A N U A L HANDLEIDING - ACTIEVE MOTORKRAAN MANUAL - ACTIVE MOTOR VALVE Model E710877 E710878 E710856 E710972 E710973 www.tasseron.nl Inhoud / Content NEDERLANDS Hoofdstuk Pagina NL 1 ALGEMEEN 2 NL 1.1
BO4900V BO4900 BO4901
 GB Finishing Sander Instruction Manual F Ponceuse orbitale Manuel d instructions D Schwingschleifer Betriebsanleitung I Levigatrice orbitale Istruzioni per l uso NL Vlakschuurmachine Gebruiksaanwijzing
Professional GEBRUIKSAANWIJZING FRITEUSE USER INSTRUCTIONS DEEP FRYER GEBRAUCHSANWEISUNG FRITEUSE MODE D EMPLOI FRITEUSE
 Professional GEBRUIKSAANWIJZING FRITEUSE USER INSTRUCTIONS DEEP FRYER GEBRAUCHSANWEISUNG FRITEUSE MODE D EMPLOI FRITEUSE Alvorens de apparatuur in gebruik te nemen dient u deze gebruiksaanwijzing aandachtig
Settings for the C100BRS4 MAC Address Spoofing with cable Internet.
 Settings for the C100BRS4 MAC Address Spoofing with cable Internet. General: Please use the latest firmware for the router. The firmware is available on http://www.conceptronic.net! Use Firmware version
Shipment Centre EU Quick Print Client handleiding [NL]
![Shipment Centre EU Quick Print Client handleiding [NL]](/thumbs/78/76906513.jpg "Shipment Centre EU Quick Print Client handleiding [NL]") Shipment Centre EU Quick Print Client handleiding [NL] Please scroll down for English. Met de Quick Print Client kunt u printers in Shipment Centre EU configureren. De Quick Print Client kan alleen op
Shipment Centre EU Quick Print Client handleiding [NL] Please scroll down for English. Met de Quick Print Client kunt u printers in Shipment Centre EU configureren. De Quick Print Client kan alleen op
SAMPLE 11 = + 11 = + + Exploring Combinations of Ten + + = = + + = + = = + = = 11. Step Up. Step Ahead
 7.1 Exploring Combinations of Ten Look at these cubes. 2. Color some of the cubes to make three parts. Then write a matching sentence. 10 What addition sentence matches the picture? How else could you
Procedure Reset tv-toestellen:
 Procedure Reset tv-toestellen: Volgende procedure is te volgen wanneer er een tv-toestel, op een van de kamers niet meer werkt. TV Re-installation Factory Default Her-installeren van de TV Fabrieksinstellingen
256 kb Memory in NMS 8250, 8255 and 8280
 256 kb Memory in NMS 8250, 8255 and 8280 Supplied by Bastiaan Huber, 2001 Converted to PDF by HansO, 2001 Dutch text follows the english text! MEMORY-UPGRADE to 256Kb This description is only for people
EM7580 Firmware Update by Micro SD card
 EM7580 Firmware Update by Micro SD card 2 NEDERLANDS/ENGLISH EM7580 Firmware update by Micro SD card Table of contents 1.0 (NL) Introductie... 3 2.0 (NL) Firmware installeren... 3 3.0 (NL) Opmerking...
L.Net s88sd16-n aansluitingen en programmering.
 De L.Net s88sd16-n wordt via één van de L.Net aansluitingen aangesloten op de LocoNet aansluiting van de centrale, bij een Intellibox of Twin-Center is dat de LocoNet-T aansluiting. L.Net s88sd16-n aansluitingen
100 mm mm mm 9542
 GB Angle grinder Instruction manual F Meuleuse d angle Manuel d instructions D Winkelschleifer Betriebsanleitung I Smerigliatrice angolare Istruzioni per l uso NL Haakse slijpmachine Gebruiksaanwijzing
Mounting ceiling & wall
 5 / profile 34 bending radius R 15*) (1015) R 20 (1015) R 30 (1015) R>80 (1018) filler position profile 26 bending radius filler position R 15*) (1015) R 25 (1015) R>100 (1018) 28 15 405 gr/m 522 gr/m
MyDHL+ Van Non-Corporate naar Corporate
 MyDHL+ Van Non-Corporate naar Corporate Van Non-Corporate naar Corporate In MyDHL+ is het mogelijk om meerdere gebruikers aan uw set-up toe te voegen. Wanneer er bijvoorbeeld meerdere collega s van dezelfde
GB Random Orbit Sander Instruction Manual Ponceuse orbitale à disque Manuel d instructions Exzenterschleifer Betriebsanleitung
 GB Random Orbit Sander Instruction Manual F Ponceuse orbitale à disque Manuel d instructions D Exzenterschleifer Betriebsanleitung I Levigatrice rotorbitale Istruzioni per l uso NL Excenter schuurmachine
GB Belt Sander Instruction Manual F Ponceuse à bande Manuel d instructions D Bandschleifer Betriebsanleitung I Levigatrice a nastro Istruzioni per l
 GB Belt Sander Instruction Manual F Ponceuse à bande Manuel d instructions D Bandschleifer Betriebsanleitung I Levigatrice a nastro Istruzioni per l uso NL Bandschuurmachine Gebruiksaanwijzing E Lijadora
My Inspiration I got my inspiration from a lamp that I already had made 2 years ago. The lamp is the you can see on the right.
 Mijn Inspiratie Ik kreeg het idee om een variant te maken van een lamp die ik al eerder had gemaakt. Bij de lamp die in de onderstaande foto s is afgebeeld kun je het licht dimmen door de lamellen open
Alistair LED stairwell luminaire Handleiding Alistair (UC03 sensor)
") Alistair LED stairwell luminaire Handleiding Alistair (UC03 sensor) Let op: Als het flexibele draad van dit licht beschadigd is, dient het te worden vervangen door iemand van de technische service, of
Alistair LED stairwell luminaire Handleiding Alistair (UC03 sensor) Let op: Als het flexibele draad van dit licht beschadigd is, dient het te worden vervangen door iemand van de technische service, of
Smeertechniek Rotterdam Cairostraat 74 3047 BC Rotterdam Tel.: 010 466 62 55 Fax 010 466 66 55 Internet: www.smeertechniek.
 DEZE KOPPELINGEN WORDEN GEBRUIKT IN OLIE- EN VETSMEERSYSTEMEN IN PLAATS VAN DE SNIJRINGKOPPELINGEN ( SNIJRING & DRUKMOER ) KOPPELEN EN ONTKOPPELEN VAN DE LEIDING KAN HERHAALD WORDEN ZONDER BESCHADIGING
DALISOFT. 33. Configuring DALI ballasts with the TDS20620V2 DALI Tool. Connect the TDS20620V2. Start DALISOFT
 TELETASK Handbook Multiple DoIP Central units DALISOFT 33. Configuring DALI ballasts with the TDS20620V2 DALI Tool Connect the TDS20620V2 If there is a TDS13620 connected to the DALI-bus, remove it first.
Vertaling Engels Gedicht / songteksten
 Vertaling Engels Gedicht / songteksten Vertaling door een scholier 1460 woorden 23 januari 2002 5,4 399 keer beoordeeld Vak Engels Songtekst 1 Another day in paradise Artiest: Brandy & Ray J She calls
MONTAGE INSTRUCTIE ASSEMBLY INSTRUCTION
 MONTAGE INSTRUCTIE ASSEMBLY INSTRUCTION - 1. Waterpas stellen. De groef aan de zijkant van de beschermdeksel moet gelijk staan met de deellijn van het inbouw box. 2. Zet de inbouw box vast in de muur.
GV7000 GV7000C. Instruction Manual. Manuel d instructions. Betriebsanleitung. Istruzioni per l uso. Gebruiksaanwijzing. Manual de instrucciones
 GB F D I NL E P DK S N SF GR Disc Sander Electronic Disc Sander Ponceuse à disc Ponceuse à disc èlectronique Tellerschleifer Elecktronik-tellerschleifer Levigatrice a disco Levigatrice a disco elettronica
Handleiding Manual. Model: CP-TWK14. Te gebruiken in combinatie met de WAHOO Kickr To use in combination with the following trainer WAHOO Kickr.
 Handleiding Manual Model: CP-TWK14 Te gebruiken in combinatie met de WAHOO Kickr To use in combination with the following trainer WAHOO Kickr Benodigd gereedschap Tools required 5 mm De informatie en gegevens
Alistair LED stairwell luminaire Handleiding Alistair (UC03 sensor)
") Alistair LED stairwell luminaire Handleiding Alistair (UC03 sensor) Let op: Als het flexibele draad van dit licht beschadigd is, dient het te worden vervangen door iemand van de technische service, of
Alistair LED stairwell luminaire Handleiding Alistair (UC03 sensor) Let op: Als het flexibele draad van dit licht beschadigd is, dient het te worden vervangen door iemand van de technische service, of
Voorbeelden van machtigingsformulieren Nederlands Engels. Examples of authorisation forms (mandates) Dutch English. Juli 2012 Versie 2.
 Dutch English. Juli 2012 Versie 2.") Voorbeelden van machtigingsformulieren Nederlands Engels Examples of authorisation forms (mandates) Dutch English Voorbeelden machtigingsformulieren standaard Europese incasso Examples of authorisation
Voorbeelden van machtigingsformulieren Nederlands Engels Examples of authorisation forms (mandates) Dutch English Voorbeelden machtigingsformulieren standaard Europese incasso Examples of authorisation
GB Cordless Impact Driver Instruction Manual Tournevis à chocs sans fil Manuel d instructions Akku-Schlagschrauber Betriebsanleitung
 GB Cordless Impact Driver Instruction Manual F Tournevis à chocs sans fil Manuel d instructions D Akku-Schlagschrauber Betriebsanleitung I Avvitatrice ad impulso a batteria Istruzioni per l uso NL Snoerloze
8+ 60 MIN Alleen te spelen in combinatie met het RIFUGIO basisspel. Only to be played in combination with the RIFUGIO basicgame.
 8+ 60 MIN. 2-5 Alleen te spelen in combinatie met het RIFUGIO basisspel. Only to be played in combination with the RIFUGIO basicgame. HELICOPTER SPEL VOORBEREIDING: Doe alles precies hetzelfde als bij
Bijlage 2: Informatie met betrekking tot goede praktijkvoorbeelden in Londen, het Verenigd Koninkrijk en Queensland
 Bijlage 2: Informatie met betrekking tot goede praktijkvoorbeelden in Londen, het Verenigd Koninkrijk en Queensland 1. Londen In Londen kunnen gebruikers van een scootmobiel contact opnemen met een dienst
WWW.EMINENT-ONLINE.COM
 WWW.EMINENT-ONLINE.COM NL HANDLEIDING USERS MANUAL EM1033 HANDLEIDING NL EM1033 TWEE POORTS AUTOMATISCHE KVM SWITCH INHOUDSOPGAVE: PAGINA 1.0 Introductie.... 2 1.1 Functies en kenmerken.... 2 1.2 Inhoud
PANEELRADIATOR - Type PR Handleiding. PANEL RADIATOR - Type PR Manual
 Fax. +31 (0)227-549 150 Website: www.sinusjevi.com PANEELRADIATOR - Type PR Handleiding PANEL RADIATOR - Type PR Manual Page 2 of 8 Page 3 of 8 Technische informatie Spanning: 230 of 400 Volt Vermogen:
1/8 ATLAS Atlas cabinet cabinet 1 7
 TLS cabinet / / / 0 D E F G H / L x Lx x L / x x D E Dx Ex / x x x x x x Fx x Hx Gx Fx Fx Fx Fx G H G H H G 0 0 0 0 0 / L / 0 NL: Deze kast bevat twee gaten aan de achterkant om aan de wand te kunnen bevestigen.
Gebruiksaanwijzing Pagina 14. Koelkast met explosieveilige binnenkuip Voor de inbedrijfstelling de gebruiksaanwijzing lezen 7083 099-00.
 Gebruiksaanwijzing Pagina 14 Koelkast met explosieveilige binnenkuip Voor de inbedrijfstelling de gebruiksaanwijzing lezen NL 7083 099-00 LKexv Changing over door hinges Door hinges should only be changed
IOS and Android APP instruction
 IOS and Android APP instruction - Open de APP Store of Google Play op uw toestel - Open the APP Store or Google Play on your device IOS Android - Download de Eurom Heating APP: - Download the Eurom Heating
!!!! Wild!Peacock!Omslagdoek!! Vertaling!door!Eerlijke!Wol.!! Het!garen!voor!dit!patroon!is!te!verkrijgen!op! Benodigdheden:!!
 WildPeacockOmslagdoek VertalingdoorEerlijkeWol. Hetgarenvoorditpatroonisteverkrijgenopwww.eerlijkewol.nl Benodigdheden: 4strengenWildPeacockRecycledSilkYarn rondbreinaaldnr8(jekuntnatuurlijkookgewonebreinaaldengebruiken,maar
GB Trimmer Instruction Manual Affleureuse Manuel d instructions Einhandfräse Betriebsanleitung
 GB Trimmer Instruction Manual F Affleureuse Manuel d instructions D Einhandfräse Betriebsanleitung I Rifilatore Istruzioni per l uso NL Kantenfrees Gebruiksaanwijzing E Rebordeadora Manual de instrucciones
EM7680 Firmware Update by OTA
 EM7680 Firmware Update by OTA 2 NEDERLANDS/ENGLISH EM7680 Firmware update by OTA Table of contents 1.0 (NL) Introductie... 3 2.0 (NL) Firmware installeren... 3 3.0 (NL) Release notes:... 3 4.0 (NL) Overige
Engels op Niveau A2 Workshops Woordkennis 1
 A2 Workshops Woordkennis 1 A2 Workshops Woordkennis 1 A2 Woordkennis 1 Bestuderen Hoe leer je 2000 woorden? Als je een nieuwe taal wilt spreken en schrijven, heb je vooral veel nieuwe woorden nodig. Je
Andere Dimmers / Other Dimmers. Inhoud / Contents. - Overige Dimmers / Other Dimmers. COMPACT klantenspecificatie / Custom Special 5-1
 Andere Dimmers / Other Dimmers Inhoud / Contents - Overige Dimmers / Other Dimmers 5 mini-spotmat klantenspecificatie / Custom Special 5-2 5-4 5-6 elpo_074 rev. 08/03 5-1 mini mini-spotmat De mini-spotmat
1a. We werken het geval voor het tandenpoetsen uit. De concepten zijn (we gebruiken Engelse termen en afkortingen):
:") Uitwerking Huiswerkopgave Inleiding Modelleren Hoofdstuk 3 1a. We werken het geval voor het tandenpoetsen uit. De concepten zijn (we gebruiken Engelse termen en afkortingen): tube=[cap:{open,close},hand:{l,r,none}]
Uitwerking Huiswerkopgave Inleiding Modelleren Hoofdstuk 3 1a. We werken het geval voor het tandenpoetsen uit. De concepten zijn (we gebruiken Engelse termen en afkortingen): tube=[cap:{open,close},hand:{l,r,none}]
ANGSTSTOORNISSEN EN HYPOCHONDRIE: DIAGNOSTIEK EN BEHANDELING (DUTCH EDITION) FROM BOHN STAFLEU VAN LOGHUM
 FROM BOHN STAFLEU VAN LOGHUM") Read Online and Download Ebook ANGSTSTOORNISSEN EN HYPOCHONDRIE: DIAGNOSTIEK EN BEHANDELING (DUTCH EDITION) FROM BOHN STAFLEU VAN LOGHUM DOWNLOAD EBOOK : ANGSTSTOORNISSEN EN HYPOCHONDRIE: DIAGNOSTIEK STAFLEU
Read Online and Download Ebook ANGSTSTOORNISSEN EN HYPOCHONDRIE: DIAGNOSTIEK EN BEHANDELING (DUTCH EDITION) FROM BOHN STAFLEU VAN LOGHUM DOWNLOAD EBOOK : ANGSTSTOORNISSEN EN HYPOCHONDRIE: DIAGNOSTIEK STAFLEU
2019 SUNEXCHANGE USER GUIDE LAST UPDATED
 2019 SUNEXCHANGE USER GUIDE LAST UPDATED 0 - -19 1 WELCOME TO SUNEX DISTRIBUTOR PORTAL This user manual will cover all the screens and functions of our site. MAIN SCREEN: Welcome message. 2 LOGIN SCREEN:
GB Cordless Screwdriver Instruction Manual Visseuse sans fil Manuel d instructions Akku-Schrauber Betriebsanleitung
 GB Cordless Screwdriver Instruction Manual F Visseuse sans fil Manuel d instructions D Akku-Schrauber Betriebsanleitung I Avvitatrice a batteria Istruzioni per l uso NL Snoerloze schroevendraaier Gebruiksaanwijzing
Meetkunde en Lineaire Algebra
 Hoofdstuk 1 Meetkunde en Lineaire Algebra Vraag 1.1 De samenstelling van rotaties in het vlak is commutatief. Vraag 1.2 De samenstelling van de orthogonale spiegelingen t.o.v. twee gegeven vlakken in de
Meetkunde en Lineaire Algebra
 Hoofdstuk 1 Meetkunde en Lineaire Algebra Vraag 1.1 Het trapoppervlak is een afwikkelbaar oppervlak met oneindig veel singuliere punten. Vraag 1.2 Het schroefoppervlak is een afwikkelbaar oppervlak met
Installatie van Windows 10 op laptops. Windows 10 installation on laptops
 Installatie van Windows 10 op laptops In mei vindt de migratie naar Windows 10 plaats op de laptops. Per dag worden ongeveer 25 laptops gemigreerd. Elke laptop heeft een ISSC-sticker met een laptop-nummer.
Introductie in flowcharts
 Introductie in flowcharts Flow Charts Een flow chart kan gebruikt worden om: Processen definieren en analyseren. Een beeld vormen van een proces voor analyse, discussie of communicatie. Het definieren,
General info on using shopping carts with Ingenico epayments
 Inhoudsopgave 1. Disclaimer 2. What is a PSPID? 3. What is an API user? How is it different from other users? 4. What is an operation code? And should I choose "Authorisation" or "Sale"? 5. What is an
Dagelijkse checklist Daily checklist
 Dagelijkse checklist Daily checklist Sluiting met snelspanner Verstelbare hoofdsteun Verstelbare en aanpasbare riem Verstelbare voetsteunen Verstelbare riemen van de voetsteun Quick release locked Head
Classification of triangles
 Classification of triangles A triangle is a geometrical shape that is formed when 3 non-collinear points are joined. The joining line segments are the sides of the triangle. The angles in between the sides
Pure Bending. A beam satisfying above given requirements are shown below: Why this surface is called neutral will be explained later in the lecture.
 In this section we will derive a formula to analyze a the deformation and stress distribution of a beam under flexural action. Theformulatobederivedinthis section will be used for straight beams with sections
MyDHL+ Uw accountnummer(s) delen
 delen") MyDHL+ Uw accountnummer(s) delen met anderen Uw accountnummer(s) delen met anderen in MyDHL+ In MyDHL+ is het mogelijk om uw accountnummer(s) te delen met anderen om op uw accountnummer een zending te
MyDHL+ Uw accountnummer(s) delen met anderen Uw accountnummer(s) delen met anderen in MyDHL+ In MyDHL+ is het mogelijk om uw accountnummer(s) te delen met anderen om op uw accountnummer een zending te
Firewall van de Speedtouch 789wl volledig uitschakelen?
 Firewall van de Speedtouch 789wl volledig uitschakelen? De firewall van de Speedtouch 789 (wl) kan niet volledig uitgeschakeld worden via de Web interface: De firewall blijft namelijk op stateful staan
Preschool Kindergarten
 Preschool Kindergarten Objectives Students will recognize the values of numerals 1 to 10. Students will use objects to solve addition problems with sums from 1 to 10. Materials Needed Large number cards