AVVERTENZE IMPORTANTI
|
|
|
- Emma Brander
- 8 jaren geleden
- Aantal bezoeken:
Transcriptie
1

2
3 IT AVVERTENZE IMPORTANTI LEGGERE QUESTE ISTRUZIONI PRIMA DELL'USO Usando apparecchi elettrici necessario prendere le opportune precauzioni, tra le quali: 1 Assicurarsi che il voltaggio elettrico dell apparecchio corrisponda a quello della vostra rete elettrica 2 Non lasciare l apparecchio incustodito quando collegato alla rete elettrica; disinserirlo dopo ogni uso 3 Non mettere l apparecchio sopra o vicino a fonti di calore 4 Durante l utilizzo posizionare l apparecchio su di un piano orizzontale, stabile e ben illuminato 5 Non lasciare l apparecchio esposto ad agenti atmosferici (pioggia, sole, ecc) 6 Fare attenzione che il cavo elettrico non venga a contatto con superfici calde 7 Questo apparecchio non adatto all utilizzo da parte di persone (compresi i bambini) con capacita fisiche, sensoriali o mentali ridotte Gli utenti che manchino di esperienza e conoscenza dell apparecchio oppure ai quali non siano state date istruzioni relative all utilizzo dell apparecchio dovranno essere soggette alla supervisione da parte di una persona responsabile della loro sicurezza 8 E necessario vigilare sui bambini per assicurare che non giochino con l apparecchio 9 NON IMMERGERE MAI IL CORPO DEL PRODOTTO, LA SPINA ED IL CAVO ELETTRICO IN ACQUA O ALTRI LIQUIDI, USARE UN PANNO UMIDO PER LA LORO PULIZIA 10 ANCHE QUANDO L APPARECCHIO NON E IN FUNZIONE, STACCARE LA SPINA DALLA PRESA DI CORRENTE ELETTRICA PRIMA DI INSERIRE O TOGLIERE LE SINGOLE PARTI O PRIMA DI ESEGUIRE LA PULIZIA 11 Assicurarsi di avere sempre le mani ben asciutte prima di utilizzare o di regolare gli interruttori posti sull apparecchio o prima di toccare la spina e i collegamenti di alimentazione 12 Mentre l'apparecchio effettua la cottura, non toccare le sue parti in movimento 13 Non accendere mai l'apparecchio senza che la vaschetta sia stata riempita con gli ingredienti 14 Non inserire dentro l'apparecchio carta stagnola o altro materiale metallico in modo da evitare un incendio o un corto circuito 15 Non toccare superfici calde Usare guanti da forno o canovacci per stoviglie ripiegati 16 Lasciare almeno 5 cm intorno alla macchina per il pane per permettere la ventilazione e non coprire per nessun motivo le bocchette per vapore 17 Non introdurre mani o dita nella vaschetta durante il funzionamento dell apparecchio 18 Posizionare il cavo di collegamento in modo che non rimanga sospeso sopra la zona di lavoro, non vi si urti accidentalmente o vi si inciampi 19 Non usare vicino o sotto tende, credenze o qualunque altro oggetto che rischi di essere bruciacchiato o di incendiarsi 20 Non usare la macchina per pane come deposito 21 Per mantenere al meglio il contenitore, ogni tanto lavare bene e ungere con olio 22 Per staccare la spina, afferrarla direttamente e staccarla dalla presa a parete Non staccarla mai tirandola per il cavo 23 Non usare l apparecchio se il cavo elettrico o la spina risultano danneggiati, o se l apparecchio stesso risulta difettoso; in questo caso portatelo al pi vicino Centro di Assistenza Autorizzato - 1 -
 6 Fare attenzione che il cavo elettrico non venga a contatto con superfici calde 7 Questo apparecchio non adatto all utilizzo da parte di persone (compresi i bambini) con")
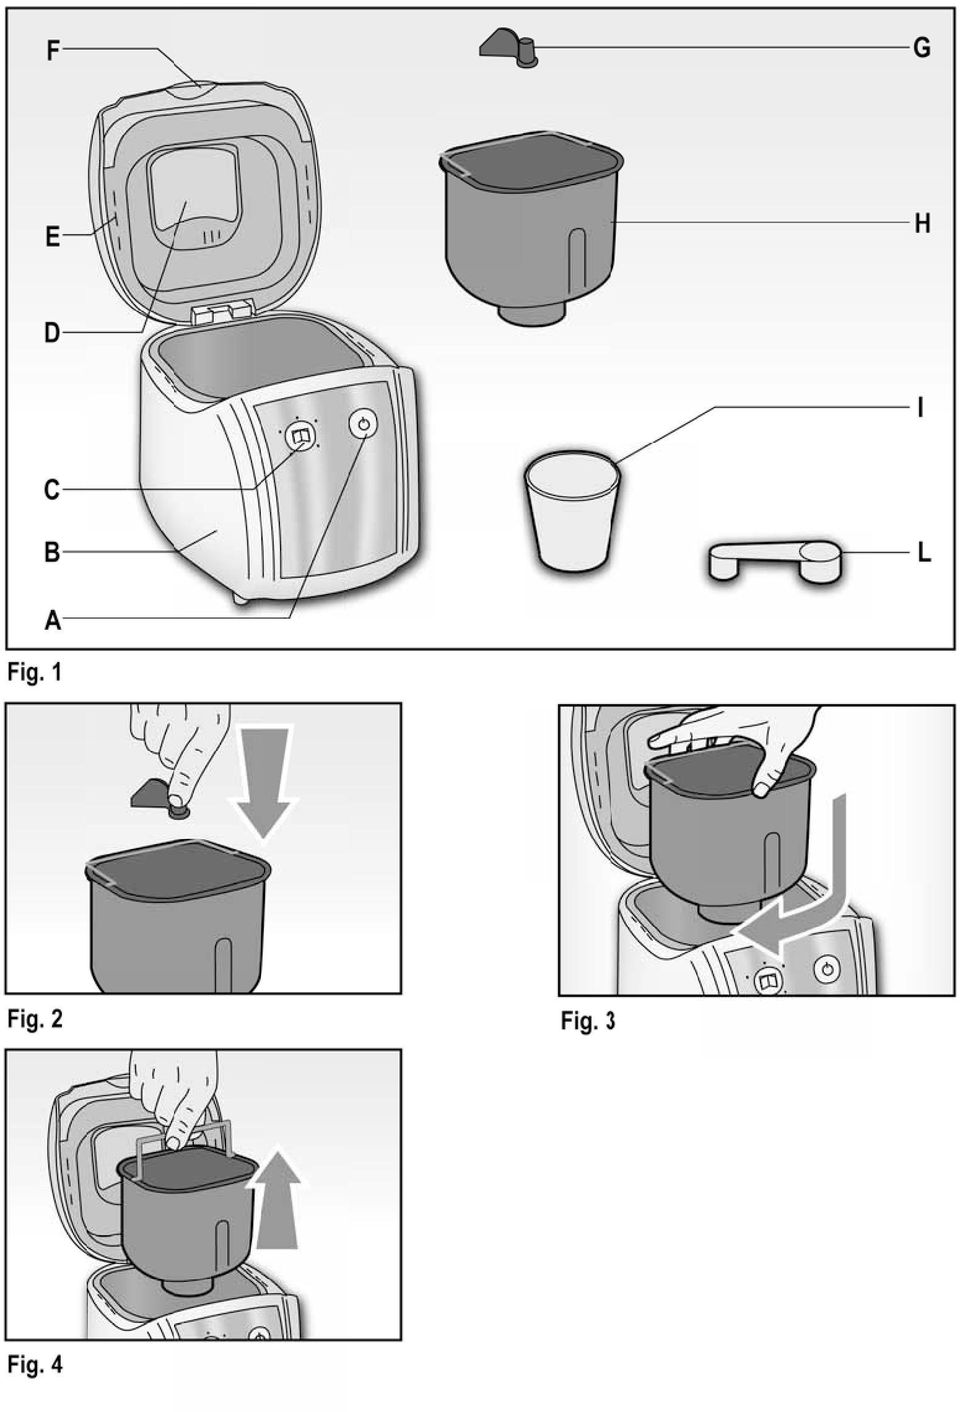
4 IT 24 Se il cavo di alimentazione danneggiato, esso deve essere sostituito dal Costruttore o dal suo servizio assistenza tecnica o comunque da una persona con qualifica similare, in modo da prevenire ogni rischio 25 L apparecchio concepito per il SOLO USO DOMESTICO e non deve essere adibito ad uso commerciale o industriale 26 Questo apparecchio conforme alla direttiva 2006/95/CE e EMC 2004/108/CE 27 Eventuali modifiche a questo prodotto, non espressamente autorizzate dal produttore, possono comportare il decadimento della sicurezza e della garanzia del suo utilizzo da parte dell utente 28 Allorch si decida di smaltire come rifiuto questo apparecchio, si raccomanda di renderlo inoperante tagliandone il cavo di alimentazione Si raccomanda inoltre di rendere innocue quelle parti dell apparecchio suscettibili di costituire un pericolo, specialmente per i bambini che potrebbero servirsi dell apparecchio per i propri giochi 29 Gli elementi dell imballaggio non devono essere lasciati alla portata dei bambini in quanto potenziali fonti di pericolo CONSERVARE QUESTE ISTRUZIONI DESCRIZIONE DELL APPARECCHIO (Fig 1) A Tasto accensione / spegnimento B Corpo dell apparecchio C Tasto selezione programmi D Obl E Bocchette F Coperchio G Pala impastatrice H Vaschetta I Misurino L Cucchiaio dosatore BREVI CENNI SULLE MACCHINE PER PANE La vostra macchina un prodotto per risparmiare fatica Il suo vantaggio principale che tutte le operazioni di impasto, lievitazione e cottura avvengono all interno di uno spazio contenuto La vostra macchina per pane sforner con facilit e frequenza superbe pagnotte, se seguirete le istruzioni ed avrete chiari alcuni principi di base L apparecchiatura non pu pensare al posto vostro Non pu dirvi che avete dimenticato un ingrediente o che ne avete usato un tipo sbagliato o che lo avete misurato in modo non corretto L accurata selezione degli ingredienti la fase pi importante del processo di preparazione del pane - 2 -

5 - 3 - IT ISTRUZIONI PER L'USO ATTENZIONE: ANCHE QUANDO L APPARECCHIO NON E IN FUNZIONE, STACCARE LA SPINA DALLA PRESA DI CORRENTE ELETTRICA PRIMA DI INSERIRE O TOGLIERE LE SINGOLE PARTI O PRIMA DI ESEGUIRE LA PULIZIA NOTA: Al primo utilizzo, pulire tutti i componenti secondo quanto riportato nel paragrafo Pulizia e manutenzione Mettere la macchina in modalit cottura (Prog 5) e farla funzionare a vuoto per circa 10 minuti Dopo che si sar raffreddata, pulirla ancora una volta Asciugare bene tutto e poi rimontare i componenti, adesso la macchina pronta per esser usata - Montare la pala impastatrice (G) sul perno all interno della vaschetta (H) (Fig 2) - Misurare gli ingredienti con il misurino (I) o il cucchiaio (L) in dotazione, oppure pesandoli ed introdurli nella vaschetta (H) - Inserire la vaschetta (H) sull apposito perno all interno dell apparecchio, ruotandola in senso orario per bloccarla (Fig 3) ATTENZIONE: E' fondamentale seguire la sequenza di inserimento degli ingredienti come descritto nella ricetta Questa sequenza in generale : ingredienti liquidi, uova, sale, latte in polvere, farina e infine il lievito E fondamentale che il lievito non venga mai in contatto con il sale Dopo che la farina stata impastata per un po il "bip" pu ricordare di inserire gli ingredienti alla frutta Se, invece, si inseriscono gli ingredienti alla frutta troppo presto, dopo lunga mescolatura si frantumeranno - Chiudere il coperchio (F) ed inserire la spina nella presa di corrente Non appena si collega la macchina all elettricit si sente un "bip" e si accende la spia che indica che il programma "Base" acceso Si tratta del programma di default - Scegliere il programma di cottura desiderato premendo in sequenza il tasto selezioni programmi (C); la relativa spia del programma selezionato si accender - Avviare il processo di cottura premendo il tasto di accensione/spegnimento (A) una volta; si sentir un breve "bip" ed il programma si avvier In questo momento tutti gli altri pulsanti sono disattivati eccetto il tasto (A) Per arrestare il programma premere il tasto di accensione/spegnimento (A) per circa 3 secondi finch si sente un "bip" di conferma Si tratta di una caratteristica che contribuisce ad impedire le interruzioni non richieste per le quali sarebbe necessario riavviare il programma Tasto selezione programmi Si usa per impostare i diversi programmi Ogni volta che lo si preme (e si sente un breve "bip") il programma cambia Se si preme il pulsante in modo non continuo allora compaiono in sequenza tutti e 5 i menu e si accender il led sotto il coperchio (F) Selezionare, dunque, il programma desiderato Ecco le funzioni dei 5 menu: 1 Base: impasto, lievitazione e cottura di pane comune 2 Integrale: impasto, lievitazione e cottura di pane integrale Questo programma ha un tempo di preriscaldamento pi lungo per consentire ai grani della farina di riempirsi d acqua e quindi espandersi 3 Veloce: impasto, lievitazione e cottura in tempi ridotti Il pane di questo tipo in genere pi piccolo e con un impasto pi denso
 sul perno all interno della vaschetta (H) (Fig 2) - Misurare gli ingredienti con il misurino (I) o il cucchiaio (L) in dotazione, oppure pesandoli ed introdurli nella vaschetta (H) -")
6 IT 4 Impasto: impasto, lievitazione ma senza cottura Rimuovere l impasto e utilizzarlo per farne panini, pizza, pane al vapore ecc 5 Cottura: solo cottura al forno senza impasto n lievitazione Usato anche per aumentare il tempo di cottura per ogni programma selezionato e per la preparazione di marmellate Nota: Tempo di funzionamento per ogni programma: 1 Base 3:00 2 Integrale 3:40 3 Veloce 1:38 4 Impasto 1:30 5 Cottura 0:30 Mantenimento in caldo Dopo che stato cotto, il pane pu esser tenuto al caldo per 60 minuti Durante questa funzione i 4 led sotto il tasto di accensione/spegnimento (A) lampeggiano Per estrarre il pane, spegnere il programma con il tasto (A) Interruzione di corrente Se l interruzione di corrente dura meno di 8 minuti, il programma continuer appena la corrente sar ripristinata Il tempo del programma sar prolungato di un intervallo pari alla durata dell interruzione Se quest ultima dura pi di 8 minuti, il programma si arrester Nel caso che questo accada, scollegare l apparecchio, lasciarlo raffreddare, svuotare la vaschetta, togliere gli ingredienti, pulire e avviare nuovamente ATTENZIONE: Fare attenzione a non graffiare le superfici antiaderenti della vaschetta (H) e della pala impastatrice (G) Temperatura ambiente La macchina funziona bene alle diverse temperature ma c una differenza nelle dimensioni del pane a seconda che l ambiente sia molto caldo o molto freddo Raccomandiamo una temperatura tra i 15 e i 34 C Indicazioni d'allarme Quando i 5 led sotto il tasto selezioni programmi (C) lampeggiano mentre si sente il cicalino fare "bip", significa che la temperatura all interno troppo elevata Aprire il coperchio (F) e lasciar raffreddare la macchina per minuti COME FARE IL PANE - Mettere gli ingredienti dentro la vaschetta (H), attenendosi all ordine espresso nella ricetta In caso l impasto contenga segale o frumento integrale suggeriamo di invertire l ordine degli ingredienti: ovvero mettere prima gli ingredienti secchi lievito e farina e poi i liquidi in modo da impastare meglio Nota: le quantit massime di farina e di lievito devono essere quelle della ricetta - Fare un buco con le dita sulla cima della farina, mettervi dentro il lievito facendo attenzione che non venga in contatto con i liquidi o con il sale - 4 -
 Interruzione di corrente Se l interruzione di corrente dura meno di 8 minuti, il programma continuer appena la corrente sar")
7 - 5 - IT - Chiudere il coperchio (F) delicatamente e inserire la spina nella presa - Premere il tasto selezione programmi (C) per scegliere il programma che si desidera - Premere il tasto di accensione/spegnimento (A) per avviare - Per il programma "Base" si sentir un lungo "bip" Serve a ricordare di inserire gli ingredienti Aprire il coperchio e inserire i vostri ingredienti ATTENZIONE: Durante la cottura possibile che dalla ventola sotto il coperchio (F) fuoriesca del vapore: ci perfettamente normale - Quando la macchina finisce il suo processo si sentono 10 bip Premere il tasto di accensione/ spegnimento (A) per circa 3-5 secondi Aprire il coperchio (F) e, avendo indossato dei guanti da forno, afferrare bene il manico della vaschetta (H) ruotandola in senso antiorario per sbloccarla ed estrarla fuori ben dritta (Fig 4) - Lasciare raffreddare prima di prendere il pane e poi, utilizzando una spatola antiaderente tirare fuori il pane dalla vaschetta cominciando dai lati Se necessario, rovesciare la vaschetta su di una griglia raffreddante oppure su di una superficie pulita e scuoterla delicatamente finch il pane non fuoriesce ATTENZIONE: Non utilizzare mai utensili di metallo per prelevare il pane dalla vaschetta (H), in modo da non rovinare il rivestimento antiaderente - Togliere il pane delicatamente e lasciarlo raffreddare per circa 20 minuti prima di tagliarlo - Quando il processo finito e non stato premuto il tasto di accensione/spegnimento (A) il pane si manterr comunque caldo per 1 ora e poi la macchina si spegner - A cottura ultimata, spegnere l'apparecchio e staccare la spina dalla presa di corrente, attendere che i componenti si siano raffreddati e procedere con la pulizia INGREDIENTI FARINA Il tipo di farina che si usa molto importante L elemento pi importante contenuto nella farina la proteina chiamata glutine, che l agente naturale che conferisce all impasto la capacit di modellarsi e di trattenere il biossido di carbonio prodotto dal lievito Comprate farina sulla cui confezione sia scritto TIPO 0 o PER PANE (tipo manitoba), quest ultima ha un alto contenuto di glutine ALTRE FARINE PER PANE Esse includono farina integrale e farine di altri cereali Esse forniscono un eccellente apporto di fibra dietetica ma contengono livelli pi bassi di glutine rispetto a quelli della farina bianca 0 Ci significa che le pagnotte integrali tendono ad essere pi piccole e pi dense di quelle bianche In termini generali, se nella ricetta sostituite farina bianca 0 con met farina integrale, potete preparare un prodotto con un sapore di pane integrale e una consistenza di pane bianco LIEVITO Il lievito un organismo vivente che si moltiplica nell impasto In presenza di umidit, cibo e calore, il lievito crescer e rilascer biossido di carbonio in gas Quest ultimo produce bolle che rimangono intrappolate nell impasto e che lo fanno crescere Tra i vari tipi di lievito disponibili raccomandiamo l uso del lievito di birra secco Questi sono normal-
 per circa 3-5 secondi Aprire il coperchio (F) e, avendo indossato dei guanti da forno, afferrare bene il manico della vaschetta (H) ruotandola in senso antiorario per")
8 IT mente venduti in buste e non devono essere precedentemente sciolti in acqua Potreste anche trovare lievito ad azione rapida o lievito per macchine per pane Questi sono lieviti pi forti che hanno la capacit di fare lievitare l impasto con una velocit superiore del 50% rispetto agli altri Usateli solo con il programma "VELOCE" Il lievito in buste molto sensibile all umidit, quindi non conservate quelli parzialmente usati per pi di un giorno In alternativa, potete utilizzare il lievito di birra fresco in panetti: 1 gr di lievito di birra secco equivale a 3,5 gr di lievito di birra fresco TABELLA EQUIVALENZA LIEVITO DI BIRRA SECCO e FRESCO Secco Fresco 1/4 bustina 2 gr 1 cucchiaino 7 gr 1/2 bustina 4 gr 2 cucchiaini 13 gr 3/4 bustina 6 gr 3 cucchiaini 21 gr 1 bustina 7 gr 3,5 cucchiaini 25 gr 1,5 bustina 10 gr 5 cucchiaini 37 gr 2 bustina 14 gr 7 cucchiaini 50 gr INGREDIENTE LIQUIDO L ingrediente liquido normalmente costituito da acqua o latte o da una miscela dei due L acqua rende la crosta pi croccante Il latte rende quest ultima pi morbida e la consistenza pi soffice Ci sono opinioni contrastanti su quale dovrebbe essere la temperatura dell acqua Potete decidere voi stessi mano a mano che acquistate familiarit con l apparecchio L acqua un altro ingrediente fondamentale per il pane Parlando in generale, una temperatura dell acqua tra i 20 C e i 25 C la pi appropriata Ma nel caso del pane ultra veloce se si vuole accelerare il processo la temperatura deve essere tra i 45 C e i 50 C E fondamentale che l acqua sia di buona qualit e preferibilmente in bottiglia, in quanto il calcare presente nell acqua pu compromettere la buona riuscita del pane Al posto dell acqua si pu mettere anche del latte fresco o acqua con il 2% di latte in polvere, il che favorisce il sapore e migliora il colore della crosta Alcune ricette citano anche il succo di frutta, come: arancia, mela, limone e cos via BASSO CONTENUTO DI GRASSO Non usate olii, margarine etc con una bassa percentuale di grasso Tali prodotti racchiudono pochi grassi, mentre la ricetta ne prevede una quantit maggiore, e si potrebbero non ottenere i risultati desiderati ZUCCHERO Lo zucchero attiva e nutre il lievito permettendogli di gonfiare Aggiunge sapore e consistenza e favorisce la doratura della crosta Miele, sciroppo e melassa possono essere usati al posto dello zucchero, purch adattiate l ingrediente liquido per compensare Non devono essere usati dolcificanti artificiali, poich non nutrono il lievito, al contrario alcuni lo uccidono - 6 -

9 IT SALE Il sale aiuta a controllare la crescita del lievito Senza sale il pane potrebbe gonfiare troppo e poi sgonfiarsi Inoltre d pi sapore UOVA Le uova renderanno il vostro pane pi ricco e nutriente, aggiungeranno colore e aiuteranno la forma e la consistenza Le uova rientrano tra gli ingredienti liquidi del pane, quindi dosate gli altri ingredienti liquidi se aggiungete uova In caso contrario l impasto potrebbe essere troppo liquido per gonfiarsi in modo corretto ERBE E SPEZIE Possono essere aggiunte all inizio insieme agli ingredienti principali Le erbe e le spezie, come la cannella, lo zenzero, l origano, il prezzemolo e il basilico, aggiungeranno gusto e colpiranno maggiormente l occhio Usatene in piccole quantit (1-2 cucchiaini) per evitare che coprano il sapore del pane Le erbe fresche, come l aglio e l erba cipollina, contengono abbastanza liquido da squilibrare i dosaggi della ricetta, quindi bilanciate il contenuto liquido INGREDIENTI AGGIUNTIVI La frutta secca e le noci dovrebbero essere tagliati in piccoli pezzi, il formaggio grattugiato, il cioccolato sminuzzato in piccoli pezzi e non in grumi Non aggiungetene di pi di quelli previsti nelle ricette, altrimenti il pane potrebbe non crescere correttamente Fate attenzione alla frutta fresca e alle noci poich contengono liquidi (succo e olio), quindi dosate l ingrediente liquido principale per compensare E preferibile unire gli ingredienti aggiuntivi quando il dispositivo emette un "bip" CONSERVARE IL PANE Il pane che si trova in commercio contiene solitamente additivi (cloro, calcare, colorante di catrame minerale, sorbitol, soia, ecc) Il vostro pane non conterr nessuno di essi, quindi non si manterr come quello venduto in commercio e avr un aspetto diverso Inoltre, non avr il sapore del pane in commercio, avr il gusto che il pane dovrebbe sempre avere E preferibile mangiarlo fresco, ma lo potete conservare per due giorni a temperatura ambiente, in una busta di polietilene dal cui interno avrete tolto tutta l aria Per surgelare il pane fatto in casa, lasciatelo raffreddare, mettetelo in una busta di polietilene e togliete tutta l aria, quindi sigillate e surgelate - 7 -
 per evitare che coprano il sapore del")
10 IT PULIZIA E MANUTENZIONE ATTENZIONE: NON IMMERGERE MAI IL CORPO DEL PRODOTTO, LA SPINA ED IL CAVO ELETTRICO IN ACQUA O ALTRI LIQUIDI, USARE UN PANNO UMIDO PER LA LORO PULIZIA ATTENZIONE: ANCHE QUANDO L APPARECCHIO NON E IN FUNZIONE, STACCARE LA SPINA DALLA PRESA DI CORRENTE ELETTRICA PRIMA DI INSERIRE O TOGLIERE LE SINGOLE PARTI O PRIMA DI ESEGUIRE LA PULIZIA ATTENZIONE: Lasciare raffreddare l'apparecchio prima di procedere con la pulizia ATTENZIONE: Non usare mai utensili di metallo per rimuovere qualunque cosa dalla vaschetta, poich possono rovinare il rivestimento antiaderente - Pulire la vaschetta (H) strofinando l interno e l esterno con uno straccio inumidito - Se la pala impastatrice (G) non viene via dall albero motore riempire eccezionalmente la vaschetta con acqua calda e lasciarlo cos per circa 30 m La pala poi andr pulita delicatamente con uno panno inumidito - Lavare il misurino (I), il cucchiaio dosatore (L) in acqua calda e sapone - Pulire tutte le altre superfici, interne ed esterne, con un panno inumidito Usare un po di detersivo liquido se necessario, ma assicurarsi di risciacquarlo completamente, altrimenti eventuali residui di detersivo potrebbero compromettere la buona riuscita del vostro prossimo pane RICETTE 1 BASE PANE BIANCO (350 gr) Acqua tiepida 100 ml Zucchero 1/2 cucchiaino Olio Extravergine d oliva 1 cucchiaio Sale 1 cucchiaino Farina gr Lievito di birra secco (*) 1/4 bustina o lievito di birra fresco 8 gr Inserire gli ingredienti ed attendere 10 minuti prima di avviare la macchina Il lievito avr cos il tempo di preattivarsi PANE SENZA GLUTINE (350 gr) Acqua tiepida 215 ml Zucchero 1 cucchiaino Sale 1 cucchiaino Olio extravergine d oliva 1 cucchiaio Mix di farine senza glutine 250 gr Lievito di birra secco (*) consentito 1/2 bustina o lievito di birra fresco 12gr PANE BIANCO (500 gr) Acqua tiepida 150 ml Zucchero 1 cucchiaino Olio Extravergine d oliva 1,5 cucchiai Sale 1,5 cucchiaini Farina gr Lievito di birra secco (*) 1 cucchiaino abbondante o lievito di birra fresco 10 gr Inserire gli ingredienti ed attendere 10 minuti prima di avviare la macchina Il lievito avr cos il tempo di preattivarsi PANE SENZA GLUTINE (500 gr) Acqua tiepida 325 ml Zucchero 1,5 cucchiaini Sale 1,5 cucchiaini Olio Extravergine d oliva 1,5 cucchiai Mix di farine senza glutine 375 gr Lievito di birra secco (*) consentito 3/4 di bustina o lievito di birra fresco 21 gr (*) Vedi tabella di confronto dosi di lievito (secco o fresco) in gr/bustine/cucchiaini alla voce Lievito nel paragrafo INGREDIENTI - 8 -
 strofinando l interno e l esterno con uno straccio inumidito - Se la pala impastatrice (G) non viene via dall albero motore riempire eccezionalmente la")
11 IT oppure: Latte intero tiepido 215 ml Zucchero 1 cucchiaio Sale 1/2 cucchiaino Margarina o burro 20 gr Mix di farine senza glutine 250 gr Lievito di birra secco (*) consentito 1/2 bustina o lievito di birra fresco 12 gr oppure: Latte intero tiepido 325 ml Zucchero 1,5 cucchiaini Sale 1 cucchiaino Margarina o burro 30 gr Mix di farine senza glutine 375 gr Lievito di birra secco (*) consentito 3/4 di bustina o lievito di birra fresco consentito 21 gr Potrete utilizzare questa ricetta base per pane bianco e senza glutine anche per le altre preparazioni (dolci o salate) di questo ricettario, sostituendo le farine ed aumentando la quantit del liquido indicato In maniera approssimativa le proporzioni sono pari peso del mix senza glutine e dei liquidi In alcuni casi pi prove saranno probabilmente necessarie Altri accorgimenti utili sono: Il preriscaldamento degli ingredienti (intiepidite i liquidi, se ci sono uova nell impasto immergetele in acqua tiepida per 15 minuti, togliete dal frigo burro o margarina 15 minuti prima di utilizzarli, etc ) Seguire la fase iniziale dell impasto Controllate che la consistenza della pasta Sar di giusta consistenza quando non ci saranno pi residui di farina ai lati del cestello ed alcuni profondi solchi si formeranno in superficie durante il funzionamento della pala, che dovr girare liberamente e senza sforzo L impasto sar sempre molto umido e tenero e dovr essere molto pi morbido rispetto ad una pasta di farina tradizionale Aggiustare la consistenza dell impasto durante i primi 5-10 minuti di lavoro Aggiungete un cucchiaio alla volta di farina se il composto fosse troppo tenero di liquido se troppo asciutto fino a giusta consistenza Acquistare un nuovo cestello ed una nuova pala da utilizzare per questo esclusivo scopo se l apparecchio serve anche per la produzione di pane con glutine In ogni caso, lavate sempre molto bene ed accuratamente tutto ci che entra in contatto con farina tradizionale (coltelli per affettare, spatole, coperchio e pareti dell apparecchio, etc ) per evitare contaminazioni 2 INTEGRALE PANE INTEGRALE (350 gr) Latte 140 ml Sale 1/2 cucchiaino Burro 12,5 gr Zucchero di canna 1/2 cucchiaino Farina bianca gr Farina integrale 110 gr Lievito di birra secco (*) 1/4 bustina o lievito di birra fresco 10 gr PANE INTEGRALE (500 gr) Latte 210 ml Sale 1 cucchiaino Burro 18 gr Zucchero di canna 1 cucchiaino Farina bianca gr Farina integrale 165 gr Lievito di birra secco 1/2 bustina o lievito di birra fresco 14 gr (*) Vedi tabella di confronto dosi di lievito (secco o fresco) in gr/bustine/cucchiaini alla voce Lievito nel paragrafo INGREDIENTI - 9 -

12 IT 3 VELOCE PANE BIANCO (350 gr) Acqua tiepida 100 ml Zucchero 1 cucchiaino Olio Extravergine d oliva 1 cucchiaio Sale 1/2 cucchiaino Farina gr Lievito di birra secco (*) 1/4 bustina o lievito di birra fresco 10 gr Inserire gli ingredienti ed attendere 10 minuti prima di avviare la macchina Il lievito avr cos il tempo di preattivarsi PANE BIANCO (500 gr) Acqua tiepida 150 ml Zucchero 1,5 cucchiaini Olio Extravergine d oliva 1,5 cucchiai Sale 1 cucchiaino Farina gr Lievito di birra secco (*) 1/2 cucchiaino o lievito di birra fresco 14 gr Inserire gli ingredienti ed attendere 10 minuti prima di avviare la macchina Il lievito avr cos il tempo di preattivarsi 4 IMPASTO PASTA PER PIZZA (350 gr) Acqua 200 ml Sale 1 cucchiaino Olio oliva 3 cucchiai Farina bianca g Lievito birra secco (*) 1 bustina o lievito di birra fresco 25 gr Togliere dall apparecchio e rimpastare Stendere e far riposare per 20 minuti Infornare a 220 per 25 minuti PASTA PER PIZZA (500 gr) Acqua 300 ml Sale 1,5 cucchiaini Olio oliva 4, 5 cucchiai Farina bianca g Lievito birra secco (*) 1,5 bustine o lievito di birra fresco 36 gr Togliere dall apparecchio e rimpastare Stendere e far riposare per 20 minuti Infornare a 220 per 25 minuti (*) Vedi tabella di confronto dosi di lievito (secco o fresco) in gr/bustine/cucchiaini alla voce Lievito nel paragrafo INGREDIENTI
 Acqua 200 ml Sale 1 cucchiaino Olio oliva 3 cucchiai Farina bianca 0 350 g Lievito")
13 IT PASTA PER MUFFINS (350 gr) Latte 125 ml Panna 125 ml Burro 60 gr Sale 1 pizzico Zucchero 175 gr Scorza d arancia grattata Farina bianca g Lievito birra secco (*) 1 bustina o lievito di birra fresco 25 gr Al termine aggiungere mescolando a mano e secondo i propri gusti: gr di mirtilli opp gr di uvetta sultanina ammollata e leggermente infarinata opp gr di gocce di cioccolato opp - 75 gr di scorze di canditi a scelta Distribuire in 12 stampini da muffin e cuocere a 200 per 25 minuti PASTA PER MUFFINS Latte 185 ml Panna 185 ml Burro 90 gr Sale 1 pizzico Zucchero 260 gr Scorza D arancia grattata Farina bianca g Lievito birra secco (*) 1,5 bustine o lievito di birra fresco 36 gr Al termine aggiungere mescolando a mano e secondo i propri gusti: gr di mirtilli opp gr di uvetta sultanina ammollata e leggermente infarinata opp gr di gocce di cioccolato opp gr di scorze di canditi a scelta Distribuire in 18 stampini da muffin e cuocere a 200 per 25 minuti MARMELLATA Frutta tagliata in piccoli pezzi o passata 250 gr Zucchero 250 gr Succo di 1/2 limone Pectina in polvere 20 gr Riunire frutta, pectina, e succo di limone nel cestello ed avviare il programma 4 (impasto) per circa 15 min quando avr incorporato la pectina aggiungete lo zucchero versandolo un po per volta Chiudete il coperchio e portate a termine il ciclo avviando il programma 5 (cottura) per due volte consecutive, cos da ottenere 1h di cottura totale (30 min ciascun ciclo) (*) Vedi tabella di confronto dosi di lievito (secco o fresco) in gr/bustine/cucchiaini alla voce Lievito nel paragrafo INGREDIENTI
 1,5 bustine o lievito di birra fresco 36 gr Al termine aggiungere mescolando a mano e secondo i propri gusti: - 185 gr")
14 EN IMPORTANT SAFEGUARDS READ THESE INSTRUCTIONS BEFORE USE The necessary precautions must be taken when using electrical appliances, and these include the following: 1 Make sure that the voltage on the appliance rating plate corresponds to that of the mains electricity 2 Never leave the appliance unattended when connected to the power supply; unplug it after every use 3 Never place the appliance on or close to sources of heat 4 Always place the appliance on a flat, level surface during use 5 Never leave the appliance exposed to the elements (rain, sun, etc) 6 Make sure that the power cord does not come into contact with hot surfaces 7 This appliance is not intended for use by persons (including children) with reduced physical, sensory or mental capabilities, or lack of experience and knowledge, unless they have been given supervision or instruction concerning use of the appliance by a person responsible for their safety 8 Children should be supervised to ensure that they do not play with the appliance 9 NEVER PLACE THE APPLIANCE BODY, PLUG OR POWER CORD IN WATER OR OTHER LIQUIDS; ALWAYS WIPE CLEAN WITH A DAMP CLOTH 10 ALWAYS UNPLUG THE POWER CORD FROM THE ELECTRICITY MAINS BEFORE FITTING OR REMOVING SINGLE ATTACHMENTS OR BEFORE CLEANING THE APPLIANCE 11 Always make sure that your hands are thoroughly dry before using or adjusting the switches on the appliance, or before touching the power plug or power connections 12 Do not touch the moving parts whilst the appliance is in use 13 Never switch on the appliance without ingredients in the bread pan 14 Do not place aluminium kitchen foil or other metallic materials in the appliance to avoid a fire or a short circuit 15 Do not touch hot surfaces use oven gloves or folded tea towels 16 Leave at least 5 cm (2 inches) around the bread-making machine to allow for ventilation Under no circumstances cover the steam vents 17 Do not place your hands or fingers in the bowl while the appliance is working 18 Arrange the connecting cable so that it is not suspended above the working area and cannot be knocked or tripped over 19 Do not use close to or under curtains, sideboards or any other object where there is a risk of scorching or catching fire 20 Do not use the machine for storing bread 21 To keep the breadpan in optimum condition, wash it well from time to time and wipe over with oil 22 To unplug the appliance, grip the plug and remove it directly from the power socket Never pull the power cord to unplug the appliance 23 Never use the appliance if the power cord or plug are damaged or if the appliance itself is faulty; in this case, take it to your nearest Authorised Assistance Centre 24 To prevent any risks, if the power cord is damaged, it must be replaced by the manufacturer, its Technical Assistance Service or a similarly qualified person
 with reduced physical, sensory or mental capabilities, or lack of")
15 EN 25 This appliance is designed for HOME USE ONLY and may not be used for commercial or industrial purposes 26 This appliance conforms to the 2006/95/EC and EMC 2004/108/EC directives 27 Any changes to this product that have not been expressly authorised by the manufacturer may lead to the user s guarantee being rendered null and void 28 In the event that you decide to dispose of the appliance, we advise you to make it inoperative by cutting off the power cord We also recommend that any parts that could be dangerous be rendered harmless, especially for children, who may play with the appliance or its parts 29 Packaging must never be left within the reach of children since it is potentially dangerous DO NOT THROW AWAY THESE INSTRUCTIONS DESCRIPTION OF THE APPLIANCE (Fig 1) A On/off key B Appliance body C Menu selector key D Window E Steam vents F Lid G Kneading arm H Bowl I Measure L Measuring spoon BRIEF NOTES ON THE BREAD-MAKING MACHINE Your appliance serves to save time and effort Its main advantage lies in the fact that all of the mixing, proving and baking stages take place within a contained space Your bread-making machine will easily and regularly produce superb loaves, if you follow the instructions and keep in mind one basic principle The appliance cannot think for you It cannot tell you that you have forgotten an ingredient or that you have used one of the wrong type or that you have measured something incorrectly Careful selection of ingredients is the most important stage when it comes to preparing bread INSTRUCTIONS FOR USE ATTENTION: EVEN IF THE APPLIANCE IS NOT WORKING, REMOVE THE PLUG FROM THE ELECTRICAL SOCKET BEFORE INSERTING OR REMOVING INDIVIDUAL PARTS OR CLEANING NB Before utilising for the first time, clean all components according to the paragraph Cleaning and maintenance Set the appliance to baking mode (Prog 5) and operate it empty for about 10 minutes After it has cooled, clean it again Dry thoroughly and then refit the parts The appliance is now ready for use
 A")
16 EN - Fit the kneading arm (G) to the shaft inside the bowl (H) (Fig 2) - Measure out the ingredients with the measure (I) or measuring spoon (L) provided or weigh them and then place them in the bowl (H) - Place the bowl (H) over the special shaft inside the appliance, turning it clockwise to lock it in place (Fig 3) ATTENTION: It is fundamental to follow the insertion sequence of the ingredients as described in the recipe Generally, this sequence is: liquid ingredients, eggs, salt, milk powder, flour and finally, yeast It is essential for the yeast not to come into contact with the salt After the flour has been mixing in for a while, the beep may sound to remind you to add fruit ingredients If fruit ingredients are inserted too early, a long mixing process will cause them to break up - Close the lid (F) and insert the plug into the electrical socket As soon as the machine is connected to the electrical circuit, a beep sounds and an LED lights up that indicates that the Basic default programme is switched on - Choose the desired baking programme by pressing the menu selection key (C) in sequence; the relative LED of the selected programme lights up - Start the baking process by pressing the on/off key (A) once; a short beep is heard and the programme starts At that moment, all other keys are deactivated, except key (A) To stop the programme, press the on/off key (A) for approximately 3 seconds until a confirmation beep is heard This is a characteristic that helps to prevent unrequested stoppages that would make it necessary to restart the programme Menu selection key The menu selection key is used for setting the various programmes Each time it is pressed (and a beep is heard) the programme changes If the key is not pressed continuously then all 5 menus appear in sequence and the LED lights up under the lid (F) Select the desired programme at that point The functions of the 5 menus are listed below: 1 Basic: mixing, rising and baking of ordinary bread 2 Whole Wheat: mixing, rising and baking of brown bread This programme has a longer preheating time to allow the grains of the flour to fill with water and therefore expand 3 Quick: mix, proving and baking in shorter time Generally, a loaf made on this setting is smaller and has a less airy consistency 4 Dough: mixing and rising but without baking Remove the mix and utilize it to make rolls, pizzas, steamed bread, etc 5 Bake: baking without mixing or proving This function is also used to increase the baking time for each selected programme as well as for making jams NB Functioning time for each programme: 1 Basic 3:00 2 Whole Wheat 3:40 3 Quick 1:38 4 Dough 1:30 5 Bake 0:

17 EN Keeping the bread hot After the bread has been baked, it can be kept hot for 60 minutes During this function, the 4 LEDs underneath the on/off key (A) flash To extract the bread, press key (A) to switch off the programme Power cut If there is a power cut that lasts less than 8 minutes, the programme will continue as soon as the electricity returns The programme time will be extended for as long as the time of the power cut If the power cut lasts more than 8 minutes, the programme will stop If this happens, disconnect the appliance, let it cool down, empty the bread pan, remove the ingredients, clean and switch on again ATTENTION: Do not scratch the non-stick surfaces of the bread pan (H) and the kneading arm(g) Room temperature The machine functions at various temperatures, but there is a difference in the dimensions of the bread depending on whether the ambience is hot or cold An ambient temperature of between 15 C and 34 C is recommended Alarm indications When the 5 LEDs underneath the menu selector key (C) flash whilst the beeper beeps means that the inside temperature is too high Open the lid (F) and let the machine cool down for minutes HOW TO MAKE BREAD - Put the ingredients into the bowl (H), following the order given in the recipe If the mix contains rye or whole wheat flour, we suggest inverting the order of the ingredients, ie, first add the dry ingredients, yeast and flour and then the liquid ingredients; this makes them easier to mix Note: The maximum quantity of flour and yeast must be the quantities outlined in the recipe - Make a hole in the mound of flour with a finger, put the yeast inside the hole, being careful that the yeast does not come into contact with the liquids or salt - Close the lid (F) gently and insert the plug into the socket - Press the menu selector key (C) to select the desired programme - Press the on/off key (A) to start the machine - A long beep can be heard for the Basic programme Do not forget to open the lid and insert your ingredients ATTENTION: Whilst baking, steam might exit from the vents under the lid (F) This is perfectly normal - When the machine finishes its operation, you will hear 10 beeps Hold down the on/off key (A) for 3-5 seconds Open the lid (F) and, wearing oven gloves, firmly grip the handle of the bowl (H), turning it anticlockwise to release it and take it out the right way (Fig 4) - Let the bread cool down first, and then pull the bread out of the bread pan by its sides by utilising an anti-stick spatula If necessary, turn the bread pan upside down on a cooling grill or on a clean surface and gently shake it until the bread drops out
 and the kneading arm(g) Room temperature The machine functions at various temperatures,")
18 EN ATTENTION: Never use metal utensils to remove the bread from the bread pan (H) to avoid ruining the anti-stick coating of the bread pan - Gently remove the bread and let it cool down for approximately 20 minutes before cutting it - When the process has finished but the on/off key (A) has not been pressed, the bread remains hot for 1 hour and then the machine switches off - When the baking has finished, switch off the appliance and remove the plug from the electrical socket and wait for the components to cool down before proceeding with cleaning INGREDIENTS FLOUR The type of flour used is very important The most important element in the flour is a protein known as gluten, which gives the dough its ability to hold its shape and trap the carbon dioxide produced by the yeast Buy flour marked TYPE 0 or FOR BREAD (manitoba), as these have a higher gluten content OTHER BREAD FLOURS These include whole wheat flour and flours made from other types of grain These provide an excellent source of dietary fibre but contain lower levels of gluten than white type 0 This means that wholemeal loaves tend to be smaller and denser than white ones In general terms, if you replace half the wholemeal flour with white type 00 flour, you can prepare a product with the taste of wholemeal bread but the texture of white bread YEAST Yeast is a living organism which multiplies in the dough Given moisture, food and warmth, the yeast grows and releases carbon dioxide gas This produces bubbles which remain trapped in the dough and make it rise Of the several types of yeast available, we recommend the use of dry brewer s yeast These are usually sold in sachets and do not need to be previously dissolved in water You may also find «fast acting» yeast or «yeast for bread-making machines» These are stronger and can raise the dough 50% faster than the others Only use them for the QUICK programs Powdered yeast is very sensitive to moisture and therefore, do not keep partially used sachets for more than one day Alternatively, you can use fresh brewer s yeast in cubes: 1 gram of dry yeast is equal to 35 grams of fresh brewer s yeast DRY AND FRESH YEAST TABLE OF EQUIVALENTS Dry Fresh 1/4 sachet 2 gr 1 teaspoon 7 gr 1/2 sachet 4 gr 2 teaspoons 13 gr 3/4 sachet 6 gr 3 teaspoons 21 gr 1 sachet 7 gr 3,5 teaspoons 25 gr 1,5 sachets 10 gr 5 teaspoons 37 gr 2 sachets 14 gr 7 teaspoons 50 gr

19 EN THE LIQUID INGREDIENT The liquid ingredient is normally water or milk or a mixture of both Water makes a crisper crust Milk makes the crust softer and the texture more velvety There are differing opinions over what the temperature of the water should be You can decide for yourself as you become familiar with the appliance Water is another fundamental ingredient for bread Normally, the temperature of the water should be between 20 C and 25 C, but in the case of ultra fast bread the temperature must be between 45 C and 50 C if the process has to be accelerated It is extremely important for the water to be of good quality and preferably bottled, since the lime scale in mains water can affect the quality of the finished loaf Fresh milk can be used instead of water, or water with 2% of powdered milk which favours the flavour and improves the colour of the crust Some recipes also mention fruit juice, such as orange, apple, lemon and so on LOW FAT SPREADS Never use oil, margarine, etc with a low fat content These products contain little fat, while the recipe requires a greater amount and the end result may not be satisfactory SUGAR Sugar activates and feeds the yeast, allowing it to grow It adds flavour and consistency as well as aiding the browning of the crust Honey, syrup and treacle can be used instead of sugar, but adjust the quantity of the liquid ingredient to compensate Artificial sweeteners must not be used, because they do not feed the yeast, in fact they can kill it SALT Salt helps to control the growth of the yeast Without salt, the bread can swell too much and then collapse Salt also gives more flavour EGGS Eggs will make your bread richer and more nutritious, add colour and improve the shape and consistency Eggs are included in the liquid ingredients, so adjust the other liquid ingredients if you add eggs, otherwise the dough may be too wet and will not rise satisfactorily HERBS AND SPICES These can be added at the start, together with the main ingredients Herbs and spices such as cinnamon, ginger, oregano, parsley and basil add flavour and improve appearance Use small quantities (1-2 teaspoons) to avoid swamping the flavour of the bread Fresh herbs such as garlic and chives contain enough liquid to upset the balance of the recipe, so adjust the liquid ingredient ADDITIONAL INGREDIENTS Dry fruit and nuts should be cut into small pieces, cheese grated, chocolate should be in small chips, not lumps Do not add more than the recipe indicates, or the bread may not rise correctly Be careful with fresh fruit and nuts as they contain liquid (juice and oil), so adjust the main liquid ingredient Put together the added ingredients when the machine emits a beep

20 EN STORING BREAD Bread found on sale usually contains additives (chlorine, lime, tar colour agent, sorbitol, soya, etc) Your bread contains none of these, so it does not keep as well as bread bought from the shop and has a different appearance Also, it does not have the same flavour as shop-bought bread, it has the taste that bread should always have It is best to eat it fresh, but it can be kept for two days at room temperature, in a polythene bag from which all the air has been removed To freeze home-made bread, allow it to cool, put it in a polythene bag and remove all the air, then seal it and freeze CLEANING ATTENTION: NEVER PLACE THE APPLIANCE BODY, PLUG OR POWER CORD IN WATER OR OTHER LIQUIDS; ALWAYS WIPE CLEAN WITH A DAMP CLOTH ATTENTION: ALWAYS UNPLUG THE POWER CORD FROM THE ELECTRICITY MAINS BEFORE FITTING OR REMOVING SINGLE ATTACHMENTS OR BEFORE CLEANING THE APPLIANCE ATTENTION: Let the appliance cool down before clearing it ATTENTION: Never use metal utensils to remove anything from the bread pan (H) to avoid ruining the anti-stick coating of the bread pan - Clean the bread pan (H) by rubbing the inside and outside with a damp cloth - This is an exceptional circumstance; if the kneading arm (G) does not detach itself from the motor shaft, fill the bread pan with hot water and leave it for approximately 30 minutes The kneading arm can then be pulled out and gently cleaned with a damp cloth - Wash the measure (I) and the measuring spoon (L) with hot water and soap - Wipe all of the other surfaces, inside and out, clean with a damp cloth Use a little liquid detergent if necessary but be sure to rinse thoroughly as detergent residues could spoil the end result of your next loaf

21 EN RECIPES 1 BASIC WHITE BREAD (350 gr) 100 ml lukewarm water 1/2 teaspoon sugar 1 tablespoon extra virgin olive oil 1 teaspoon salt 215 g type 0 flour 1/4 sachet dry brewer s yeast (*) or 8 g fresh brewer s yeast Add all ingredients and wait for 10 minutes before starting up the appliance This gives the yeast time to pre-activate GLUTEN-FREE BREAD (350 g) 215 ml lukewarm water 1 teaspoon sugar 1 teaspoon salt 1 tablespoon extra virgin olive oil 250 g gluten-free flour mix 1/2 sachet dry brewer s yeast (*) or 12 g fresh brewer s yeast or: 215 ml full-cream milk (lukewarm) 1 tablespoon sugar 1/2 teaspoon salt 20 g margarine or butter 250 g gluten-free flour mix 1/2 sachet dry brewer s yeast (*) or 12 g fresh brewer s yeast WHITE BREAD (500 gr) 150 ml lukewarm water 1 teaspoon sugar 15 spoons extra virgin olive oil 15 teaspoons salt 325 g type 0 flour 1 heaped teaspoon dry brewer s yeast (*) or 10 g fresh brewer s yeast Add all ingredients and wait for 10 minutes before starting up the appliance This gives the yeast time to pre-activate GLUTEN-FREE BREAD (500 gr) 325 ml lukewarm water Sugar 15 teaspoons 15 teaspoons salt 15 spoons extra virgin olive oil 375 g gluten-free flour mix 3/4 sachet dry brewer s yeast (*) or 21 g fresh brewer s yeast or: 325 ml full-cream milk (lukewarm) Sugar 15 teaspoons 1 teaspoon salt 30 g margarine or butter 375 g gluten-free flour mix 3/4 sachet dry brewer s yeast (*) or 21 g fresh brewer s yeast (*) See table of comparisons for yeast amount (dry or fresh (in g/sachets/teaspoons) under the heading Yeast in the INGREDIENTS section You can use this recipe for white bread or gluten-free dough to make other recipes (sweet or savoury) in this recipe booklet, replacing flour types and increasing the amounts of liquid given Approximately, the proportions are the same weight for gluten-free mix and liquids In some cases, you will need to experiment Other useful tricks of the trade are: Preheating the ingredients (warm up the liquids; if there are eggs in the mix, emerge them in warm water for 15 minutes, remove butter/margarine from the fridge 15 minutes before using them, etc)
22 EN Check the initial phase of mixing Check that the consistency of the dough is the right consistency when there are no flour residues on the sides of the bread pan and deep troughs form on the surface of the mix when the kneading arm is functioning The kneading arm should turn freely without forcing The dough must always be humid and soft and much softer than a traditional flour mix Correct the consistency of the mix during the first 15 minutes of the cycle Add a spoonful of flour at a time if the mix is too soft or a spoonful of liquid if it is too dry until the right consistency is reached Purchase a new bread pan and kneading arm to utilize for gluten-free baking if the appliance is to be used also for the production of bread with glutens In any case, always thoroughly and accurately wash all parts that come into contact with traditional flour (bread knives, spatulas, lid and sides of the appliance, etc) to avoid contamination 2 WHOLE WHEAT WHOLE WHEAT BREAD (350 gr) 140 ml milk 1/2 teaspoon of salt 125 gr of butter 1/2 teaspoon of cane sugar 110 gr of 0 grade white flour 110 gr of wholemeal flour 1/4 sachet dry brewer s yeast (*) or 10 g fresh brewer s yeast 3 QUICK WHITE BREAD (350 gr) 100 ml of warm water 1 teaspoon of sugar 1 table spoon of extra-virgin olive oil 1/2 teaspoon salt 215 gr of 0 grade white flour 1/4 sachet dry brewer s yeast (*) or 10 g fresh brewer s yeast Put in the ingredients and wait 10 minutes before switching on the machine The yeast will then have time to activate WHOLE WHEAT BREAD (500 gr) 210 ml milk 1 teaspoon of salt 18 gr of butter 1 teaspoon of cane sugar 165 gr of 0 grade white flour 165 gr of wholemeal flour 1/2 sachet dry brewer s yeast (*) or 14 g fresh brewer s yeast WHITE BREAD (500 gr) 150 ml of warm water Sugar 15 teaspoons 15 spoons extra virgin olive oil 1 teaspoon salt 325 gr of 0 grade white flour 1/2 sachet dry brewer s yeast (*) or 14 g fresh brewer s yeast Put in the ingredients and wait 10 minutes before switching on the machine The yeast will then have time to activate (*) See table of comparisons for yeast amount (dry or fresh (in g/sachets/teaspoons) under the heading Yeast in the INGREDIENTS section
23 EN 4 DOUGH DOUGH FOR PIZZA (350 gr) 200 ml of water 1 teaspoon of salt 3 table spoons of olive oil 350 gr of 0 grade white flour 1 sachet dry brewer s yeast (*) or 25 g fresh brewer s yeast Remove from the appliance and knead again Roll out and leave to rest for 20 minutes Bake at 220 for 25 minutes SWEET DOUGH FOR MUFFINS (350 gr) 125 ml of milk 125 ml of cream 60 gr of butter A pinch of salt 175 gr of sugar Grated orange rind 300 gr of 00 grade white flour 1 sachet dry brewer s yeast (*) or 25 g fresh brewer s yeast At the end of the process, mix in by hand and according to individual tastes: gr of bilberries or, gr of sultanas soaked and lightly floured or, gr of chocolate drops or, - 75 gr of candied fruit of your choice Divide into 12 small muffin moulds and cook at 200 C for 25 minutes DOUGH FOR PIZZA (500 gr) 300 ml of water 15 teaspoons salt 4, 5 table spoons of olive oil 525 gr of 0 grade white flour 15 sachets dry brewer s yeast (*) or 36 g fresh brewer s yeast Remove from the appliance and knead again Roll out and leave to rest for 20 minutes Bake at 220 for 25 minutes SWEET DOUGH FOR MUFFINS 185 ml of milk 185 ml of cream 90 gr of butter A pinch of salt 260 gr of sugar Grated orange rind 450 gr of 00 grade white flour 15 sachets dry brewer s yeast (*) or 36 g fresh brewer s yeast At the end of the process, mix in by hand and according to individual tastes: gr of bilberries or, gr of sultanas soaked and lightly floured or, gr of chocolate drops or, gr of candied fruit of your choice Divide into 18 small muffin moulds and cook at 200 C for 25 minutes JAM 250 g fruit chopped into small pieces or pured 250 g sugar Juice of 1/2 lemon 20 g pectin powder Combine the fruit, sugar and lemon in the basket and start programme 4 (dough) for about 15 mins When the pectin has been mixed in, pour in the sugar a little at a time Close the lid and complete the cycle by starting programme 5 (bake) twice in a row for a total baking time of 1 hour (30 minutes for each cycle) (*) See table of comparisons for yeast amount (dry or fresh (in g/sachets/teaspoons) under the heading Yeast in the INGREDIENTS section
24 FR INSTRUCTIONS IMPORTANTES LIRE CES INSTRUCTIONS AVANT L EMPLOI Lors de l utilisation d appareils lectriques, il est ncessaire de prendre les prcautions suivantes: 1 Vrifiez que le voltage lectrique de l appareil corresponde celui de votre rseau lectrique 2 Ne laissez jamais l appareil sans surveillance lorsqu il est branch au rseau lectrique; dbranchez-le aprs chaque utilisation 3 Ne placez pas l appareil au dessus ou prs de sources de chaleur 4 Lors de son utilisation, placez l appareil sur une surface horizontale et stable 5 N exposez jamais l appareil aux agents atmosphriques externes (pluie, soleil, etc) 6 Veillez ce que le cble lectrique n entre jamais en contact avec des surfaces chaudes 7 Cet appareil n est pas indiqu pour l utilisation de la part de personnes (y compris les enfants) ayant des capacits physiques, sensorielles ou mentales rduites Les utilisateurs n ayant pas l exprience, une connaissance suffisante de l appareil ou n ayant pas reu les instructions relatives l appareil, devront faire l objet d un contrle de supervision de la part d une personne responsable de leur scurit 8 Il est ncessaire de surveiller les enfants pour empcher qu ils ne jouent avec l appareil 9 NE PAS PLONGER LE CORPS DU PRODUIT, LA FICHE NI LE CABLE ELECTRIQUE DANS L EAU OU AUTRES LIQUIDES, ET UTILISER TOUJOURS UN CHIFFON HUMIDE POUR LES NETTOYER 10 MEME LORSQUE L APPAREIL N EST PAS EN MARCHE, DEBRANCHER LA FICHE DE LA PRISE DE COURANT ELECTRIQUE AVANT D INSTALLER OU DE DEFAIRE LES SIMPLES PARTIES OU AVANT DE PROCEDER AU NETTOYAGE 11 Vrifier d avoir toujours les mains sches avant d utiliser ou de rgler les interrupteurs placs sur l appareil ou avant de manipuler la fiche et les connexions lectriques 12 Ne touchez jamais les parties du four en mouvement pendant la cuisson 13 Ne mettez jamais l appareil en marche si le rcipient ne contient pas les ingrdients 14 Ne mettez pas de papier d aluminium l intrieur de l appareil ou autre matire mtallique afin d viter les risques d incendie ou les courts-circuits 15 Ne touchez pas les surfaces chaudes Utilisez des gants four ou des prises pour plats four 16 Laisser un espace d au moins 5 cm autour de la machine pain pour permettre la ventilation et ne jamais couvrir les ouvertures d vacuation de la vapeur 17 N introduisez pas vos mains ou vos doigts dans le rcipient pendant le fonctionnement de l appareil 18 Positionner le cordon de connexion en vitant qu il reste suspendu au-dessus de la zone de travail ou qu il soit possible de s y heurter ou d y trbucher contre 19 L appareil ne doit jamais tre utilis prs des rideaux ou de tout autre objet qui peut prendre feu ou brler 20 N utilisez pas l appareil pour conserver le pain 21 Pour un entretien parfait du rcipient, lavez-le et graissez-le de temps en temps avec de l huile 22 Pour dbrancher l appareil, saisir directement la fiche en la dbranchant de la prise murale Ne tirez jamais sur le cble d alimentation 23 N utilisez pas l appareil si le cble lectrique ou la fiche sont endommags, ou si l appareil rsulte dfectueux; dans ce cas, contactez le Centre d Assistance Aprs-vente Autoris le plus proche
SAMPLE 11 = + 11 = + + Exploring Combinations of Ten + + = = + + = + = = + = = 11. Step Up. Step Ahead
 7.1 Exploring Combinations of Ten Look at these cubes. 2. Color some of the cubes to make three parts. Then write a matching sentence. 10 What addition sentence matches the picture? How else could you
MyDHL+ Van Non-Corporate naar Corporate
 MyDHL+ Van Non-Corporate naar Corporate Van Non-Corporate naar Corporate In MyDHL+ is het mogelijk om meerdere gebruikers aan uw set-up toe te voegen. Wanneer er bijvoorbeeld meerdere collega s van dezelfde
Quality requirements concerning the packaging of oak lumber of Houthandel Wijers vof (09.09.14)
") Quality requirements concerning the packaging of oak lumber of (09.09.14) Content: 1. Requirements on sticks 2. Requirements on placing sticks 3. Requirements on construction pallets 4. Stick length and
Quality requirements concerning the packaging of oak lumber of (09.09.14) Content: 1. Requirements on sticks 2. Requirements on placing sticks 3. Requirements on construction pallets 4. Stick length and
Mobile concrete base
 1 14 Mobile concrete base UMBASM8000000000 Mobile concrete base UMBASM8000000000 Congratula ons with your purchase! Please completely read and follow all the instruc ons. pg. 3 Proficiat met uw aankoop!
Add the standing fingers to get the tens and multiply the closed fingers to get the units.
 Digit work Here's a useful system of finger reckoning from the Middle Ages. To multiply $6 \times 9$, hold up one finger to represent the difference between the five fingers on that hand and the first
Procedure Reset tv-toestellen:
 Procedure Reset tv-toestellen: Volgende procedure is te volgen wanneer er een tv-toestel, op een van de kamers niet meer werkt. TV Re-installation Factory Default Her-installeren van de TV Fabrieksinstellingen
Group work to study a new subject.
 CONTEXT SUBJECT AGE LEVEL AND COUNTRY FEATURE OF GROUP STUDENTS NUMBER MATERIALS AND TOOLS KIND OF GAME DURATION Order of operations 12 13 years 1 ste year of secundary school (technical class) Belgium
Het leven in een gastgezin
 Het leven in een gastgezin Wees vriendelijk als je het gezin respectvol behandeld zullen ze jou ook respectvol behandelen Wees behulpzaam als iemand jou hulp nodig heeft is het netjes om je hulp aan te
Rhythm of Light. Susanne de Graef, Montagehandleiding / Instruction manual
 Rhythm of Light Susanne de Graef, 2016 Montagehandleiding / Instruction manual GELEVERD MATERIAAL / SUPPLIED MATERIAL B. C. D. A. E. F. A. B. C. D. E. F. armatuur / fixture fitting lange staalkabels (3)
Function checklist for the ML-350 or XL-350 with a print set. Missing loop.
 Function checklist for the ML-350 or XL-350 with a 260217 print set. Below mentioned check-point should resolve function problems of the lift systems. Missing loop. When a lift is connected to an external
Flybye. Ernst Koning, Montagehandleiding / Instruction manual
 Flybye Ernst Koning, 2018 Montagehandleiding / Instruction manual GELEVERD MATERIAAL / MATERIALS SUPPLIED A. B. C. D. E. F. G. A. B. C. D. E. F. G. H. H. lichtbuis / lighting tube plafondkap / ceiling
L.Net s88sd16-n aansluitingen en programmering.
 De L.Net s88sd16-n wordt via één van de L.Net aansluitingen aangesloten op de LocoNet aansluiting van de centrale, bij een Intellibox of Twin-Center is dat de LocoNet-T aansluiting. L.Net s88sd16-n aansluitingen
NEDERLANDS. Display Instructies. Knoppen. Geeft afwisselend Tijd, Datum en Temperatuur weer, kan ook ingesteld worden op enkel tijd
 NEDERLANDS Het ziet eruit als een simpel blokje hout, maar maak een geluid (knip met je vingers, kuch, klap in je handen, of tip op de bovenkant) en het geeft onmiddelijk en afwisselend tijd, datum en
(1) De hoofdfunctie van ons gezelschap is het aanbieden van onderwijs. (2) Ons gezelschap is er om kunsteducatie te verbeteren
 De hoofdfunctie van ons gezelschap is het aanbieden van onderwijs. (2) Ons gezelschap is er om kunsteducatie te verbeteren") (1) De hoofdfunctie van ons gezelschap is het aanbieden van onderwijs (2) Ons gezelschap is er om kunsteducatie te verbeteren (3) Ons gezelschap helpt gemeenschappen te vormen en te binden (4) De producties
(1) De hoofdfunctie van ons gezelschap is het aanbieden van onderwijs (2) Ons gezelschap is er om kunsteducatie te verbeteren (3) Ons gezelschap helpt gemeenschappen te vormen en te binden (4) De producties
Preschool Kindergarten
 Preschool Kindergarten Objectives Students will recognize the values of numerals 1 to 10. Students will use objects to solve addition problems with sums from 1 to 10. Materials Needed Large number cards
OUTDOOR HD DOME IP CAMERA PRODUCT MANUAL GB - NL
 OUTDOOR HD DOME IP CAMERA PRODUCT MANUAL GB - NL GB PARTS & FUNCTIONS 2. ---- 1. ---- 3. ---- 7. ---------- 5. 4. 6. 1. Outdoor IP camera unit 2. Antenna 3. Mounting bracket 4. Network connection 5. Power
RECEPTEERKUNDE: PRODUCTZORG EN BEREIDING VAN GENEESMIDDELEN (DUTCH EDITION) FROM BOHN STAFLEU VAN LOGHUM
 FROM BOHN STAFLEU VAN LOGHUM") Read Online and Download Ebook RECEPTEERKUNDE: PRODUCTZORG EN BEREIDING VAN GENEESMIDDELEN (DUTCH EDITION) FROM BOHN STAFLEU VAN LOGHUM DOWNLOAD EBOOK : RECEPTEERKUNDE: PRODUCTZORG EN BEREIDING VAN STAFLEU
Read Online and Download Ebook RECEPTEERKUNDE: PRODUCTZORG EN BEREIDING VAN GENEESMIDDELEN (DUTCH EDITION) FROM BOHN STAFLEU VAN LOGHUM DOWNLOAD EBOOK : RECEPTEERKUNDE: PRODUCTZORG EN BEREIDING VAN STAFLEU
2019 SUNEXCHANGE USER GUIDE LAST UPDATED
 2019 SUNEXCHANGE USER GUIDE LAST UPDATED 0 - -19 1 WELCOME TO SUNEX DISTRIBUTOR PORTAL This user manual will cover all the screens and functions of our site. MAIN SCREEN: Welcome message. 2 LOGIN SCREEN:
OUTDOOR HD BULLET IP CAMERA PRODUCT MANUAL
 OUTDOOR HD BULLET IP CAMERA PRODUCT MANUAL GB - NL GB PARTS & FUNCTIONS 1. 7. ---- 3. ---- 4. ---------- 6. 5. 2. ---- 1. Outdoor IP camera unit 2. Antenna 3. Mounting bracket 4. Network connection 5.
!!!! Wild!Peacock!Omslagdoek!! Vertaling!door!Eerlijke!Wol.!! Het!garen!voor!dit!patroon!is!te!verkrijgen!op! Benodigdheden:!!
 WildPeacockOmslagdoek VertalingdoorEerlijkeWol. Hetgarenvoorditpatroonisteverkrijgenopwww.eerlijkewol.nl Benodigdheden: 4strengenWildPeacockRecycledSilkYarn rondbreinaaldnr8(jekuntnatuurlijkookgewonebreinaaldengebruiken,maar
B1 Woordkennis: Spelling
 B1 Woordkennis: Spelling Bestuderen Inleiding Op B1 niveau gaan we wat meer aandacht schenken aan spelling. Je mag niet meer zoveel fouten maken als op A1 en A2 niveau. We bespreken een aantal belangrijke
Luister alsjeblieft naar een opname als je de vragen beantwoordt of speel de stukken zelf!
 Martijn Hooning COLLEGE ANALYSE OPDRACHT 1 9 september 2009 Hierbij een paar vragen over twee stukken die we deze week en vorige week hebben besproken: Mondnacht van Schumann, en het eerste deel van het
2000 Volkswagen Passat GLS
 REAR DOOR WINDOW Rear door window, assembly overview Fig. 304: Exploded View Of Rear Door Window 1 - Door Removing and installing: --> Rear door, removing and installing 2 - Spring nut Qty 2 3 - Screw
5/2/2011 Understanding Clouds Clouds form as warm air is forced upward As the air is forced upward, it expands and cools 1
 Understanding Clouds Clouds form as warm air is forced upward As the air is forced upward, it expands and cools 1 Understanding Clouds As the air cools, the relative humidity reaches 100% Water vapor begins
ANT S KINGDOM Here is some advice for setting up your Master Ant Farm!
 ANT S KINGDOM Master NL EN Instructies Mierenboerderij Master Bedankt voor je bestelling van de Mierenboerderij Master. De beste keus! Installatie NL Naast de informatie die te lezen is in ons boekje
L.Net s88sd16-n aansluitingen en programmering.
 De L.Net s88sd16-n wordt via één van de L.Net aansluitingen aangesloten op de LocoNet aansluiting van de centrale, bij een Intellibox of Twin-Center is dat de LocoNet-T aansluiting. L.Net s88sd16-n aansluitingen
Introductie in flowcharts
 Introductie in flowcharts Flow Charts Een flow chart kan gebruikt worden om: Processen definieren en analyseren. Een beeld vormen van een proces voor analyse, discussie of communicatie. Het definieren,
Quick start guide. Powerbank MI Mah. Follow Fast All rights reserved. Page 1
 Quick start guide Powerbank MI 16.000 Mah Follow Fast 2016 - All rights reserved. Page 1 ENGLISH The Mi 16000 Power Bank is a very good backup option for those on the move. It can keep you going for days
8+ 60 MIN Alleen te spelen in combinatie met het RIFUGIO basisspel. Only to be played in combination with the RIFUGIO basicgame.
 8+ 60 MIN. 2-5 Alleen te spelen in combinatie met het RIFUGIO basisspel. Only to be played in combination with the RIFUGIO basicgame. HELICOPTER SPEL VOORBEREIDING: Doe alles precies hetzelfde als bij
OPEN TRAINING. Onderhandelingen met leveranciers voor aankopers. Zeker stellen dat je goed voorbereid aan de onderhandelingstafel komt.
 OPEN TRAINING Onderhandelingen met leveranciers voor aankopers Zeker stellen dat je goed voorbereid aan de onderhandelingstafel komt. Philip Meyers Making sure to come well prepared at the negotiation
The upside down Louisa tutorial by Dorothée: Noortjeprullemie.blogspot.be Written for Compagnie M.: m.com
 The upside down Louisa tutorial by Dorothée: Noortjeprullemie.blogspot.be Written for Compagnie M.: www.compagnie- m.com Dorothée heeft een unieke Compagnie M. hack gemaakt: de Louisa op zijn kop. Als
3 I always love to do the shopping. A Yes I do! B No! I hate supermarkets. C Sometimes. When my mother lets me buy chocolate.
 1 Test yourself read a Lees de vragen van de test. Waar gaat deze test over? Flash info 1 In the morning I always make my bed. A Yes. B No. C Sometimes, when I feel like it. 2 When I see an old lady with
Settings for the C100BRS4 MAC Address Spoofing with cable Internet.
 Settings for the C100BRS4 MAC Address Spoofing with cable Internet. General: Please use the latest firmware for the router. The firmware is available on http://www.conceptronic.net! Use Firmware version
S e v e n P h o t o s f o r O A S E. K r i j n d e K o n i n g
 S e v e n P h o t o s f o r O A S E K r i j n d e K o n i n g Even with the most fundamental of truths, we can have big questions. And especially truths that at first sight are concrete, tangible and proven
Het beheren van mijn Tungsten Network Portal account NL 1 Manage my Tungsten Network Portal account EN 14
 QUICK GUIDE C Het beheren van mijn Tungsten Network Portal account NL 1 Manage my Tungsten Network Portal account EN 14 Version 0.9 (June 2014) Per May 2014 OB10 has changed its name to Tungsten Network
Gebruikershandleiding Operation instructions. ELEKTRISCHE VERHITTING LOS (voor Chafing Dish) (For Chafing Dish) Modelnr.: *
 (For Chafing Dish) Modelnr.: *") Professional Supplies ELEKTRISCHE VERHITTING LOS (voor Chafing Dish) Electric heating Unit (For Chafing Dish) Modelnr.: *115.115 Gebruikershandleiding Operation instructions TECHNISCHE PARAMETERS Naam:
Professional Supplies ELEKTRISCHE VERHITTING LOS (voor Chafing Dish) Electric heating Unit (For Chafing Dish) Modelnr.: *115.115 Gebruikershandleiding Operation instructions TECHNISCHE PARAMETERS Naam:
Engels op Niveau A2 Workshops Woordkennis 1
 A2 Workshops Woordkennis 1 A2 Workshops Woordkennis 1 A2 Woordkennis 1 Bestuderen Hoe leer je 2000 woorden? Als je een nieuwe taal wilt spreken en schrijven, heb je vooral veel nieuwe woorden nodig. Je
General info on using shopping carts with Ingenico epayments
 Inhoudsopgave 1. Disclaimer 2. What is a PSPID? 3. What is an API user? How is it different from other users? 4. What is an operation code? And should I choose "Authorisation" or "Sale"? 5. What is an
Jacob 1,25' Muurplaat Etagère Wall unit
 Jacob Muurplaat Etagère Wall unit Gebruik deze handleiding van begin tot einde voor het probleemloos monteren van uw aangekocht meubel aub.. Veuillez bien suivre nos instructions ci-après lors du montage
Activant Prophet 21. Prophet 21 Version 12.0 Upgrade Information
 Activant Prophet 21 Prophet 21 Version 12.0 Upgrade Information This class is designed for Customers interested in upgrading to version 12.0 IT staff responsible for the managing of the Prophet 21 system
ATD Floor Fan Owner s Manual Features:
 ATD-30320 20 Floor Fan Owner s Manual Features: Made in China to ATD Tools, Inc. Specifications Visit us at www.atdtools.com General Safety Warnings: WARNING: The in and warnings ned in this manual d be
Professional Supplies. WATERKOKER WATER BOILER Modelnr.: * * * * Gebruikershandleiding Operation instructions
 Professional Supplies WATERKOKER WATER BOILER Modelnr.: *688.190 - *688.191 *688.192 - *688.193 Gebruikershandleiding Operation instructions LEES DEZE GEBRUIKSAANWIJZING VÓÓR GEBRUIK ZORGVULDIG DOOR EN
ANGSTSTOORNISSEN EN HYPOCHONDRIE: DIAGNOSTIEK EN BEHANDELING (DUTCH EDITION) FROM BOHN STAFLEU VAN LOGHUM
 FROM BOHN STAFLEU VAN LOGHUM") Read Online and Download Ebook ANGSTSTOORNISSEN EN HYPOCHONDRIE: DIAGNOSTIEK EN BEHANDELING (DUTCH EDITION) FROM BOHN STAFLEU VAN LOGHUM DOWNLOAD EBOOK : ANGSTSTOORNISSEN EN HYPOCHONDRIE: DIAGNOSTIEK STAFLEU
Read Online and Download Ebook ANGSTSTOORNISSEN EN HYPOCHONDRIE: DIAGNOSTIEK EN BEHANDELING (DUTCH EDITION) FROM BOHN STAFLEU VAN LOGHUM DOWNLOAD EBOOK : ANGSTSTOORNISSEN EN HYPOCHONDRIE: DIAGNOSTIEK STAFLEU
01/ M-Way. cables
 01/ 2015 M-Way cables M-WaY Cables There are many ways to connect devices and speakers together but only few will connect you to the music. My Way of connecting is just one of many but proved it self over
Limpid Light. design Esther Jongsma & Sam van Gurp, Montagehandleiding / Assembly Instructions
 Limpid Light design Esther Jongsma & Sam van Gurp, 05 Montagehandleiding / Assembly Instructions GELEVERD MATERIAAL / SUPPLIED MATERIAL A. A. B. B. C. D. E. F. G. G. H. I. J. K. / / ophanging / suspension:
PIR DC-SWITCH. DC Passive infra-red Detector. Model No. PDS-10 GEBRUIKSAANWIJZING/INSTRUCTION MANUAL
 PIR DC-SWITCH DC Passive infra-red Detector Model No. PDS-10 GEBRUIKSAANWIJZING/INSTRUCTION MANUAL Please read this manual before operating your DETECTOR PIR DC-Switch (PDS-10) De PDS-10 is een beweging
Impact en disseminatie. Saskia Verhagen Franka vd Wijdeven
 Impact en disseminatie Saskia Verhagen Franka vd Wijdeven Wie is wie? Voorstel rondje Wat hoop je te leren? Heb je iets te delen? Wat zegt de Programma Gids? WHAT DO IMPACT AND SUSTAINABILITY MEAN? Impact
Illustrator Tutorial - How to Create a Watch
 Illustrator Tutorial - How to Create a Watch «Andrew Bannecker - Simple, True and Tender Vector Movie Posters by GABZ» Categories: Tutorials Have you ever seen print advertising of some watch brand before?
CHROMA STANDAARDREEKS
 CHROMA STANDAARDREEKS Chroma-onderzoeken Een chroma geeft een beeld over de kwaliteit van bijvoorbeeld een bodem of compost. Een chroma bestaat uit 4 zones. Uit elke zone is een bepaald kwaliteitsaspect
Chapter 4 Understanding Families. In this chapter, you will learn
 Chapter 4 Understanding Families In this chapter, you will learn Topic 4-1 What Is a Family? In this topic, you will learn about the factors that make the family such an important unit, as well as Roles
EM7680 Firmware Update by OTA
 EM7680 Firmware Update by OTA 2 NEDERLANDS/ENGLISH EM7680 Firmware update by OTA Table of contents 1.0 (NL) Introductie... 3 2.0 (NL) Firmware installeren... 3 3.0 (NL) Release notes:... 3 4.0 (NL) Overige
I.S.T.C. Intelligent Saving Temperature Controler
 MATEN & INFORMATIE I.S.T.C. Intelligent Saving Temperature Controler Deze unieke modulerende zender, als enige ter wereld, verlaagt het energieverbruik aanzienlijk. Het werkt in combinatie met de energy
DALISOFT. 33. Configuring DALI ballasts with the TDS20620V2 DALI Tool. Connect the TDS20620V2. Start DALISOFT
 TELETASK Handbook Multiple DoIP Central units DALISOFT 33. Configuring DALI ballasts with the TDS20620V2 DALI Tool Connect the TDS20620V2 If there is a TDS13620 connected to the DALI-bus, remove it first.
Discover FILE 6 DISCOVER BK 2
 Discover FILE 6 DISCOVER BK 2 Your favourite pizza, a Rolls Royce, your favourite movie... All these things have to be made before we can eat or enjoy them! In this file you will discover how things are
Lester 1,35' Tv Meubel Meuble Tele Tv - Case
 Lester Tv Meubel Meuble Tele Tv - ase Gebruik deze handleiding van begin tot einde voor het probleemloos monteren van uw aangekocht meubel aub.. Veuillez bien suivre nos instructions ci-après lors du montage
Reading comprehension: The Tropical Rainforest
 Auteur Laatst gewijzigd Licentie Webadres Patricia Termeer 05 februari 2016 CC Naamsvermelding 3.0 Nederland licentie https://maken.wikiwijs.nl/71971 Dit lesmateriaal is gemaakt met Wikiwijs van Kennisnet.
Online Resource 1. Title: Implementing the flipped classroom: An exploration of study behaviour and student performance
 Online Resource 1 Title: Implementing the flipped classroom: An exploration of study behaviour and student performance Journal: Higher Education Authors: Anja J. Boevé, Rob R. Meijer, Roel J. Bosker, Jorien
Topic 10-5 Meeting Children s Intellectual Needs
 Topic 10-5 Meeting Children s Intellectual Needs In this topic, you will learn how to help children develop the ability to reason and use complex thought, as well as The role of play in intellectual development
Buy Me! FILE 5 BUY ME KGT 2
 Buy Me! FILE 5 BUY ME KGT 2 Every day we see them during the commercial break: the best products in the world. Whether they are a pair of sneakers, new mascara or the latest smartphone, they all seem to
Op het potje Potty training
 Op het potje Potty training Wat is zindelijkheid? Je kind is zindelijk als het: - niet meer in zijn broek plast. - overdag droog is. - zelf op het potje of het toilet gaat zitten wanneer het moet plassen.
ALGORITMIEK: answers exercise class 7
 Problem 1. See slides 2 4 of lecture 8. Problem 2. See slides 4 6 of lecture 8. ALGORITMIEK: answers exercise class 7 Problem 5. a. Als we twee negatieve (< 0) getallen bij elkaar optellen is het antwoord
Esther Lee-Varisco Matt Zhang
 Esther Lee-Varisco Matt Zhang Want to build a wine cellar Surface temperature varies daily, seasonally, and geologically Need reasonable depth to build the cellar for lessened temperature variations Building
dv d sign is following a new direction
 tavola d sign dv d sign is following a new direction dv d sign produce objects for interior decoration in your home, which are sold across the World! The goal of our design is always to combine the best
Handleiding Zuludesk Parent
 Handleiding Zuludesk Parent Handleiding Zuludesk Parent Met Zuludesk Parent kunt u buiten schooltijden de ipad van uw kind beheren. Hieronder vind u een korte handleiding met de mogelijkheden. Gebruik
Handleiding Digipass DP310
 Handleiding Digipass DP310 Deze handleiding geeft u uitleg over het activeren en gebruik maken van uw Digipass. Toetsen van de Digipass OK: voor het aan- of uitschakelen van het apparaat of om een handeling
Profes sional Supplies. CERAMIC CONTACT GRILL Modelnr.: * * * Gebruikershandleiding Operation instructions
 Profes sional Supplies CERAMIC CONTACT GRILL Modelnr.: *688.450 - *688.455 - *688.460 Gebruikershandleiding Operation instructions AANTEKENINGEN VOOR GEBRUIK. 1. Waarschuwing! De gril kan zeer hoge temperaturen
V01.indd :06
 2015.021.00V01.indd 1 02-07-18 11:06 2015.021.00V01.indd 2-3 02-07-18 11:06 nl ICONEN LEGENDA en ICONS LEGEND nl ICONEN LEGENDA en ICONS LEGEND Dit product voldoet aan de Richtlijn Medische hulpmiddelen
EU Declaration of Conformity and safety instructions EU Conformiteitsverklaring en veiligheidsinstructies
 EU Declaration of Conformity and safety instructions EU Conformiteitsverklaring en veiligheidsinstructies Battery operated UNICOM 300 N51 UNICOM 300 met batterijvoeding N51 Explosion safety instructions
My Inspiration I got my inspiration from a lamp that I already had made 2 years ago. The lamp is the you can see on the right.
 Mijn Inspiratie Ik kreeg het idee om een variant te maken van een lamp die ik al eerder had gemaakt. Bij de lamp die in de onderstaande foto s is afgebeeld kun je het licht dimmen door de lamellen open
EM7580 Firmware Update by Micro SD card
 EM7580 Firmware Update by Micro SD card 2 NEDERLANDS/ENGLISH EM7580 Firmware update by Micro SD card Table of contents 1.0 (NL) Introductie... 3 2.0 (NL) Firmware installeren... 3 3.0 (NL) Opmerking...
FSW-VW-2X2 FSW-VW. Handleiding / Manual
 FSW-VW-2X2 FSW-VW Handleiding / Manual Rev. 1.0 17-03-2014 I Pakketinhoud / Content Accessoires Benodigde gereedschappen / Required Tools Montage / Assembling Onderhoud / Maintenance Veel Gestelde Vragen
04/11/2013. Sluitersnelheid: 1/50 sec = 0.02 sec. Frameduur= 2 x sluitersnelheid= 2/50 = 1/25 = 0.04 sec. Framerate= 1/0.
 Onderwerpen: Scherpstelling - Focusering Sluitersnelheid en framerate Sluitersnelheid en belichting Driedimensionale Arthrokinematische Mobilisatie Cursus Klinische Video/Foto-Analyse Avond 3: Scherpte
MyDHL+ ProView activeren in MyDHL+
 MyDHL+ ProView activeren in MyDHL+ ProView activeren in MyDHL+ In MyDHL+ is het mogelijk om van uw zendingen, die op uw accountnummer zijn aangemaakt, de status te zien. Daarnaast is het ook mogelijk om
20 twenty. test. This is a list of things that you can find in a house. Circle the things that you can find in the tree house in the text.
 9006625806_boek.indd 1 31/08/16 15:26 1 6 test This is a list of things that you can find in a house. Circle the things that you can find in the tree house in the text. living room kitchen bedroom toilet
IOS and Android APP instruction
 IOS and Android APP instruction - Open de APP Store of Google Play op uw toestel - Open the APP Store or Google Play on your device IOS Android - Download de Eurom Heating APP: - Download the Eurom Heating
FOR DUTCH STUDENTS! ENGLISH VERSION NEXT PAGE. Toets Inleiding Kansrekening 1 8 februari 2010
 FOR DUTCH STUDENTS! ENGLISH VERSION NEXT PAGE Toets Inleiding Kansrekening 1 8 februari 2010 Voeg aan het antwoord van een opgave altijd het bewijs, de berekening of de argumentatie toe. Als je een onderdeel
EU Declaration of Conformity and safety instructions EU Conformiteitsverklaring en veiligheidsinstructies ISC 230B
 EU Declaration of Conformity and safety instructions EU Conformiteitsverklaring en veiligheidsinstructies ISC 230B Explosion safety instructions (Ex) (EN) ISC230B is approved for use outside the explosion-hazardous
MyDHL+ Exportzending aanmaken
 MyDHL+ Exportzending aanmaken Exportzending aanmaken In MyDHL+ is het aanmaken van een exportzending zo eenvoudig mogelijk gemaakt. De website en deze handleiding zal u stap voor stap erdoorheen leiden.
Travel Survey Questionnaires
 Travel Survey Questionnaires Prot of Rotterdam and TU Delft, 16 June, 2009 Introduction To improve the accessibility to the Rotterdam Port and the efficiency of the public transport systems at the Rotterdam
Opgave 2 Geef een korte uitleg van elk van de volgende concepten: De Yield-to-Maturity of a coupon bond.
 Opgaven in Nederlands. Alle opgaven hebben gelijk gewicht. Opgave 1 Gegeven is een kasstroom x = (x 0, x 1,, x n ). Veronderstel dat de contante waarde van deze kasstroom gegeven wordt door P. De bijbehorende
z x 1 x 2 x 3 x 4 s 1 s 2 s 3 rij rij rij rij
 ENGLISH VERSION SEE PAGE 3 Tentamen Lineaire Optimalisering, 0 januari 0, tijdsduur 3 uur. Het gebruik van een eenvoudige rekenmachine is toegestaan. Geef bij elk antwoord een duidelijke toelichting. Als
Ius Commune Training Programme Amsterdam Masterclass 15 June 2018
 www.iuscommune.eu Dear Ius Commune PhD researchers, You are kindly invited to participate in the Ius Commune Amsterdam Masterclass for PhD researchers, which will take place on Friday, 15 June 2018. This
Angststoornissen en hypochondrie: Diagnostiek en behandeling (Dutch Edition) Click here if your download doesn"t start automatically
 Click here if your download doesnt start automatically") Angststoornissen en hypochondrie: Diagnostiek en behandeling (Dutch Edition) Click here if your download doesn"t start automatically Angststoornissen en hypochondrie: Diagnostiek en behandeling (Dutch
Angststoornissen en hypochondrie: Diagnostiek en behandeling (Dutch Edition) Click here if your download doesn"t start automatically Angststoornissen en hypochondrie: Diagnostiek en behandeling (Dutch
How to install and use dictionaries on the ICARUS Illumina HD (E652BK)
") (for Dutch go to page 4) How to install and use dictionaries on the ICARUS Illumina HD (E652BK) The Illumina HD offers dictionary support for StarDict dictionaries.this is a (free) open source dictionary
(for Dutch go to page 4) How to install and use dictionaries on the ICARUS Illumina HD (E652BK) The Illumina HD offers dictionary support for StarDict dictionaries.this is a (free) open source dictionary
FRAME [UPRIGHT MODEL] / [DEPTH] / [HEIGHT] / [FINISH] TYPE OF BASEPLATE P Base plate BP80 / E alternatives: ZINC finish in all cases
![FRAME [UPRIGHT MODEL] / [DEPTH] / [HEIGHT] / [FINISH] TYPE OF BASEPLATE P Base plate BP80 / E alternatives: ZINC finish in all cases](/thumbs/60/44127117.jpg "FRAME [UPRIGHT MODEL] / [DEPTH] / [HEIGHT] / [FINISH] TYPE OF BASEPLATE P Base plate BP80 / E alternatives: ZINC finish in all cases") FRAME XS UPRIGHT BASE PLATE UPRIGHT HORIZONTAL PROFILE DIAGONAL PROFILE DESCRIPTION A vertical structure consisting of 2 uprights, joined by a system of bracing profiles, and base plates intended to support
FRAME XS UPRIGHT BASE PLATE UPRIGHT HORIZONTAL PROFILE DIAGONAL PROFILE DESCRIPTION A vertical structure consisting of 2 uprights, joined by a system of bracing profiles, and base plates intended to support
Main language Dit is de basiswoordenschat. Deze woorden moeten de leerlingen zowel passief als actief kennen.
 Lesbrief Les 2.1: My family Main language Dit is de basiswoordenschat. Deze woorden moeten de leerlingen zowel passief als actief kennen. Nouns: brother, sister, cousin, mother, father, aunt, uncle, grandmother,
FOR DUTCH STUDENTS! ENGLISH VERSION NEXT PAGE
 FOR DUTCH STUDENTS! ENGLISH VERSION NEXT PAGE Tentamen Bewijzen en Technieken 1 7 januari 211, duur 3 uur. Voeg aan het antwoord van een opgave altijd het bewijs, de berekening of de argumentatie toe.
QUEEN S VALLEY SCHOOL QUEEN S VALLEY JUNIOR SCHOOL
 INSTRUCTIONS FOR HOLIDAY HOMEWORK (CLASS VIII) Subject: CHEMISTRY 1. BIO GAS PLANT: Material required Clay, thermocol sheet, plastic straw, cardboard, pastel sheet, artificial hut, trees etc. Make a village
EM7680 Firmware Update by Micro SD card or USB
 EM7680 Firmware Update by Micro SD card or USB 2 NEDERLANDS/ENGLISH EM7680 Firmware update by Micro SD card or USB Table of contents 1.0 (NL) Introductie... 3 2.0 (NL) Firmware installeren... 3 3.0 (NL)
FOR DUTCH STUDENTS! ENGLISH VERSION NEXT PAGE
 FOR DUTCH STUDENTS! ENGLISH VERSION NEXT PAGE Tentamen Analyse 6 januari 203, duur 3 uur. Voeg aan het antwoord van een opgave altijd het bewijs, de berekening of de argumentatie toe. Als je een onderdeel
/ /
 Cookie statement / www.temagroningen.nl / board@temagroningen.nl / www.temagroningen.nl / board@temagroningen.nl Dutch hospitality is a cookie with your coffee or tea. Digital hospitality is a cookie for
Nice that you attended a cooking course in Culinary Center. We hope you enjoyed it and learned a lot!
 Dear guest, Nice that you attended a cooking course in Culinary Center. We hope you enjoyed it and learned a lot! Here you will receive the recipes to make them at home again. We regularly organize new
Global TV Canada s Pulse 2011
 Global TV Canada s Pulse 2011 Winnipeg Nobody s Unpredictable Methodology These are the findings of an Ipsos Reid poll conducted between August 26 to September 1, 2011 on behalf of Global Television. For
Exercise P672 Lightweight Structures. A.P.H.W. Habraken. Report
 Exercise 2011-2012 7P672 Lightweight Structures A.P.H.W. Habraken Report Group 4: S.H.M. van Dijck J.C. Fritzsche J. Koeken T. Relker F.G.M. van Rooijen M. Slotboom M. Steenbeeke J.P.T. Theunissen Date:
Classification of triangles
 Classification of triangles A triangle is a geometrical shape that is formed when 3 non-collinear points are joined. The joining line segments are the sides of the triangle. The angles in between the sides
Koninklijk ontbijt. Croissant met boter en jam. Yoghurt met granola en rood fruit. Oerbrood met ham en kaas. Roerei Supplement met zalm 2,50 extra
 Ontbijt menu voor groepen 2017 Koninklijk ontbijt Croissant met boter en jam Yoghurt met granola en rood fruit Oerbrood met ham en kaas Roerei Supplement met zalm 2,50 extra Een glas verse jus d orange
EM7680 Firmware Update by Micro SD card
 EM7680 Firmware Update by Micro SD card 2 NEDERLANDS/ENGLISH EM7680 Firmware update by Micro SD card Table of contents 1.0 (NL) Introductie... 2 2.0 (NL) Firmware installeren... 2 3.0 (NL) Opmerking...
BathySurvey. A Trimble Access hydrographic survey module
 BathySurvey A Trimble Access hydrographic survey module Contents 1. Introduction... 3 2. Installation... 4 3. Main Screen... 5 4. Device... 6 5. Jobs... 7 6. Settings Odom Echotrac... 8 7. Settings Ohmex
Free time! Better skills. Free time with Brenda and Brian. Worksheet
 1 Free time! read a Stel je hebt een dag vrij van school. Schrijf op wat je dan gaat doen. b Lees de tekst en schrijf op welke dingen Brian en Brenda voorstellen om te doen op een vrije dag. Free time