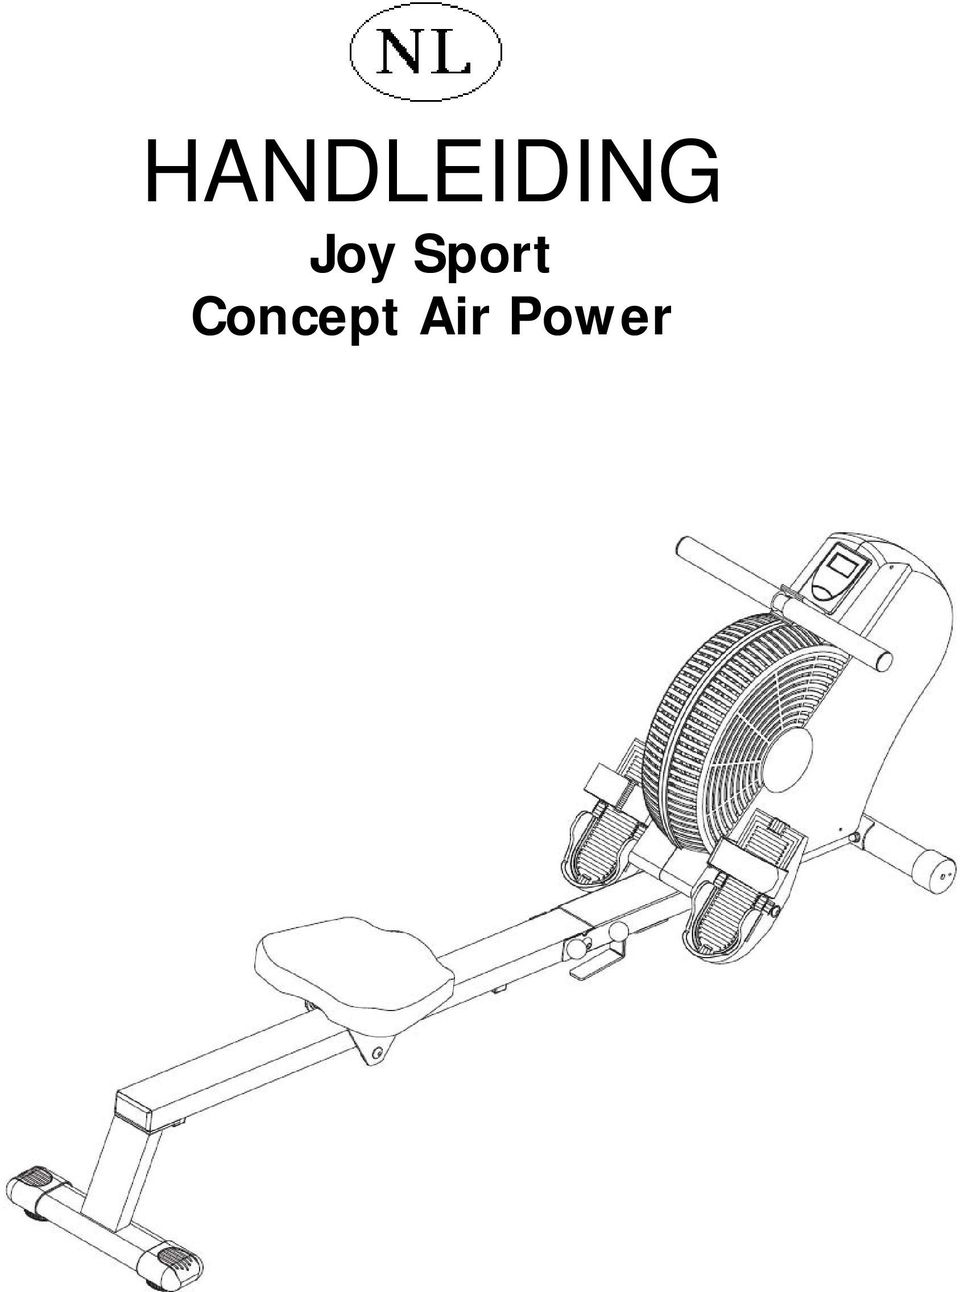
HANDLEIDING. Joy Sport Concept Air Power
|
|
|
- Joanna de Vos
- 8 jaren geleden
- Aantal bezoeken:
Transcriptie
1 HANDLEIDING Joy Sport Concept Air Power
2 Joy Sport Importeur Fitness-Import Timmermannsweg AP Ysselsteyn (LB) Geachte klant, Wij feliciteren u met de aankoop van dit JOY SPORT product. Tevens wensen wij u veel sportplezier toe met uw goede keuze. Volg aandachtig de montage handleiding. Mocht u nog vragen hebben dan helpen wij u graag verder. Garantie, Deze garantie geldt gedurende 24 maanden voor elke fabricagefout aan uw JOY SPORT product die door een JOY SPORT dealer werd verkocht. Wanneer u garantie claimt bied JOY SPORT de mogelijkheid om naar eigen goeddunken het defecte apparaat of het betreffende onderdeel te herstellen of te vervangen. De transportkosten van en naar onze werkplaats worden uitgesloten van deze garantie, en zijn dus voor rekening van de bezitter van het product. Wanneer u aanspraak wenst te maken op garantie gaat u met het aankoopbewijs naar de dealer waar u uw product heeft gekocht. De dealer zal uw claim dan verder afhandelen. Garantie uitsluitingen, De garantie geldt niet voor: de normale slijtage, de gevolgen van een ondeskundige handeling, of beschadiging door de koper of door derden zelf, en defecten die aan extreme omstandigheden te wijten zijn. De garantie kan ook niet worden geclaimd wanneer de originele constructie of uitrusting werd gewijzigd, of wanneer geen originele JOY SPORT onderdelen voor de reparatie werden gebruikt. De fabrikant kan niet verantwoordelijk gesteld worden voor schade, verlies of kosten, direct of indirect ten gevolg van gebruik van dit apparaat. Fitness-Import Timmermannsweg AP Ysselsteyn (LB) info@joysport.nl 2

3

4

5 Montage instructies STAP 1 Verwijder de kartonnen rol die aan de roeier is gemonteerd door de bouten en moeren te demonteren. STAP 2 Er is een buckle bevestigd aan het trekkoord (24), om te voorkomen dat tijdens het transport Het trekkoord in de roeier schiet. Verwijder de buckle door onderstaande stappen te volgen. Volg de stappen in de tekeningen om de buckle te verwijderen.

6 STAP 3 Zorg er voor dat de transportwieltjes van de voorsteun (7) naar de voorkant wijzen. Monteer de voorsteun (7) aan het hoofdframe (1) met Slotbouten (M8x1.25x65mm) (71), gebogen ringen (M8) (35), Veerringen (M8) (34), en dopmoeren (M8x1.25)(33). STEP 4 Monteer de C clip (48) Op de voetpedaal buis (6). Monteer het lange gedeelte van de voetpedaal buis (6) door het hoofdframe (1). Verzeker de voetpedaal buis (6) in de positie met de clip (46). STEP 5 De linker voetplaat is gemarkeerd met de letter L (43L), en de rechter voetplaat met de letter R (43R). Monteer de voetplaathouder (45) door de gaten in het hoofdframe (1). Plaats de linker voetplaat (43L) aan de linkerkant op de voetplaathouder (45) en plaats de rechter voetplaat (43R) op de rechterkant van de voetplaathouden (45), en schuif deze tegen het hoofdframe (1) aan. Zet de voetplaten (43L, 43R) vast met ringen (M8) (42), veerringen (M8) (34), en dopmoeren (M8x1.25x15mm) (41) aan beide kanten van de voetplaathouder (45). TIP: U heeft twee sleutes nodig om de dopmoeren (M8x1.25x15mm) (41) vast te zetten aan beide kanten omdat deze anders meedraaien.
, en de rechter voetplaat met de letter R (43R). Monteer de voetplaathouder (45) door de gaten in het hoofdframe (1).")
7 STEP 6 Schuif de zitting (66) Op de rails (2). Monteer de stop bumper (56) op de rails (2) met de inbusbouten (M8x1.25x25mm) (22). Controleer ook of de stop bumper (56) die al vanaf de fabriek is voor gemonteerd vast zit. Mocht deze stop bumper er onverhoopt niet opzitten monteer deze dan zelf. STEP 7 Monteer de achter standaard (3) aan de rails (2) met bout (M8x1.25x15mm) (59) en veerring (M8)(34) aan de binnenkant van de rails (2) en twee inbusbouten (M8x1.25x15mm) (57) van de onderkant. Zet alle bouten pas vast als ze allemaal gemonteerd zijn. Druk nu het rail kapje (53) in de achterkant van de rails (2).
 (59) en veerring (M8)(34) aan de binnenkant van de rails (2) en twee inbusbouten (M8x1.25x15mm) (57) van de onderkant.")
8 STEP 8 Monteer de rails (2) aan het hoofdframe (1) met inbusbouten (M10x1.5x100mm) (55), Ringen (M10) (52), en dopmoeren (M10x1.5) (51). Vergrendel de rails (2) in de positie met de twee pinnen (54). STEP 9 Monteer de twee AA batterijen in de computer (67), de batterijen worden niet bijgeleverd. Bevestig de sensor kabel (68) in de computer (67). Monteer de computer (67) in de opening van de kappen (10, 84).
, de batterijen worden niet bijgeleverd.")
9 Computer handleiding Het gebruik van Uw computer. De computer geeft de volgende 5 functies weer. (Tijd, Snelheid, afstand, calorieverbruik en scan). 1) Snelheid kan weergegeven worden in miles of kilometers per uur. 2) Afstand kan weergegeven worden van 0.1 tot 9999 miles of kilometers. 3) Tijd wordt weergegeven in uren: minuten: seconden met een maximum van 23 uur: 59 minuten: 59 seconden. 4) Calorieverbruik wordt weergegeven van calorieën. 5) SCAN is de functie die om de 4 seconde U de gegevens zal tonen zoals tijd, afstand, snelhied en calorieverbruik. 6) De computer zal automatisch na 4 minuten uitschakelen als U de roeier niet gebruikt, ook zal de computer weer automatisch inschakelen als U de roeier weer in gebruik neemt. 1) Houdt de knop 4 seconde vast om de computer te resetten. 2) Als U de batterijen de eerste keer installeert zal de computer opstarten in scan mode.
 SCAN is de functie die om de 4 seconde U de gegevens zal tonen zoals tijd, afstand, snelhied en calorieverbruik.")
10 Onderdelen diagram
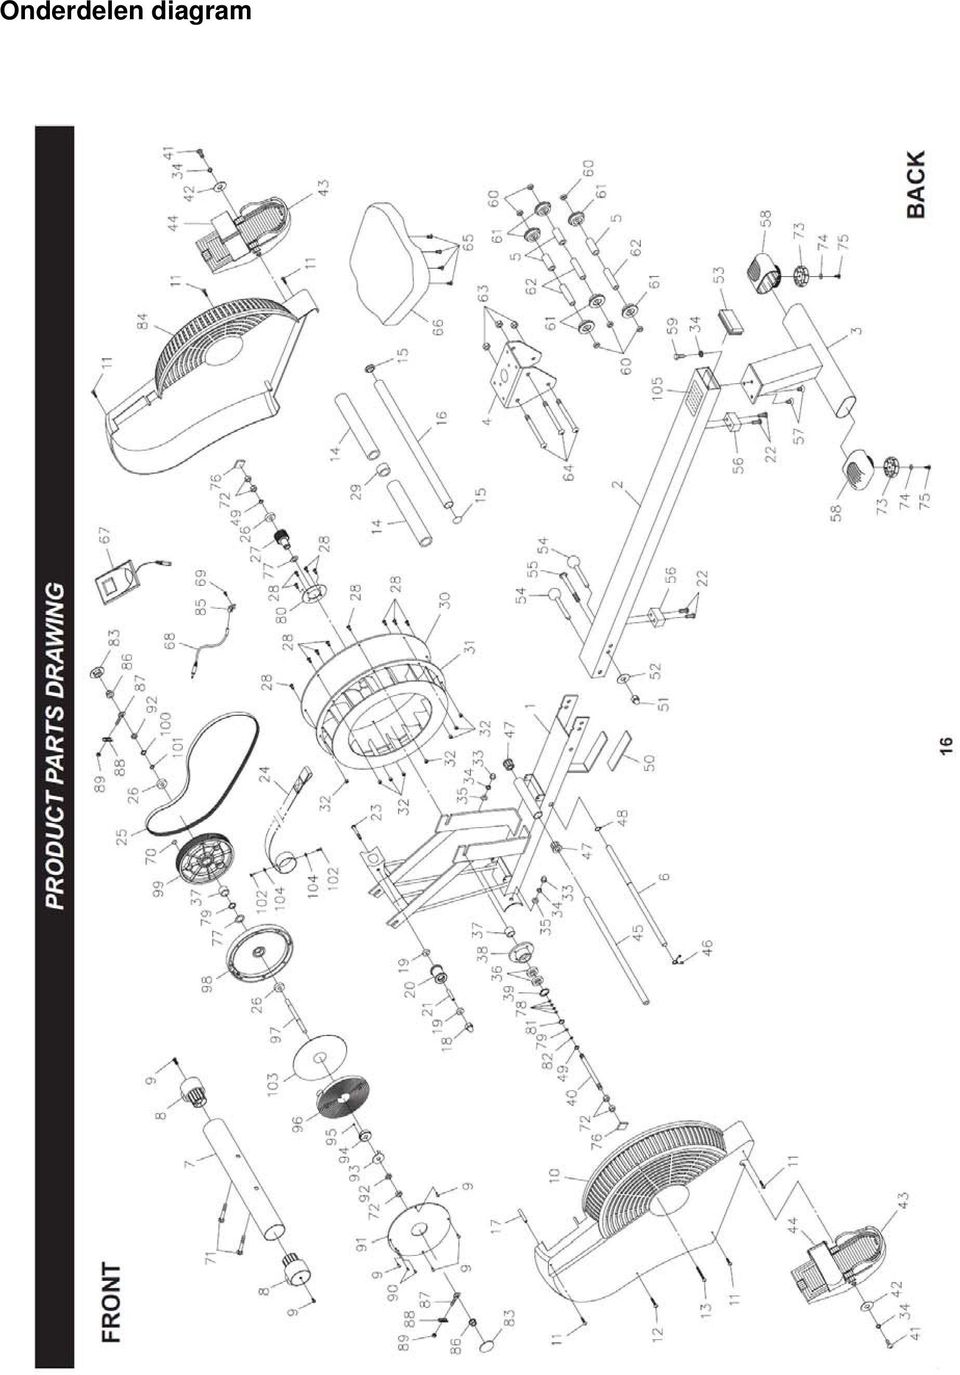
11 Onderdelenlijst Onderdeel Nr. Beschrijving Aantal 1 Hoofdframe 1 2 Rails 1 3 Achter standard 1 4 Zitting houder 1 5 Foam afstandshouder 3 6 Stopper 1 7 Voor standaard 1 8 Eindkapje 2 9 Schroef (M4 x 12mm) 6 10 Linker kap 1 11 Schroef (M5 x 15mm) 6 12 Schroef (M5 x 25mm) 1 13 Schroef (M5 x 70mm) 1 14 Foam 2 15 Rond eindkapje 2 16 Stuur 1 17 Busje 1 18 Borgmoer (M8 x 1.25mm) 1 19 Lager (698z) 2 20 Trekkoord roller 1 21 Afstandsbusje (8.2 x 10.5 x 26.2mm) 1 22 Inbusbout (M8 x 1.25 x 25mm) 4 23 Inbusbout M8 x 1.25 X 57mm) 1 24 Trekkoord 1 25 Multiriem 1 26 Lager (6000z) 3 27 Pulley 1 28 Schroef (M5 x 0.8 x 12mm) Busje 1 30 Vliegwielafdekking 1 31 Vliegwiel 1 32 Borgmoer (M5 x 0.5) 8 33 Dopmoer (M8 x 1.25) 2 34 Veerring (M8) 5 35 Gebogen ring (M8) 2 36 Lager (6903z) 2 37 Meeneemlager (HF1716) 2 38 Lager behuizing 1 39 Binnen C ring (30mm) 1 40 As 1 41 Inbusbout (M8 x 1.25 x 15mm) 2 42 Ring (M8) 2 43 Voetplaat (L+R) 2 44 Voetplaat strap 2 45 Voetplaathouder 1 46 Veerclip 1 47 Busje 2 48 C ring (12.7mm) 1 49 C ring (10mm) 2 50 Foam 1 51 Dopmoer 1 52 Ring (M10) 1 53 Eindkapje 1 54 Pin 2
 1 19 Lager (698z) 2 20 Trekkoord roller 1 21 Afstandsbusje (8.2 x 10.5 x 26.2mm) 1 22 Inbusbout (M8 x 1.25 x 25mm) 4 23 Inbusbout M8 x 1.")
12 55 Inbusbout (M10 x 1.5 x 100mm) 1 56 Stop bumper 2 57 Bout (M8 x 1.25 x 15mm) 2 58 Ovaal eindkapje (30mm x 60mm) 2 59 Bout (M8 x 1.25 x 15mm) 1 60 Afstansbusje 6 61 Wieltje 6 62 Asje 3 63 Borgmoer (M10 x 1.5 x 7mm) 3 64 Bout (M10 x 1.5 x 105mm) 3 65 Bout (M6 x 1 x 15mm) 4 66 Zitting 1 67 Computer 1 68 Sensorkabel 1 69 Schroef (M5 x 8mm) 1 70 Magneet 1 71 Slotbout (M8 x 1.25 x 65mm) 2 72 Moer (3/8-26 x 7mm) 5 73 Rubber voetje 2 74 Ring (M6) 2 75 Schroef (M5 x 12mm) 2 76 Foam 2 77 Borgmoer 2 78 Ring 4 79 Nylon ring 2 80 Plaatje 1 81 C rinf (17mm) 1 82 Nylon ring 1 83 Beschermkapje 2 84 Rechter kap 1 85 Sensor clip 1 86 Moer 2 87 Bout (M6 x 1 x 35mm) 2 88 Spanner 2 89 Moer (M6 x 1) 2 90 Schroef (M3 x 12mm) 2 91 Afdekplaat veerpakket 1 92 Moer 2 93 Veerhouder 1 94 Veerbus 1 95 Schroef (M4 x 0.7 x 6mm) 1 96 Veer 1 97 Pulley as 1 98 Veerbox 1 99 Multiriem Pulley C ring (9mm) Ring Schroef (M5 x 0.8 x 12mm) Disk Ring Waarschuwings label Sleutel Inbussleutel (5mm) Inbussleutel (6mm) met schroevendraaier Handleiding 1
 2 72 Moer (3/8-26 x 7mm) 5 73 Rubber voetje 2 74 Ring (M6) 2 75 Schroef (M5 x 12mm) 2 76 Foam 2 77 Borgmoer 2 78 Ring 4 79 Nylon ring 2 80 Plaatje 1 81 C rinf (17mm) 1 82 Nylon ring 1 83")
13 USER MANUAL Joy Sport Concept Air Power

14 Joy Sport Importer Fitness-Import Timmermannsweg AP Ysselsteyn (LB) Dear customer, We want to thank you for having chosen a JOY SPORT product, and wish you a lot of fun and success during training with your JOY SPORT exercisers. Please note and follow the enclosed safety and assembly instructions carefully. If you have questions please do not hesitate to contact us. Guarantee, This guarantee covers all manufacturing and material flaws on JOY SPORT products purchased from an authorized JOY SPORT dealer for a period of 24 months from purchase. If you wish to make a claim under the guarantee, JOY SPORT shall be entitled to repair or replace the defective unit or part at its discretion. The owner of the unit must pay for the transport costs and any dealer's workshop costs. To make a claim under the guarantee, take your guarantee card to your dealer. The dealer will then take the necessary action. If this is not possible, contact your national JOY SPORT importer. The following are not covered by the guarantee : normal wear and tear and the consequences of improper treatment or damage caused by the purchaser or third persons and faults which are due to other circumstances. Claims may not be made under the guarantee if modifications have been made to the original construction or equipment or if JOY SPORT original parts were not used to repair the unit. In no event the manufacturer shall be liable for incidental or consequential losses, damages or expenses in connection with exercise products. Fitness-Import Timmermannsweg AP Ysselsteyn (LB) info@joysport.nl

15 BEFORE YOU BEGIN Thank you for choosing the Air Rower. We take great pride in producing this quality product and hope it will provide many hours of quality exercise to make you feel better, look better, and enjoy life to its fullest. It's a proven fact that a regular exercise program can improve your physical and mental health. Too often, our busy lifestyles limit our time and opportunity to exercise. The Air Rower provides a convenient and simple method to begin your assault on getting your body in shape and achieving a happier and healthier lifestyle. Before reading further, please review the drawing below and familiarize yourself with the parts that are labeled. Read this manual carefully before using the Air Rower. Although construct its products with the finest materials and uses the highest standards of manufacturing and quality control, there can sometimes be missing parts or incorrectly sized parts. If you have any questions or problems with the parts included with your Air Rower please do not return the product. Contact us FIRST! Be sure to have the name and model number of the product available when you contact us. Handlebar Meter Left Cover Pedal Cap Right Cover Front Stabilizer Seat Warning Label Rail Pull Pins Pedal Cap Pedal Strap Seat Carriage Oval Endcap Rear Stand THE FOLLOWING TOOLS ARE INCLUDED FOR ASSEMBLY : Wrench Allen Wrench (5mm) 4 Allen Wrench (6mm)

16 HARDWARE IDENTIFICATION CHART This chart is provided to help identify the hardware used in the assembly process. Place the washers or the ends of the bolts or screws on the circles to check for the correct diameter. Use the small scale to check the length of the bolts and screws. 3/16" 1/4" 5/16" 3/8" 1/2" INCHES 0 1/2 1 1/2 2 1/2 3 1/2 4 1/2 5 1/2 6 in. mm MILLIMETERS NOTICE: The length of all bolts and screws, except those with flat heads, is measured from below the head to the end of the bolt or screw. Flat head bolts and screws are measured from the top of the head to the end of the bolt or screw. length length After unpacking the unit, open the hardware bag and make sure that you have all the following items. Some hardware may be already attached to the part. Part Number and Description Qty 22 Bolt, Button Head (M8 x 1.25 x 25mm) 2 41 Bolt, Button Head (M8 x 1.25 x 15mm) 2 33 Acorn Nut (M8 x 1.25) 2 51 Acorn Nut (M10 x 1.5) 1 34 Lock Washer (M8) 5 35 Arc Washer (M8) 2 42 Washer (M8) 2 52 Washer (M10) 1 55 Bolt, Button Head (M10 x 1.5 x 100mm) 1 57 Bolt, Flat Head (M8 x 1.25 x 15mm) 2 59 Bolt, Hex Head (M8 x 1.25 x 15mm) 1 71 Carriage Bolt (M8 x 1.25 x 65mm) 2 6

17 ASSEMBLY INSTRUCTIONS Place all parts from the box in a cleared area and position them on the floor in front of you. Remove all packing materials from your area and place them back into the box. Do not dispose of the packing materials until assembly is completed. Read each step carefully before beginning. NOTE: There are some packing parts attached on the Air Rower. Please follow the steps below to remove them before any assembly. These parts are only for packing, do not dispose of the packing materials until assembly is completed. STEP 1 Remove the CARDBOARD ROLLER from the front of the MAIN FRAME(1) by removing the SCREWS and WASHERS. STEP 2 A BUCKLE has been attached to the STRAP(24) to prevent the STRAP(24) from returning into the main body of the 1399 Air Rower during shipping. Remove the BUCKLE by following these steps: 1. Refer to detail view 1. Pull the STRAP(24) away from the main body about 8 inches. Use one hand to hold the STRAP(24) at position A while using the other hand to pull the STRAP(24) loop on the top of the BUCKLE to the position as shown in detail view Refer to detail view 2. Continue to hold the STRAP(24) at position A. Pull the STRAP(24) from position B until the STRAP(24) is completely removed from the BUCKLE. Make sure the STRAP(24) isn't twisted and let it return into the main body of the 1399 Air Rower. The STRAP(24) will hold the HANDLEBAR(16) taut against the MAIN FRAME(1) Buckle Buckle A B Buckle A Cardboard Roller Screws Washers 7
 by removing the SCREWS and WASHERS.")
18 ASSEMBLY INSTRUCTIONS STEP 3 Make sure the Wheels on the FRONT STABILIZER(7) face the front. Attach the FRONT STABILIZER(7) to the MAIN FRAME(1) with CARRIAGE BOLTS(M8x1.25x65mm)(71), ARC WASHERS(M8)(35), LOCK WASHERS(M8)(34), and ACORN NUTS(M8x1.25)(33). Wheel Wheel 8

19 ASSEMBLY INSTRUCTIONS STEP 4 Locate the C Ring(48) on the STOPPER BAR(6). Insert the longer end of the STOPPER BAR(6) through the MAIN FRAME(1). Secure the STOPPER BAR(6) in position with the SPRING CLIP(46). STEP 5 There is an L decal on the LEFT PEDAL CAP(43L), and an R decal on the RIGHT PEDAL CAP(43R). Insert the PEDAL SHAFT(45) through the holes on the MAIN FRAME(1). Place the LEFT PEDAL CAP(43L) onto the left end of the PEDAL SHAFT(45) and place the RIGHT PEDAL CAP(43R) onto the right end of the PEDAL SHAFT(45), and slide them toward the MAIN FRAME(1). Then secure the PEDAL CAPS (43L, 43R) with WASHERS(M8)(42), LOCK WASHERS(M8)(34), and BUTTON HEAD BOLTS(M8x1.25x15mm)(41) at both sides of the PEDAL SHAFT(45). NOTE: You need to use two Allen wrenches to tighten the BUTTON HEAD BOLTS(M8x1.25x15mm)(41) at both ends of the PEDAL SHAFT(45) at the same time. L R 9
 onto the left end of the PEDAL SHAFT(45) and place the RIGHT PEDAL CAP(43R) onto the right end of the PEDAL SHAFT(45), and slide them toward the MAIN FRAME(1).")
20 ASSEMBLY INSTRUCTIONS STEP 6 Slide the SEAT(66) onto the RAIL(2). Attach the STOPPER BUMPER(56) to the RAIL(2) with BUTTON HEAD BOLTS(M8x1.25x25mm)(22). Also, please verify that the other STOPPER BUMPER(56) have already been assembled at the factory. If it has not been pre-assembled, then please assemble at this time. STEP 7 Attach the REAR STAND(3) to the RAIL(2) with a HEX BOLT(M8x1.25x15mm)(59) and a LOCK WASHER(M8)(34) from inside the RAIL(2) and two FLAT HEAD BOLTS(M8x1.25x15mm)(57) from underneath. Tighten all three bolts only after all three have been started. Press the RAIL CAP(53) into the back end of the RAIL(2). (Assembled at the factory) 10
(59) and a LOCK WASHER(M8)(34) from inside the RAIL(2) and two FLAT HEAD BOLTS(M8x1.25x15mm)(57) from underneath.")
21 ASSEMBLY INSTRUCTIONS STEP 8 Attach the RAIL(2) to the MAIN FRAME(1) with BUTTON HEAD BOLT(M10x1.5x100mm)(55), WASHER(M10)(52), and ACORN NUT(M10x1.5)(51). Lock the RAIL(2) in position with the two LOCKING PINS(54). STEP 9 Install two AA batteries into the METER(67), the batteries are not included. See page 12 for detailed battery installation instructions. Connect the SENSOR WIRE(68) to the METER(67). Press the METER(67) into the opening in the COVERS(10, 84). 11
22 OPERATIONAL INSTRUCTIONS USING THE FITNESS METER POWER ON : POWER OFF : Pull the HANDLEBAR(16) or push the button. Automatic shut off after four minutes of inactivity. DIST TIME CAL FUNCTION BUTTON: Press to select the function value displays of DISTANCE, TIME, and CALORIES. Reset all functions to zero by pressing the button and holding it down for four seconds. MODE FUNCTIONS: SPEED: Displays the current speed on upper display from zero to miles per hour. SCAN: Lower display automatically scans each function of DISTANCE, TIME, and CALORIES in sequence every six seconds. DISTANCE: TIME: Displays the distance from zero to 99.9 miles. Displays the time from one second up to 99:59 minutes. CALORIES: NOTE: Displays the calorie consumption from zero to Kcal. The calorie readout is an estimate for an average user. It should be used only as a comparison between workouts on this unit. The meter will shut off automatically after four minutes of inactivity. All function values will be kept. Press the MODE button and hold it down for four seconds to reset all functions to zero. HOW TO INSTALL AND REPLACE BATTERIES: AA Batteries 1. Use your hand or a simple tool to pry the METER(67) from the side covers. 2. The meter operates with two AA batteries, the batteries are not included. Refer to the illustration to install or replace the batteries. NOTE: 1. Do not mix a new battery with an old battery. 2. Use the same type of battery. Do not mix an alkaline battery with another type of battery. 3. Rechargeable batteries are not recommended. 12
23 FRONT PRODUCT PARTS DRAWING 16 BACK
24 PARTS LIST PART# PART NAME QTY 1 Main Frame 1 2 Rail 1 3 Rear Stand 1 4 Seat Carriage 1 5 Foam Spacer 3 6 Stopper Bar 1 7 Front Stabilizer 1 8 Front Endcap 2 9 Screw, Round Head (M4 x 12mm) 6 10 Left Cover 1 11 Screw, Round Head (M5 x 15mm) 6 12 Screw, Round Head (M5 x 25mm) 1 13 Screw, Round Head (M5 x 70mm) 1 14 Foam Grip 2 15 Round Plug (25.4mm) 2 16 Handlebar 1 17 Sleeve (ø16 x 80mm) 1 18 Nylock Nut (M8 x 1.25) 1 19 Bearing (698z) 2 20 Strap Roller 1 21 Spacer Sleeve (ø8.2 x ø10.5 x 26.2mm) 1 22 Bolt, Button Head (M8 x 1.25 x 25mm) 4 23 Bolt, Button Head (M8 x 1.25 x 57mm) 1 24 Strap 1 25 V Belt 1 26 Bearing (6000z) 3 27 Small Belt Pulley 1 28 Screw, Round Head (M5 x 0.8 x 12mm) Strap Bushing 1 30 Fan Plate 1 31 Fan Wheel 1 32 Nylock Nut (M5 x 0.5) 8 33 Acorn Nut (M8 x 1.25) 2 34 Lock Washer (M8) 5 35 Arc Washer (M8) 2 36 Bearing (6903z) 2 37 One Way Bearing (HF1716) 2 38 Bearing Housing 1 39 Inner C Ring (30mm) 1 40 Fan Axle 1 41 Bolt, Button Head (M8 x 1.25 x 15mm) 2 42 Washer (M8 x ø22 x 2mm thick) 2 43 Pedal Cap 2 44 Pedal Strap 2 45 Pedal Shaft 1 46 Spring Clip 1 47 Bushing (ø13 x ø25.4 x 20mm) 2 48 C Ring (12.7mm) 1 49 C Ring (10mm) 2 50 Foam Pad 1 51 Acorn Nut (M10 x 1.5) 1 52 Washer (M10) 1 53 Rail Cap 1 54 Pull Pin 2 55 Bolt, Button Head (M10 x 1.5 x 100mm) 1 17
25 PARTS LIST PART# PART NAME QTY 56 Stopper Bumper 2 57 Bolt, Flat Head (M8 x 1.25 x 15mm) 2 58 Oval Endcap (30mm x 60mm) 2 59 Bolt, Hex Head (M8 x 1.25 x 15mm) 1 60 Roller Spacer (ø10.2 x ø16 x 5.5mm) 6 61 Roller 6 62 Spacer Tube (ø10.2 x ø12 x 66mm) 3 63 Nylock Nut (M10 x 1.5 x 7mm Thick) 3 64 Bolt, Button Head (M10 x 1.5 x 105mm) 3 65 Bolt, Round Head (M6 x 1 x 15mm) 4 66 Seat 1 67 Meter 1 68 Sensor Wire 1 69 Screw, Round Head (M5 x 8mm) 1 70 Magnet 1 71 Carriage Bolt (M8 x 1.25 x 65mm) 2 72 Nut (3/8"-26 x 7mm thick) 5 73 Rubber Stand 2 74 Washer (M6) 2 75 Screw, Round Head (M5 x 12mm) 2 76 Foam Pad (25 x 25 x 5mm thick) 2 77 Nylon Washer (ø17.5 x ø25 x 1 mm thick) 2 78 Washer (ø17.2 x ø21 x 1 mm thick) 4 79 Nylon Washer (ø10.2 x ø16.5 x 1 mm thick) 2 80 Support Plate 1 81 C Ring (17mm) 1 82 Nylon Washer (ø10.2 x ø16 x 0.5 mm thick) 1 83 Protection Cap 2 84 Right Cover 1 85 Sensor Clip 1 86 Flange Nut (3/8"-26) 2 87 Eyelet Bolt (M6 x 1 x 35mm) 2 88 Tension Bracket 2 89 Nut (M6 x 1) 2 90 Screw, Round Head (M3 x 12mm) 2 91 Spring Box Cover 1 92 Thin Nut (3/8"-26, 0.16" thick) 2 93 Spring Holder 1 94 Spring Core 1 95 Set screw (M4 x 0.7 x 6mm) 1 96 Spring 1 97 Pulley Axle 1 98 Spring Box 1 99 Belt Pulley C Ring (9mm) Washer (ø10.2 x ø13 x 0.5 mm thick) Screw, Flat Head (M5 x 0.8 x 12mm) Rubbing Disc Washer (ø5 x ø11 x 1 mm thick) Warning Label Wrench Allen Wrench (5mm) Allen Wrench (6mm) w/ Screwdriver Manual 1 18
HANDLEIDING Joy Sport Relax
 HANDLEIDING Joy Sport Relax Joy Sport Importeur Fitness-Import Timmermannsweg 46 5813 AP Ysselsteyn (LB) info@joysport.nl www.joysport.nl Geachte klant, Wij feliciteren u met de aankoop van dit JOY SPORT
HANDLEIDING Joy Sport Marathon
 HANDLEIDING Joy Sport Marathon Joy Sport Importeur Fitness-Import Timmermannsweg 46 5813 AP Ysselsteyn (LB) info@joysport.nl www.joysport.nl Geachte klant, Wij feliciteren u met de aankoop van dit JOY
Joy Sport Concept Air Power
 HANDLEIDING Joy Sport Concept Air Power Joy Sport Importeur Fitness-Import Timmermannsweg 46 5813 AP Ysselsteyn (LB) info@joysport.nl www.joysport.nl Geachte klant, Wij feliciteren u met de aankoop van
2000 Volkswagen Passat GLS
 REAR DOOR WINDOW Rear door window, assembly overview Fig. 304: Exploded View Of Rear Door Window 1 - Door Removing and installing: --> Rear door, removing and installing 2 - Spring nut Qty 2 3 - Screw
HANDLEIDING Te chno Life Pla tinum
 HANDLEIDING Te chno Life Pla tinum 1 Onde rde le n ove rzicht. 3 Onde rde le nlijs t. NR. Naam e n Spe cificatie Aantal. NR. Naam e n Spe cificatie Aantal. 1 Hoofdframe 1 39 Plastic bus 6 2 Gewichtsgeleiders
2006 Volkswagen Jetta TDI
 Door handle and door lock, assembly overview The illustration shows the left side. The right side is derived accordingly from this. Fig. 99: Door Handle And Door Lock, Assembly Overview 1 - Cable For disengaging
Rhythm of Light. Susanne de Graef, Montagehandleiding / Instruction manual
 Rhythm of Light Susanne de Graef, 2016 Montagehandleiding / Instruction manual GELEVERD MATERIAAL / SUPPLIED MATERIAL B. C. D. A. E. F. A. B. C. D. E. F. armatuur / fixture fitting lange staalkabels (3)
OUTDOOR HD DOME IP CAMERA PRODUCT MANUAL GB - NL
 OUTDOOR HD DOME IP CAMERA PRODUCT MANUAL GB - NL GB PARTS & FUNCTIONS 2. ---- 1. ---- 3. ---- 7. ---------- 5. 4. 6. 1. Outdoor IP camera unit 2. Antenna 3. Mounting bracket 4. Network connection 5. Power
OUTDOOR HD BULLET IP CAMERA PRODUCT MANUAL
 OUTDOOR HD BULLET IP CAMERA PRODUCT MANUAL GB - NL GB PARTS & FUNCTIONS 1. 7. ---- 3. ---- 4. ---------- 6. 5. 2. ---- 1. Outdoor IP camera unit 2. Antenna 3. Mounting bracket 4. Network connection 5.
Flybye. Ernst Koning, Montagehandleiding / Instruction manual
 Flybye Ernst Koning, 2018 Montagehandleiding / Instruction manual GELEVERD MATERIAAL / MATERIALS SUPPLIED A. B. C. D. E. F. G. A. B. C. D. E. F. G. H. H. lichtbuis / lighting tube plafondkap / ceiling
Dagelijkse checklist Daily checklist
 Dagelijkse checklist Daily checklist Sluiting met snelspanner Verstelbare hoofdsteun Verstelbare en aanpasbare riem Verstelbare voetsteunen Verstelbare riemen van de voetsteun Quick release locked Head
Gebruikershandleiding
 ProForm Proton Hometrainer Gebruikershandleiding Belangrijk! Lees alle voorzorgsmaatregelen en instructies in deze handleiding voor u dit apparaat in gebruik neemt. Bewaar deze handleiding voor naslag.
Gebruikershandleiding
 Krachtstation Homegym KH 1 Gebruikershandleiding Voor vragen of ontbrekende onderdelen kunt u contact opnemen met Fitness Benelux: Twekkelerweg 263 7553 LZ Hengelo Nederland T +31 (0)74-7600219 E service@fitnessbenelux.nl
Wij willen u bedanken dat u hebt gekozen voor een hometrainer van QualitySports en wensen u veel plezier en succes tijdens de training.
 Beste klanten, Wij willen u bedanken dat u hebt gekozen voor een hometrainer van QualitySports en wensen u veel plezier en succes tijdens de training. Let op en volg de bijgevoegde Veiligheids-en montage-instructies,
EM7680 Firmware Update by Micro SD card
 EM7680 Firmware Update by Micro SD card 2 NEDERLANDS/ENGLISH EM7680 Firmware update by Micro SD card Table of contents 1.0 (NL) Introductie... 2 2.0 (NL) Firmware installeren... 2 3.0 (NL) Opmerking...
Preschool Kindergarten
 Preschool Kindergarten Objectives Students will recognize the values of numerals 1 to 10. Students will use objects to solve addition problems with sums from 1 to 10. Materials Needed Large number cards
MONTAGE INSTRUCTIE ASSEMBLY INSTRUCTION
 MONTAGE INSTRUCTIE ASSEMBLY INSTRUCTION - 1. Waterpas stellen. De groef aan de zijkant van de beschermdeksel moet gelijk staan met de deellijn van het inbouw box. 2. Zet de inbouw box vast in de muur.
Onderdeel Nr R0896A 1996 WEIDER is een merk van ICON Health & Fitness, Inc.
 Onderdeel Nr. 1327068 R0896A 96 WEIDER is een merk van ICON Health & Fitness, Inc. Gedrukt in de VS INHOUD BELANGRIJKE VOORZORGSMAATREGELEN................................................2 VOORDAT U BEGINT...................................................................3
Settings for the C100BRS4 MAC Address Spoofing with cable Internet.
 Settings for the C100BRS4 MAC Address Spoofing with cable Internet. General: Please use the latest firmware for the router. The firmware is available on http://www.conceptronic.net! Use Firmware version
Kies uit setje A of B voor deze bakfiets Choose between set A or B for this transportbike
 Kies uit setje A of B voor deze bakfiets Choose between set A or B for this transportbike A A Selecteer op bestelformulier: Houtenbak gat 5 punts bevestiging Set A: standaard setje voor bevestiging icm
INSTALLATION INSTRUCTION
 TV MOUNT INSTALLATION INSTRUCTION MODEL:HA051 HA051-T1 HA051-T6 Max VESA: 200 X 200 mm/8x8" Please read this instruction carefully before installation. Fits for most 14-32 inches Plasma, LCD and LED TVs.
EU Declaration of Conformity and safety instructions EU Conformiteitsverklaring en veiligheidsinstructies
 EU Declaration of Conformity and safety instructions EU Conformiteitsverklaring en veiligheidsinstructies Battery operated UNICOM 300 N51 UNICOM 300 met batterijvoeding N51 Explosion safety instructions
NEDERLANDS. Display Instructies. Knoppen. Geeft afwisselend Tijd, Datum en Temperatuur weer, kan ook ingesteld worden op enkel tijd
 NEDERLANDS Het ziet eruit als een simpel blokje hout, maar maak een geluid (knip met je vingers, kuch, klap in je handen, of tip op de bovenkant) en het geeft onmiddelijk en afwisselend tijd, datum en
User manual Gebruikershandleiding. Version 1.0 March
 User Manual Hotel Safe GB NL User manual Gebruikershandleiding 1 User Manual Overview LED display Override key cover * button # button General Thank you for choosing a SafetyFirst Hotel Safe. Before operating
Montagehandleiding: doucheset
 Montagehandleiding: doucheset Installation manual: showerset 0 6 5 7 8 9 0 8 9 7 5 6 Controleer voor installatie of alle onderdelen aanwezig zijn. Check if all parts are present before installation. 5
EM7580 Firmware Update by Micro SD card
 EM7580 Firmware Update by Micro SD card 2 NEDERLANDS/ENGLISH EM7580 Firmware update by Micro SD card Table of contents 1.0 (NL) Introductie... 3 2.0 (NL) Firmware installeren... 3 3.0 (NL) Opmerking...
Quick start guide. Powerbank MI Mah. Follow Fast All rights reserved. Page 1
 Quick start guide Powerbank MI 16.000 Mah Follow Fast 2016 - All rights reserved. Page 1 ENGLISH The Mi 16000 Power Bank is a very good backup option for those on the move. It can keep you going for days
Function checklist for the ML-350 or XL-350 with a print set. Missing loop.
 Function checklist for the ML-350 or XL-350 with a 260217 print set. Below mentioned check-point should resolve function problems of the lift systems. Missing loop. When a lift is connected to an external
2019 SUNEXCHANGE USER GUIDE LAST UPDATED
 2019 SUNEXCHANGE USER GUIDE LAST UPDATED 0 - -19 1 WELCOME TO SUNEX DISTRIBUTOR PORTAL This user manual will cover all the screens and functions of our site. MAIN SCREEN: Welcome message. 2 LOGIN SCREEN:
WWW.EMINENT-ONLINE.COM
 WWW.EMINENT-ONLINE.COM NL HANDLEIDING USERS MANUAL EM1033 HANDLEIDING NL EM1033 TWEE POORTS AUTOMATISCHE KVM SWITCH INHOUDSOPGAVE: PAGINA 1.0 Introductie.... 2 1.1 Functies en kenmerken.... 2 1.2 Inhoud
INBEGREPEN ACCESSOIRES LIJST ONDERDELEN LIJST ASSEMBLAGE DIAGRAM. M8x50 mm bout (4 stuks) Schroevendraaier 10, 13, 15, 17 (1 stuk)
 Schroevendraaier 10, 13, 15, 17 (1 stuk)") OXISTEP HANDLEIDING INBEGREPEN ACCESSOIRES LIJST M8x50 mm bout (4 stuks) Ø 8 Sluitring (6 stuks) M8 moerkap (6 stuks) Schroevendraaier 10, 13, 15, 17 (1 stuk) Ø 8 Sluitring (11 stuks) M8 moer (3 stuks)
OXISTEP HANDLEIDING INBEGREPEN ACCESSOIRES LIJST M8x50 mm bout (4 stuks) Ø 8 Sluitring (6 stuks) M8 moerkap (6 stuks) Schroevendraaier 10, 13, 15, 17 (1 stuk) Ø 8 Sluitring (11 stuks) M8 moer (3 stuks)
Introductie in flowcharts
 Introductie in flowcharts Flow Charts Een flow chart kan gebruikt worden om: Processen definieren en analyseren. Een beeld vormen van een proces voor analyse, discussie of communicatie. Het definieren,
L.Net s88sd16-n aansluitingen en programmering.
 De L.Net s88sd16-n wordt via één van de L.Net aansluitingen aangesloten op de LocoNet aansluiting van de centrale, bij een Intellibox of Twin-Center is dat de LocoNet-T aansluiting. L.Net s88sd16-n aansluitingen
DALISOFT. 33. Configuring DALI ballasts with the TDS20620V2 DALI Tool. Connect the TDS20620V2. Start DALISOFT
 TELETASK Handbook Multiple DoIP Central units DALISOFT 33. Configuring DALI ballasts with the TDS20620V2 DALI Tool Connect the TDS20620V2 If there is a TDS13620 connected to the DALI-bus, remove it first.
EU Declaration of Conformity and safety instructions EU Conformiteitsverklaring en veiligheidsinstructies ISC 230B
 EU Declaration of Conformity and safety instructions EU Conformiteitsverklaring en veiligheidsinstructies ISC 230B Explosion safety instructions (Ex) (EN) ISC230B is approved for use outside the explosion-hazardous
Handleiding Crosstrainer Focus Fitness Fox 3
 Handleiding Crosstrainer Focus Fitness Fox 3 Opengemaakte tekening 1 2 component parts M8*P1.25*55L*S13 4pcs 8* 19*2T 4pcs M6*43L*S22L 4pcs 6* 13*1T 4pcs 6 6.1*1.6T 4pcs M6*5.5T 4pcs M8*P1.25*20L 2pcs
SAMPLE 11 = + 11 = + + Exploring Combinations of Ten + + = = + + = + = = + = = 11. Step Up. Step Ahead
 7.1 Exploring Combinations of Ten Look at these cubes. 2. Color some of the cubes to make three parts. Then write a matching sentence. 10 What addition sentence matches the picture? How else could you
EM7680 Firmware Update by OTA
 EM7680 Firmware Update by OTA 2 NEDERLANDS/ENGLISH EM7680 Firmware update by OTA Table of contents 1.0 (NL) Introductie... 3 2.0 (NL) Firmware installeren... 3 3.0 (NL) Release notes:... 3 4.0 (NL) Overige
1/8 ATLAS Atlas cabinet cabinet 1 7
 TLS cabinet / / / 0 D E F G H / L x Lx x L / x x D E Dx Ex / x x x x x x Fx x Hx Gx Fx Fx Fx Fx G H G H H G 0 0 0 0 0 / L / 0 NL: Deze kast bevat twee gaten aan de achterkant om aan de wand te kunnen bevestigen.
256 kb Memory in NMS 8250, 8255 and 8280
 256 kb Memory in NMS 8250, 8255 and 8280 Supplied by Bastiaan Huber, 2001 Converted to PDF by HansO, 2001 Dutch text follows the english text! MEMORY-UPGRADE to 256Kb This description is only for people
DRAAIDEUR 80/90 PIVOT DOOR
 HANDLEIDING MANUAL DRAAIDEUR 80/90 PIVOT DOOR 800/900 Montagehandleiding Reflex draaideur 80/90 met zijpaneel 80/90 Verstelbaarheid 611801: (770-810) x (770-810) x 1850 mm Verstelbaarheid 611802: (870-910)
RECEPTEERKUNDE: PRODUCTZORG EN BEREIDING VAN GENEESMIDDELEN (DUTCH EDITION) FROM BOHN STAFLEU VAN LOGHUM
 FROM BOHN STAFLEU VAN LOGHUM") Read Online and Download Ebook RECEPTEERKUNDE: PRODUCTZORG EN BEREIDING VAN GENEESMIDDELEN (DUTCH EDITION) FROM BOHN STAFLEU VAN LOGHUM DOWNLOAD EBOOK : RECEPTEERKUNDE: PRODUCTZORG EN BEREIDING VAN STAFLEU
Read Online and Download Ebook RECEPTEERKUNDE: PRODUCTZORG EN BEREIDING VAN GENEESMIDDELEN (DUTCH EDITION) FROM BOHN STAFLEU VAN LOGHUM DOWNLOAD EBOOK : RECEPTEERKUNDE: PRODUCTZORG EN BEREIDING VAN STAFLEU
Handleiding Digipass DP310
 Handleiding Digipass DP310 Deze handleiding geeft u uitleg over het activeren en gebruik maken van uw Digipass. Toetsen van de Digipass OK: voor het aan- of uitschakelen van het apparaat of om een handeling
Quality requirements concerning the packaging of oak lumber of Houthandel Wijers vof (09.09.14)
") Quality requirements concerning the packaging of oak lumber of (09.09.14) Content: 1. Requirements on sticks 2. Requirements on placing sticks 3. Requirements on construction pallets 4. Stick length and
Quality requirements concerning the packaging of oak lumber of (09.09.14) Content: 1. Requirements on sticks 2. Requirements on placing sticks 3. Requirements on construction pallets 4. Stick length and
FRAME [UPRIGHT MODEL] / [DEPTH] / [HEIGHT] / [FINISH] TYPE OF BASEPLATE P Base plate BP80 / E alternatives: ZINC finish in all cases
![FRAME [UPRIGHT MODEL] / [DEPTH] / [HEIGHT] / [FINISH] TYPE OF BASEPLATE P Base plate BP80 / E alternatives: ZINC finish in all cases](/thumbs/60/44127117.jpg "FRAME [UPRIGHT MODEL] / [DEPTH] / [HEIGHT] / [FINISH] TYPE OF BASEPLATE P Base plate BP80 / E alternatives: ZINC finish in all cases") FRAME XS UPRIGHT BASE PLATE UPRIGHT HORIZONTAL PROFILE DIAGONAL PROFILE DESCRIPTION A vertical structure consisting of 2 uprights, joined by a system of bracing profiles, and base plates intended to support
FRAME XS UPRIGHT BASE PLATE UPRIGHT HORIZONTAL PROFILE DIAGONAL PROFILE DESCRIPTION A vertical structure consisting of 2 uprights, joined by a system of bracing profiles, and base plates intended to support
ANT S KINGDOM Here is some advice for setting up your Master Ant Farm!
 ANT S KINGDOM Master NL EN Instructies Mierenboerderij Master Bedankt voor je bestelling van de Mierenboerderij Master. De beste keus! Installatie NL Naast de informatie die te lezen is in ons boekje
FSW-VW-2X2 FSW-VW. Handleiding / Manual
 FSW-VW-2X2 FSW-VW Handleiding / Manual Rev. 1.0 17-03-2014 I Pakketinhoud / Content Accessoires Benodigde gereedschappen / Required Tools Montage / Assembling Onderhoud / Maintenance Veel Gestelde Vragen
AIR-SUSPENSION AIR-SUSPENSION
 AIR-SUSPENSION AIR-SUSPENSION Dunlop Systems and Components Het Wegdam 22 A.J.V. 7496 Luchtveersystemen CA Hengevelde B.V. Het Wegdam The 22 Netherlands 7496 CA Hengevelde Tel.: +31-(0)547-333065 Nederland
Procedure Reset tv-toestellen:
 Procedure Reset tv-toestellen: Volgende procedure is te volgen wanneer er een tv-toestel, op een van de kamers niet meer werkt. TV Re-installation Factory Default Her-installeren van de TV Fabrieksinstellingen
L.Net s88sd16-n aansluitingen en programmering.
 De L.Net s88sd16-n wordt via één van de L.Net aansluitingen aangesloten op de LocoNet aansluiting van de centrale, bij een Intellibox of Twin-Center is dat de LocoNet-T aansluiting. L.Net s88sd16-n aansluitingen
!!!! Wild!Peacock!Omslagdoek!! Vertaling!door!Eerlijke!Wol.!! Het!garen!voor!dit!patroon!is!te!verkrijgen!op! Benodigdheden:!!
 WildPeacockOmslagdoek VertalingdoorEerlijkeWol. Hetgarenvoorditpatroonisteverkrijgenopwww.eerlijkewol.nl Benodigdheden: 4strengenWildPeacockRecycledSilkYarn rondbreinaaldnr8(jekuntnatuurlijkookgewonebreinaaldengebruiken,maar
Travel Survey Questionnaires
 Travel Survey Questionnaires Prot of Rotterdam and TU Delft, 16 June, 2009 Introduction To improve the accessibility to the Rotterdam Port and the efficiency of the public transport systems at the Rotterdam
B1 Woordkennis: Spelling
 B1 Woordkennis: Spelling Bestuderen Inleiding Op B1 niveau gaan we wat meer aandacht schenken aan spelling. Je mag niet meer zoveel fouten maken als op A1 en A2 niveau. We bespreken een aantal belangrijke
The upside down Louisa tutorial by Dorothée: Noortjeprullemie.blogspot.be Written for Compagnie M.: m.com
 The upside down Louisa tutorial by Dorothée: Noortjeprullemie.blogspot.be Written for Compagnie M.: www.compagnie- m.com Dorothée heeft een unieke Compagnie M. hack gemaakt: de Louisa op zijn kop. Als
Gebruiksaanwijzing Crosstrainer Focus Fitness Fox 5 iplus
 Onderdelenlijst. N Main frame R Monitor TOOLS P Rear stabilizer O Central support tube S T Small handlebar Side handle bar Q Front stabilizer Water bottle U Handlebar joint cover Pedal tube joint cover
PIR DC-SWITCH. DC Passive infra-red Detector. Model No. PDS-10 GEBRUIKSAANWIJZING/INSTRUCTION MANUAL
 PIR DC-SWITCH DC Passive infra-red Detector Model No. PDS-10 GEBRUIKSAANWIJZING/INSTRUCTION MANUAL Please read this manual before operating your DETECTOR PIR DC-Switch (PDS-10) De PDS-10 is een beweging
NL Montage Handleiding EN Assembly Manual
 NL Montage Handleiding EN Assembly Manual NL Verpakkingsinhoud EN Package content DU FR NL Inhoud verpakking: 1 grote doos (A), 1 kleine doos (B), en een montageset. EN The packaging consists of 2 boxes,
INDOOR SPEED BIKE Gebruiksaanwijzing Focus Fitness SPIN 8 (Home Use)
") INDOOR SPEED BIKE Gebruiksaanwijzing Focus Fitness SPIN 8 (Home Use) Inhoudsopgave Veiligheidsvoorschriften Waarschuwing Opengemaakte tekening Onderdelenlijst Montage Computerbevelen VEILIGHEIDSVOORSCHRIFTEN
INDOOR SPEED BIKE Gebruiksaanwijzing Focus Fitness SPIN 8 (Home Use) Inhoudsopgave Veiligheidsvoorschriften Waarschuwing Opengemaakte tekening Onderdelenlijst Montage Computerbevelen VEILIGHEIDSVOORSCHRIFTEN
MyDHL+ Van Non-Corporate naar Corporate
 MyDHL+ Van Non-Corporate naar Corporate Van Non-Corporate naar Corporate In MyDHL+ is het mogelijk om meerdere gebruikers aan uw set-up toe te voegen. Wanneer er bijvoorbeeld meerdere collega s van dezelfde
GB - Installation manual Mercedes Benz C-Class A205 convertible wind deflector (from 2015).
.") GB - Installation manual Mercedes Benz C-Class A205 convertible wind deflector (from 2015). DE Montage Anleitung Mercedes Benz C-Klasse Cabrio Windschott (ab 2015). NL Montage handleiding Mercedes Benz
GB - Installation manual Mercedes Benz C-Class A205 convertible wind deflector (from 2015). DE Montage Anleitung Mercedes Benz C-Klasse Cabrio Windschott (ab 2015). NL Montage handleiding Mercedes Benz
HANDLEIDING Joy Sport HT-Excellent
 HANDLEIDING Joy Sport HT-Excellent 1 Joy Sport Importeur Fitness-Import Timmermannsweg 46 5813 AP Ysselsteyn (LB) info@joysport.nl www.joysport.nl Geachte klant, Wij feliciteren u met de aankoop van dit
Limpid Light. design Esther Jongsma & Sam van Gurp, Montagehandleiding / Assembly Instructions
 Limpid Light design Esther Jongsma & Sam van Gurp, 05 Montagehandleiding / Assembly Instructions GELEVERD MATERIAAL / SUPPLIED MATERIAL A. A. B. B. C. D. E. F. G. G. H. I. J. K. / / ophanging / suspension:
(1) De hoofdfunctie van ons gezelschap is het aanbieden van onderwijs. (2) Ons gezelschap is er om kunsteducatie te verbeteren
 De hoofdfunctie van ons gezelschap is het aanbieden van onderwijs. (2) Ons gezelschap is er om kunsteducatie te verbeteren") (1) De hoofdfunctie van ons gezelschap is het aanbieden van onderwijs (2) Ons gezelschap is er om kunsteducatie te verbeteren (3) Ons gezelschap helpt gemeenschappen te vormen en te binden (4) De producties
(1) De hoofdfunctie van ons gezelschap is het aanbieden van onderwijs (2) Ons gezelschap is er om kunsteducatie te verbeteren (3) Ons gezelschap helpt gemeenschappen te vormen en te binden (4) De producties
iconsole HTR 2.1 Hometrainer User manual ENG
 iconsole HTR 2.1 Hometrainer User manual CONTENTS Safety Instruction 3 Check List 4-5 Assembly Instruction 6-12 Exploded Drawing 13 Parts List 14-16 Computer Instruction 17-23 iconsole+ App 24 Training
Bijlage 2: Informatie met betrekking tot goede praktijkvoorbeelden in Londen, het Verenigd Koninkrijk en Queensland
 Bijlage 2: Informatie met betrekking tot goede praktijkvoorbeelden in Londen, het Verenigd Koninkrijk en Queensland 1. Londen In Londen kunnen gebruikers van een scootmobiel contact opnemen met een dienst
Smeertechniek Rotterdam Cairostraat 74 3047 BC Rotterdam Tel.: 010 466 62 55 Fax 010 466 66 55 Internet: www.smeertechniek.
 DEZE KOPPELINGEN WORDEN GEBRUIKT IN OLIE- EN VETSMEERSYSTEMEN IN PLAATS VAN DE SNIJRINGKOPPELINGEN ( SNIJRING & DRUKMOER ) KOPPELEN EN ONTKOPPELEN VAN DE LEIDING KAN HERHAALD WORDEN ZONDER BESCHADIGING
Installatie van Windows 10 op laptops. Windows 10 installation on laptops
 Installatie van Windows 10 op laptops In mei vindt de migratie naar Windows 10 plaats op de laptops. Per dag worden ongeveer 25 laptops gemigreerd. Elke laptop heeft een ISSC-sticker met een laptop-nummer.
HANDLEIDING Joy Sport CT-Superieur
 HANDLEIDING Joy Sport CT-Superieur 1 Joy Sport Importeur Fitness-Import Timmermannsweg 46 5813 AP Ysselsteyn (LB) info@joysport.nl www.joysport.nl Geachte klant, Wij feliciteren u met de aankoop van dit
EM7680 Firmware Auto-Update for Kodi 17.2
 EM7680 Firmware Auto-Update for Kodi 17.2 2 NEDERLANDS/ENGLISH EM7680 Firmware Auto-update for Kodi 17.2 Table of contents 1.0 (NL) Introductie... 3 2.0 (NL) Firmware installeren... 3 3.0 (NL) Opmerking...
EM7680 Firmware Update by Micro SD card or USB
 EM7680 Firmware Update by Micro SD card or USB 2 NEDERLANDS/ENGLISH EM7680 Firmware update by Micro SD card or USB Table of contents 1.0 (NL) Introductie... 3 2.0 (NL) Firmware installeren... 3 3.0 (NL)
Engels op Niveau A2 Workshops Woordkennis 1
 A2 Workshops Woordkennis 1 A2 Workshops Woordkennis 1 A2 Woordkennis 1 Bestuderen Hoe leer je 2000 woorden? Als je een nieuwe taal wilt spreken en schrijven, heb je vooral veel nieuwe woorden nodig. Je
1. Onderdelenlijst Controlelijst Explosietekening Veiligheidsinstructies Montage Trainingsinstructies...
 Index 1. Onderdelenlijst...3 2. Controlelijst...5 3. Explosietekening.....6 4. Veiligheidsinstructies.....7 5. Montage......9 6. Trainingsinstructies......21 7. Trainingsadvies......22 Handleiding Focus
ANGSTSTOORNISSEN EN HYPOCHONDRIE: DIAGNOSTIEK EN BEHANDELING (DUTCH EDITION) FROM BOHN STAFLEU VAN LOGHUM
 FROM BOHN STAFLEU VAN LOGHUM") Read Online and Download Ebook ANGSTSTOORNISSEN EN HYPOCHONDRIE: DIAGNOSTIEK EN BEHANDELING (DUTCH EDITION) FROM BOHN STAFLEU VAN LOGHUM DOWNLOAD EBOOK : ANGSTSTOORNISSEN EN HYPOCHONDRIE: DIAGNOSTIEK STAFLEU
Read Online and Download Ebook ANGSTSTOORNISSEN EN HYPOCHONDRIE: DIAGNOSTIEK EN BEHANDELING (DUTCH EDITION) FROM BOHN STAFLEU VAN LOGHUM DOWNLOAD EBOOK : ANGSTSTOORNISSEN EN HYPOCHONDRIE: DIAGNOSTIEK STAFLEU
Illustrator Tutorial - How to Create a Watch
 Illustrator Tutorial - How to Create a Watch «Andrew Bannecker - Simple, True and Tender Vector Movie Posters by GABZ» Categories: Tutorials Have you ever seen print advertising of some watch brand before?
Firewall van de Speedtouch 789wl volledig uitschakelen?
 Firewall van de Speedtouch 789wl volledig uitschakelen? De firewall van de Speedtouch 789 (wl) kan niet volledig uitgeschakeld worden via de Web interface: De firewall blijft namelijk op stateful staan
EVA. Uitgave : Januari 2010 Edition : January 2010
 Montagehandleiding Installation manual EVA Uitgave : Januari 2010 Edition : January 2010 Inhoud pagina Contents page lees dit eerst! oneigenlijk gebruik montage notities First read this! improper use
Registratie- en activeringsproces voor de Factuurstatus Service NL 1 Registration and activation process for the Invoice Status Service EN 10
 QUICK GUIDE B Registratie- en activeringsproces voor de Factuurstatus Service NL 1 Registration and activation process for the Invoice Status Service EN 10 Version 0.19 (Oct 2016) Per May 2014 OB10 has
EM7680 Firmware Update by Micro SD card or USB stick
 EM7680 Firmware Update by Micro SD card or USB stick 2 NEDERLANDS/ENGLISH EM7680 Firmware update by Micro SD card or USB stick Table of contents 1.0 (NL) Introductie... 3 2.0 (NL) Firmware installeren...
Chapter 4 Understanding Families. In this chapter, you will learn
 Chapter 4 Understanding Families In this chapter, you will learn Topic 4-1 What Is a Family? In this topic, you will learn about the factors that make the family such an important unit, as well as Roles
Shipment Centre EU Quick Print Client handleiding [NL]
![Shipment Centre EU Quick Print Client handleiding [NL]](/thumbs/78/76906513.jpg "Shipment Centre EU Quick Print Client handleiding [NL]") Shipment Centre EU Quick Print Client handleiding [NL] Please scroll down for English. Met de Quick Print Client kunt u printers in Shipment Centre EU configureren. De Quick Print Client kan alleen op
Shipment Centre EU Quick Print Client handleiding [NL] Please scroll down for English. Met de Quick Print Client kunt u printers in Shipment Centre EU configureren. De Quick Print Client kan alleen op
Mobile concrete base
 1 14 Mobile concrete base UMBASM8000000000 Mobile concrete base UMBASM8000000000 Congratula ons with your purchase! Please completely read and follow all the instruc ons. pg. 3 Proficiat met uw aankoop!
Registratie- en activeringsproces voor de Factuurstatus Service NL 1 Registration and activation process for the Invoice Status Service EN 11
 QUICK GUIDE B Registratie- en activeringsproces voor de Factuurstatus Service NL 1 Registration and activation process for the Invoice Status Service EN 11 Version 0.14 (July 2015) Per May 2014 OB10 has
WWW.EMINENT-ONLINE.COM
 WWW.EMINENT-OINE.COM HNDLEIDING USERS MNUL EM1016 HNDLEIDING EM1016 USB NR SERIEEL CONVERTER INHOUDSOPGVE: PGIN 1.0 Introductie.... 2 1.1 Functies en kenmerken.... 2 1.2 Inhoud van de verpakking.... 2
My Inspiration I got my inspiration from a lamp that I already had made 2 years ago. The lamp is the you can see on the right.
 Mijn Inspiratie Ik kreeg het idee om een variant te maken van een lamp die ik al eerder had gemaakt. Bij de lamp die in de onderstaande foto s is afgebeeld kun je het licht dimmen door de lamellen open
Alistair LED stairwell luminaire Handleiding Alistair (Emergency UC03 sensor)
") Alistair LED stairwell luminaire Handleiding Alistair (Emergency UC03 sensor) Let op: Als het flexibele draad van dit licht beschadigd is, dient het te worden vervangen door iemand van de technische service,
Alistair LED stairwell luminaire Handleiding Alistair (Emergency UC03 sensor) Let op: Als het flexibele draad van dit licht beschadigd is, dient het te worden vervangen door iemand van de technische service,
Alistair LED stairwell luminaire Handleiding Alistair (UC03 sensor)
") Alistair LED stairwell luminaire Handleiding Alistair (UC03 sensor) Let op: Als het flexibele draad van dit licht beschadigd is, dient het te worden vervangen door iemand van de technische service, of
Alistair LED stairwell luminaire Handleiding Alistair (UC03 sensor) Let op: Als het flexibele draad van dit licht beschadigd is, dient het te worden vervangen door iemand van de technische service, of
Mounting ceiling & wall
 5 / profile 34 bending radius R 15*) (1015) R 20 (1015) R 30 (1015) R>80 (1018) filler position profile 26 bending radius filler position R 15*) (1015) R 25 (1015) R>100 (1018) 28 15 405 gr/m 522 gr/m
Splicing Procedures 1 Page 1 of 9 Copyright Ford FoMoCo
 Splicing Procedures 1 Page 1 of 9 Copyright Ford FoMoCo Splicing Procedures 2 Page 2 of 9 Copyright Ford FoMoCo Splicing Procedures 3 Page 3 of 9 Copyright Ford FoMoCo Splicing Procedures 4 Page 4 of 9
Handleiding Zuludesk Parent
 Handleiding Zuludesk Parent Handleiding Zuludesk Parent Met Zuludesk Parent kunt u buiten schooltijden de ipad van uw kind beheren. Hieronder vind u een korte handleiding met de mogelijkheden. Gebruik
Triple tumble bars BBPE040.4K
 Triple tumble bars BBPE040.4K 0,0 m 0,05 m 0,00 m,8 m,45 m,7 m,0 m,00 m B Typeplaatje Identification plate 0,00 m 0,00 m 0,80 m,59 m,9 m Duikel trio 0--07 TOE BBP 040 4K Hoofdafmetingen Main dimensions
HANDLEIDING - ACTIEVE MOTORKRAAN
 M A N U A L HANDLEIDING - ACTIEVE MOTORKRAAN MANUAL - ACTIVE MOTOR VALVE Model E710877 E710878 E710856 E710972 E710973 www.tasseron.nl Inhoud / Content NEDERLANDS Hoofdstuk Pagina NL 1 ALGEMEEN 2 NL 1.1
VirtuFit V2 Opvouwbare stoelfiets met computer. Gebruikershandleiding
 VirtuFit V2 Opvouwbare stoelfiets met computer Gebruikershandleiding NL inhoudsopgave Belangrijke voorzorgsmaatregelen 3 montage 4-5 trainingscomputer 6 Functies 6 Functiebeschrijving 6 Werking 7 voorgestelde
SPANBUSSEN RVS LOCKING DEVICES SS SPANNSÄTZE INOX MOYEUX DE SERRAGE INOX
 SPANBUSSEN RVS OCKING EVICES SS SPANNSÄTZE INOX MOYEUX E SERRAGE INOX KTN 10 KTN 30 KTN 40 KTN 61 KTN 80.7.1 SPANBUSMONTAGE OCKING EVICE MONTAGE SPANNSÄTZE MONTAGE MOYEUX E SERRAGE MONTAGE 1 2 3 4 5 dg
Het beheren van mijn Tungsten Network Portal account NL 1 Manage my Tungsten Network Portal account EN 14
 QUICK GUIDE C Het beheren van mijn Tungsten Network Portal account NL 1 Manage my Tungsten Network Portal account EN 14 Version 0.9 (June 2014) Per May 2014 OB10 has changed its name to Tungsten Network
Hoe te verbinden met NDI Remote Office (NDIRO): Apple OS X How to connect to NDI Remote Office (NDIRO): Apple OS X
: Apple OS X How to connect to NDI Remote Office (NDIRO): Apple OS X") Handleiding/Manual Hoe te verbinden met (NDIRO): Apple OS X How to connect to (NDIRO): Apple OS X Inhoudsopgave / Table of Contents 1 Verbinden met het gebruik van Apple OS X (Nederlands)... 3 2 Connect
Handleiding/Manual Hoe te verbinden met (NDIRO): Apple OS X How to connect to (NDIRO): Apple OS X Inhoudsopgave / Table of Contents 1 Verbinden met het gebruik van Apple OS X (Nederlands)... 3 2 Connect
WARNING DECAL PLACEMENT
 Joy Sport The Choice Of The Experts CT-Explorer CT- Exp lore r Joy Sport The Choice Of The Experts Fitness-Import Timmermannsweg 46 5813 AP Ysselsteyn (LB) info@joysport.nl www.joysport.nl INHOUDSOPGAVE
Group work to study a new subject.
 CONTEXT SUBJECT AGE LEVEL AND COUNTRY FEATURE OF GROUP STUDENTS NUMBER MATERIALS AND TOOLS KIND OF GAME DURATION Order of operations 12 13 years 1 ste year of secundary school (technical class) Belgium
Activant Prophet 21. Prophet 21 Version 12.0 Upgrade Information
 Activant Prophet 21 Prophet 21 Version 12.0 Upgrade Information This class is designed for Customers interested in upgrading to version 12.0 IT staff responsible for the managing of the Prophet 21 system
SPARE PARTS LIST ROBOTIC LAWN MOWERS AUTOMOWER 105,2019-
 SPARE PARTS LIST ROBOTIC LAWN MOWERS AUTOMOWER 05,209- DEKSEL AUTOMOWER 05,209- DEKSEL AUTOMOWER 05,209- Referentie Onderdeel nr Omschrijving Opmerking Aant KIT al 577 73 47-02 KIT Bumper Front, Grey 2